Jupyter Notebook on a subdomain of your website
Jupyter Notebook is kind of a Python (and some other languages) sandbox, where you can mix text (Markdown) with code blocks and “run” all that in a web-browser. So it’s like running Python interpreter in interactive mode, but more convenient and user-friendly.
So, here’s the plan:
- install and run a local instance of Jupyter Notebook on Linux server
- local here means that Jupyter instance itself will be bound to
localhost(not available from the internet) - also create a systemd service
- local here means that Jupyter instance itself will be bound to
- interface it with the internet via NGINX as a reverse proxy
- using HTTPS, of course, so the existing certificate needs to be extended
- host it on a subdomain of existing website, so there will be a new DNS record
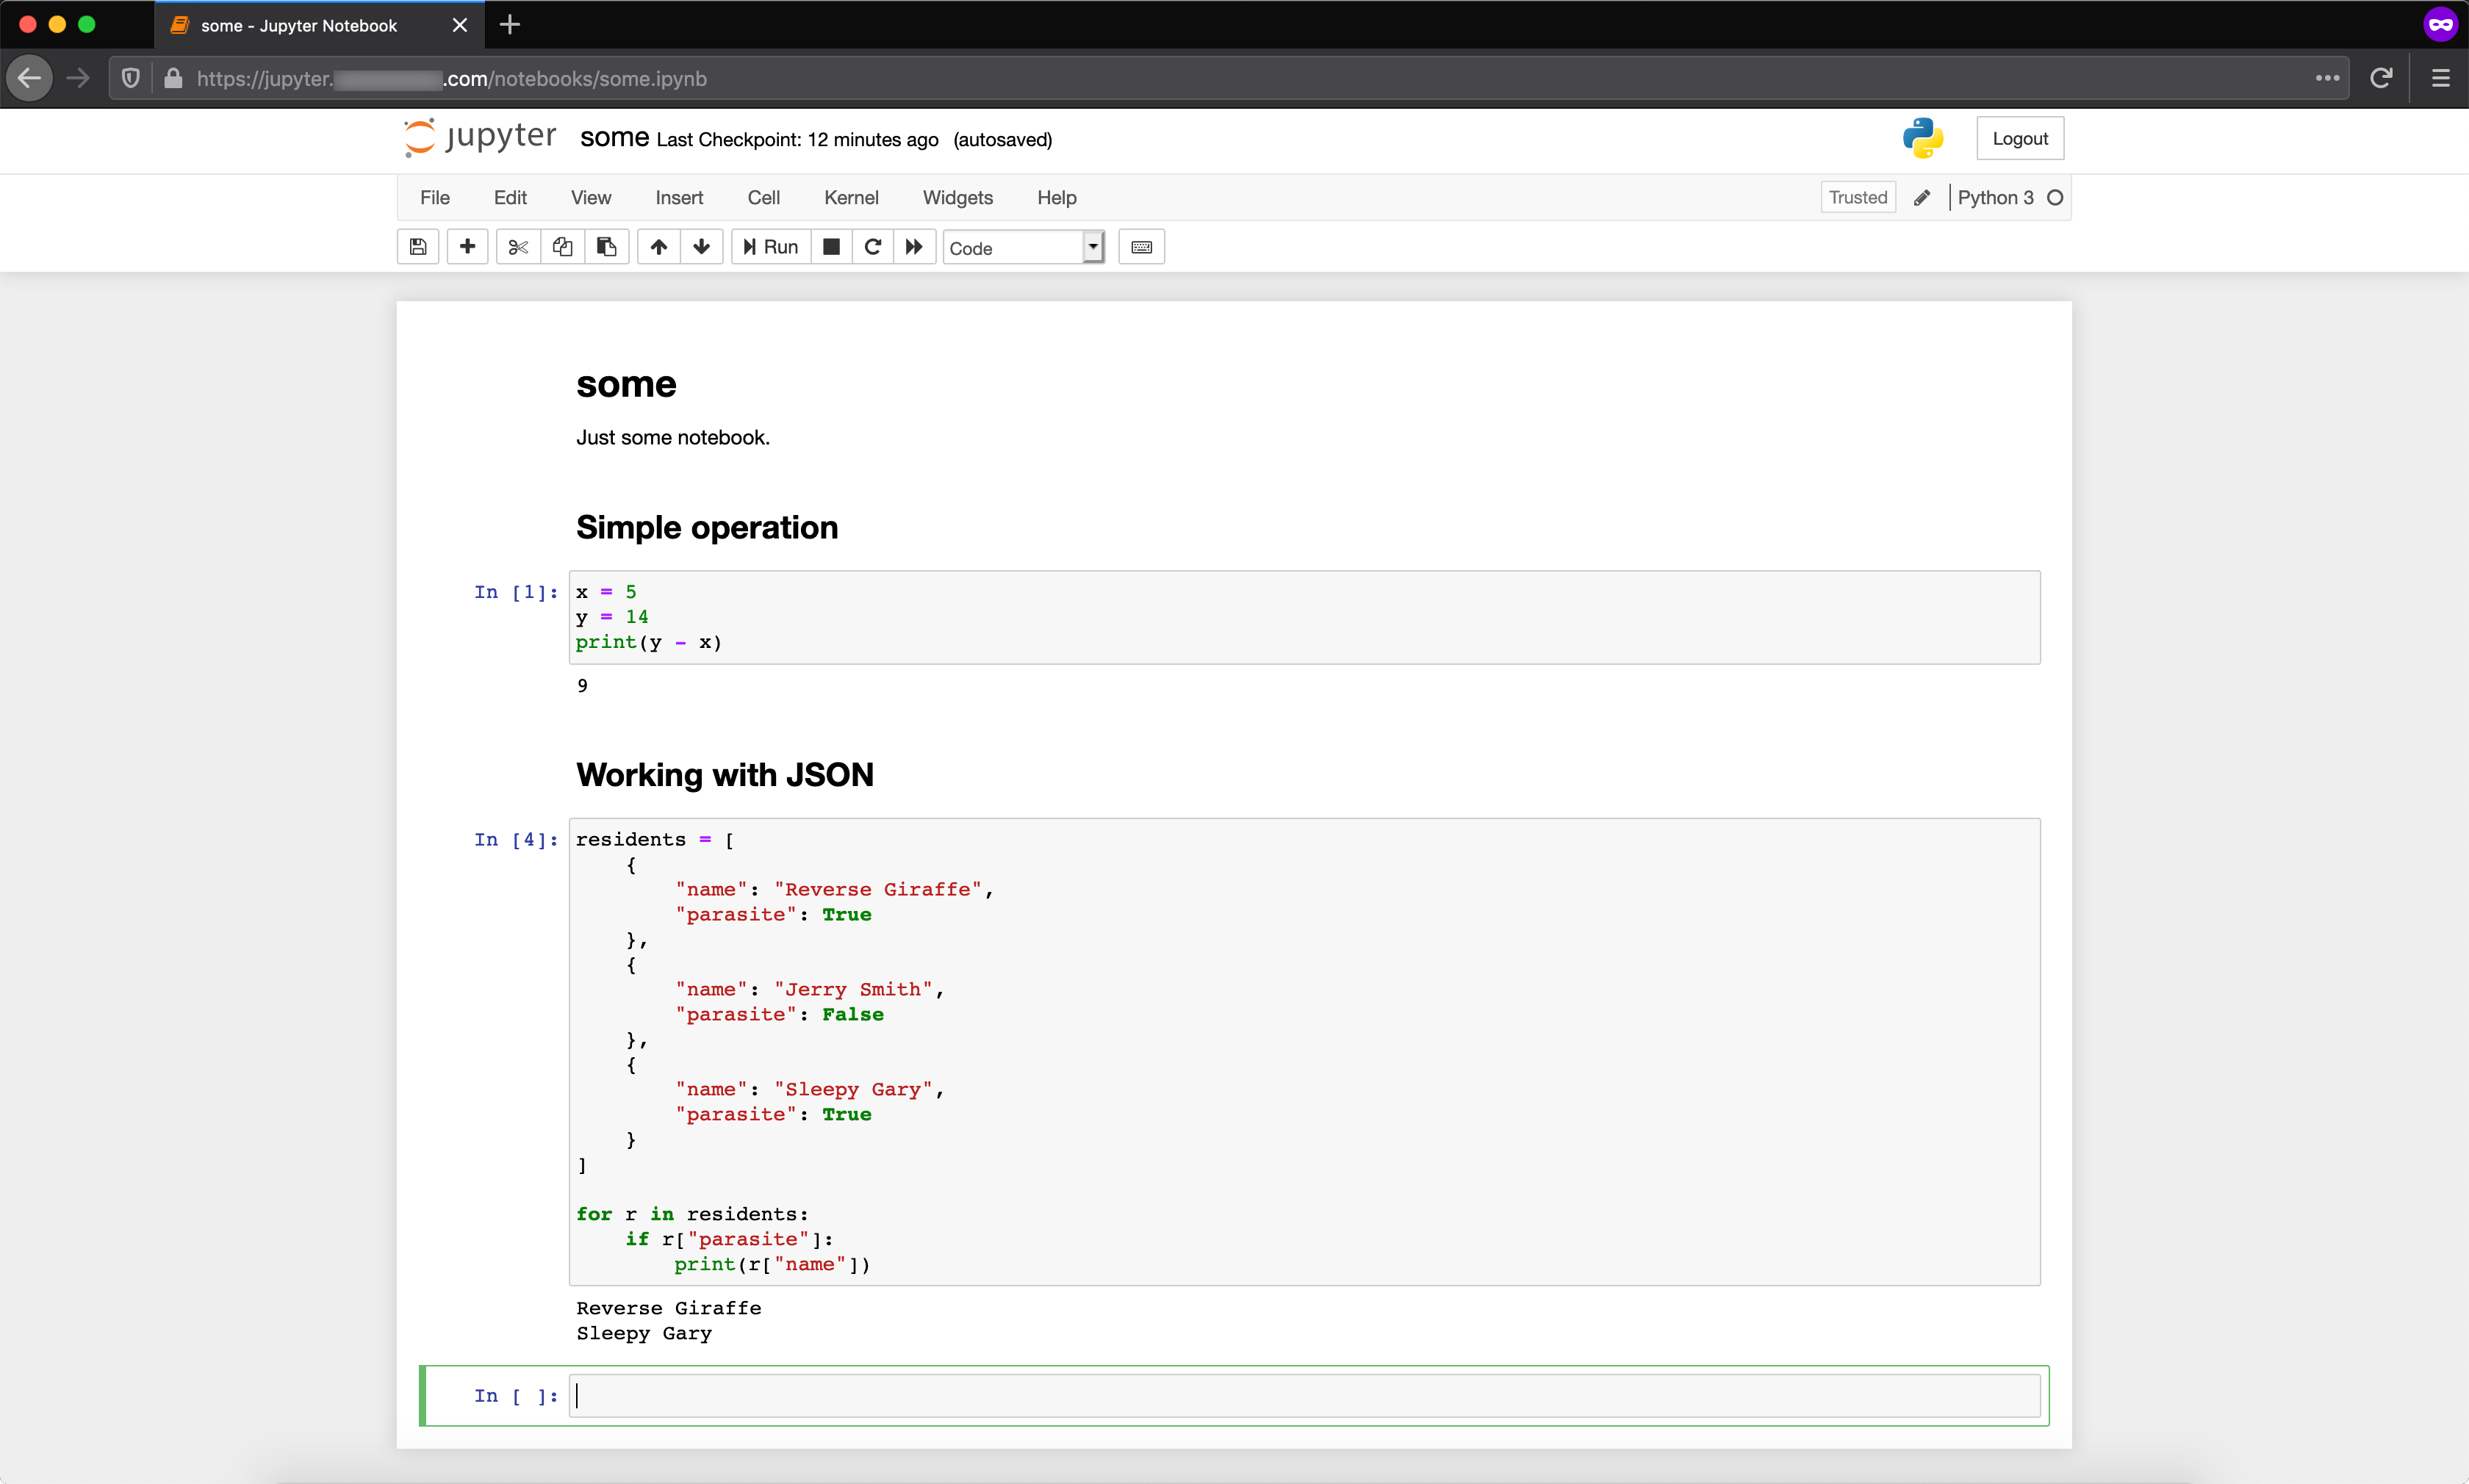
The example of a Jupyter Notebook from the screenshot above is of course a very silly one. If you want to see some more sophisticated ones, here’s a whole gallery of them (like this one or that one).
Setup
My environment:
$ lsb_release -a
Description:	Ubuntu 19.10

$ python --version
Python 3.7.5

$ pip --version
pip 20.1.1 from /usr/local/lib/python3.7/dist-packages/pip (python 3.7)

$ nginx -v
nginx version: nginx/1.16.1 (Ubuntu)

$ mysql --version
mysql  Ver 8.0.20-0ubuntu0.19.10.1 for Linux on x86_64 ((Ubuntu))
Installing Jupyter
Jupyter itself is easy:
$ pip install jupyterBut then comes a number of infrastructural things. First of all, it’s better if you won’t run it as root, so:
- Create a new user for it
- Pick a folder where to store notebooks (I went with
/var/www/jupyter) - Generate a config, as you’ll need to overwrite some default settings
$ sudo useradd -m jupyter
$ sudo mkdir /var/www/jupyter
$ sudo chown -R jupyter:jupyter /var/www/jupyter
$ sudo -u jupyter jupyter notebook --generate-config
Edit the generated config:
$ nano /home/jupyter/.jupyter/jupyter_notebook_config.py# I think it's better to keep remote access disabled
#c.NotebookApp.allow_remote_access = False
# allow requests from your domain (works in combo with $http_host from NGINX)
c.NotebookApp.local_hostnames = ['localhost','jupyter.YOUR-DOMAIN.com']systemd service
Create a service:
$ sudo nano /etc/systemd/system/jupyter.service[Unit]
Description=Jupyter Notebook
[Service]
WorkingDirectory=/var/www/jupyter/
ExecStart=/usr/local/bin/jupyter notebook --no-browser --config=/home/jupyter/.jupyter/jupyter_notebook_config.py
Restart=always
RestartSec=10
SyslogIdentifier=jupyter-notebook
User=jupyter
[Install]
WantedBy=multi-user.targetEnable and run the service:
$ sudo systemctl enable jupyter.service
$ sudo systemctl start jupyter.service
$ sudo systemctl status jupyter.service
NGINX config
$ sudo nano /etc/nginx/sites-available/jupytermap $http_upgrade $connection_upgrade {
default upgrade;
'' close;
}
server {
listen 80;
listen [::]:80;
# so it will be available at this subdomain of the main website
server_name jupyter.YOUR-DOMAIN.com;
location / {
# or whichever port you've set for your Jupyter
proxy_pass http://localhost:8888;
# $http_host is important for accessing Jupyter locally
proxy_set_header Host $http_host;
# http://nginx.org/en/docs/http/websocket.html
proxy_http_version 1.1;
proxy_set_header Upgrade $http_upgrade;
proxy_set_header Connection $connection_upgrade;
}
}$ sudo ln -s /etc/nginx/sites-available/jupyter /etc/nginx/sites-enabled/
$ sudo systemctl restart nginx.serviceLet’s Encrypt certificate for the subdomain
If you already have a certificate for your main domain, here’s how to extend it to the new subdomain:
$ certbot --expand -d jupyter.YOUR-DOMAIN.comIt will also make required changes in the NGINX config.
DNS-record
Go to your hoster and add a new subdomain under your main domain. Then add a new DNS record for it (just one A record):
jupyter.YOUR-DOMAIN.com A YOUR-SERVER-IP-ADDRESSNow as soon as DNS records update on servers, your Jupyter instance will be available on https://jupyter.YOUR-DOMAIN.com.
Authentication
Conveniently enough, Jupyter already has authentication out of the box, so anonymous users won’t be able to open your notebooks. Here’s how the login page looks like:
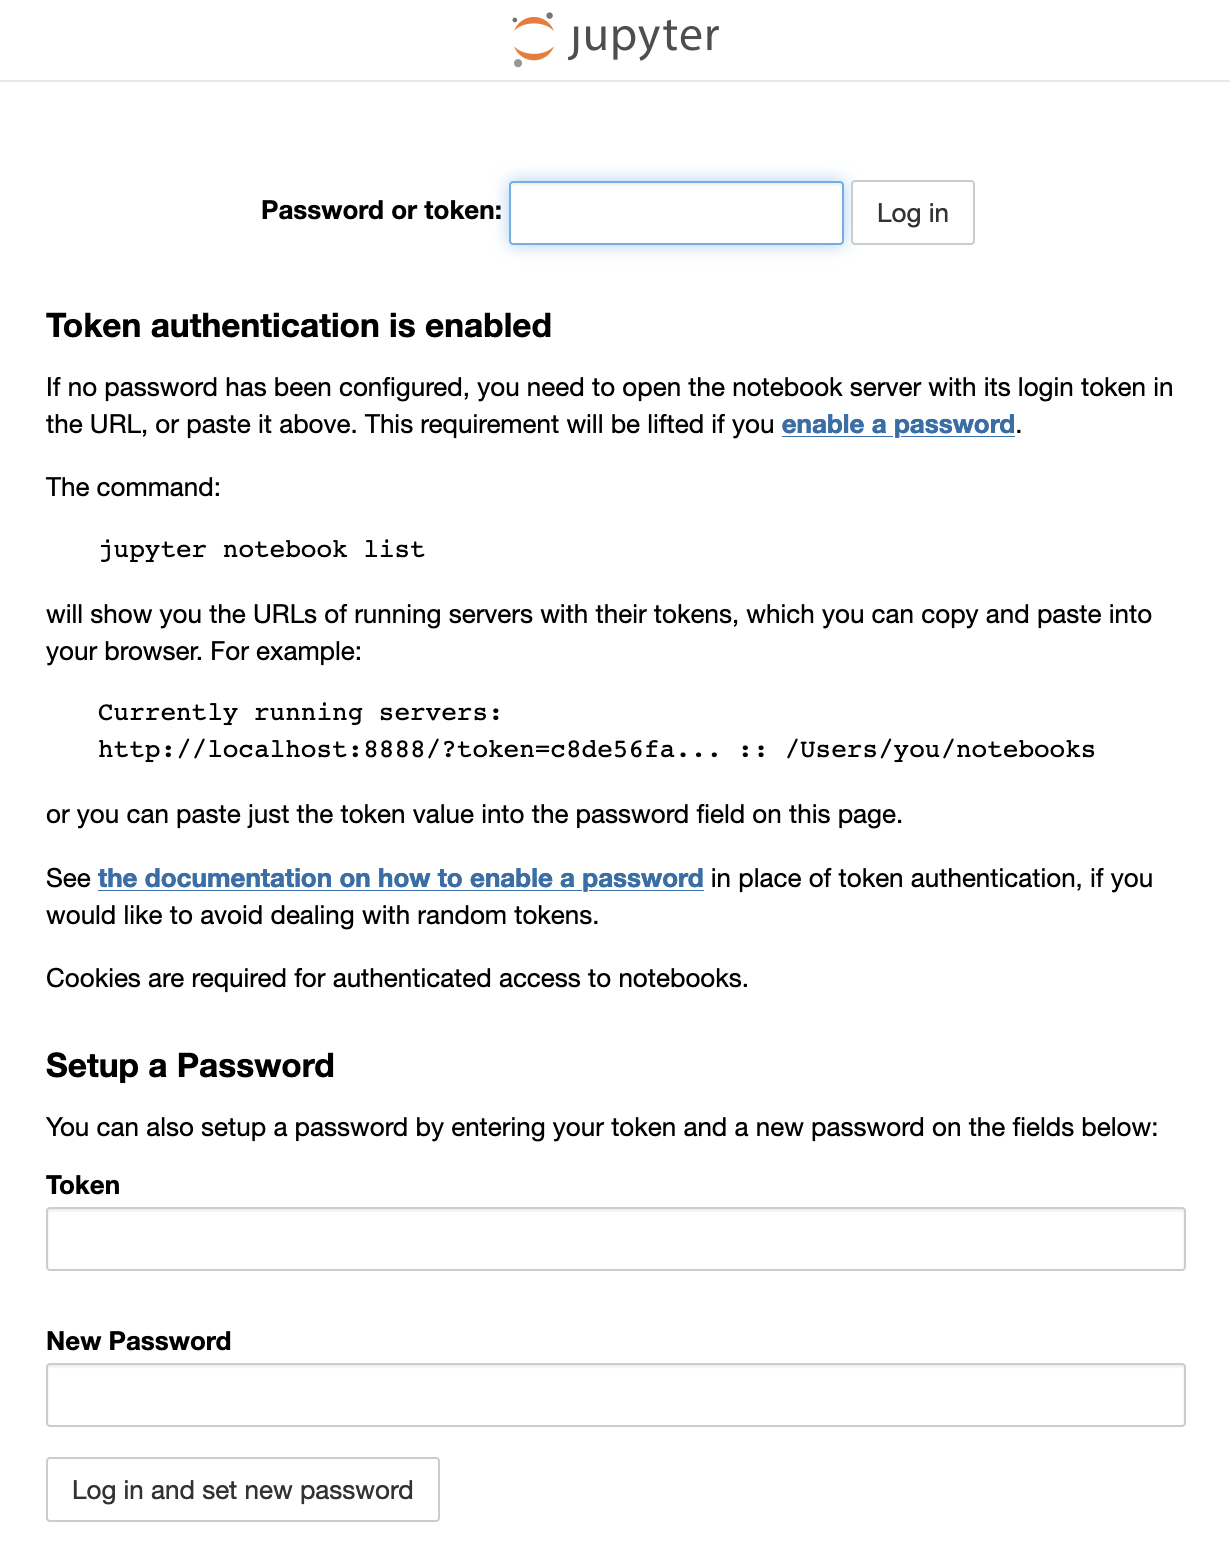
With token
At least for the first time you’ll need to log in using token. To get your current token value run the following:
$ sudo -u jupyter jupyter notebook list
Currently running servers:
http://localhost:8888/?token=h8g4a81416de5ofcc3nmb9ao32de80206ae640dq8agee9nn :: /var/www/jupyter
After successful authentication you will get a listing of your working folder (/var/www/jupyter) where you can manage your notebooks:

With password
You can keep logging in with token, but its value will be different with every service restart, so you might want to switch to using password. Use the Setup a Password form in the bottom of the login page - your password will be hashed and saved
to /home/jupyter/.jupyter/jupyter_notebook_config.json:
{
  "NotebookApp": {
    "password": "sha1:bd10epf67nc8:1fg568845sgdeb3377bf90eccc0d34337ddhcc94"
  }
}
Sadly, it doesn’t seem to support multiple users accounts, but for us that is fine for now.
Restart the service. From now on your login page will have just the password field:
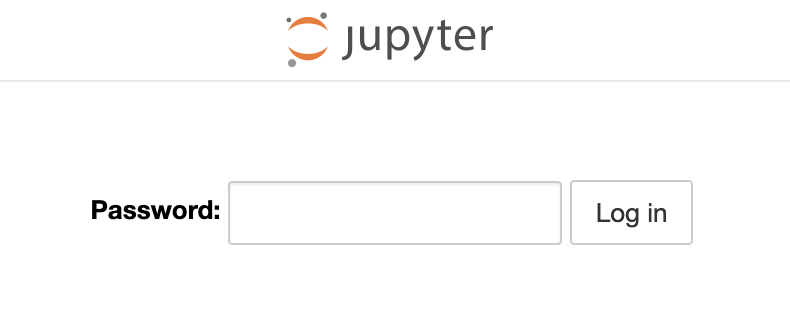
And if you list the running Jupyter server now, it will no longer have the token value:
$ sudo -u jupyter jupyter notebook list
Currently running servers:
http://localhost:8888/ :: /var/www/jupyter
Working with SQL database
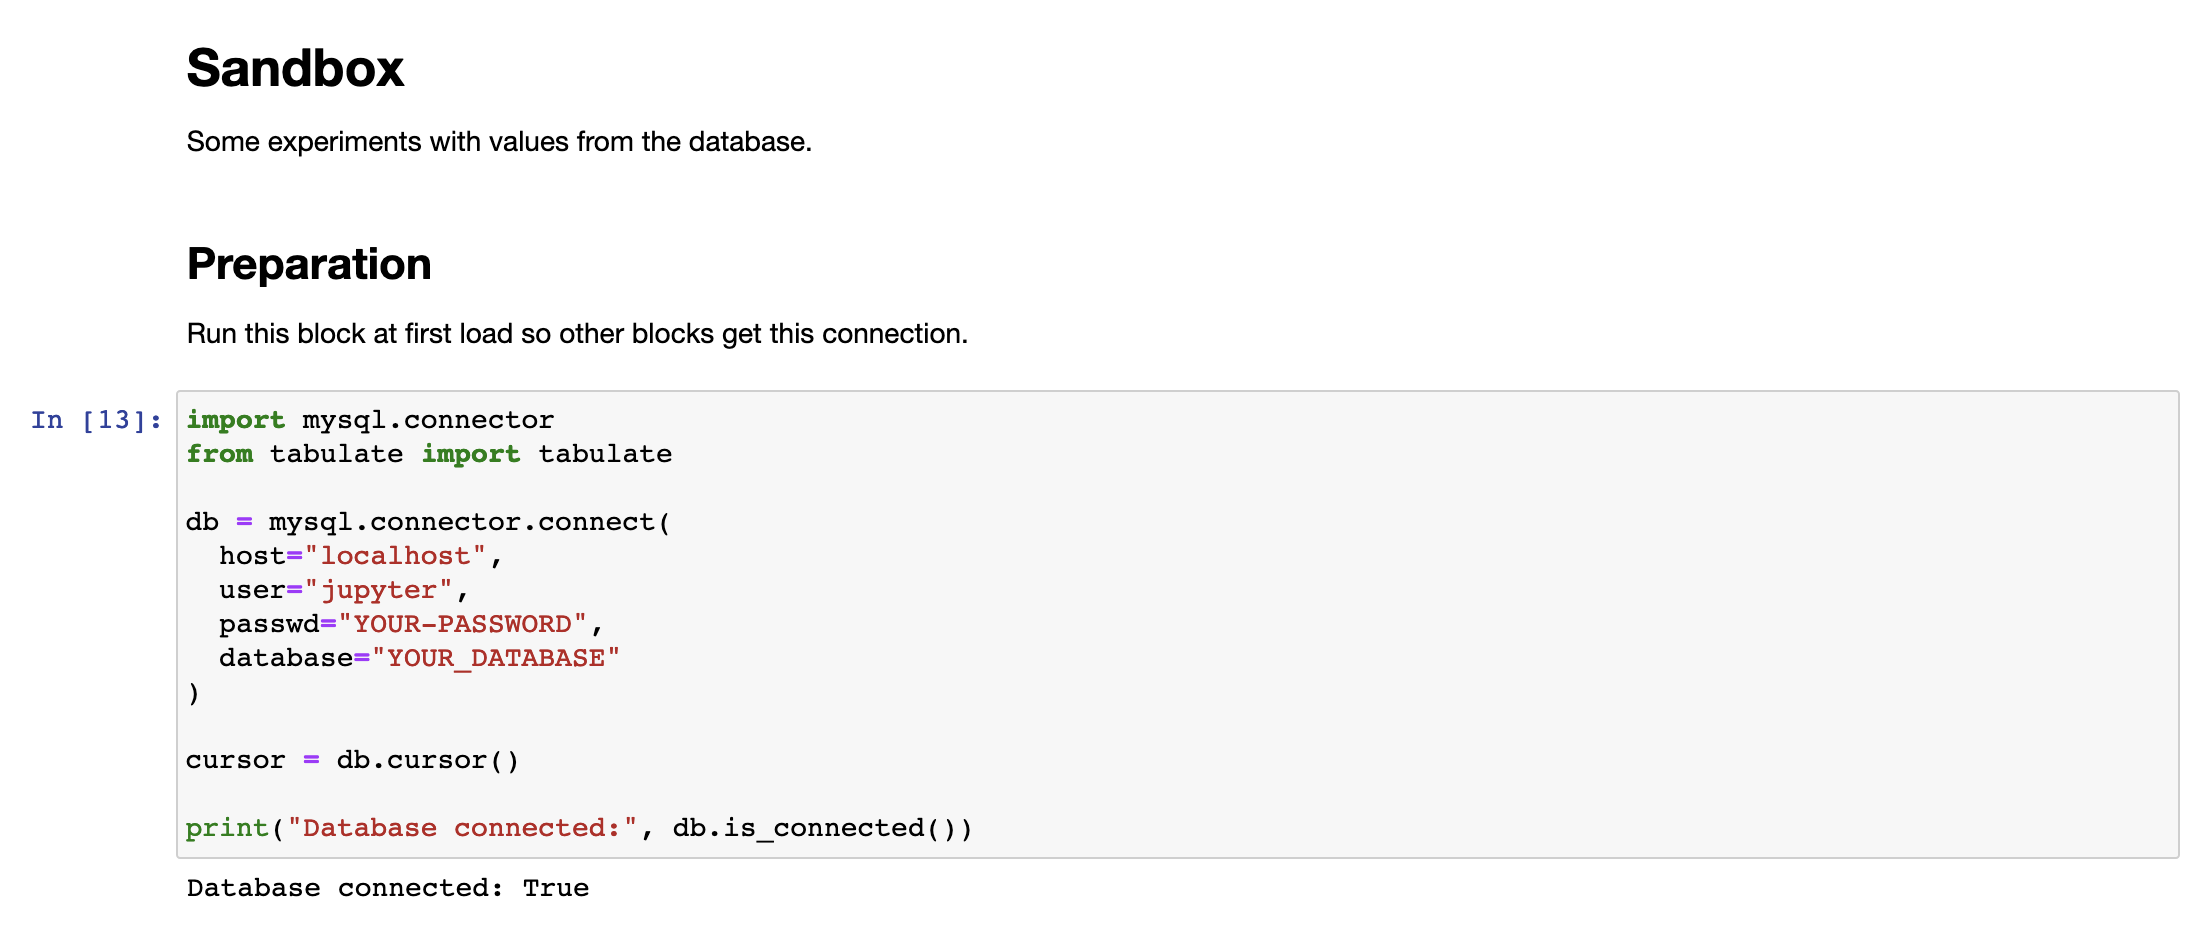
In our case we needed to do some analytics/statistics on certain values in our database. At first we started adding views for that in our .NET Core MVC admin interface, but that was veeeeery time consuming, especially given the dynamic nature of our momentary needs.
Jupyter Notebook, on the other hand, turned out to be a super convenient and fast tool for such purpose. So instead of piling up admin pages (or exposing our MySQL server over the internet) we can just run SQL queries from a notebook and process results with simple Python operations.
Packages needed for that:
$ pip install mysql-connector
$ pip install tabulate
If you will be getting this error:
mysql.connector.errors.NotSupportedError: Authentication plugin 'caching_sha2_password' is not supportedthen install this package:
$ pip install mysql-connector-pythonWhen it comes to executing SQL, I would not recommend connecting to the database from Jupyter Notebook with a user that has any writing privileges, so it’s better to create a new user with read-only privileges:
CREATE USER 'jupyter'@'localhost' IDENTIFIED BY 'YOUR-PASSWORD';
GRANT SELECT ON YOUR_DATABASE.SOME_TABLE to 'jupyter'@'localhost';
SHOW GRANTS FOR 'jupyter'@'localhost';
Now you can start your notebook with something like:
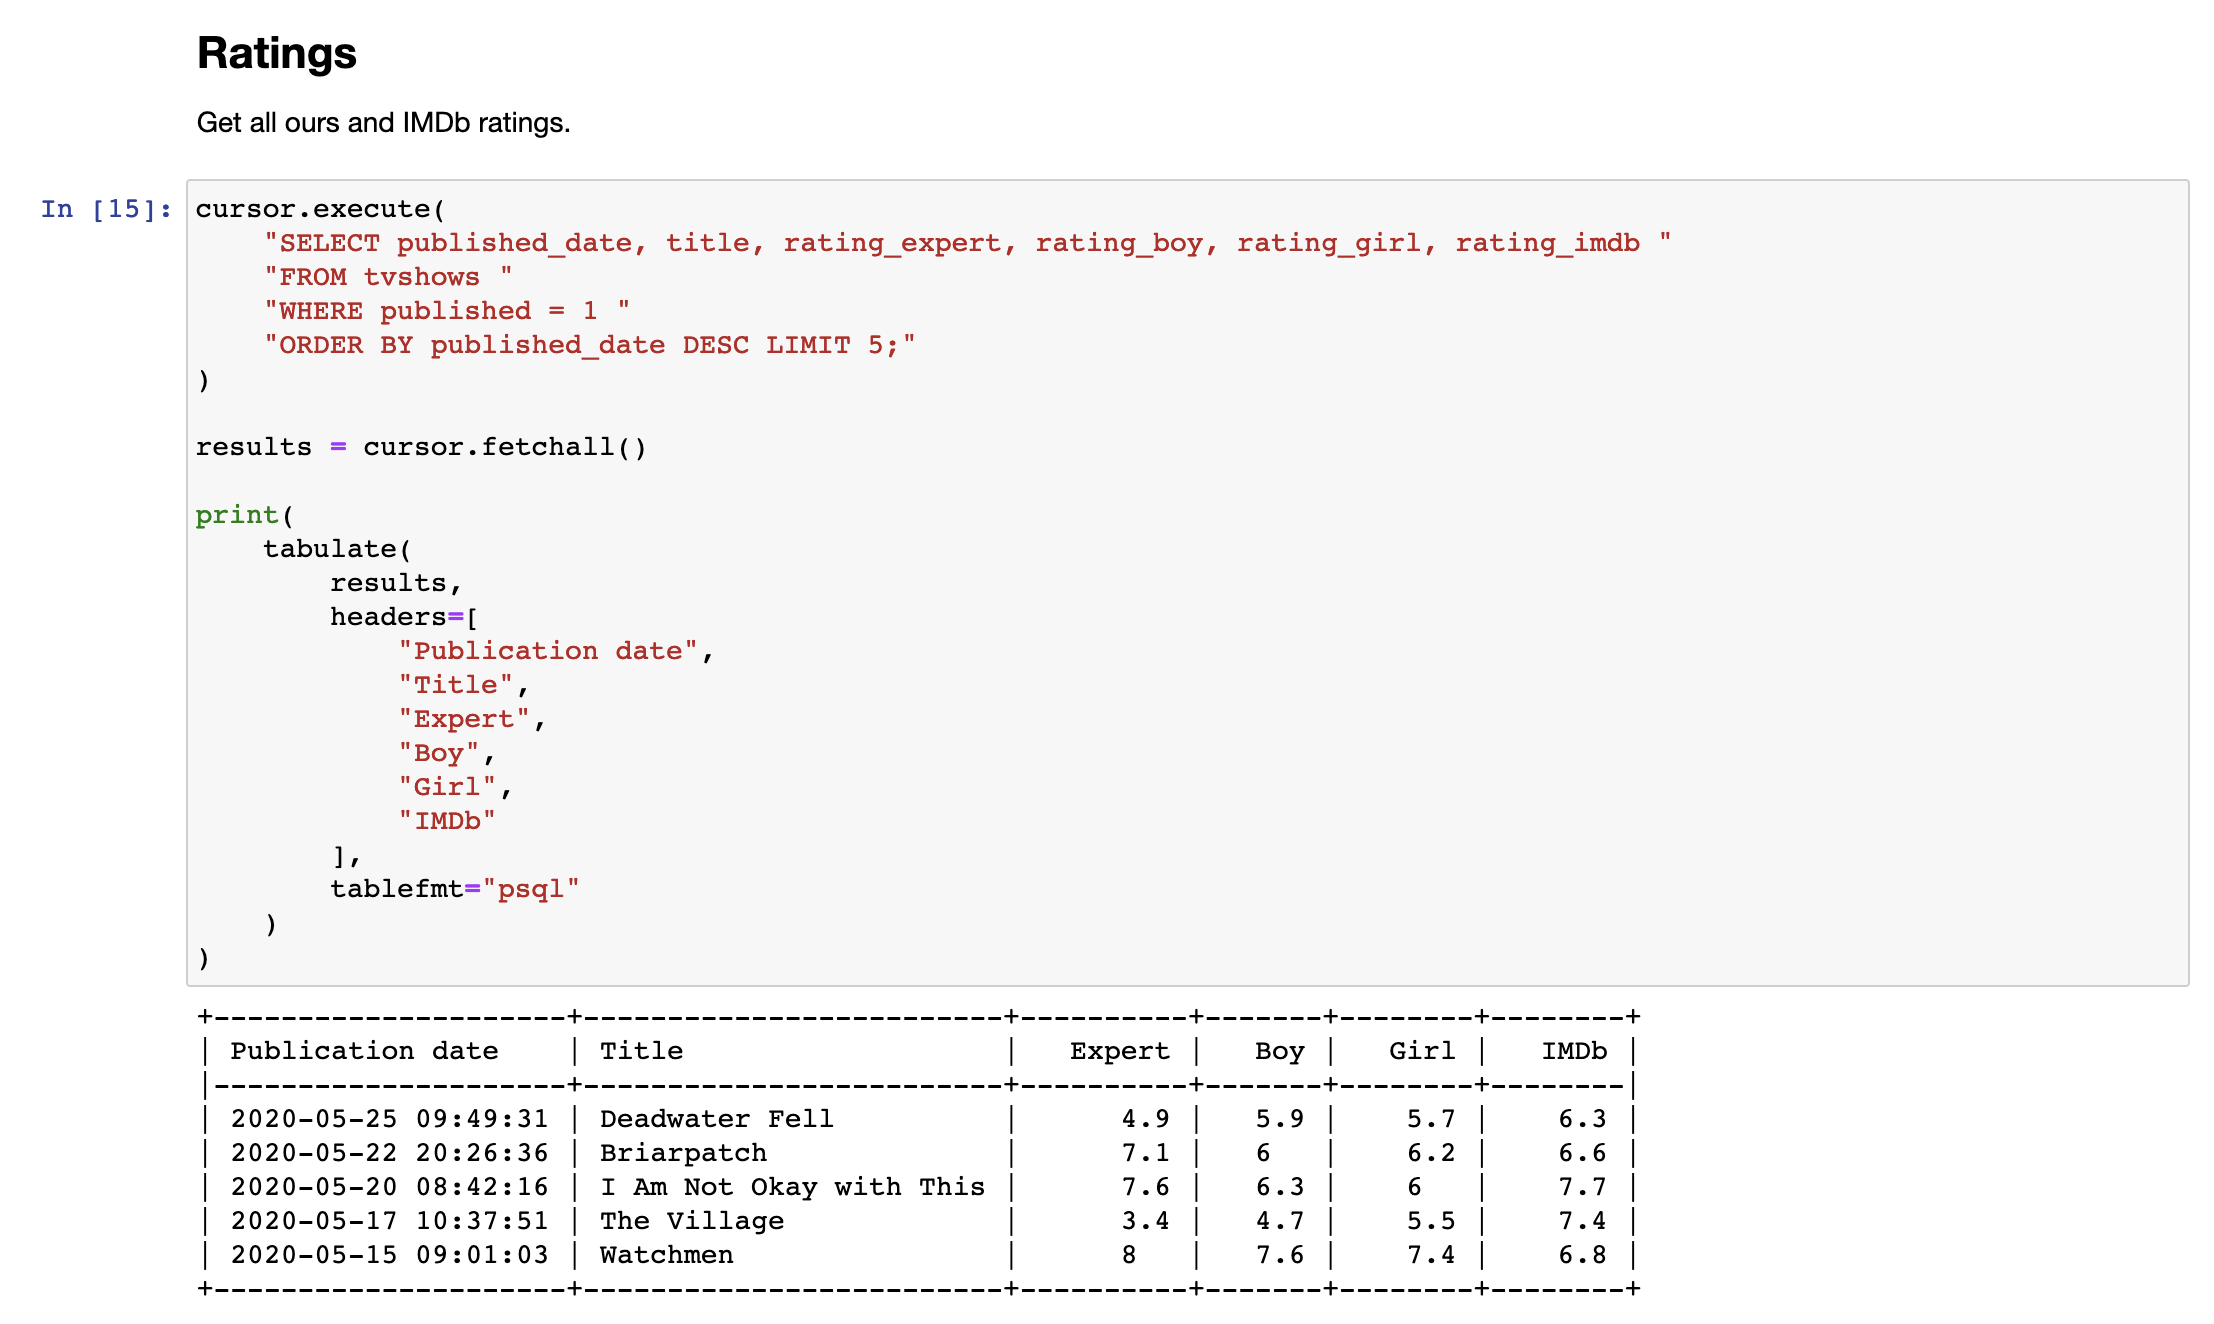
and then add as many blocks with queries as you want, formatting their results as nice tables:
Notebook in Visual Studio Code
Amazingly enough, you can work with Jupyter notebooks from Visual Studio Code. Here’s their documentation about that.
While it does support connecting to a remote server, sadly, you’ll need to download a local copy of your notebook file (sandbox.ipynb in our case). Put it into some folder on your computer and open that folder in VS Code.
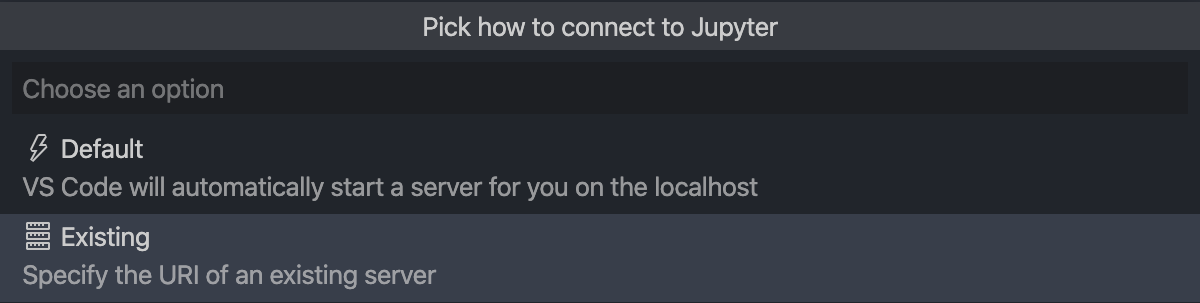
Open Command Palette and run Python: Specify local or remote Jupyter server for connections:
Give it your https://jupyter.YOUR-DOMAIN.com and password/token when asked for it.
You might get the following error right after trying to add a server:
Command 'Python: Specify local or remote Jupyter server for connections' resulted in an error (Unable to write to Workspace Settings because no workspace is opened. Please open a workspace first and try again.)That is because, like I said, first you need to open some folder in VS Code (which will be your workplace), preferably the one where you will be storing your .ipynb files, and only then run this command.
If it’s all good, you’ll have .vscode/settings.json file in the workspace folder with the following contents:
{
    "python.dataScience.jupyterServerURI": "https://jupyter.YOUR-DOMAIN.com/"
}
Now you can open your sandbox.ipynb, try to run some code, and VS Code will connect to your Jupyter server:
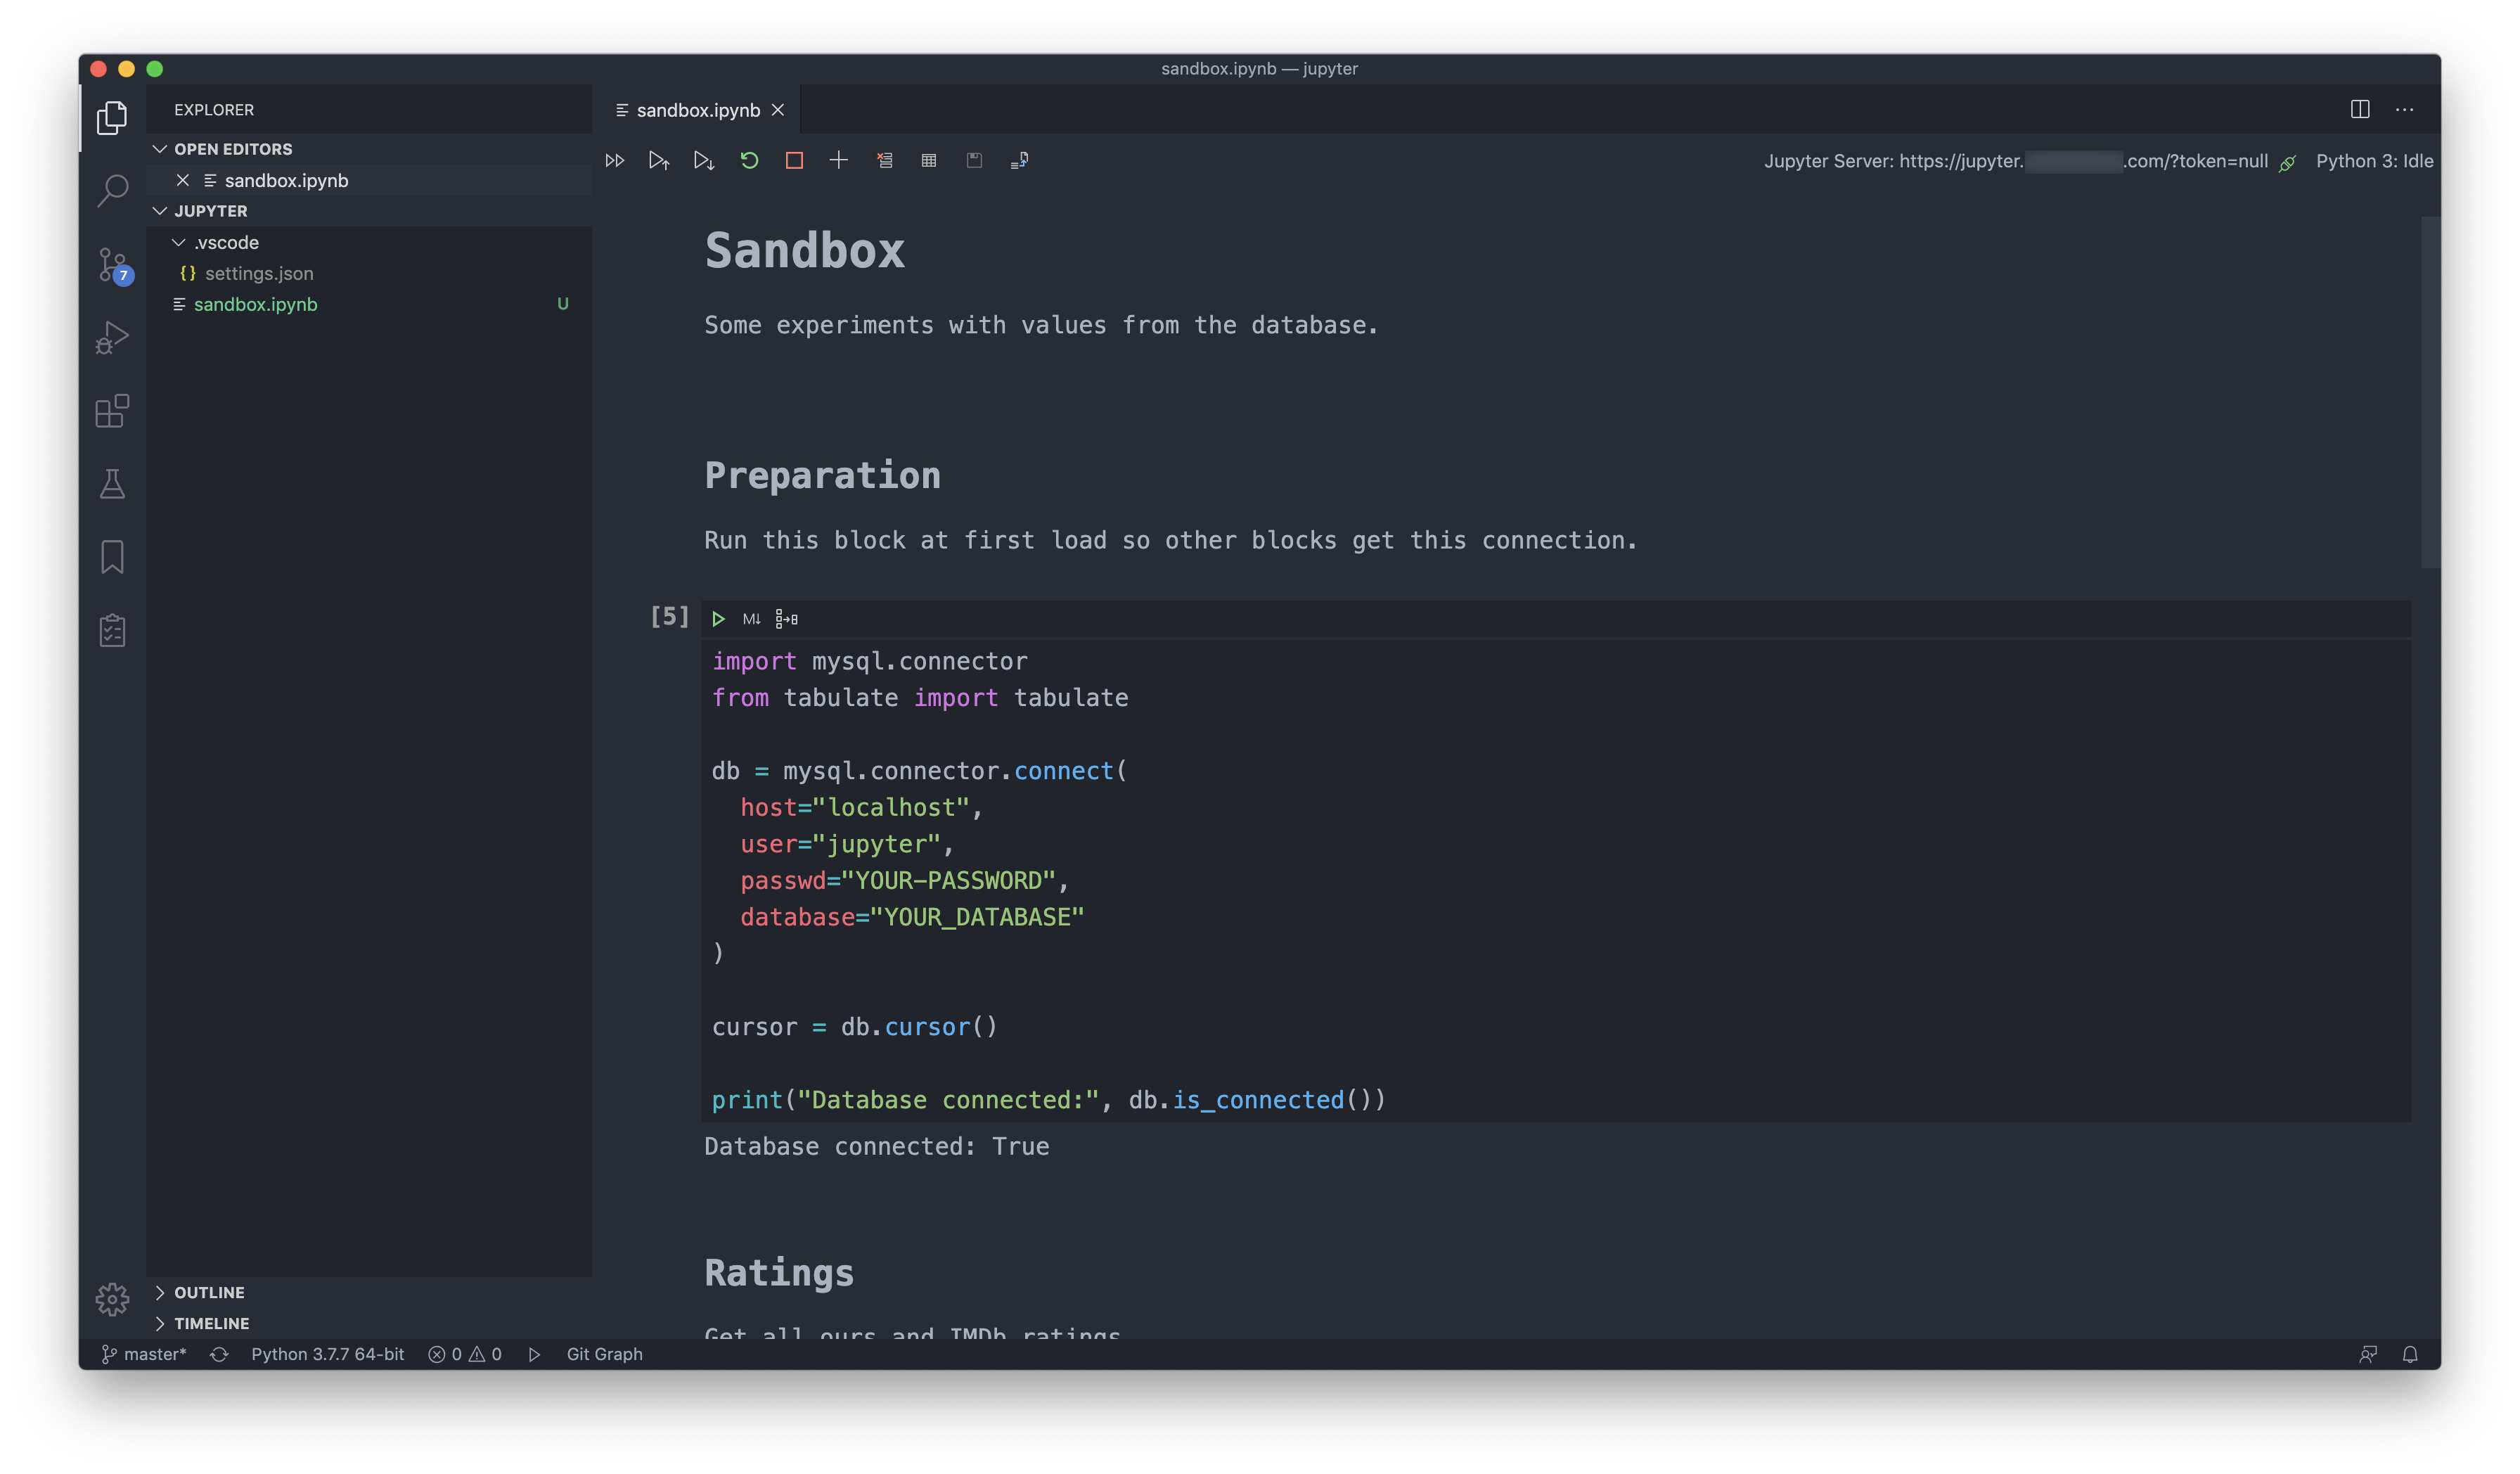
Awesome, innit.
But sadly we will still have to use the browser, at least until something like this feature is implemented, because, like I said, we need everyone in the team to work with the same version of the notebook.
Jupyter as a local service on Mac OS
Though initially that was not a part of the article, but since I brought up working with Jupyter notebooks in VS Code, quite likely you’ll want to run Jupyter locally too (on Mac OS, in my case). So here’s how to do it.
I assume you’ve managed to install Jupyter with pip, generate the default config and create a folder for notebooks:
$ pip install jupyter
$ jupyter notebook --generate-config
$ mkdir /Users/YOUR-NAME/jupyter
So now you can get something like this from your environment:
$ which jupyter
/usr/local/bin/jupyter

$ jupyter --version
jupyter core     : 4.6.3
jupyter-notebook : 6.1.3
qtconsole        : 4.7.6
ipython          : 7.17.0
ipykernel        : 5.3.4
jupyter client   : 6.1.6
jupyter lab      : not installed
nbconvert        : 5.6.1
ipywidgets       : 7.5.1
nbformat         : 5.0.7
traitlets        : 4.3.3
To run Jupyter (or anything, really) as a service, you’ll need to add a launchd user agent to your system. For that create a /Users/YOUR-NAME/Library/LaunchAgents/SOME.DOMAIN.jupyter-python.plist file:
<?xml version="1.0" encoding="UTF-8"?>
<!DOCTYPE plist PUBLIC "-//Apple Computer//DTD PLIST 1.0//EN" "http://www.apple.com/DTDs/PropertyList-1.0.dtd">
<plist version="1.0">
<dict>
        <key>Label</key>
        <string>Jupyter Python</string>
        <key>WorkingDirectory</key>
        <string>/Users/YOUR-NAME/jupyter</string>
        <key>ProgramArguments</key>
        <array>
                <string>/Users/YOUR-NAME/bin/start-jupyter.sh</string>
        </array>
        <key>StandardErrorPath</key>
        <string>/Users/YOUR-NAME/Library/Logs/jupyter-python.log</string>
        <key>StandardOutPath</key>
        <string>/Users/YOUR-NAME/Library/Logs/jupyter-python.log</string>
        <key>Disabled</key>
        <false/>
        <key>RunAtLoad</key>
        <true/>
        <key>KeepAlive</key>
        <true/>
</dict>
</plist>
And yes, having absolute paths (/Users/YOUR-NAME/ instead of just ~/) turned out to be important.
Also, if you are on Catalina, don’t put jupyter folder inside Documents or other privacy-sensitive places, otherwise you’ll get the following errors:
shell-init: error retrieving current directory: getcwd: cannot access parent directories: Operation not permitted
Starting Jupyter server...
job-working-directory: error retrieving current directory: getcwd: cannot access parent directories: Operation not permitted
shell-init: error retrieving current directory: getcwd: cannot access parent directories: Operation not permitted
Starting Jupyter server...
job-working-directory: error retrieving current directory: getcwd: cannot access parent directories: Operation not permitted
Traceback (most recent call last):
  File "/usr/local/bin/jupyter-notebook", line 8, in <module>
    sys.exit(main())
  File "/usr/local/lib/python3.8/site-packages/jupyter_core/application.py", line 270, in launch_instance
    return super(JupyterApp, cls).launch_instance(argv=argv, **kwargs)
  File "/usr/local/lib/python3.8/site-packages/traitlets/config/application.py", line 663, in launch_instance
    app.initialize(argv)
  File "<decorator-gen-7>", line 2, in initialize
  File "/usr/local/lib/python3.8/site-packages/traitlets/config/application.py", line 87, in catch_config_error
    return method(app, *args, **kwargs)
  File "/usr/local/lib/python3.8/site-packages/notebook/notebookapp.py", line 2029, in initialize
    super(NotebookApp, self).initialize(argv)
  File "<decorator-gen-6>", line 2, in initialize
  File "/usr/local/lib/python3.8/site-packages/traitlets/config/application.py", line 87, in catch_config_error
    return method(app, *args, **kwargs)
  File "/usr/local/lib/python3.8/site-packages/jupyter_core/application.py", line 246, in initialize
    self.load_config_file()
  File "/usr/local/lib/python3.8/site-packages/jupyter_core/application.py", line 179, in load_config_file
    self.log.debug("Searching %s for config files", self.config_file_paths)
  File "/usr/local/lib/python3.8/site-packages/jupyter_core/application.py", line 87, in config_file_paths
    path.insert(0, py3compat.getcwd())
PermissionError: [Errno 1] Operation not permitted
To overcome this, you’ll need to grant Documents Folder access or even Full Disc Access to… something that potentially can execute anything? Yeah, better just to keep jupyter folder somewhere else.
Create /Users/YOUR-NAME/bin/start-jupyter.sh script, which will be starting the Jupyter server:
#!/bin/bash

echo "Starting Jupyter server..."
/usr/local/bin/jupyter notebook --no-browser --config=/Users/YOUR-NAME/.jupyter/jupyter_notebook_config.py
Don’t forget to chmod +x it.
Why a script instead of just starting Jupyter directly? Well, I guess, it would indeed be better to do so, but I failed to configure launch agent that way, while this “intermediate” script just worked.
Now you can enable the agent, and it will automatically start:
$ launchctl load /Users/YOUR-NAME/Library/LaunchAgents/SOME.DOMAIN.jupyter.plistYou can check that by looking at /Users/YOUR-NAME/Library/Logs/jupyter-python.log contents, which should be now populated:
Starting Jupyter server...
[I 15:49:03.177 NotebookApp] Serving notebooks from local directory: /Users/YOUR-NAME/jupyter
[I 15:49:03.177 NotebookApp] Jupyter Notebook 6.1.3 is running at:
[I 15:49:03.178 NotebookApp] http://localhost:8888/
[I 15:49:03.178 NotebookApp] Use Control-C to stop this server and shut down all kernels (twice to skip confirmation).
If you need to change something in the agent settings (.plist file), then, as I understood, you’ll need to stop, unload and load the agent back every time you make a change.
Open http://localhost:8888 in your browser to check if the server runs fine. Though it’s a local server, I would still recommend you to switch from tokens to password, at least because tokens might change between reboots.
This is it, now you can add your local Jupyter server to VS Code:

Don’t forget that first you need to open some folder (~/jupyter), so VS Code could save the workplace settings there.
Create a new notebook by running Python: Create New Blank Jupyter Notebook. Write some code and try to execute it. VS Code will start connecting to the server and will ask you about “connecting over HTTP without a token…”, and you’ll need to enter the password you’ve set for it:

And here’s a bummer - I didn’t find a way to save the password, so you’ll have to enter it every time you connect to the server. Hopefully, they’ll improve that in future versions.
…Or you can just go with Default option when choosing a Jupyter server in VS Code, and then it will be handled for you :)