Boot to Qt on WaRP7
A new interesting reference device was added in Qt 5.9 - WaRP7. What’s so interesting about this device? It’s small, it’s based on i.MX 7Solo processor, and it features the following: Wi-Fi, Bluetooth, NFC, camera, barometer, accelerometer, magnetometer and gyroscope. It also has a battery and (optional) round display.
Being added as a reference device means that there is a pre-built Boot to Qt image for it, so let’s take a look.
Unlike Raspberry Pi, this device has USB-OTG port, so it’s also a good opportunity to try out new auto-discovery feature of QDB (Qt’s own replacement for ADB).
WaRP7 device
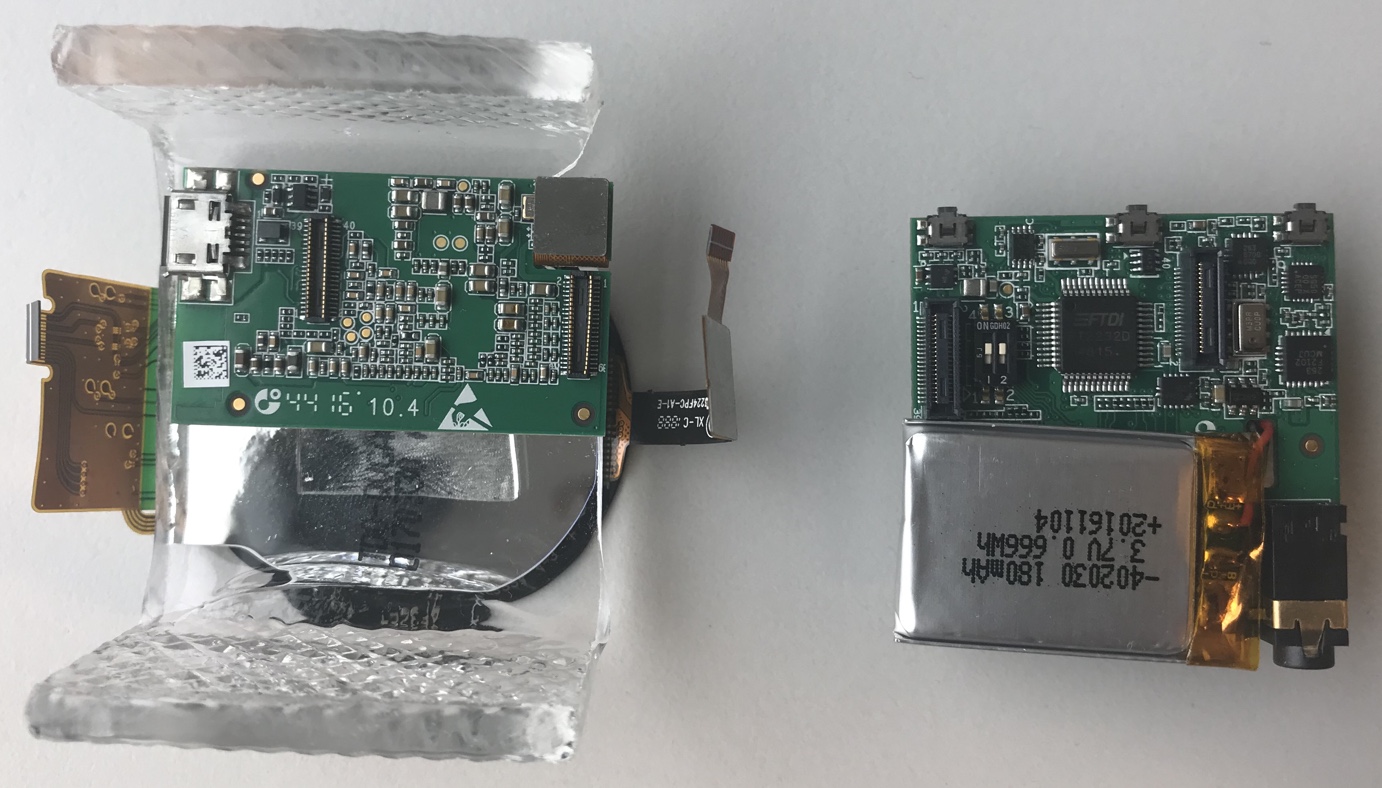
Here’s what I had in package:
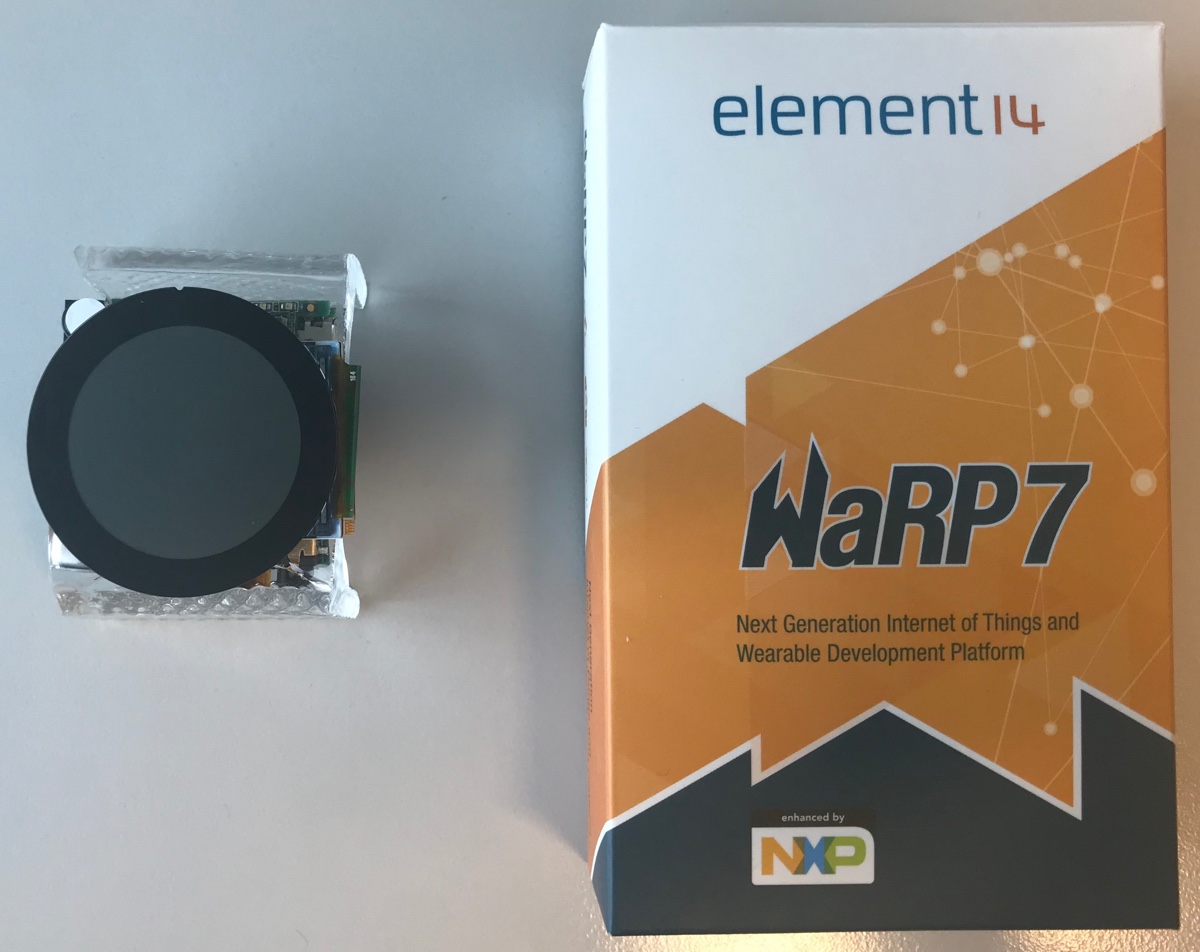
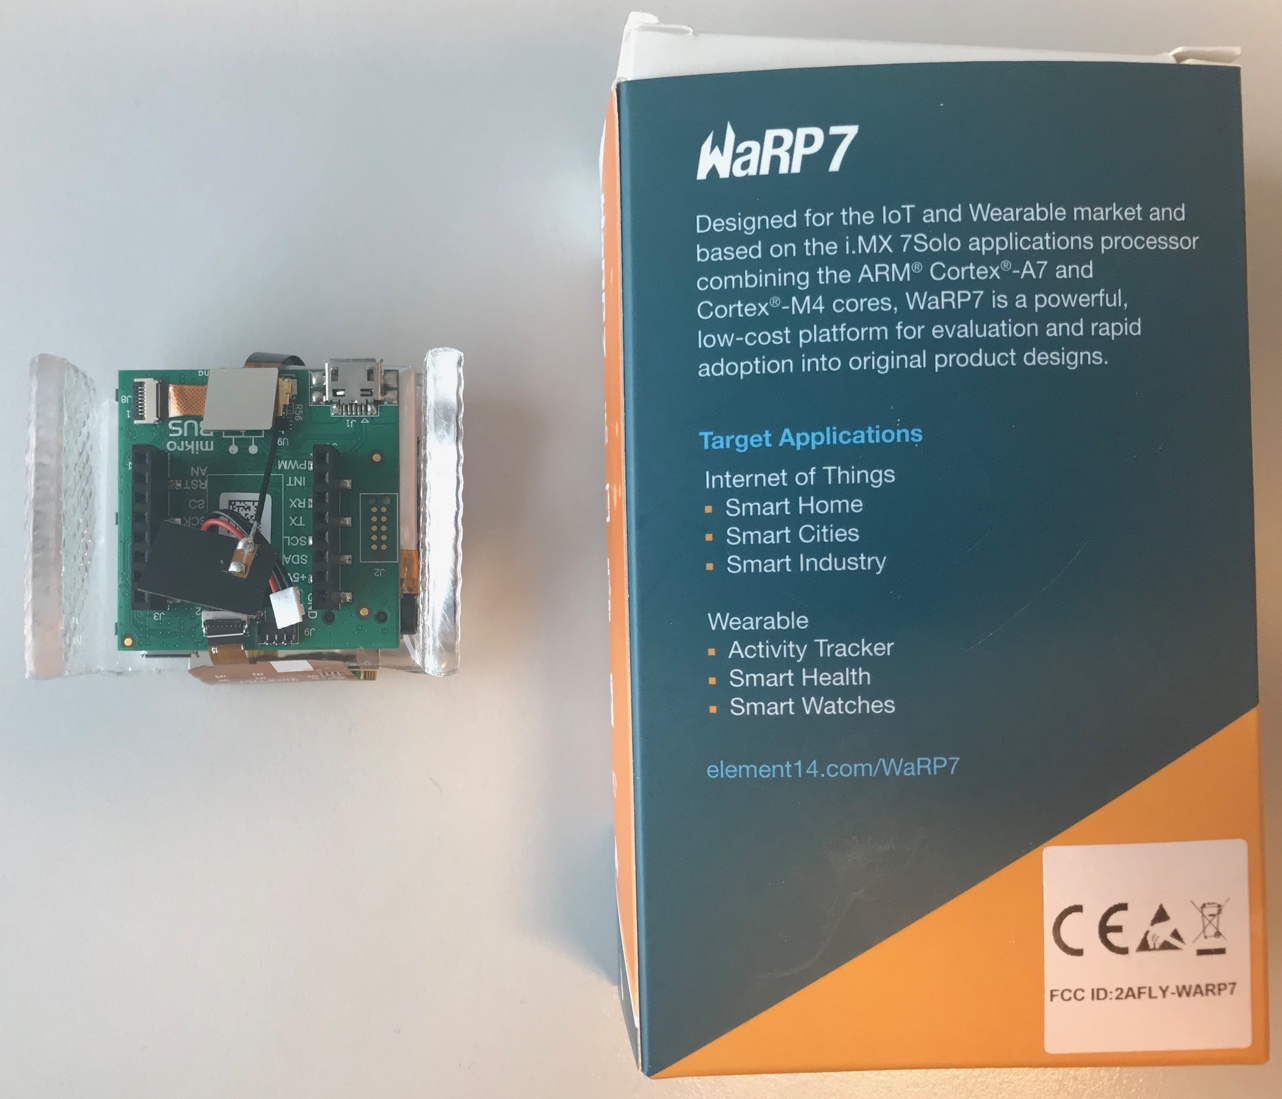
So it’s IO board, CPU-board, battery and display (and micro-USB cable). All that is mounted on a piece of plastic:
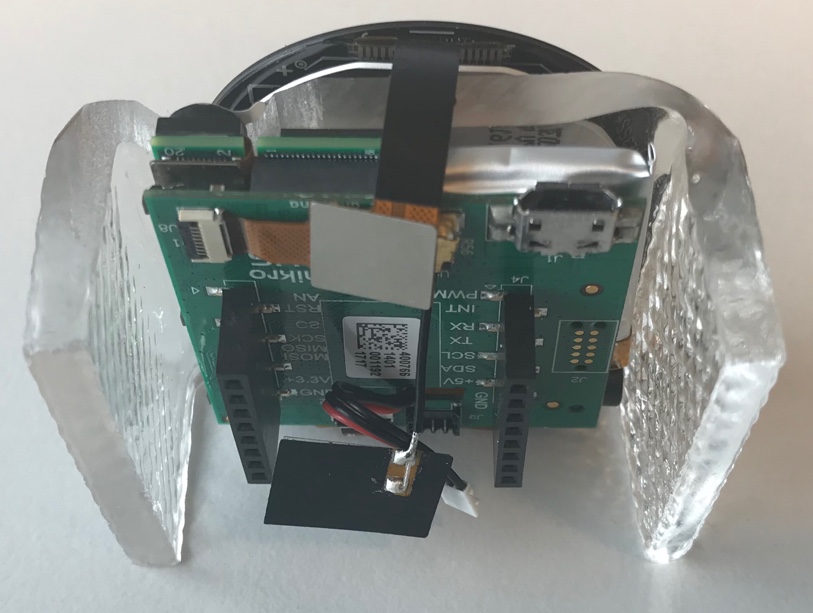
CPU board can be disconnected from IO board (and probably you’ll have to do that at some point):
Flashing Boot to Qt
Okay, let’s flash it with Boot to Qt image. I’ll do it from Linux.
Qt’s official documentation describes the process, but in my opinion it is intended for experienced embedded developers and thus lacks a lot of details, so I decided to write a more detailed manual of my own (as usual).
And let’s start with connecting your device to Linux host (your PC) using USB port on IO board. Do not connect USB port on CPU board just yet.
Check if device was recognized:
$ dmesg | tail
[  389.984069] usb 3-3: new full-speed USB device number 8 using xhci_hcd
[  390.126188] usb 3-3: New USB device found, idVendor=0403, idProduct=6010
[  390.126199] usb 3-3: New USB device strings: Mfr=1, Product=2, SerialNumber=0
[  390.126206] usb 3-3: Product: Dual RS232
[  390.126214] usb 3-3: Manufacturer: FTDI
[  390.148870] usbcore: registered new interface driver usbserial
[  390.148896] usbcore: registered new interface driver usbserial_generic
[  390.148918] usbserial: USB Serial support registered for generic
[  390.154947] usbcore: registered new interface driver ftdi_sio
[  390.154979] usbserial: USB Serial support registered for FTDI USB Serial Device
[  390.155498] ftdi_sio 3-3:1.0: FTDI USB Serial Device converter detected
[  390.155552] usb 3-3: Detected FT2232C
[  390.155742] usb 3-3: FTDI USB Serial Device converter now attached to ttyUSB0
[  390.155777] ftdi_sio 3-3:1.1: FTDI USB Serial Device converter detected
[  390.155827] usb 3-3: Detected FT2232C
[  390.156082] usb 3-3: FTDI USB Serial Device converter now attached to ttyUSB1
You can also check it like that:
$ ls -l /dev/ttyUSB*
crw-rw---- 1 root dialout 188, 0 Apr 30 12:05 /dev/ttyUSB0
crw-rw---- 1 root dialout 188, 1 Apr 30 12:05 /dev/ttyUSB1
Connect to its serial port using any suitable utility. I used screen:
sudo screen /dev/ttyUSB0 115200Now connect USB port on CPU board. Device will start booting and you will have 2 seconds to interrupt its autoboot (press any key):
U-Boot 2017.03+fslc+gac3b20c (Sep 13 2017 - 09:42:27 +0300)

CPU:   Freescale i.MX7S rev1.2 at 792MHz
CPU:   Extended Commercial temperature grade (-20C to 105C) at 31C
Reset cause: POR
Board: WARP7 in secure mode
I2C:   ready
DRAM:  512 MiB
PMIC: PFUZE3000 DEV_ID=0x30 REV_ID=0x11
MMC:   FSL_SDHC: 0
*** Warning - bad CRC, using default environment

In:    serial
Out:   serial
Err:   serial
Net:   usb_ether
Error: usb_ether address not set.

Hit any key to stop autoboot:  0
Mount device’s internal memory as a mass storage device:
=> ums 0 mmc 0It will show you the following output:
UMS: LUN 0, dev 0, hwpart 0, sector 0x0, count 0xe40000
/
Symbol / at the last line will keep rotating. That means successful mount, and you should get memory device available in your system.
…Which didn’t happen to me. And as I eventually figured out, I used a “bad” cable for connecting to USB port on CPU board. I used this one, and apparently it is only capable of providing power (no data). After I replaced it with a “normal” micro-USB cable, I got memory unit successfully mounted.
Now the only thing left is to flash Boot to Qt image from Qt Creator using Flashing Wizard:
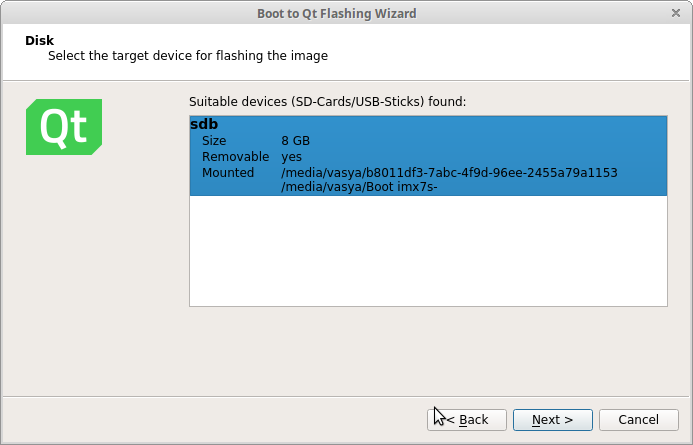
If you have Qt 5.9, don’t flash its image to your device. And if you did, read how to recover your device from it.
After flashing is done, return to terminal with screen, press Ctrl + C to unmount device’s memory and then press Ctrl + A, K to exit screen utility.
Reboot your WaRP7 device to see it loading to Boot to Qt gallery of demos (there is a video in the end of the article).
How to recover from unsuccessful flashing
So, I had Qt 5.9 installed and I flashed my WaRP7 with its Boot to Qt image. Having rebooted device after flashing I got blank white screen, and on top of that device stopped responding to serial interface (screen wasn’t showing anything).
This is because Qt 5.9 doesn’t have support for the WaRP7 display (missing proper drivers). Why did it stop to respond via serial terminal - I have no idea. And of course none of this is mentioned in Qt’s documentation, because fuck you.
In order to fix that you need to put the device into recovery mode and flash a new U-Boot. There is a manual for the process, but this one also lacks several details that are not too obvious for an average user, so I added my comments.
And here we go. Clone imx_usb_loader and try to build it:
$ make
cc -c imx_usb.c -o imx_usb.o -pipe -ggdb `pkg-config --cflags libusb-1.0` -Wall -Wstrict-prototypes -Wno-trigraphs -DSYSCONFDIR='"/usr/etc"'
Package libusb-1.0 was not found in the pkg-config search path.
Perhaps you should add the directory containing `libusb-1.0.pc'
to the PKG_CONFIG_PATH environment variable
No package 'libusb-1.0' found
imx_usb.c:35:31: fatal error: libusb-1.0/libusb.h: No such file or directory
compilation terminated.
Makefile:23: recipe for target 'imx_usb.o' failed
make: *** [imx_usb.o] Error 1
Get fucked right from the start. Especially, after you “made sure libusb is available”. Turns out, it has to be libusb-1.0-0-dev:
apt install libusb-1.0-0-devTry to build it again:
$ make
cc -c imx_usb.c -o imx_usb.o -pipe -ggdb `pkg-config --cflags libusb-1.0` -Wall -Wstrict-prototypes -Wno-trigraphs -DSYSCONFDIR='"/usr/etc"'
cc -c imx_sdp.c -o imx_sdp.o -pipe -ggdb -Wall -Wstrict-prototypes -Wno-trigraphs -DSYSCONFDIR='"/usr/etc"'
cc -c imx_loader_config.c -o imx_loader_config.o -pipe -ggdb -Wall -Wstrict-prototypes -Wno-trigraphs -DSYSCONFDIR='"/usr/etc"'
cc -o imx_usb imx_usb.o imx_sdp.o imx_loader_config.o  `pkg-config --libs libusb-1.0`
cc -c imx_uart.c -o imx_uart.o -pipe -ggdb -Wall -Wstrict-prototypes -Wno-trigraphs -DSYSCONFDIR='"/usr/etc"'
cc -o imx_uart imx_uart.o imx_sdp.o imx_loader_config.o
Here’s the executable you’ll need later (imx_usb):
$ ls -l
-rw-rw-r-- 1 vasya vasya 26530 Apr 30 16:27 COPYING
-rw-rw-r-- 1 vasya vasya  7523 Apr 30 16:27 image.h
-rw-rw-r-- 1 vasya vasya 10892 Apr 30 16:27 imx_loader_config.c
-rw-rw-r-- 1 vasya vasya  1350 Apr 30 16:27 imx_loader_config.h
-rw-rw-r-- 1 vasya vasya 23208 Apr 30 16:37 imx_loader_config.o
-rw-rw-r-- 1 vasya vasya   922 Apr 30 16:27 imx_loader.h
-rw-rw-r-- 1 vasya vasya 38365 Apr 30 16:27 imx_sdp.c
-rw-rw-r-- 1 vasya vasya  3278 Apr 30 16:27 imx_sdp.h
-rw-rw-r-- 1 vasya vasya 56576 Apr 30 16:37 imx_sdp.o
-rwxrwxr-x 1 vasya vasya 68688 Apr 30 16:37 imx_uart
-rw-rw-r-- 1 vasya vasya 10153 Apr 30 16:27 imx_uart.c
-rw-rw-r-- 1 vasya vasya 21072 Apr 30 16:37 imx_uart.o
-rwxrwxr-x 1 vasya vasya 82144 Apr 30 16:37 imx_usb
-rw-rw-r-- 1 vasya vasya 17262 Apr 30 16:27 imx_usb.c
-rw-rw-r-- 1 vasya vasya   668 Apr 30 16:27 imx_usb.conf
-rw-rw-r-- 1 vasya vasya 35720 Apr 30 16:37 imx_usb.o
-rw-rw-r-- 1 vasya vasya  1599 Apr 30 16:27 Makefile
-rw-rw-r-- 1 vasya vasya   721 Apr 30 16:27 Makefile.mingw
drwxrwxr-x 2 vasya vasya  4096 Apr 30 16:27 msvc
-rw-rw-r-- 1 vasya vasya   710 Apr 30 16:27 mx50_usb_work.conf
-rw-rw-r-- 1 vasya vasya   895 Apr 30 16:27 mx51_usb_work.conf
-rw-rw-r-- 1 vasya vasya   865 Apr 30 16:27 mx53_usb_work.conf
-rw-rw-r-- 1 vasya vasya   220 Apr 30 16:27 mx6_usb_sdp_spl.conf
-rw-rw-r-- 1 vasya vasya  1487 Apr 30 16:27 mx6_usb_work.conf
-rw-rw-r-- 1 vasya vasya   152 Apr 30 16:27 mx7ulp_usb_work.conf
-rw-rw-r-- 1 vasya vasya  1270 Apr 30 16:27 mx7_usb_work.conf
-rw-rw-r-- 1 vasya vasya   703 Apr 30 16:27 mx8mq_usb_work.conf
-rw-rw-r-- 1 vasya vasya  1400 Apr 30 16:27 portable.h
-rw-rw-r-- 1 vasya vasya  2951 Apr 30 16:27 README.md
drwxrwxr-x 2 vasya vasya  4096 Apr 30 16:27 tests
-rw-rw-r-- 1 vasya vasya   786 Apr 30 16:27 vybrid_usb_work.conf
Manual says to install dfu-util next. Okay:
apt install libdfu-devNow clone U-Boot, create a local branch and try to build it:
git clone https://github.com/Freescale/u-boot-fslc.git
cd u-boot-fslc/
git checkout -b localBranch origin/2017.11+fslc
make mrproper
make warp7_secure_defconfig
make
Get fucked second time:
scripts/kconfig/conf  --silentoldconfig Kconfig
  CHK     include/config.h
  UPD     include/config.h
  CFG     u-boot.cfg
  GEN     include/autoconf.mk
  GEN     include/autoconf.mk.dep
*** Your GCC is older than 6.0 and will not be supported starting in v2018.01.
  CHK     include/config/uboot.release
  UPD     include/config/uboot.release
  CHK     include/generated/version_autogenerated.h
  UPD     include/generated/version_autogenerated.h
  CHK     include/generated/timestamp_autogenerated.h
  UPD     include/generated/timestamp_autogenerated.h
  CC      lib/asm-offsets.s
lib/asm-offsets.c:1:0: error: bad value (armv5) for -march= switch
 /*
 ^
Kbuild:43: recipe for target 'lib/asm-offsets.s' failed
make[1]: *** [lib/asm-offsets.s] Error 1
Makefile:1332: recipe for target 'prepare0' failed
make: *** [prepare0] Error 2
Because first you need to install some more packages and add some environmental variables:
apt-get install gcc-arm-linux-gnueabi
export CROSS_COMPILE=arm-linux-gnueabi-
export ARCH=arm
What, you didn’t know that? Well, we couldn’t care less, so we didn’t trouble ourselves with providing this information. Sucks to be you, silly idiot. Now wipe your tears, retard, and try to build it again, and then check if you got the U-Boot binary:
$ make
// ...

$ find -iname "*.imx"
./u-boot.imx
Put WaRP7 device into recovery mode: disconnect all USB cables, disconnect CPU board from IO board (careful with cables) and set this tiny switch №2 into the upper position:
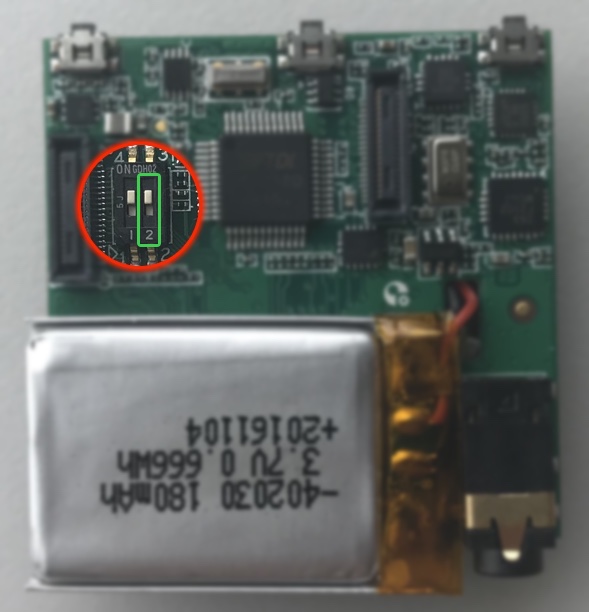
Connect CPU board back to IO board, plug it to your computer only with USB from IO board. Open a new tab in your terminal and connect to the device via screen just like before, and only then plug USB from CPU board. Return back to the main terminal tab and run this:
sudo /path/to/imx_usb_loader/imx_usb u-boot.imxIt will show something like this:
config file </home/vasya/programs/imx_usb_loader//imx_usb.conf>
vid=0x066f pid=0x3780 file_name=mx23_usb_work.conf
vid=0x15a2 pid=0x004f file_name=mx28_usb_work.conf
vid=0x15a2 pid=0x0052 file_name=mx50_usb_work.conf
vid=0x15a2 pid=0x0054 file_name=mx6_usb_work.conf
vid=0x15a2 pid=0x0061 file_name=mx6_usb_work.conf
vid=0x15a2 pid=0x0063 file_name=mx6_usb_work.conf
vid=0x15a2 pid=0x0071 file_name=mx6_usb_work.conf
vid=0x15a2 pid=0x007d file_name=mx6_usb_work.conf
vid=0x15a2 pid=0x0080 file_name=mx6_usb_work.conf
vid=0x1fc9 pid=0x0128 file_name=mx6_usb_work.conf
vid=0x15a2 pid=0x0076 file_name=mx7_usb_work.conf
vid=0x1fc9 pid=0x0126 file_name=mx7ulp_usb_work.conf
vid=0x15a2 pid=0x0041 file_name=mx51_usb_work.conf
vid=0x15a2 pid=0x004e file_name=mx53_usb_work.conf
vid=0x15a2 pid=0x006a file_name=vybrid_usb_work.conf
vid=0x066f pid=0x37ff file_name=linux_gadget.conf
vid=0x1b67 pid=0x4fff file_name=mx6_usb_sdp_spl.conf
vid=0x0525 pid=0xb4a4 file_name=mx6_usb_sdp_spl.conf
vid=0x1fc9 pid=0x012b file_name=mx8mq_usb_work.conf
config file </home/vasya/programs/imx_usb_loader//mx7_usb_work.conf>
parse /home/vasya/programs/imx_usb_loader//mx7_usb_work.conf
Trying to open device vid=0x15a2 pid=0x0076
Interface 0 claimed
HAB security state: development mode (0x56787856)
== work item
filename u-boot.imx
load_size 0 bytes
load_addr 0x00000000
dcd 1
clear_dcd 0
plug 1
jump_mode 3
jump_addr 0x00000000
== end work item
loading DCD table @0x910000

<<<468, 468 bytes>>>
succeeded (security 0x56787856, status 0x128a8a12)
clear dcd_ptr=0x877ff42c

loading binary file(u-boot.imx) to 877ff400, skip=0, fsize=5cc00 type=aa

<<<379904, 379904 bytes>>>
succeeded (security 0x56787856, status 0x88888888)
jumping to 0x877ff400
Quickly switch to the tab with screen and stop autoboot. Run there commands (set default environment and enter DFU mode):
=> env default -f -a
=> saveenv
=> dfu 0 mmc 0
Switch to the main tab and run this:
sudo dfu-util -D u-boot.imx -a bootGet fucked for the third time! You need to install this thing first:
apt install dfu-utilRun it now:
$ sudo dfu-util -D u-boot.imx -a boot
dfu-util 0.8

Copyright 2005-2009 Weston Schmidt, Harald Welte and OpenMoko Inc.
Copyright 2010-2014 Tormod Volden and Stefan Schmidt
This program is Free Software and has ABSOLUTELY NO WARRANTY
Please report bugs to dfu-util@lists.gnumonks.org

dfu-util: Invalid DFU suffix signature
dfu-util: A valid DFU suffix will be required in a future dfu-util release!!!
Opening DFU capable USB device...
ID 0525:a4a5
Run-time device DFU version 0110
Claiming USB DFU Interface...
Setting Alternate Setting #0 ...
Determining device status: state = dfuIDLE, status = 0
dfuIDLE, continuing
DFU mode device DFU version 0110
Device returned transfer size 4096
Copying data from PC to DFU device
Download    [=========================] 100%       379904 bytes
Download done.
Switch to the screen tab. There should be something like this:
#DOWNLOAD ... OK
Ctrl+C to exit ...
That means successful recovery of the device. Exit screen utility and turn device off.
Disconnect CPU board from IO board and put switch №2 back to the lower position:
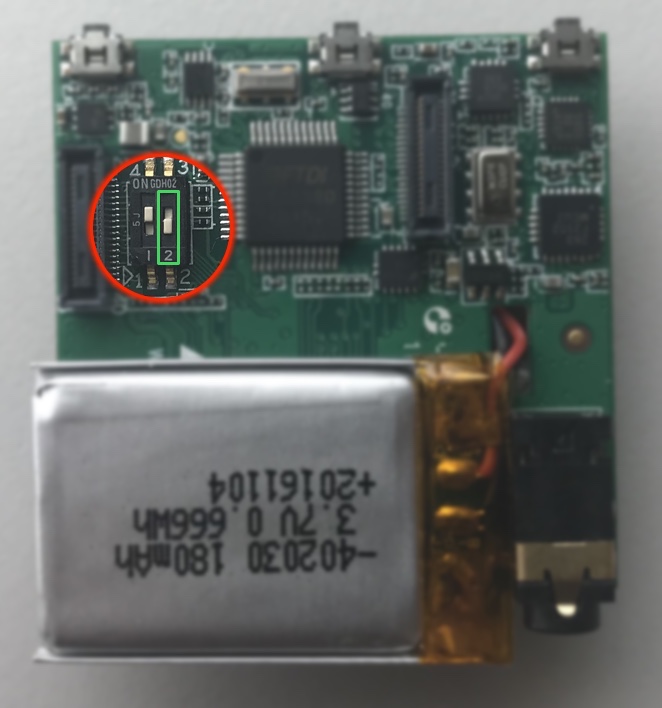
Now you can flash the Boot to Qt image again. But this time don’t use image from Qt 5.9! I flashed the one from Qt 5.10.1, and it works just fine.
Adding device to Qt Creator
Since WaRP7 is connected via USB, adding it to Qt Creator as a target is different from doing the same with Raspberry Pi.
Don’t use Device Configuration Wizard to add WaRP7 device as this wizard is for adding devices that are connected over network. USB-connected devices are discovered automatically. However, first you need to add new udev rules:
echo 'SUBSYSTEM=="usb", ATTRS{idVendor}=="dbdb", TAG+="udev-acl", TAG+="uaccess"' | sudo tee -a /etc/udev/rules.d/70-boot2qt.rulesRun udevadm control --reload for changes to apply (or simply reboot the system). Unplug and plug device back, wait for it to load Boot to Qt gallery. Check if it has been discovered:
$ /path/to/qt/Tools/qdb/bin/qdb devices
{
"_version": 1,
"devices": [
{
"hostMac": "52:44:df:07:d6:db",
"ipAddress": "172.16.58.1",
"serial": "b2qt-imx7s-warp-4c8409e90d4243a6"
}
],
"response": "devices"
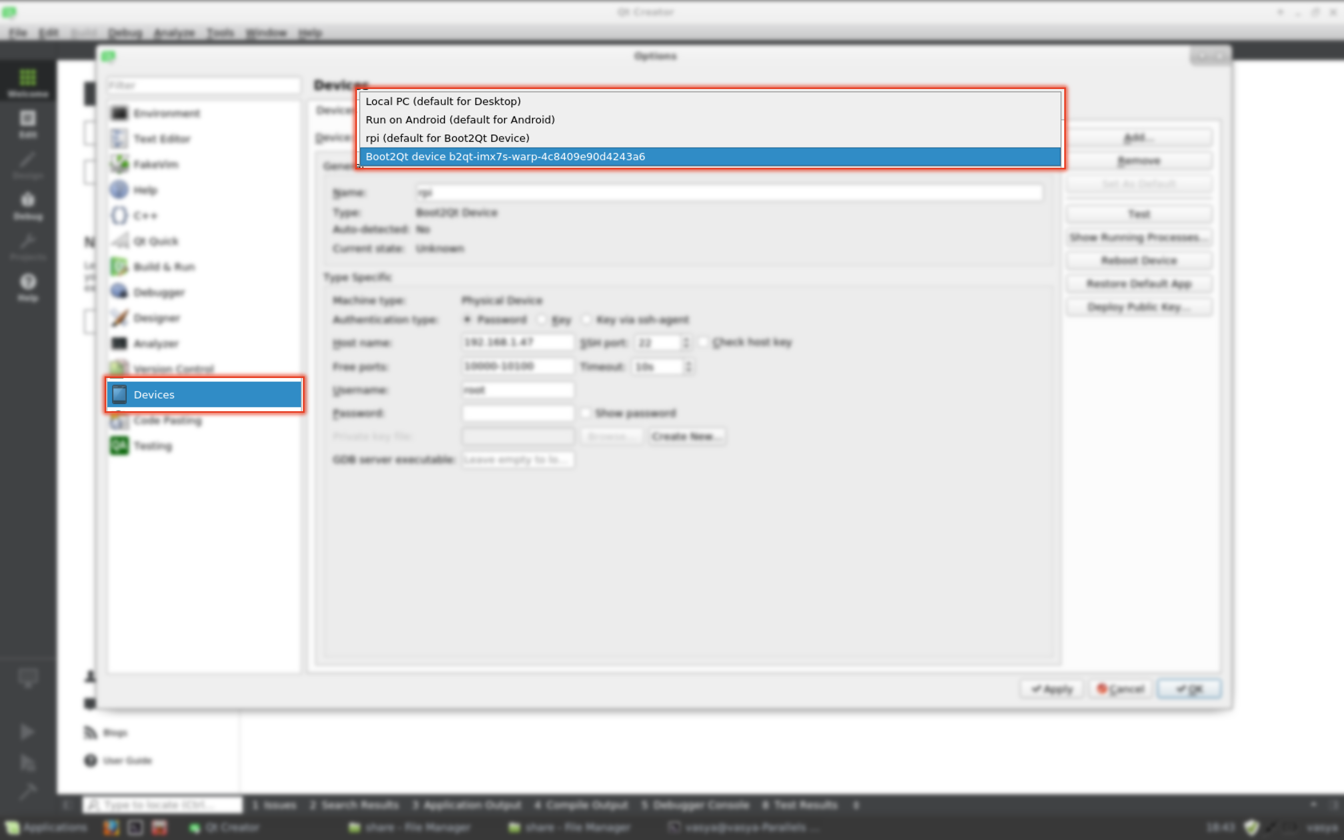
}It should also appear in Qt Creator at Devices tab:
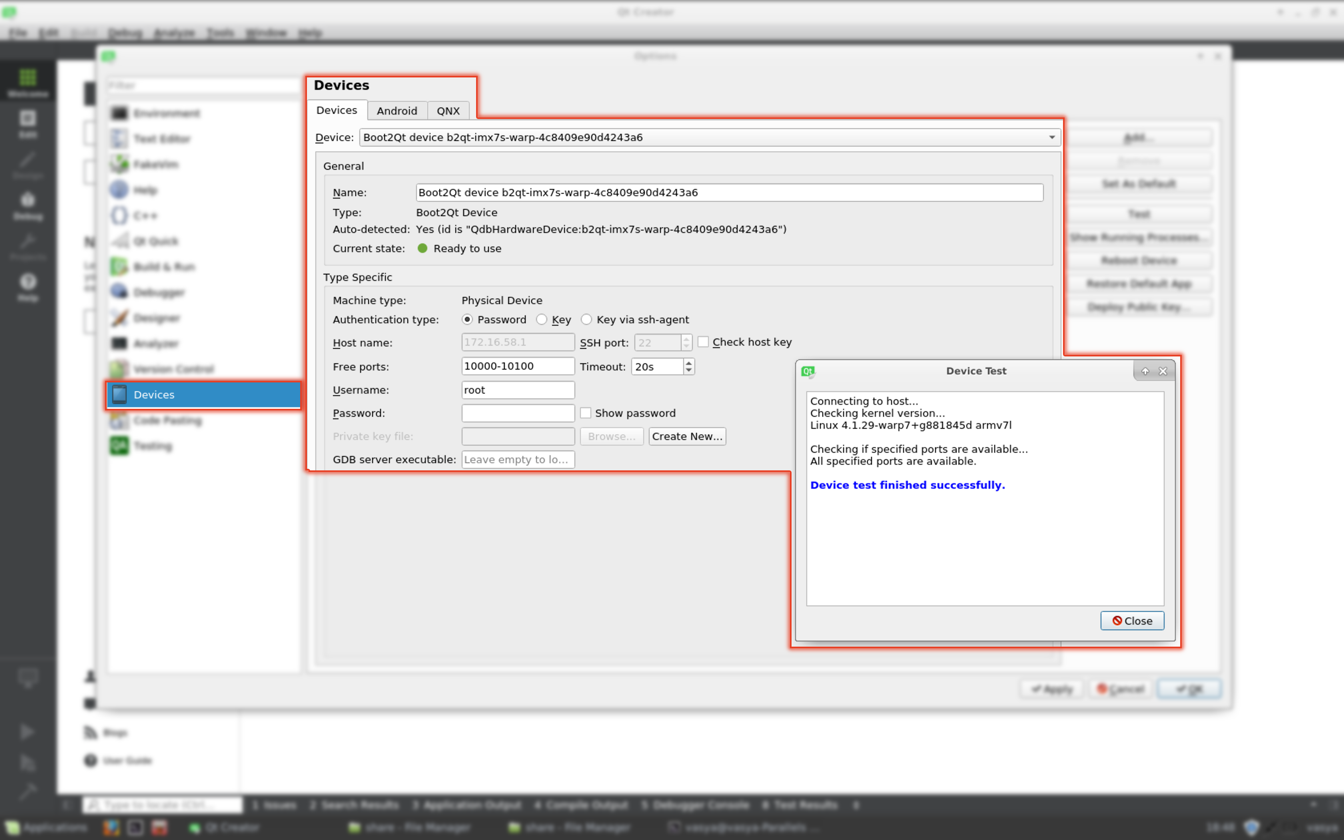
You can test it:
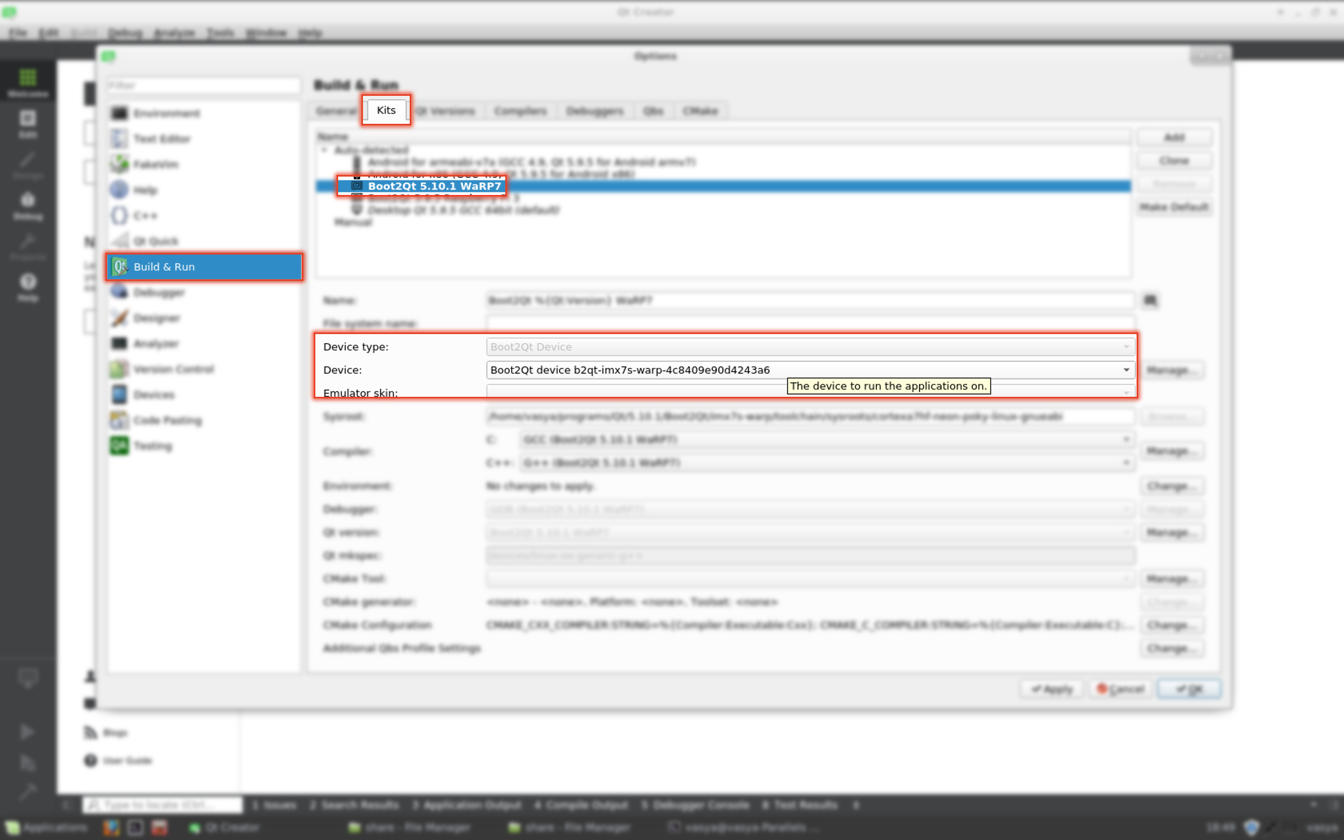
If everything is fine, go to Build & Run tab, open Kits and select this device for Boot to Qt WaRP7 kit:
Now you can try to run some applications from Qt Creator on the connected WaRP7 device. Simply select add this kit to your project, switch to it and hit run.
In the following video you’ll see Boot to Qt standard gallery of demos running on WaRP7 device. It also shows Qt Creator being used for deploying applications: my traditional silly Color Corners and the very same Wearable demo that is presented at Qt events:
If video doesn't play in your browser, you can download it here.


