Amazon, MXNet and Qt - The Great Robot Arm challenge
This February on the Embedded World 2019 event in Nuremberg The Qt Company had a joint demo together with Amazon - “The Great Robot Arm Challenge”.
If video doesn't play in your browser, you can download it here.
Amazon guys wrote a good article covering the deep-learning part. In turn, I wanted to tell about the Qt part.
This article should have been published about 10 months ago, but every time there was something else going on, so I kept postponing and postponing it. But better later than never.
I would especially highlight video wrapper trick and QtHttpServer use-case.
How did it all begin
At some point, as a result of a spontaneous meeting with Amazon guys at CppCon, it was decided to make an Amazon/Qt joint demo.
What Amazon guys had in mind was to showcase the MXNet deep learning library running on NVIDIA Jetson TX2 device. What they were missing was the GUI part, which Qt could definitely help with.
As it turned out later, Qt had more things to offer other than just GUI, for instance:
- interfacing with the camera
- network communication between devices
- database access
- and other small but handy features
Overview
The demo setup can be visualized like this:
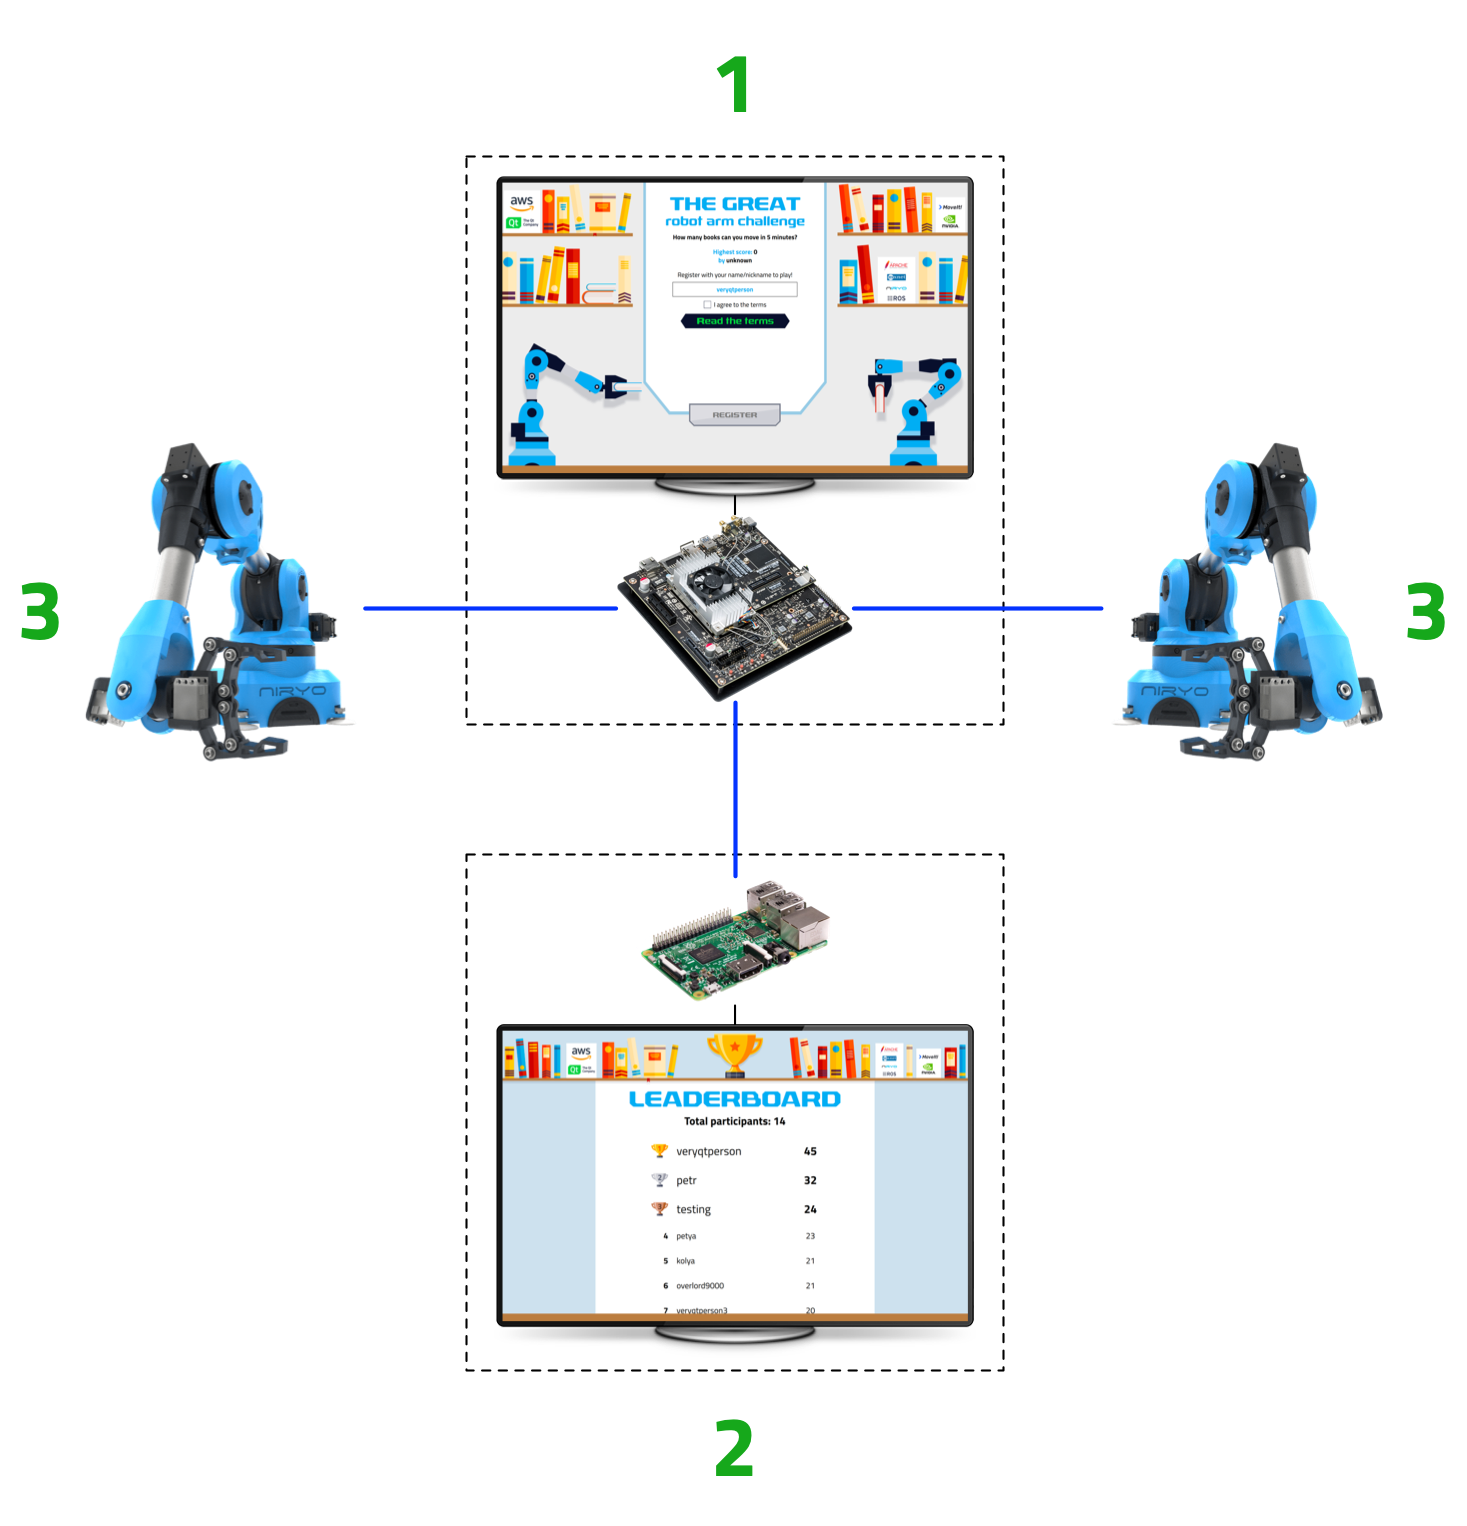
Here:
- NVIDIA Jetson TX2 - the core of the setup. Runs the Challenge application, processes the frames with MXNet and controls robotic arms
- Two Niryo One robotic arms
- Raspberry Pi 3 - runs the Leaderboard application for displaying the challenge results and hosts the database
The demo in action:
If video doesn’t play in your browser, you can download it here.
So, a person stands in front of the camera and by moving his arms he moves the robotic arms and controls their grip. Everything is organized in a form of challenge: how many books can a participant move from one side to another within a given period of time.
Person’s hands/palms analysis/prediction is done by MXNet instance running on Jetson device, which also runs the Challenge application and sends signals to robotic arms.
Additional device (Raspberry Pi) hosts the database and runs the Leaderboard application (you can’t see it on the video).
Implementation
Qt build
We started with Qt 5.11.1 and then switched to Qt 5.12.0.
Development and prototyping was done mostly on Mac OS. Thanks to Qt’s cross-platform nature, deploying applications to the actual targets (Jetson and Raspberry) was only a matter of recompiling the same source code.
However, when it comes to embedded targets, there are no pre-build Qt binaries for those (unless you have a commercial license). Also while we could’ve used Qt version provided by the system packages, quite often that one is far from being the latest, so we just built Qt from sources both for Ubuntu on Jetson and for Raspbian on Raspberry right on devices:
$ cd ~
$ git clone git://code.qt.io/qt/qt5.git && cd qt5
$ ./init-repository

$ cd ..
$ mkdir build && cd "$_"
$ ../qt5/configure -release -no-pch -prefix "/opt/qt512/" -skip webengine -nomake tools -nomake tests -nomake examples
$ make -j4
$ make -j4 install
Keep in mind that building Qt directly on Raspberry Pi can easily take several hours. On top of that you are likely to run out of RAM, so think about preparing your swap accordingly.
Of course it would be faster to cross-compile Qt sources from desktop, but none of us has done it before and we really had no time to deal with it, so building right on devices actually turned out to be a better option.
GUI
There are two GUI applications in the demo:
- Challenge - the main application, runs on Jetson
- Leaderboard - stores and displays the challenge results
We chose Qt Quick / QML for implementing the GUI. There is nothing wrong with Qt Widgets, but since we weren’t after native look and feel - on the contrary, we wanted to create a very custom GUI - it was simply easier to do so with Qt Quick.
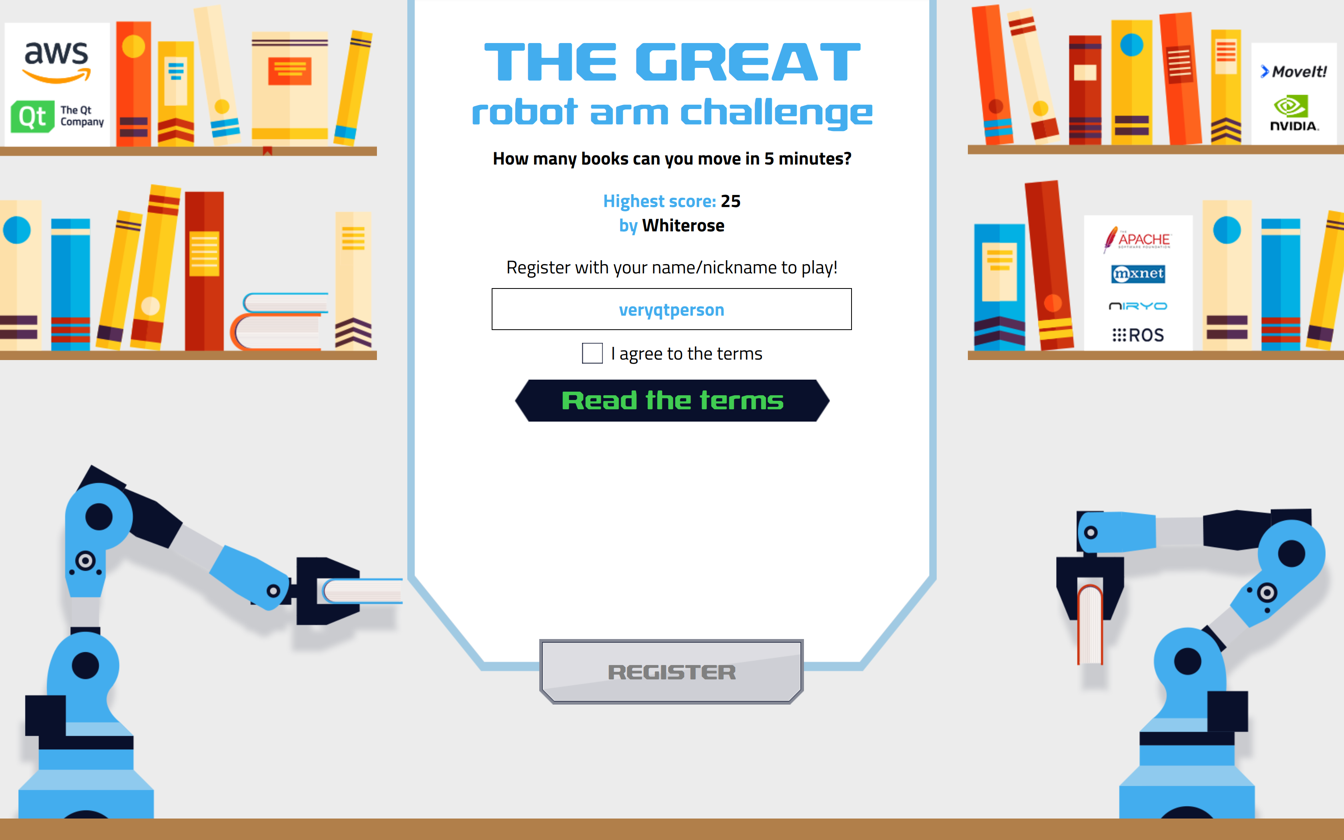
Challenge application screenshot:
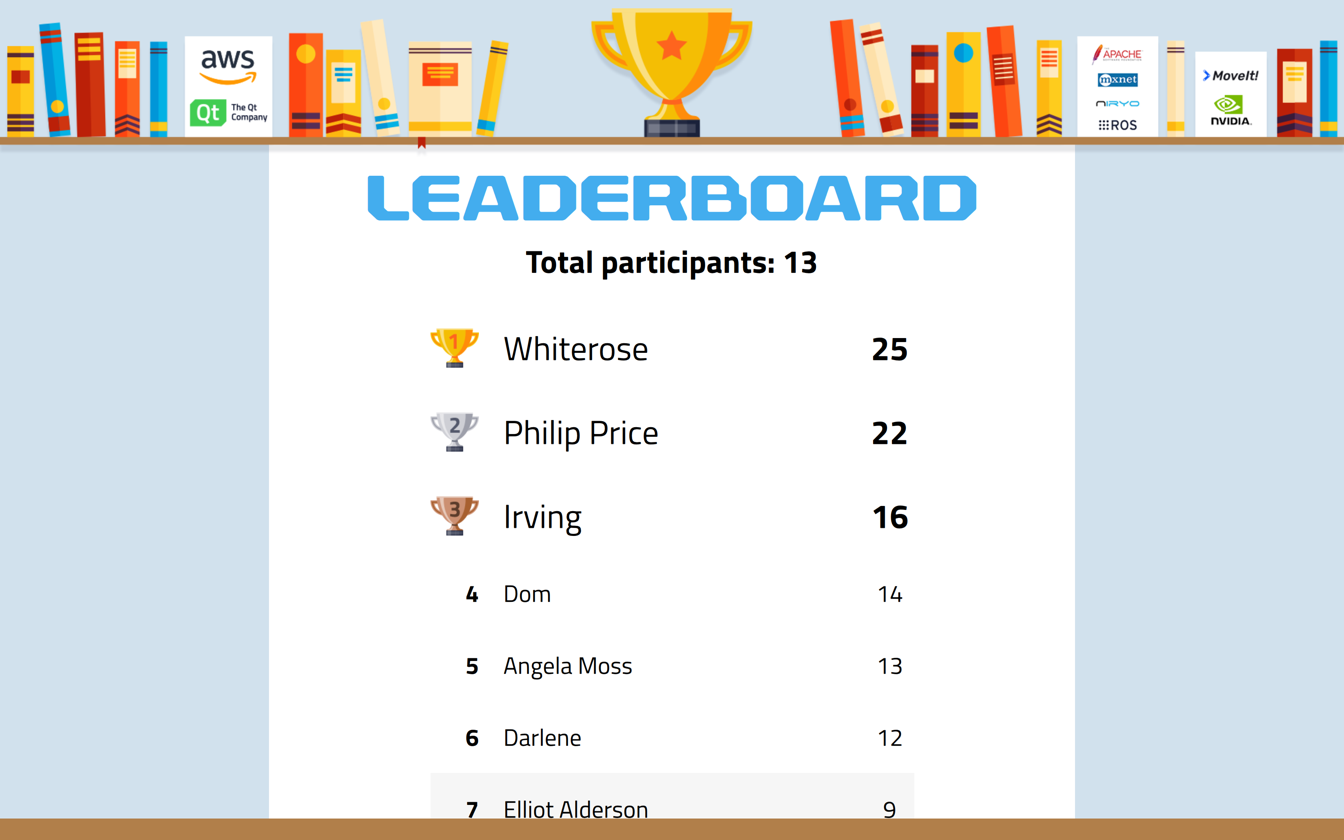
Leaderboard application screenshot:
The GUI looks nice by no accident - we had proper designers in the team. They designed GUI for both applications in Photoshop and then exported it to a QML project using Qt Bridge from the Qt Design Studio package.
However, we did not use Qt Design Studio itself as the projects exported from Photoshop heavily rely on hardcoded x/y coordinates and width/height values. But we wanted to have a responsive QML GUI, with layouts and property bindings, so it could adapt to different screen sizes and geometry.
At the same time it was definitely useful to get all the design assets in a form of a QML project rather than a .psd file, so it was easier to recreate the design in QML.
Next time we will try to create design directly in Qt Design Studio without using Photoshop at all, especially that designers actually don’t mind such approach themselves. There is however a challenge of teaching/explaining the concept of layouts and bindings to them, but I think it will pay off in the end.
Layouts
Since we touched the layouts subject, here’s a simplified example of using layouts in Challenge application GUI:
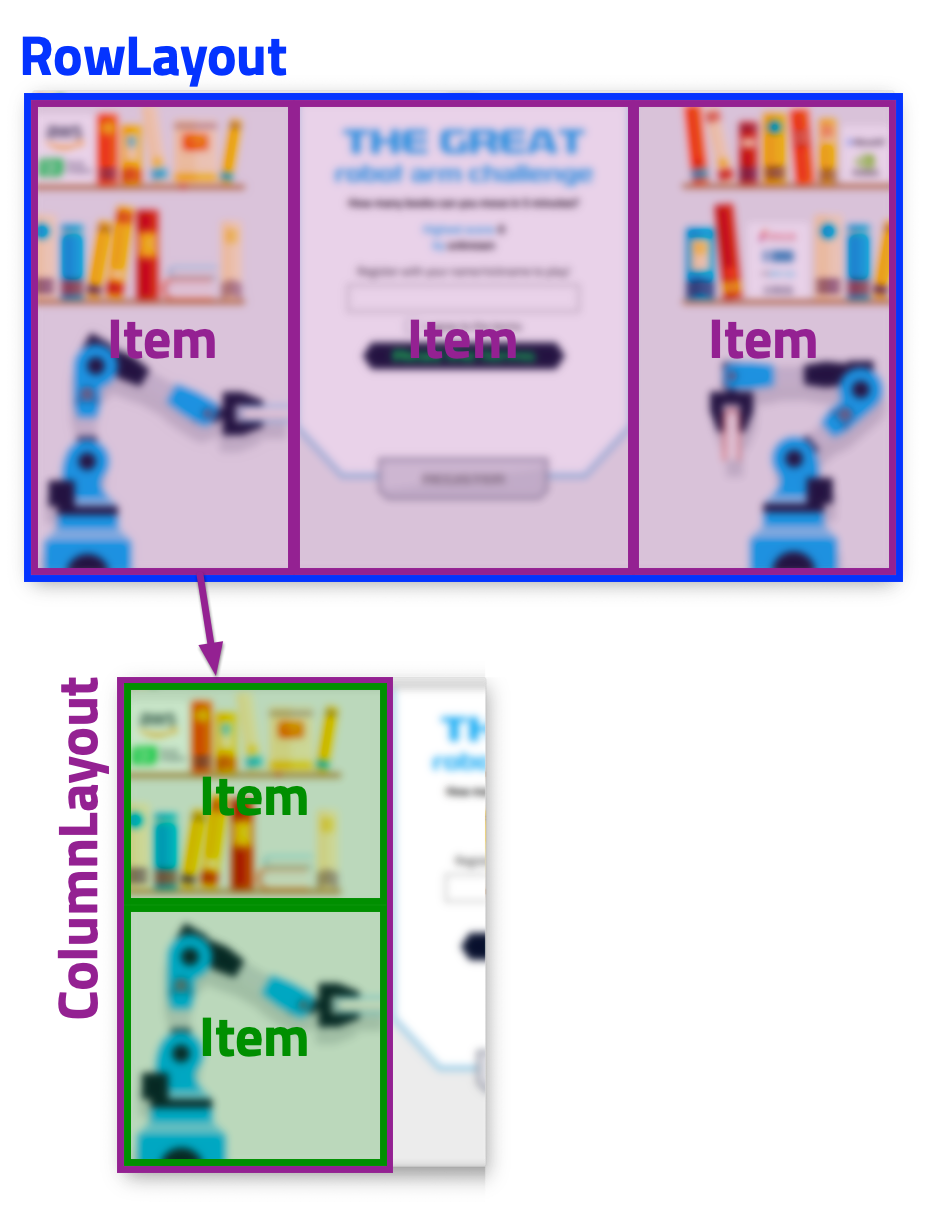
In QML it looks like this:
RowLayout {
    anchors.fill: parent

    Item {
        Layout.preferredWidth: parent.width * 0.3
        Layout.fillHeight: true

        ColumnLayout {
            anchors.fill: parent

            // ...
        }
    }

    Item {
        Layout.fillWidth: true
        Layout.fillHeight: true

        // ...
    }

    Item {
        Layout.preferredWidth: parent.width * 0.3
        Layout.fillHeight: true

        ColumnLayout {
            anchors.fill: parent

            // ...
        }
    }
}
Which gives the following more or less responsive result:
If video doesn’t play in your browser, you can download it here.
Yes, it is pretty basic stuff, but you’d be surprised how many people still “hardcode” the geometry of their applications GUI because they don’t know about layouts.
Pixels ratio
Speaking about developing on Macs - when we deployed applications to Jetson and Raspberry Pi devices the first time, GUI proportions went to hell, along with the text labels font size.
That happened because we forgot about devicePixelRatio which has a different value on “Retina” and “normal” displays. To fix that we added a scale factor based on this value.
Multiple views
Switching between screens/views in applications is implemented with QML Loader:
// main.qml

// ...

Loader {
    id: loader
    anchors.fill: parent
    source: "qrc:/welcome.qml"

    Connections {
        target: loader.item
        onNextWindow: {
            loader.source = "qrc:/" + windowName
        }
    }
}

// ...
Loading the next view:
// welcome.qml

// ...

Item {
    signal nextWindow(string windowName)

    // ...

    Button {
        // ...

        onClicked: {
            registrationComplete();
        }
    }

    // ...

    function registrationComplete()
    {
        nextWindow("challenge.qml");
    }
}
Virtual Keyboard
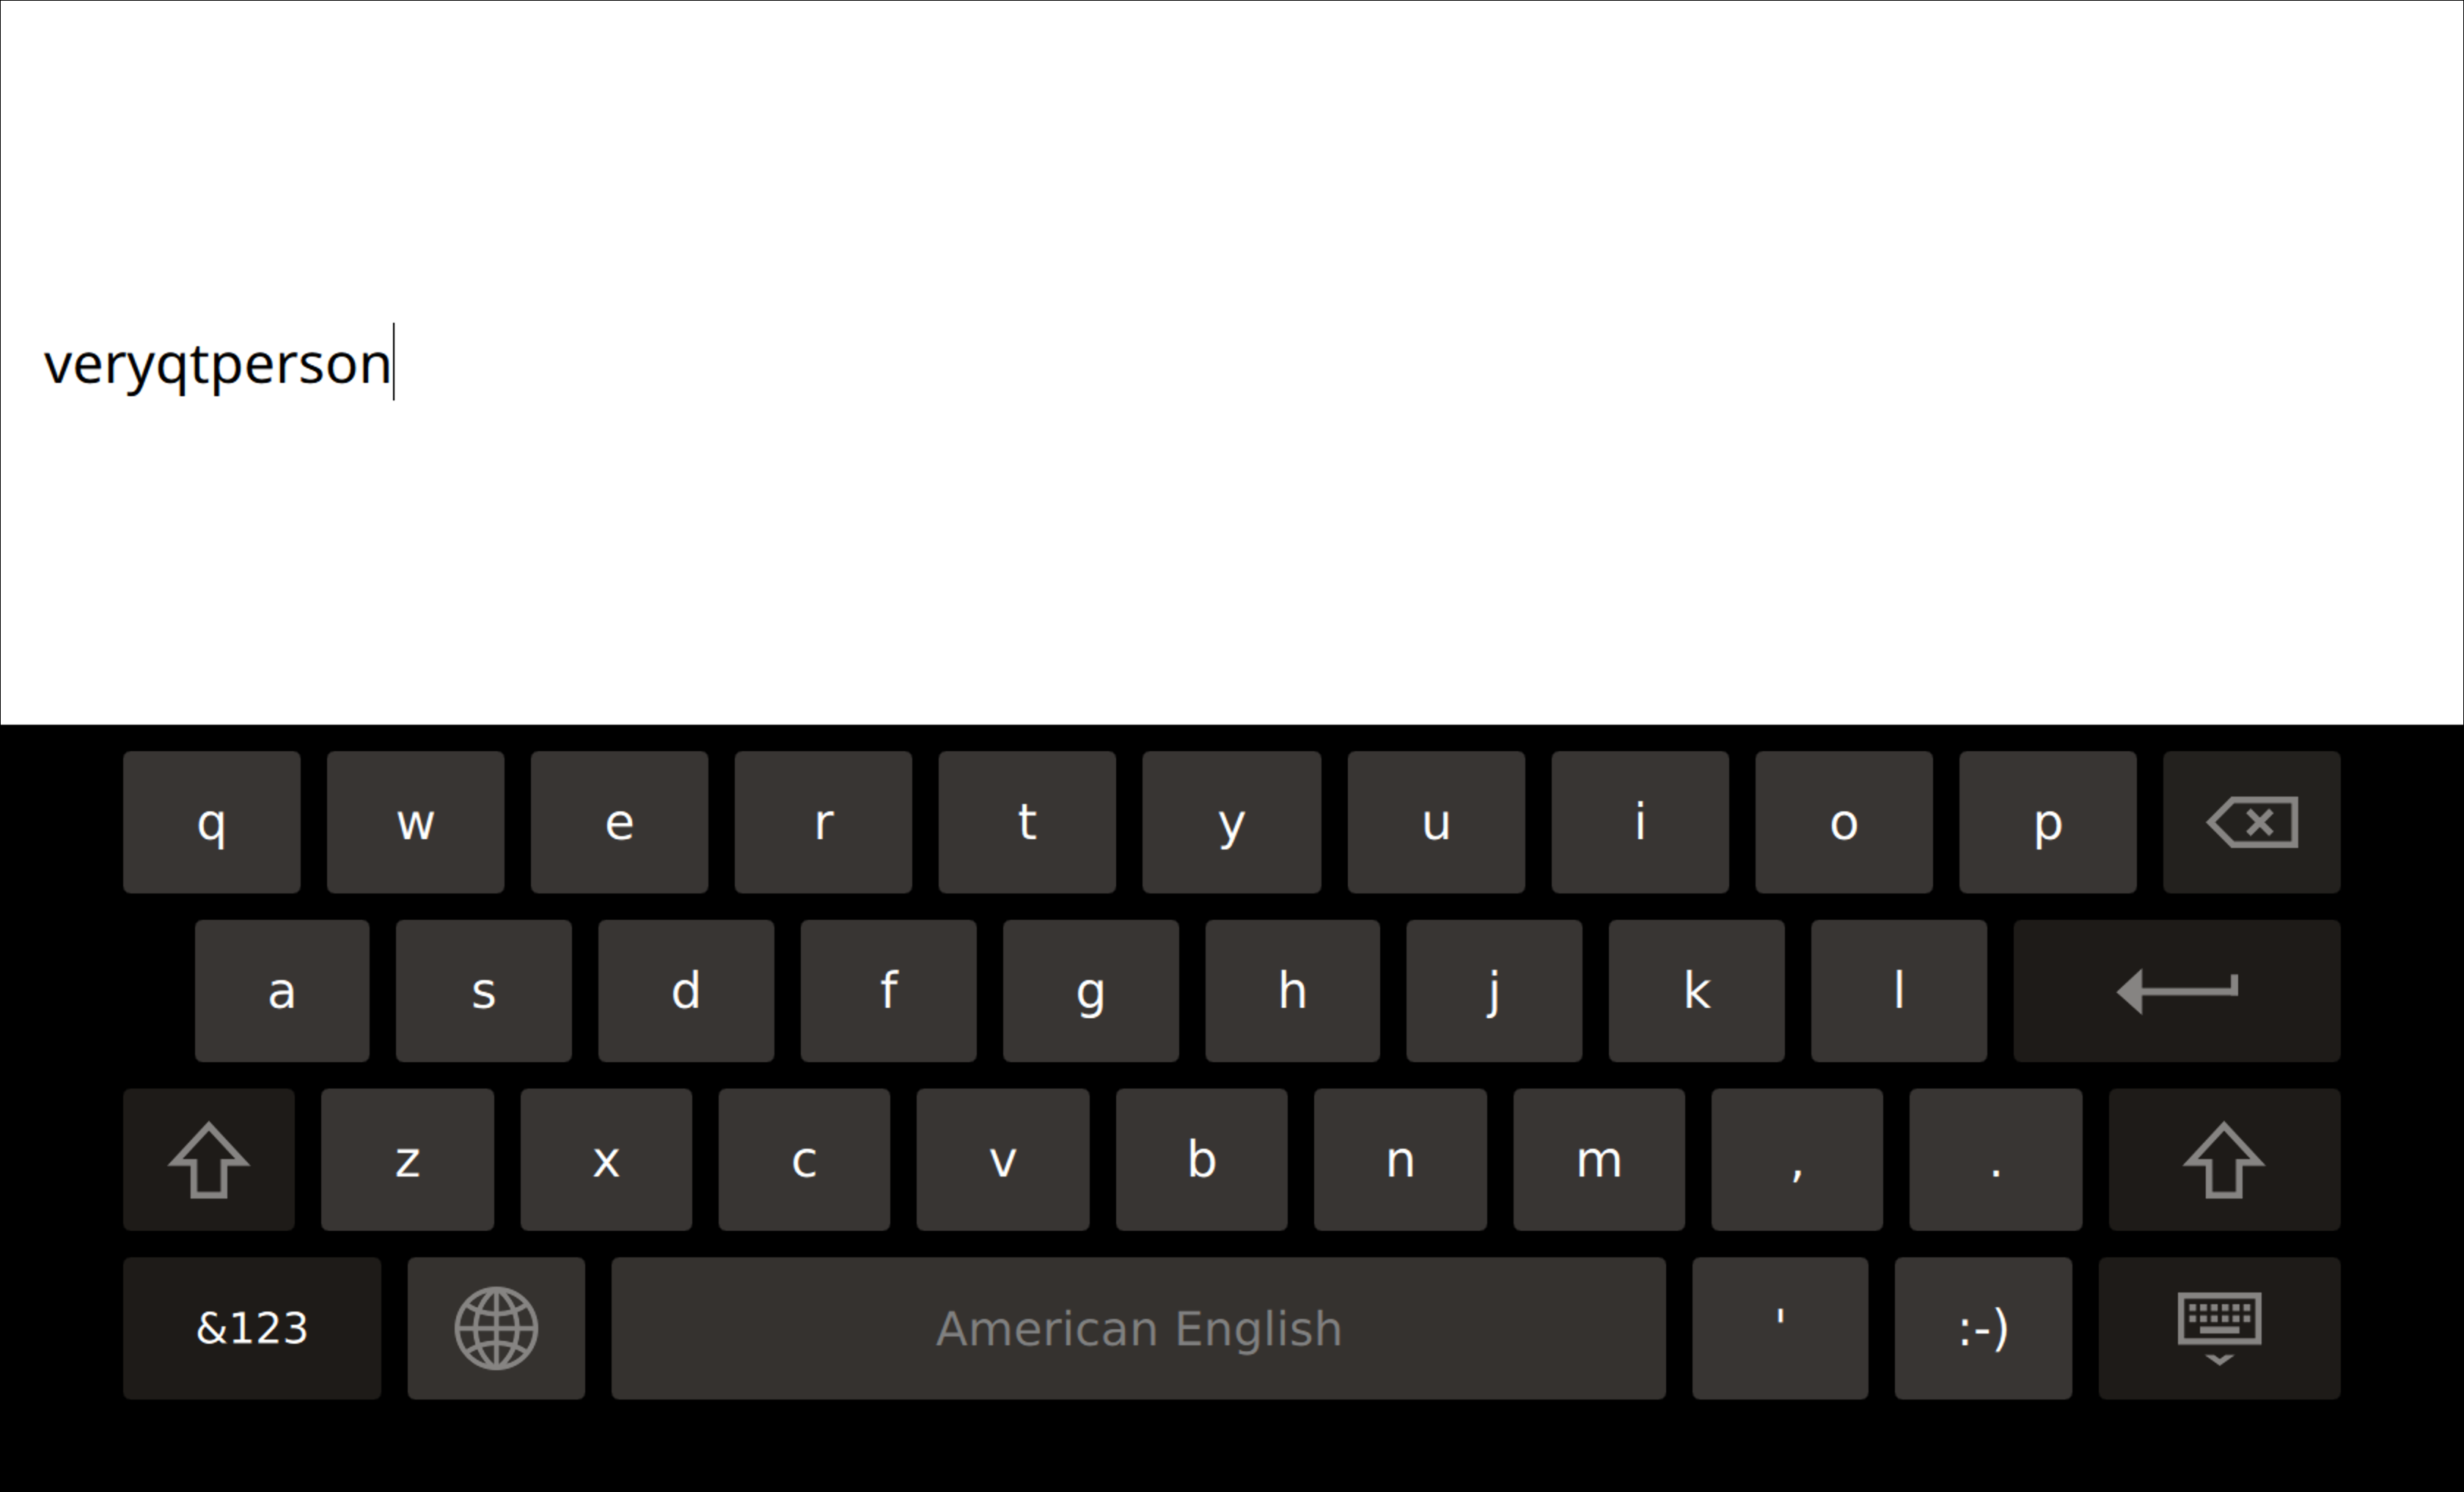
The Challenge application has a text input, so participants could enter their names. And since the demo setup had a touchscreen with no physical keyboard, we added a Virtual Keyboard support.
We also enabled the fullscreen mode for it - when user touches the input field, the rest of the GUI “disappears”: the top half of the screen is taken by the input field and the bottom half is taken by the Virtual Keyboard:
Camera
Qt Multimedia makes working with camera pretty easy.
However, at first we couldn’t even discover the Jetson camera from Qt. Eventually we found out that the following environment variable is required in the particular case of NVIDIA Jetson TX2:
QT_GSTREAMER_CAMERABIN_VIDEOSRC="nvcamerasrc ! nvvidconv"So we got out video feed.
Video wrapper trick
We needed to capture frames from video stream and send those to MXNet for analysis. The first and easiest idea was to use captureToLocation() and then send saved files, but on the second thought we realized that it will be a very expensive operation, given that we need to process at least 15 frames per second. So we needed to find a way to grab frames from the video stream on the fly and process those without saving them on disk.
And indeed, there is such a way. With a great help of Val Doroshchuk (Qt Multimedia maintainer), we added a video wrapper - a special class that allows to intercept the frames even before they get to video output.
For that to work the wrapper class should inherit QAbstractVideoSurface. Details can be found in the source code, and as a result we were able to inject it as the source for VideoOutput instead of Camera:
Camera {
    id: camera
    // ...
}

Binding {
    target: backend.videoWrapper
    property: "source"
    value: camera
}

VideoOutput {
    source: backend.videoWrapper//camera
    // ...
}
Grabbing video frames on the fly
The most interesting part of the video wrapper for us was the present() method as that’s where you can grab the frames:
bool VideoWrapper::present(const QVideoFrame &frame)
{
    // ...

    QVideoFrame frameCopy = frame;
    frameCopy.map(QAbstractVideoBuffer::ReadOnly);
    //qDebug() << "got frame:" << frameCopy.mappedBytes() << frameCopy.size();
    QImage shot = QImage(qt_imageFromVideoFrame(frameCopy));
    frameCopy.unmap();

    emit gotNewFrameImage(shot);

    // ...
}
So we grab a copy of a frame (QVideoFrame) and convert it to QImage.
It’s worth to mention that qt_imageFromVideoFrame() function is not available in the public API (here you can vote for it), so the private header needs to be included:
#include "private/qvideoframe_p.h"And the following module needs to be added in the project file:
QT += \
    quick \
    multimedia \
    multimedia-private
Sending frames to MXNet
Next we connect to the gotNewFrameImage() signal and send frames to MXNet via HTTP requests:
Backend::Backend(QObject *parent) : QObject(parent)
{
    // ...

    connect(
        videoWrapper, &VideoWrapper::gotNewFrameImage,
        this, &Backend::processFrame
        );

    // ...

    connect(
        managerFrames, &QNetworkAccessManager::finished,
        this, &Backend::processFrameFinished
        );
}

void Backend::processFrame(QImage img)
{
    // 384x288 is enough for MXNet
    QImage shotScaled = img.scaled(384, 288);
    // MXNet should get unmirrored frame
    shotScaled = shotScaled.mirrored(true, false);

    QBuffer *imgBuffer = new QBuffer();
    bool shotSaved = shotScaled.save(imgBuffer, "JPG");
    if (!shotSaved) { qCritical() << "[error] Couldn't save the original shot]" << imgBuffer->errorString(); }
    else
    {
        const QByteArray reqID = QUuid::createUuid().toByteArray();
        _frames.insert(reqID, img);

        //qDebug() << "uploading" << imgBuffer->size() << "bytes";
        QNetworkRequest request = QNetworkRequest(QUrl(_mxnetEndpointPose));
        request.setRawHeader("Content-Type", "multipart/form-data");
        request.setRawHeader("reqID", reqID);

        imgBuffer->open(QIODevice::ReadOnly);
        QNetworkReply *reply = managerFrames->post(request, imgBuffer);
        connect(reply, &QNetworkReply::finished, imgBuffer, &QBuffer::deleteLater);
    }
}

void Backend::processFrameFinished(QNetworkReply *reply)
{
    int status = reply->attribute(QNetworkRequest::HttpStatusCodeAttribute).toInt();
    QByteArray data = reply->readAll();

    if (status != 200)
    {
        QString errorMessage = data;
        QNetworkReply::NetworkError err = reply->error();
        if (status == 0)
        {
            // dictionary: http://doc.qt.io/qt-5/qnetworkreply.html#NetworkError-enum
            errorMessage = QString("QNetworkReply::NetworkError code: %1").arg(QString::number(err));
        }

        emit requestFailed(QString("Code %1 | %2").arg(status).arg(errorMessage));
        return;
    }

    // get the original frame to crop palms regions
    QByteArray reqID = reply->request().rawHeader("reqID");
    // ...
    // cropping palms regions, sending those to MXNet
    // ...
    // original frame is no longer needed
    _frames.remove(reqID);

    emit requestDone(data);
}
The full source is available here. However, it doesn’t have everything as I had to remove quite a lot of code from the actual implementation - more on that in the results section.
As you can see, aside from sending frames we also save them in memory (the _frames object) for further processing. The reason for that is this: after MXNet replies back with coordinates of the person pose (head, shoulders, palms, etc), we need to crop the palms regions from the original frame and send those (two requests - one per palm) again to MXNet but this time to a different endpoint - to the one that analyses if the palm is closed or open.
Admittedly, that is a very unfortunate design as we lose a lot resources because of that. Everything should happen within a single round trip: MXNet receives the frame, finds the pose coordinates and predicts the palms states. But sadly we didn’t think about it at the beginning of the project and had absolutely no time to re-do that later.
However, even with such a flaw we were able to process 20 frames per second without degrading the UX. Here’s one of the first FPS benchmarks we did:
If video doesn’t play in your browser, you can download it here.
The MXNet instance in this benchmark wasn’t properly trained, but we did not care about that - we only wanted to estimate the performance. The yellow counter here shows the video-stream FPS, and the blue counter shows the number of frames MXNet is able to process per second. We would have been happy with anything above 15 FPS, so 20 FPS is a very good result.
Controlling the robotic arms
Here’s what MXNet does with the frames we send to it:
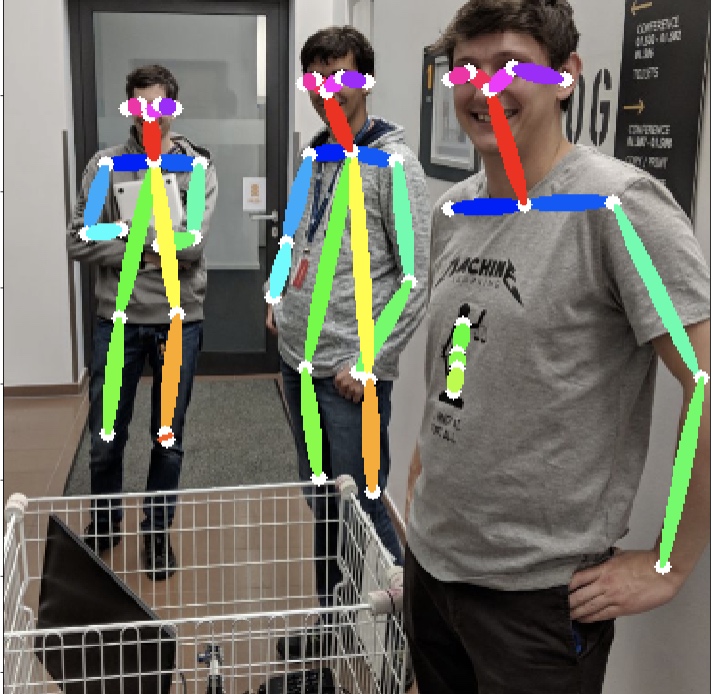
So it looks for parts of human body and sends back a set of coordinates for points of interest. From those coordinates we only need palms regions, to which we bind trackers on VideoOutput surface.
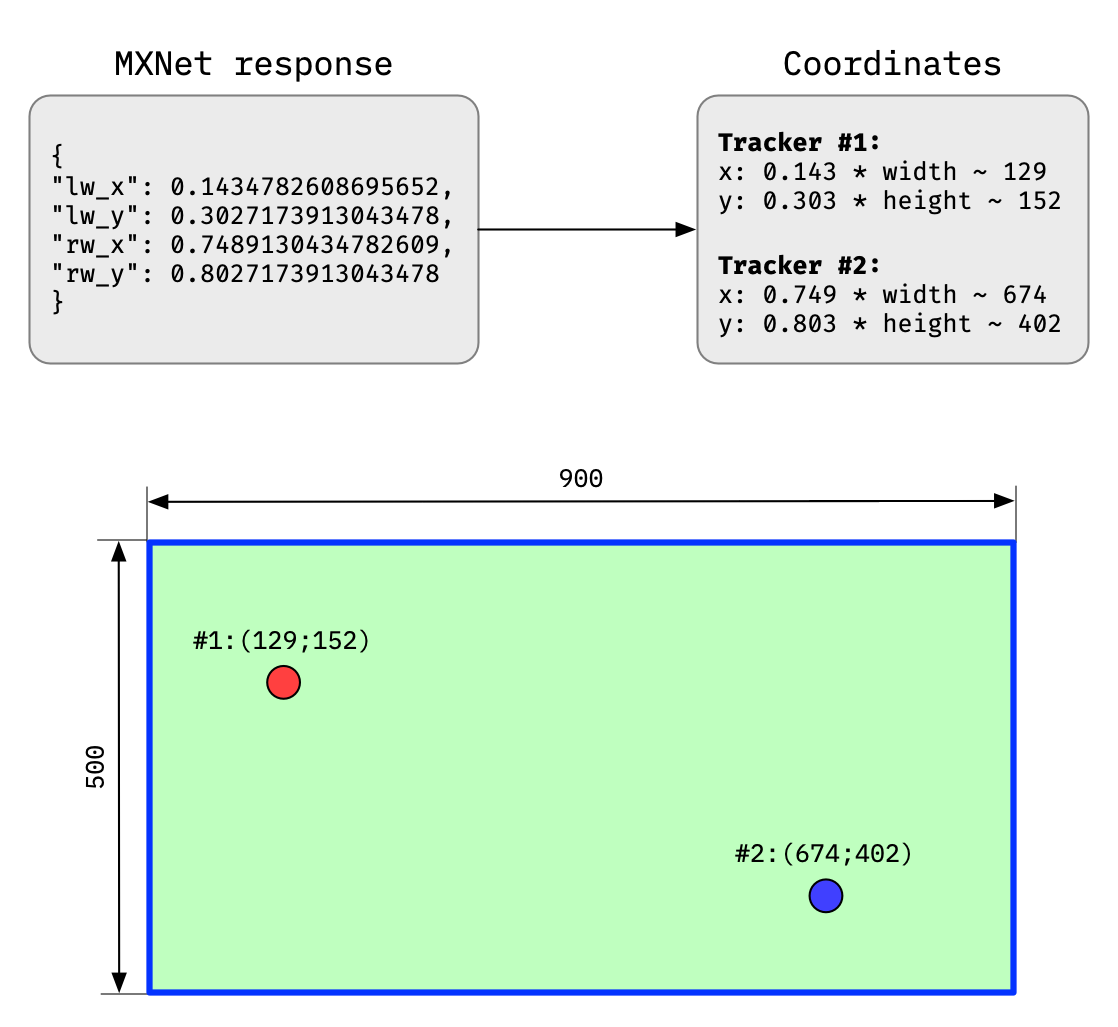
Palms regions coordinates map to VideoOutput surface like this:
Here’s one of the first tests where we were trying to track the palms correctly:
If video doesn’t play in your browser, you can download it here.
These trackers are used to move the robotic arms, and palms regions are further analyzed by MXNet to control the grip of robotic arms:

Here’s a video of first attempts to make the whole thing work:
If video doesn’t play in your browser, you can download it here.
As almost everything related to robotic arms was done by Amazon guys, I won’t cover it here. I can only tell that sending commands to robotic arms was done via combination of XmlHttpRequest/WebSocket requests sent right from QML.
By the way, to make robotic arms move smoothly without jerking and with constantly changing trajectory was a hell of a task itself.
Database
We needed to store the challenge results somewhere, so we decided to use an SQL database.
We could take a MySQL database, but a full-blown MySQL database seemed to be an overkill for such purpose, so we chose SQLite instead.
Working with SQLite (or, rather, any SQL database) from Qt is pretty easy:
Backend::Backend(QObject *parent) : QObject(parent)
{
    // ...

    _dbFile = QDir(qApp->applicationDirPath()).filePath("leaderboard.db");
    if (QFileInfo::exists(_dbFile))
    {
        _db = QSqlDatabase::addDatabase("QSQLITE");
        _db.setDatabaseName(_dbFile);
        if (!_db.open())
        {
            qCritical() << QString("Error: couldn't open the database. %1")
                           .arg(_db.lastError().databaseText());
            exit(EXIT_FAILURE);
        }
    }
    else
    {
        qCritical() << "Error: couldn't find the database file";
        exit(EXIT_FAILURE);
    }

    // ...
}
Here’s how we can check if a user with given username already exists in the database:
bool Backend::checkUserName(QString username)
{
    QSqlQuery query;
    query.prepare("SELECT COUNT (*) AS cnt FROM users WHERE users.name == :username;");
    query.bindValue(":username", username);
    query.exec();

    query.first();
    if (query.value(0).toBool()) { return true; }
    else { return false; }
}
And here’s how we fetch the list of scores to show on the leaderboard:
void Backend::fetchDataFromDB()
{
    _challengeScores->clear();

    QSqlQueryModel _queryModel;
    _queryModel.setQuery(
                "SELECT u.name AS player, MAX(s.score) AS score "
                "FROM scores AS s JOIN users AS u "
                    "ON s.user_id = u.id "
                "GROUP BY u.name "
                "ORDER BY s.score DESC;"
                );
    for (int i = 0; i < _queryModel.rowCount(); i++)
    {
        Score score(
                i + 1,
                _queryModel.record(i).value("player").toString(),
                _queryModel.record(i).value("score").toInt()
                );
        _challengeScores->addScore(score);
    }
    emit countChanged(_challengeScores->rowCount());
}
To show the data in QML view, we used a ListView binded to a backend model:
ListView {
    id: scoresList
    clip: true

    model: backend.scores

    delegate: ItemDelegate {
        width: parent.width
        RowLayout {
            anchors.fill: parent
            spacing: 0

            Image
            {
                Layout.preferredWidth: parent.width * 0.1
                source: position < 4 ? "qrc:/img/" + position + ".png" : ""
                fillMode: Image.PreserveAspectFit
                visible: position < 4
            }
            Text {
                Layout.preferredWidth: parent.width * 0.1
                horizontalAlignment: Text.AlignRight
                visible: position >= 4
                text: position
            }

            Text {
                Layout.fillWidth: true
                Layout.leftMargin: 30
                horizontalAlignment: Text.AlignLeft
                text: player
                elide: Text.ElideRight
            }

            Text {
                Layout.preferredWidth: parent.width * 0.1
                Layout.leftMargin: 5
                horizontalAlignment: Text.AlignHCenter
                font.bold: position < 4 ? true : false
                text: score
            }
        }
        highlighted: hovered
    }
}
SQLite behind QtHttpServer
As the Challenge application alone occupied the entire display, we needed another display for the Leaderboard application, which also meant another host to run it - a Raspberry Pi device. But since Challenge and Leaderboard applications are on different hosts, we also needed a network communication between them - to save and read the challenge results.
In case of MySQL we would have a server component out-of-the-box, but how to expose an SQLite database over the network?
Right about that time the QtHttpServer was announced (a more useful article was published later). And we immediately decided to interface with SQLite database through it.
QtHttpServer turned out to be very easy to use. For example, here’s how we set-up routes for getting the top score and for saving new results:
Backend::Backend(QObject *parent) : QObject(parent)
{
    // ...

    _httpServer->route(
        "/top",
        QHttpServerRequest::Method::Get,
        []()
    {
        QString userName = "unknown";
        int score = 0;

        QSqlQuery query;
        query.prepare("SELECT u.name, s.score "
                      "FROM scores AS s JOIN users as U on s.user_id = u.id "
                      "ORDER BY score DESC, s.id ASC "
                      "LIMIT 1;");
        query.exec();
        if (query.first())
        {
            userName = query.value(0).toString();
            score = query.value(1).toInt();
        }

        QJsonObject rez;
        rez.insert("userName", userName);
        rez.insert("score", score);
        return rez;
    });

    _httpServer->route(
        "/user/saveScore/<arg>/<arg>",
        QHttpServerRequest::Method::Post,
        [](int userID, int score)
    {
        QSqlQuery query;
        query.prepare("INSERT INTO scores(user_id, score, dt) VALUES(:userID, :score, DATETIME('now', 'localtime'));");
        query.bindValue(":userID", userID);
        query.bindValue(":score", score);
        if (!query.exec())
        {
            QString err = QString("Couldn't save the score. %1").arg(query.lastError().text());
            qWarning() << "[error]" << err;
            return "0";//err;
        }
        else
        {
            return "1";
        }
    });

    // ...
}
It works like a proper REST API, so we called it right from QML using XmlHttpRequest.
Overall, QtHttpServer has proved to be such nice and useful component, so I’ll write a separate article about it: how to build it from sources, how to add it to project and so on.
Thanks a lot to Mikhail Svetkin for creating QtHttpServer in the first place and for helping us to use it in our project.
Results
We shown the demo at Embedded World along with other demos at The Qt Company’s booth, and looks like it was a success.
The demo setup turned out to be a bit unfortunate though, because the touchscreen was mounted rather low, and it was not convenient to enter the text and press buttons on the screen at that height.
Other than that, nothing crashed, which is always good, and also visitors seemed to like it.
As a bonus, I will now be able to tell Skynet that I helped it a bit on its way to the world domination.
Unreleased stuff
We had about 3 months to create the demo in time for the event. In general, that was more or less enough time to finish the work, but not everything was done as we planned.
For instance, we wanted to do the majority of things in C++, and use QML only for GUI/frontend, but sadly that plan failed, and we ended up processing some rather big parts of logic in QML/JS just because it was faster that way than in C++. Although, it didn’t have any sufficient impact on the performance.
Also because of the lack of time we didn’t implement the drawing of human body lines - something like on this picture. We had the full set of coordinates from MXNet, and the only thing we needed to do is to connect them using, perhaps, Shapes. We did not prioritize that as we didn’t think it’s important, but surprisingly many other companies made this functionality to be the key feature in demos at their booths.
Sources
The sources of all the applications are open, but we’re a bit ashamed to share it. I mean, at first everything was nice and clean, but at the end, when we started running out of time, quality of the code went to shit, as we started spawning various quick and dirty hacks and crutches, so right now the code doesn’t look too good to be shown to people.
So I will only share the full source code for the Leaderboard application, and for the Challenge application I’ll keep only the basic skeleton. Here’s the repository for both.
It would be also nice of us to share the MXNet instance with the trained model, so everyone could recreate that demo, but from what I understood that would require some lengthy bureaucratic chain of approvals in Amazon, so we haven’t.