Home Assistant on Vero V with Docker
Eventually I got tired of constantly re-signing and re-uploading Kodi to my Apple TV (and being stuck with an old version). So I got a Vero V instead, and immediately it became clear that I should have done so from the beginning. Buying Apple TV was a mistake: like I said before, if not for running Kodi, Apple TV is a pretty useless device (especially now that I have a TV that supports AirPlay).
Around the same time I entered the domain of home automation. At first it was just Homely (a norwegian home security system), which comes with their own hub and a (not very large) set of supported devices/sensors. But soon enough I discovered that it’s all just a Zigbee network wrapped into a user-friendly package, so I could do more with my own hub and a much wider (and cheaper) collection of devices and sensors. Shortly after that realization I stumbled upon Home Assistant, as all roads lead to it, and, you guessed it right, I decided to host and run it on that same Vero V device.
Is something wrong with Homely
I said that I started with Homely before getting into Home Assistant, and that might have given you an impression that I switched from one to another. But no, I still use Homely, it just serves a different purpose, so it is not that I have replaced it with Home Assistant.
Homely isn’t a yet another automation hub with some devices. Its main purpose is to connect your home to their 24/7 monitoring system, and if something happens - smoke sensor detects fire, or alarm is triggered by door/window/motion sensors - monitoring will get notified, and they will call firefighters/police/whoever for you. As a bonus to that, you also get some basic home automation.
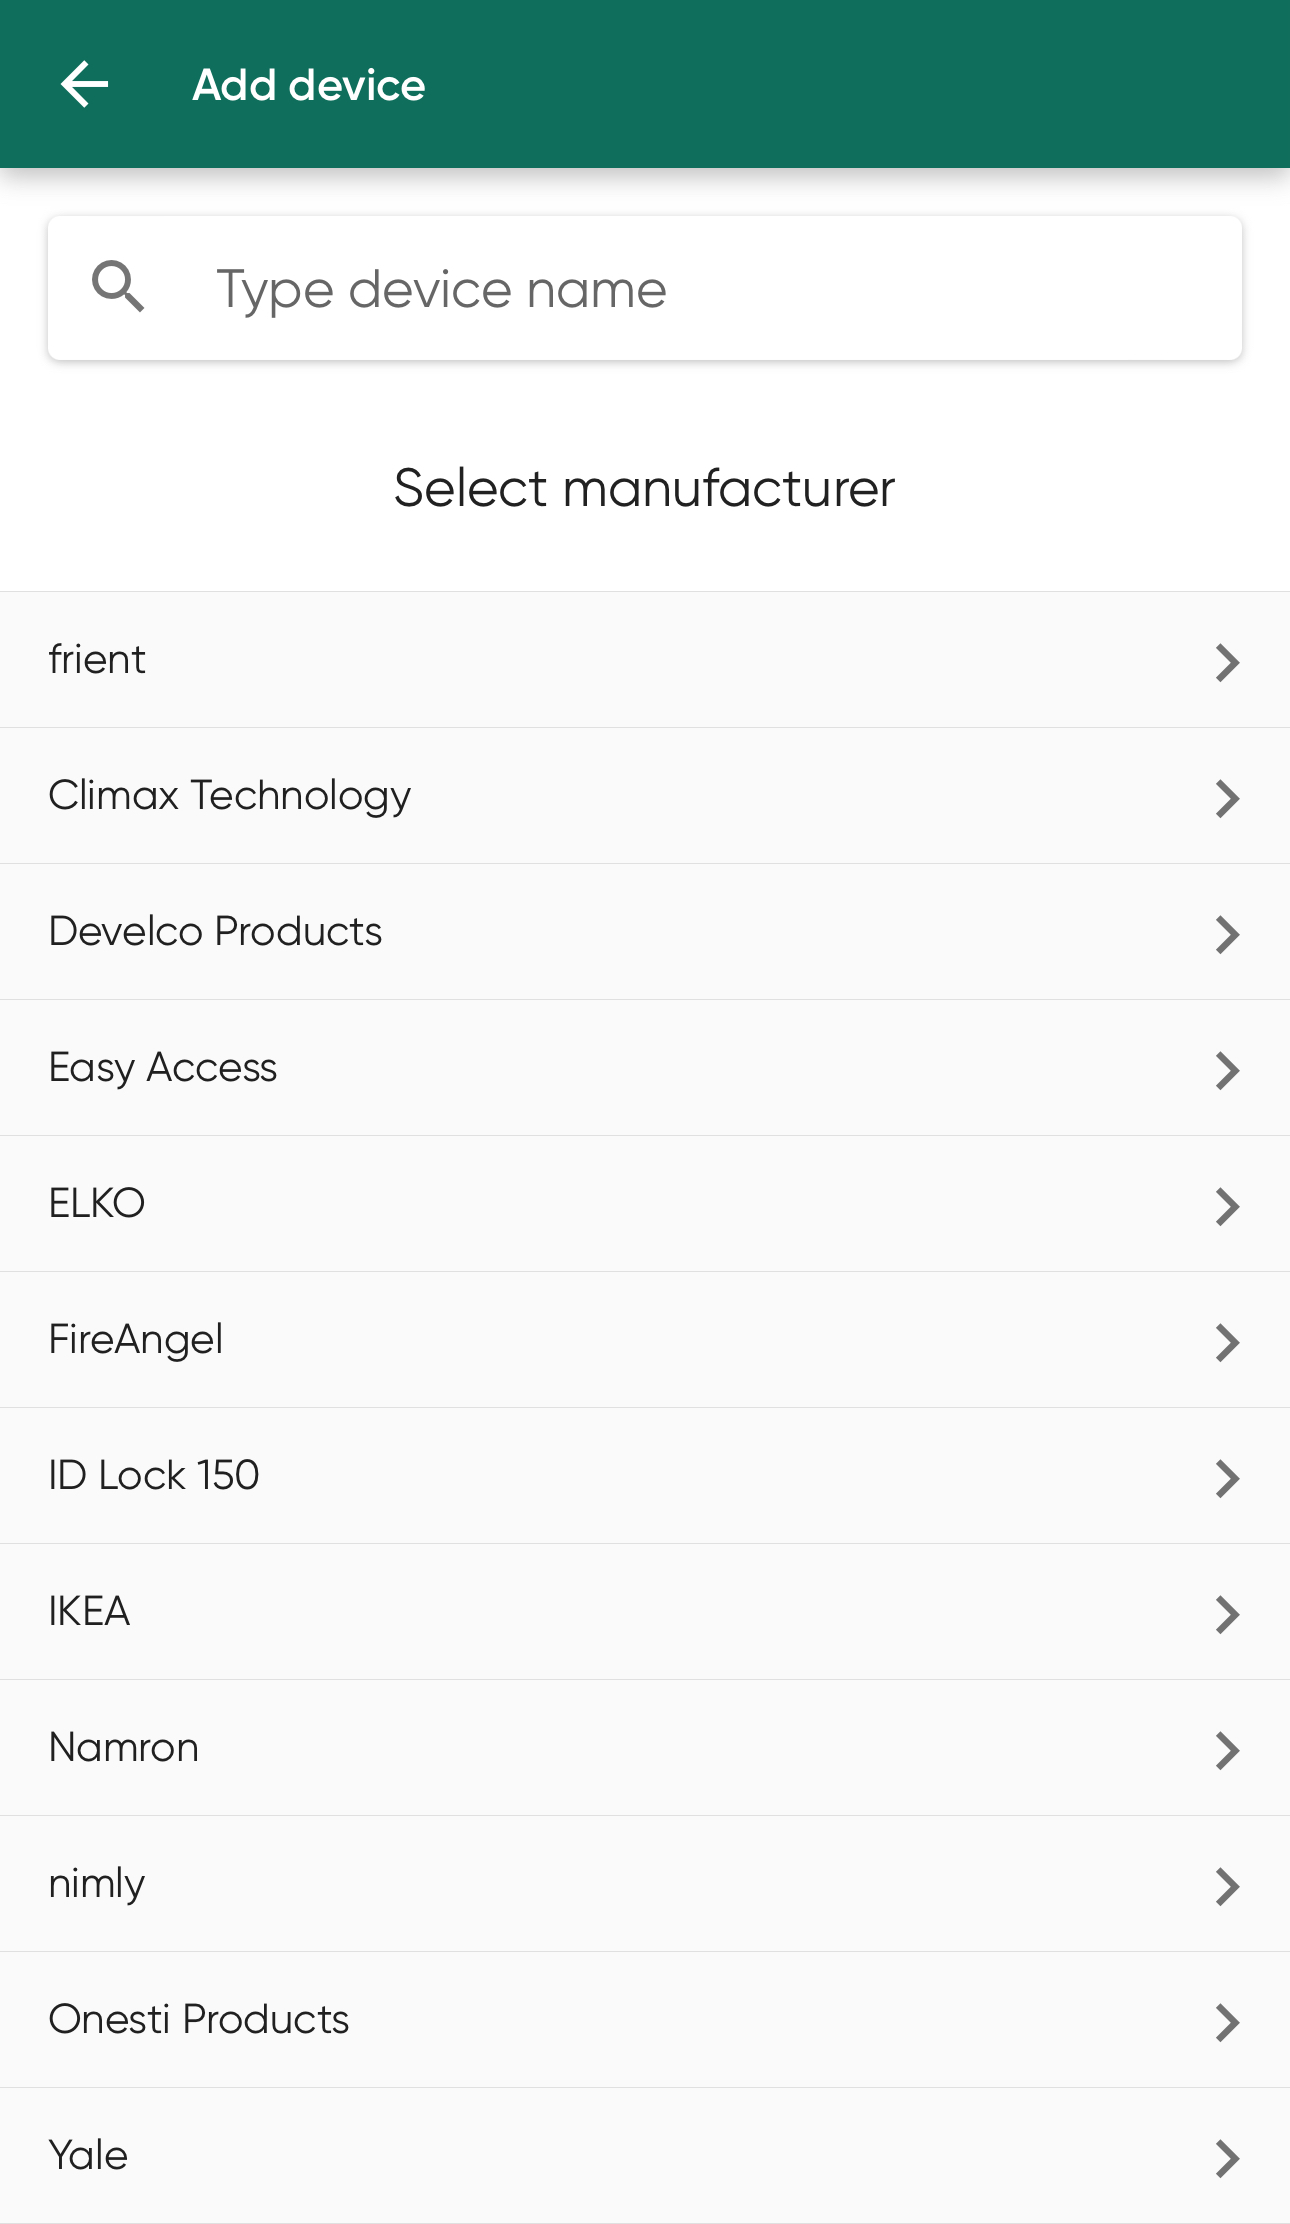
As you can imagine, such a system cannot depend on a random 1 USD sensor from uncle Lao, as it all needs to be certified/approved, which I guess is why their list of supported devices is not very long. Mostly it’s Frient/Develco/Onesti devices (they all seem to be the same thing, just re-branded), but there are also IKEA bulbs and other vendors there too, although some of them also seem to be just re-branded variants of the same things, so the “actual” list might be even shorter:
I cannot say how good (or bad) their 24/7 monitoring is, as I never had any accidents that would trigger an alarm (except for when I forgot about the alarm and opened the balcony door during the night time, while the alarm was armed, and they called me right away), and hopefully I will never know how good (or bad) their monitoring is. I can only say that out of all the security systems available in Norway, Homely’s monthly subscription fee is the lowest (in 2024 it was plain 199 NOK per month, without cheeky offers like a “free” smart lock installation), and they are recognized by insurance companies, so you can get a discount on your house insurance too. They do overprice the devices/sensors though, so you can most likely find several of those cheaper in other places.
The mobile application is okay, although looks like it’s not their own but a customized (re-styled) variant of Keyfree. The nimly application seems to be using the same. Or maybe there is some other common “parent” for all of them, but either way, they all definitely look the same.
Surprisingly, there is no web-version, so you are limited to controlling it from the mobile application only. And by the way, there is no proper iPad version, it just uses the same iPhone application, which isn’t optimized for non-iPhone screens.
Coming back to home automation, it’s actually not the small number of supported devices that made me look elsewhere, but the very limited set of automation rules/triggers. For example, you cannot create a rule to turn on the lights when movement sensor detects you entering the room, which seems to be a very common routine to have. That’s how I got to Home Assistant, where automation capabilities are practically limitless, and I left Homely to handle just the security/safety stuff.
Why not a dedicated device
Yes, I could’ve gotten a dedicated device to run Home Assistant - Raspberry Pi or maybe their own Green/Yellow boxes - and they are rather inexpensive, but that’s yet another box cluttering my shelves.
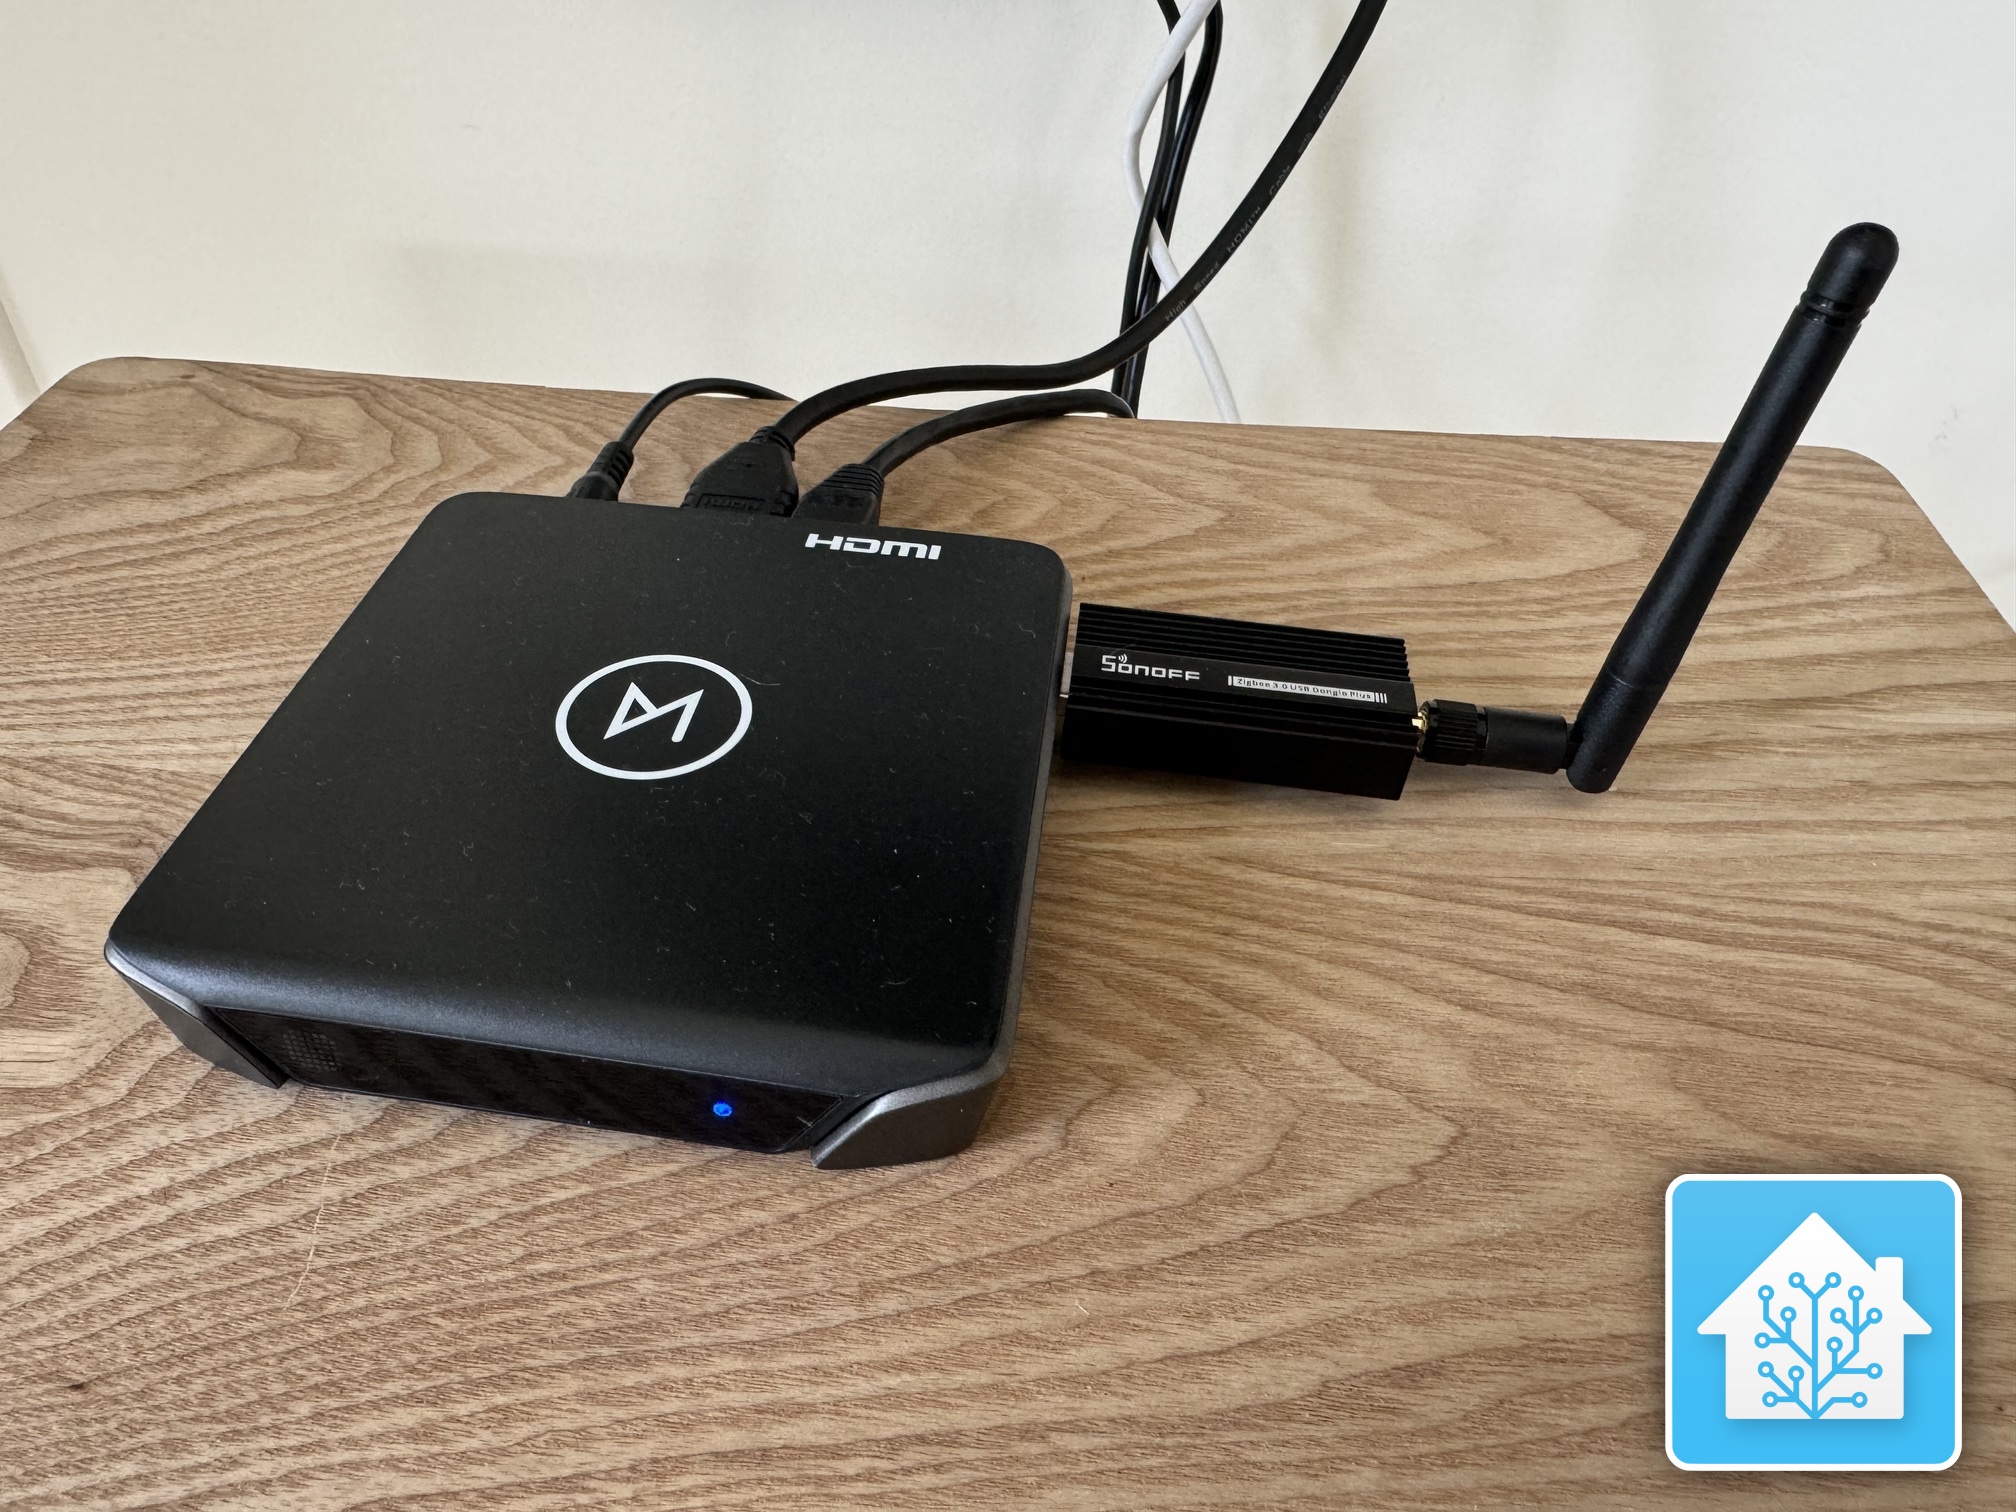
I already have Vero V, and it is quite a powerful device - 2 GHz ARM CPU (4 cores), 4 GB RAM, 32GB eMMC. Kodi is barely taking 10% of resources even while playing 4K movies, so there is a lot of room for doing something else, such as running Home Assistant, and it would be wasteful not to do so.
Environment and versions
Just in case, here’s my environment and versions of the software/firmware that I have:
- Vero V:
- Debian:
11.10 - OSMC:
2024.05-1
- Debian:
- Home Assistant:
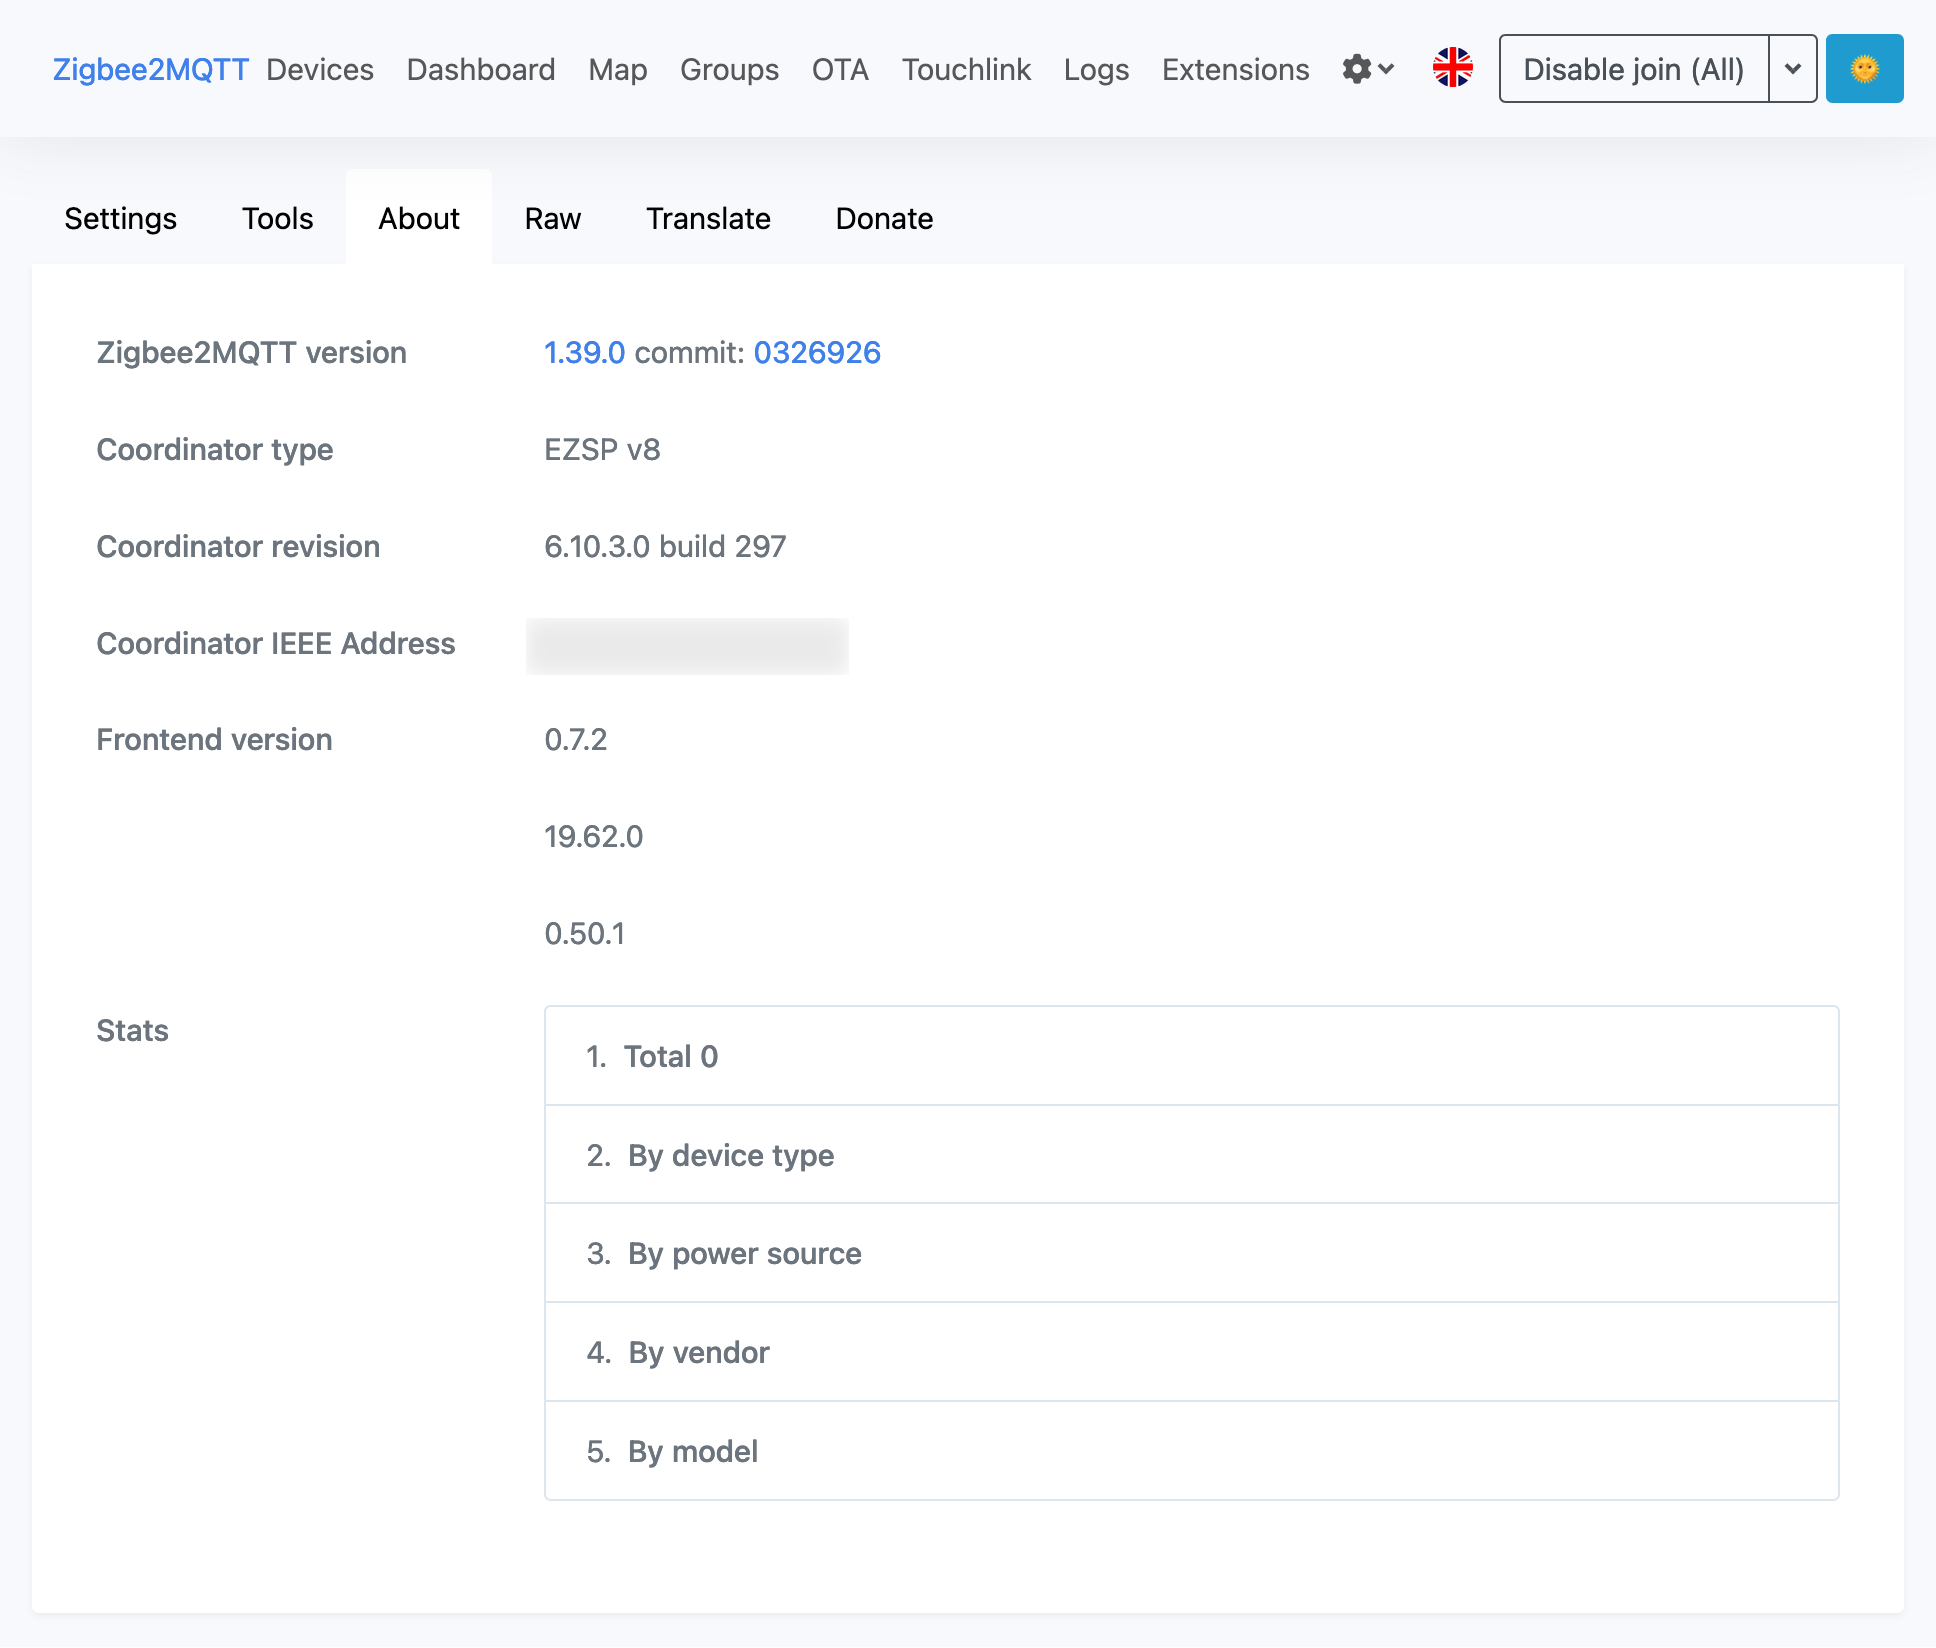
2024.7.3 - Zigbee adapter/coordinator:
SONOFF Zigbee 3.0 USB Dongle Plus-E- type:
EZSP v8 - revision:
6.10.3.0 build 297
- type:
- Zigbee2MQTT:
1.39.0, commit0326926
Installation
On the first connect, before anything else, change the default osmc password to a proper one with passwd, deploy an SSH key and disable passwords authentication.
Docker
Out of all the possible ways of installing Home Assistant I chose Docker. Mainly because I have never used Docker for anything (aside from doing some tutorials), so this seemed like a good opportunity to finally try it out for something actually useful. Secondly, from the little I knew about Docker, one of its distinguishing features is the ability to run stuff in an isolated environment, which was just the thing I needed, as I didn’t want to disrupt the default Vero/OSMC environment too much, especially given that some of the Home Assistant components are run with godawful things like Node.js.
One thing you should be aware of is that going with Docker way of installing Home Assistant you will lose certain features such as addons out of the box. That would be a major disadvantage or even a show-stopper, but actually it’s no worries, because those addons turned out to be… also Docker containers, which in other types of Home Assistant installation are just managed by the Home Assistant itself, so you absolutely can do the same on your own (and probably better too).
First you will need to install Docker, as it isn’t preinstalled in OSMC by default. Following the trend of running random Bash scripts from the internet, Docker installation is supposed to be carried out that way too:
$ mkdir ~/downloads && cd $_
$ curl -fsSL https://get.docker.com -o get-docker.sh
$ less ./get-docker.sh
I scrolled the script contents and didn’t see anything concerning enough, so I gave up and just ran it, but I certainly condemn this retarded practice. The “installation”:
$ sudo sh ./get-docker.sh --dry-run
$ sudo sh ./get-docker.sh

$ sudo systemctl enable docker.service
$ sudo systemctl enable containerd.service

$ sudo docker run hello-world
After the installation it is probably a good idea to limit Docker logs size right away. The following should limit logs to the maximum of 5 files, each being 10 MB of size:
$ sudo nano /etc/docker/daemon.json
{
    "log-driver": "json-file",
    "log-opts": {
        "max-size": "10m",
        "max-file": "5"
  }
}
$ dockerd --validate --config-file=/etc/docker/daemon.json
configuration OK
Also, you might want to run Docker from a non-root user, but for simplicity I decided to go with root, at least in the beginning, and I will probably make it non-root later.
Home Assistant
The installation or rather deployment procedure for anything Docker-based is to create a container from a specified image. If you don’t have the image available locally already, it will get fetched from Docker Hub. Which begs the question whether one can get images and host them somewhere locally and independently from Docker Hub, and fortunately that seems to be supported too.
The process of creating/running a Home Assistant container is the following:
$ sudo docker run -d \
    --name homeassistant \
    --restart=unless-stopped \
    -e TZ=Europe/Amsterdam \
    -v /root/homeassistant:/config \
    ghcr.io/home-assistant/home-assistant:stable
The -v argument here tells the container that host paths (what’s on the left from :) will be mapped to container paths (what’s on the right from :). Here Home Assistant settings (/config/ path inside container) will be stored in /root/homeassistant/ path in the host filesystem. So when container will be deleted/re-created (during an update, for example), the data (volume) will be preserved between container reincarnations. In addition to that, we can edit the configs in the host filesystem without logging-in to the container.
In their manual they also set --privileged and --network=host, but there is no need for that, as well as there is probably no need for -v /run/dbus:/run/dbus:ro (if you don’t intend to use Bluetooth). The Home Assistant team probably added those options to reduce the number of users complaining that “nothing works”, but in general these parameters certainly aren’t great for something that is supposed to be running isolated from the main/host environment.
IP address of the running container
In order to interact with Home Assistant, you will need to know the local IP address of its container. One of the ways to get it is to inspect the container:
$ sudo docker inspect -f '{{range.NetworkSettings.Networks}}{{.IPAddress}}{{end}}' homeassistant
172.17.0.2

$ ping 172.17.0.2
PING 172.17.0.2 (172.17.0.2): 56 data bytes
64 bytes from 172.17.0.2: seq=0 ttl=64 time=0.294 ms
64 bytes from 172.17.0.2: seq=1 ttl=64 time=0.263 ms
^C
You can also try to query it with cURL by sending a HEAD request to the default Home Assistant port 8123, and it should reply that HEAD method is not allowed (if you haven’t performed the initial configuration/onboarding already):
$ curl -I 172.17.0.2:8123
HTTP/1.1 405 Method Not Allowed
Content-Type: text/plain; charset=utf-8
Allow: GET
Referrer-Policy: no-referrer
X-Content-Type-Options: nosniff
Server:
X-Frame-Options: SAMEORIGIN
Content-Length: 23
Date: Mon, 22 Jul 2024 19:42:29 GMT
The GET request should return something like this:
$ curl -v 172.17.0.2:8123
*   Trying 172.17.0.2:8123...
* Connected to 172.17.0.2 (172.17.0.2) port 8123 (#0)
> GET / HTTP/1.1
> Host: 172.17.0.2:8123
> User-Agent: curl/7.74.0
> Accept: */*
>
* Mark bundle as not supporting multiuse
< HTTP/1.1 302 Found
< location: /onboarding.html
< Referrer-Policy: no-referrer
< X-Content-Type-Options: nosniff
< Server:
< X-Frame-Options: SAMEORIGIN
< Content-Length: 0
< Content-Type: application/octet-stream
< Date: Mon, 22 Jul 2024 19:42:45 GMT
<
* Connection #0 to host 172.17.0.2 left intact
So yes, this IP address is definitely from the running Home Assistant container.
However, on the next restart/reboot the container might get a different IP address, but we need it to persist. Better yet, it would be great if there was some “internal” DNS - to be able to address containers by their names instead of IP addresses, especially when it comes to other containers “talking” to each other within their network. Sadly, by default the name resolution is disabled, and you can test it right now by spawning a new container:
$ sudo docker run -it --rm alpine /bin/ash

/ # ip route get 1 | awk '{print $NF;exit}'
172.17.0.3

/ # apk --no-cache add curl

/ # curl -I http://172.17.0.2:8123 -v
*   Trying 172.17.0.2:8123...
* Connected to 172.17.0.2 (172.17.0.2) port 8123
> HEAD / HTTP/1.1
> Host: 172.17.0.2:8123
> User-Agent: curl/8.8.0

/ # curl -I http://homeassistant:8123 -v
* Could not resolve host: homeassistant
* Closing connection
curl: (6) Could not resolve host: homeassistant

/ # exit
As you can see, this new temporary (because of --rm) container got an IP address in the same network (172.17.0.3) and it could reach the homeassistant container by IP address, but could not reach it by hostname.
Fortunately, the name resolution can be enabled after all, it just isn’t enabled in the default network. Check what networks you already have:
$ sudo docker network list
NETWORK ID     NAME      DRIVER    SCOPE
f7dc4c461ccb   bridge    bridge    local
e6e7d7a437b4   host      host      local
ecc68fac9a4b   none      null      local
The one with bridge driver is the default network (172.17.x.x) where new containers are created, and that is where homeassistant container is running now too.
But if you create a new network with the same bridge driver:
$ sudo docker network create --driver bridge hub
5dfbe1989378e089d5548ae21e4b48b055108b570be7ac717a0d9ad034b79817

$ sudo docker network list
NETWORK ID     NAME      DRIVER    SCOPE
f7dc4c461ccb   bridge    bridge    local
e6e7d7a437b4   host      host      local
5dfbe1989378   hub       bridge    local
ecc68fac9a4b   none      null      local
then it will be a “user-created network”, and these have “automatic service discovery” - that very same DNS that we need. Now you can re-create your container in that new network (--network hub) or you can just move it from the default network (172.17.x.x) to this new one (172.18.x.x):
$ sudo docker network inspect bridge
[
    {
        "Name": "bridge",
        "Id": "f7dc4c461ccb9d518abcdec62207554d809bc973d874c21f55b1d92427223d0d",
        "Created": "2024-07-22T21:16:52.221175914+02:00",
        "Scope": "local",
        "Driver": "bridge",
        "EnableIPv6": false,
        "IPAM": {
            "Driver": "default",
            "Options": null,
            "Config": [
                {
                    "Subnet": "172.17.0.0/16",
                    "Gateway": "172.17.0.1"
                }
            ]
        },
        "Internal": false,
        "Attachable": false,
        "Ingress": false,
        "ConfigFrom": {
            "Network": ""
        },
        "ConfigOnly": false,
        "Containers": {
            "7e9bc60ef0f894eec68eaf784b06c0d4605ee5dc52d5733c9f0394de67a3943c": {
                "Name": "homeassistant",
                "EndpointID": "922f23693b311435906df168af5c669c606b9c41e8bca061d01f44056573922f",
                "MacAddress": "02:42:ac:11:00:02",
                "IPv4Address": "172.17.0.2/16",
                "IPv6Address": ""
            }
        },
        "Options": {
            "com.docker.network.bridge.default_bridge": "true",
            "com.docker.network.bridge.enable_icc": "true",
            "com.docker.network.bridge.enable_ip_masquerade": "true",
            "com.docker.network.bridge.host_binding_ipv4": "0.0.0.0",
            "com.docker.network.bridge.name": "docker0",
            "com.docker.network.driver.mtu": "1500"
        },
        "Labels": {}
    }
]

$ sudo docker network inspect hub
[
    {
        "Name": "hub",
        "Id": "5dfbe1989378e089d5548ae21e4b48b055108b570be7ac717a0d9ad034b79817",
        "Created": "2024-07-23T09:44:48.167021383+02:00",
        "Scope": "local",
        "Driver": "bridge",
        "EnableIPv6": false,
        "IPAM": {
            "Driver": "default",
            "Options": {},
            "Config": [
                {
                    "Subnet": "172.18.0.0/16",
                    "Gateway": "172.18.0.1"
                }
            ]
        },
        "Internal": false,
        "Attachable": false,
        "Ingress": false,
        "ConfigFrom": {
            "Network": ""
        },
        "ConfigOnly": false,
        "Containers": {},
        "Options": {},
        "Labels": {}
    }
]

$ sudo docker network disconnect bridge homeassistant
$ sudo docker network connect hub homeassistant

$ sudo docker network inspect bridge
[
    {
        "Name": "bridge",
        "...": "...",
        "Containers": {},
        "...": {}
    }
]

$ sudo docker network inspect hub
[
    {
        "Name": "hub",
        "...": "...",
        "Containers": {
            "7e9bc60ef0f894eec68eaf784b06c0d4605ee5dc52d5733c9f0394de67a3943c": {
                "Name": "homeassistant",
                "EndpointID": "db73973bfdc5d9b8e1807252da52cbfd6fda9c17899918377f28d9a21d54dfb2",
                "MacAddress": "02:42:ac:12:00:02",
                "IPv4Address": "172.18.0.2/16",
                "IPv6Address": ""
            }
        },
        "...": {}
    }
]
If you now create a new temporary container in the hub network, then you should be able to reach the homeassistant container from it by both IP and hostname:
$ sudo docker run -it --rm --network hub alpine /bin/ash

/ # ip route get 1 | awk '{print $NF;exit}'
172.18.0.3

/ # apk --no-cache add curl

/ # curl -I http://172.18.0.2:8123 -v
*   Trying 172.18.0.2:8123...
* Connected to 172.18.0.2 (172.18.0.2) port 8123
> HEAD / HTTP/1.1
> Host: 172.18.0.2:8123
> User-Agent: curl/8.8.0

/ # curl -I http://homeassistant:8123 -v
* Host homeassistant:8123 was resolved.
* IPv6: (none)
* IPv4: 172.18.0.2
*   Trying 172.18.0.2:8123...
* Connected to homeassistant (172.18.0.2) port 8123
> HEAD / HTTP/1.1
> Host: homeassistant:8123
> User-Agent: curl/8.8.0

/ # exit
While that works, it doesn’t mean that you will also be able to reach that container by hostname from your host environment too, because you won’t:
$ curl -I http://homeassistant:8123 -v
* Could not resolve host: homeassistant
* Closing connection 0
curl: (6) Could not resolve host: homeassistant
as containers name resolution can work only within their networks.
NGINX
Alright, Home Assistant is running and other containers can reach it. But you as a user are not able to reach it yet, because its port 8123 isn’t exposed from the host.
There are several ways of exposing a container port from the host, and I prefer the one with NGINX being a reverse proxy. So let’s install NGINX:
$ sudo apt install curl gnupg2 ca-certificates lsb-release debian-archive-keyring
$ curl https://nginx.org/keys/nginx_signing.key | gpg --dearmor | sudo tee /usr/share/keyrings/nginx-archive-keyring.gpg >/dev/null
$ gpg --dry-run --quiet --no-keyring --import --import-options import-show /usr/share/keyrings/nginx-archive-keyring.gpg

$ echo "deb [signed-by=/usr/share/keyrings/nginx-archive-keyring.gpg] http://nginx.org/packages/debian `lsb_release -cs` nginx" | sudo tee /etc/apt/sources.list.d/nginx.list
$ echo -e "Package: *\nPin: origin nginx.org\nPin: release o=nginx\nPin-Priority: 900\n" | sudo tee /etc/apt/preferences.d/99nginx

$ sudo apt update
$ sudo apt install nginx
$ sudo systemctl status nginx.service

$ sudo chown -R www-data:www-data /var/www
The site config for Home Assistant would be the following:
$ sudo nano /etc/nginx/sites-available/homeassistant
# this is supposed to be used for WebSocket connections,
# although it might require a separate `location` block
map $http_upgrade $connection_upgrade {
    default upgrade;
    '' close;
}

server {
    # doesn't have to be exactly `8123`, you can set it to the "usual" `80`
    listen 8123;

    location / {
        # `172.18.0.2` is the IP address of the Home Assistant container
        proxy_pass http://172.18.0.2:8123;
        proxy_http_version 1.1;
        proxy_set_header Upgrade $http_upgrade;
        proxy_set_header Connection $connection_upgrade;
        proxy_set_header Host $host;
        proxy_cache_bypass $http_upgrade;
    }
}
$ sudo ln -s /etc/nginx/sites-{available,enabled}/homeassistant
$ sudo systemctl restart nginx.service

$ ip route get 1 | sed -n 's/^.*src \([0-9.]*\) .*$/\1/p'
192.168.1.35
Now you should be able to open http://192.168.1.35:8123/ (or whichever IP address you have for your device/server) from a web-browser on your computer/tablet/phone (as long as they are in the same network). Obviously, this IP address needs to be statically assigned to the device/server (Vero V in my case) in your home network DHCP server (a router, usually).
What if container IP address will change
But what to do if container IP will change on the next restart/reboot? Since the container’s hostname isn’t resolving in the host environment (as we know, it resolves only within a user-defined Docker network), we’ll have to rely in the “bare” IP address. But we at least can make it “static”, so container doesn’t get a different address on the next restart/reboot:
$ sudo docker network disconnect hub homeassistant
$ sudo docker network connect --ip 172.18.0.100 hub homeassistant

$ sudo docker inspect -f '{{range.NetworkSettings.Networks}}{{.IPAddress}}{{end}}' homeassistant
172.18.0.100
Here it is assumed that you have already moved the container from the default bridge network to the new user-defined hub network.
Don’t forget to edit NGINX config and change the IP address from 172.18.0.2 to 172.18.0.100.
User-configured subnet
Some time later on a different host I suddenly got this error trying to run a container with specified --ip:
docker: Error response from daemon: invalid config for network hub: invalid endpoint settings:
user specified IP address is supported only when connecting to networks with user configured subnets
Not sure what this is about, maybe something changed in later Docker versions, but apparently now one needs to explicitly specify a subnet for the network, so I had to recreate my network:
$ sudo docker network rm hub
$ sudo docker network create --driver bridge --subnet=172.18.0.0/16 hub

$ sudo docker network inspect hub
[
    {
        "Name": "hub",
        "...": "...",
        "IPAM": {
            "Driver": "default",
            "Options": {},
            "Config": [
                {
                    "Subnet": "172.18.0.0/16"
                }
            ]
        },
        "...": "..."
    }
]
Yeah, the subnet is exactly the same as before, but this time it was “user-configured”, which apparently matters. Also there is no Gateway anymore, but I don’t know if this is important, as it hasn’t caused me any issues (yet?). If anything, the gateway can be specified with --gateway=172.18.0.1.
HTTPS
I don’t plan to expose my Home Assistant instance to the internet, at least not without a VPN, so I intend to use it from the local home network only, but even there it is still worth to encrypt the traffic, so credentials aren’t sent in plain text.
A self-signed certificate should be enough for this purpose:
$ sudo mkdir /opt/certificates
$ mkdir /tmp/crts && cd $_

$ openssl req -x509 -newkey rsa:2048 -nodes -sha256 \
    -subj '/CN=Home Assistant' -extensions EXT -config <( \
    printf "[dn]\nCN=Home Assistant\n[req]\ndistinguished_name=dn\n[EXT]\nsubjectAltName=IP:192.168.1.35,DNS:vero.local\nkeyUsage=digitalSignature\nextendedKeyUsage=serverAuth") \
    -days 1111 \
    -out fullchain.pem -keyout key.pem

$ ls -l
-rw-r--r-- 1 osmc osmc 1115 Jul 30 11:11 fullchain.pem
-rw------- 1 osmc osmc 1704 Jul 30 11:11 key.pem

$ sudo mv ./*.pem /opt/certificates/
$ sudo chown -R www-data:www-data /opt/certificates
Again, the 192.168.1.35 is the (static) IP address of your hub/device, which in my case is Vero V. The subjectAltName=IP:192.168.1.35,DNS:homeassistant.local might be just the IP, if you don’t have a DNS record for it in your home network. I actually don’t have it, and as a matter of fact, you can probably just drop the entire line altogether, so the command becomes:
$ openssl req -x509 -newkey rsa:2048 -nodes -sha256 \
    -subj '/CN=Home Assistant' -extensions EXT -config <( \
    printf "[dn]\nCN=Home Assistant\n[req]\ndistinguished_name=dn\n[EXT]\nkeyUsage=digitalSignature\nextendedKeyUsage=serverAuth") \
    -days 1111 \
    -out fullchain.pem -keyout key.pem
Then to enable HTTPS in NGINX site config:
$ sudo nano /etc/nginx/sites-available/homeassistant
server {
    listen 8123 ssl;

    ssl_certificate /opt/certificates/fullchain.pem;
    ssl_certificate_key /opt/certificates/key.pem;

    # ...
}
$ sudo systemctl restart nginx.service
Check the certificate expiration date from some other machine:
$ echo | openssl s_client -connect 192.168.1.35:8123 2>&1 | openssl x509 -noout -dates
notBefore=Jul 30 09:40:32 2024 GMT
notAfter=Aug 15 09:40:32 2027 GMT
Open https://YOUR-VERO-IP:8123/ (note that it’s https:// now, as http:// won’t work anymore). Since it’s a self-signed certificate, web-browsers will give you warnings, and mobile applications will do so too:
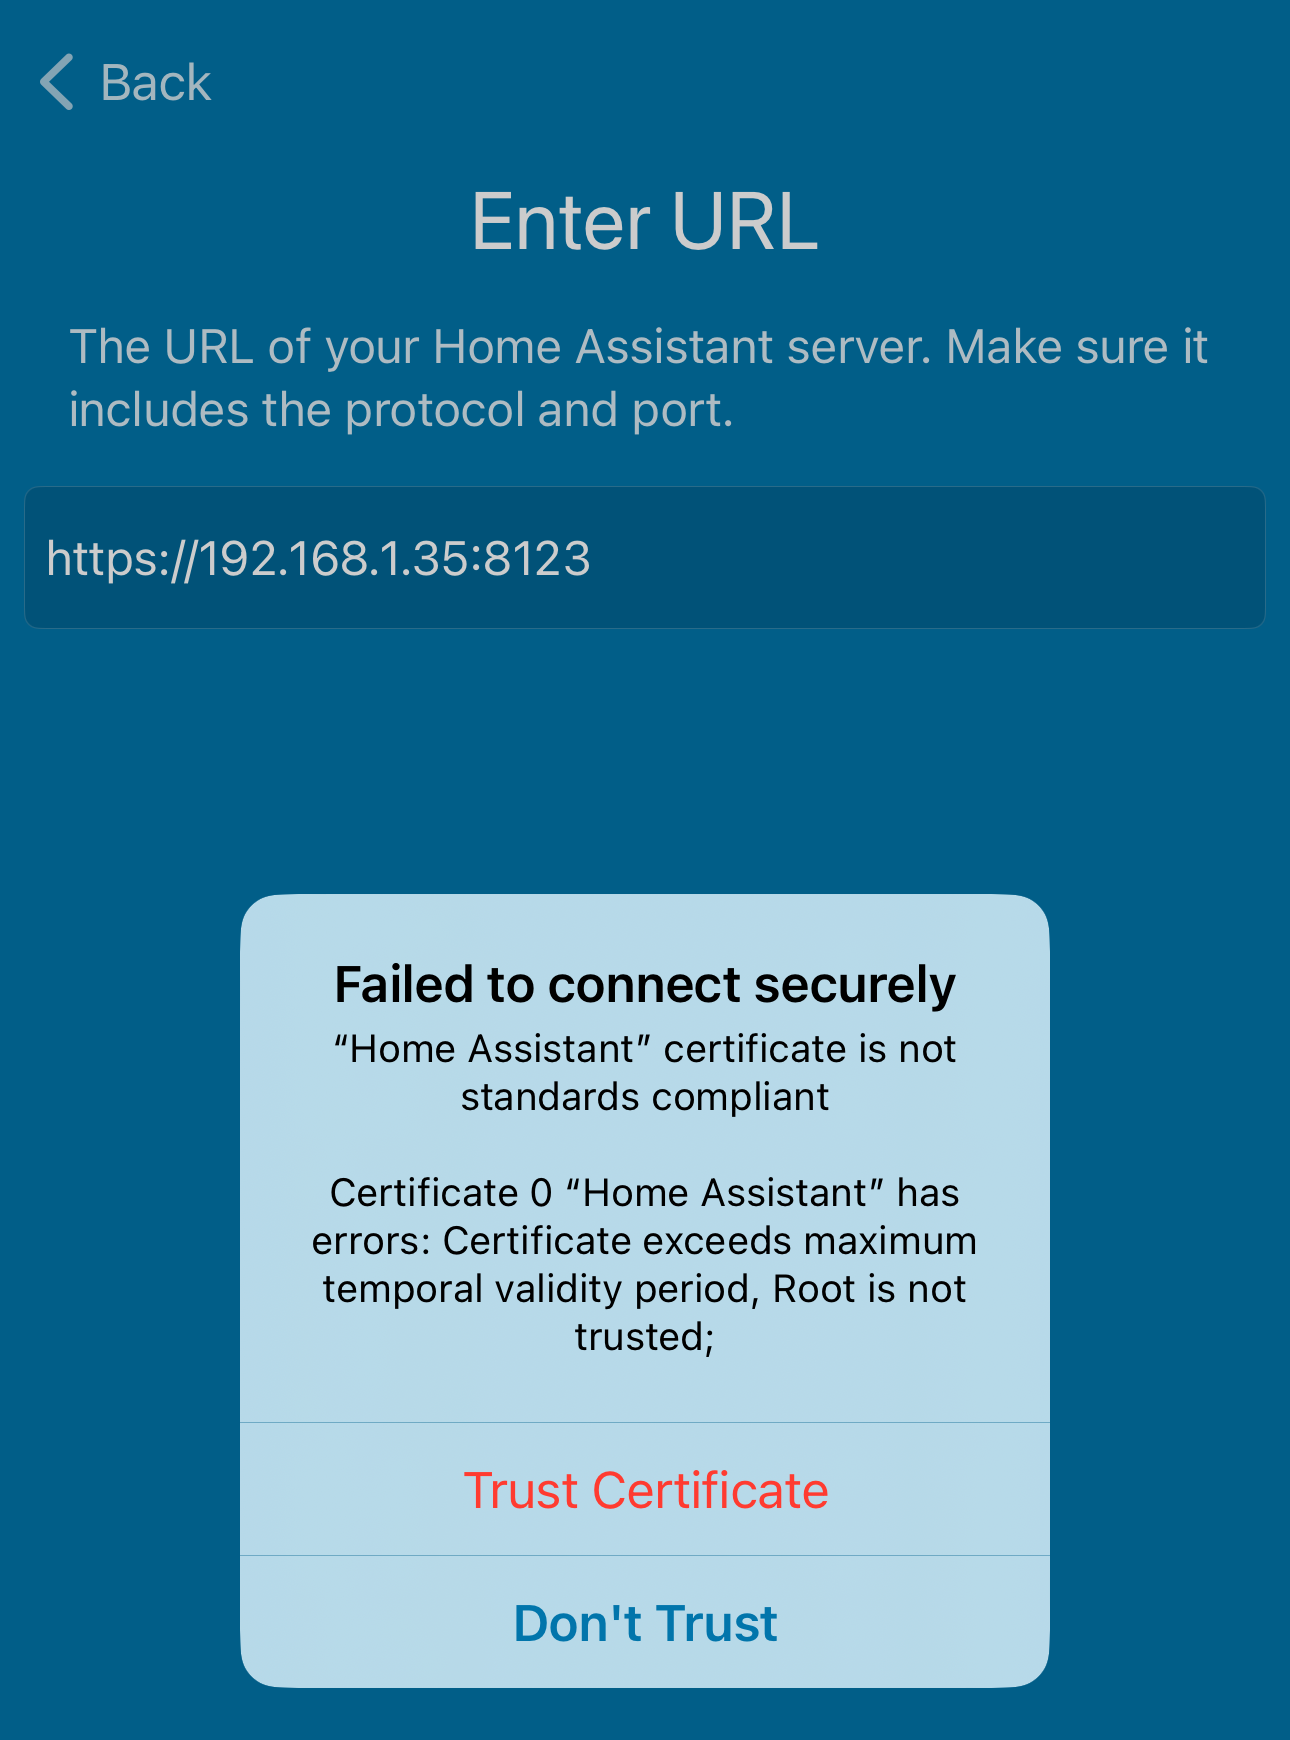
Here it also says that the validity period is too long. But who cares, it is you who issued the certificate, and you certainly trust yourself, don’t you. For the purpose of encrypting your local network connections that should be totally fine. One can even say that this whole ordeal with HTTPS in a local home network might be redundant.
If/when at some point later you will re-issue the certificate, for example to renew it, then Home Assistant UI might fail load in browser:
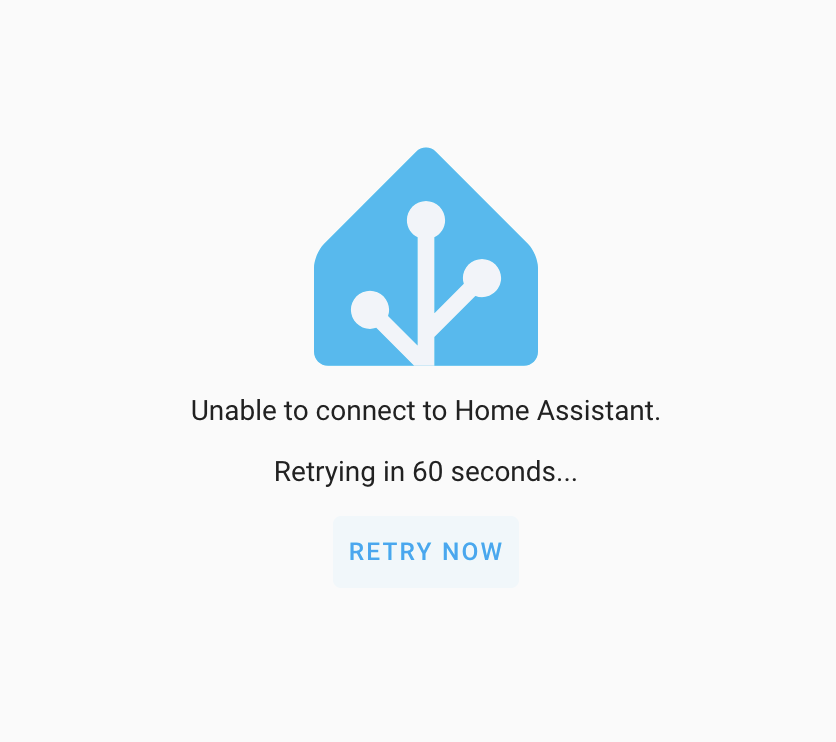
printing this useless error message to the console:
Firefox can't establish a connection to the server at wss://192.168.1.35:8123/api/websocket. core.7weG3TqZ_G4.js:1:65105
Uncaught (in promise) 1
Mobile applications will fail to connect to, but you’ll get a more informative error message there:

which simply means that you need to refresh the page with clearing cache, so clients would get the new certificate.
Zigbee
To communicate with Zigbee devices you need to have a Zigbee radio adapter/module with a coordinator firmware. Many adapters are supposed to be connected via USB, so they are plugged into the hub/server where Home Assistant is running, and preferably not into USB 3.0 port (fortunately, Vero V has both USB 3.0 and USB 2.0 ports) because of the interference. Some adapters (here’s one example) connect via RJ45 port, which might be a better option.
There are several such adaptors/modules available, and I chose SONOFF Zigbee 3.0 USB Dongle Plus-E. I didn’t know how to compare them, I just took the one that is mentioned the most.
You will also need an appropriate software, which will use this adaptor to communicate with your Zigbee devices and organize the network. The most popular options seem to be these two:
- Zigbee Home Automation (ZHA) - probably the easiest one to configure and use. It is also an officially supported one;
- Zigbee2MQTT - an “unofficial” integration, which is not that easy to set-up, especially when Home Assistant is installed in a Docker container, because you’ll need to run some more Docker containers with various required components and make them all talk to each other. On the bright side though, it has a wider range of supported devices/sensors.
ZHA looks like the way to go, but where is the fun in that, if it just works out of the box, so of course I went the Zigbee2MQTT way.
Eclipse Mosquitto
Zigbee coordinator manages Zigbee traffic from/to devices, but it also needs to be able to talk to Home Assistant and the other way around. For that type of communication it uses MQTT protocol, so we will need an MQTT broker.
One such broker is Eclipse Mosquitto. It can be installed as a Docker container too, and the image is here. Setting up a container:
$ sudo docker run -d \
    --name mosquitto \
    --restart=unless-stopped \
    -v /root/mosquitto/config:/mosquitto/config \
    -v /root/mosquitto/data:/mosquitto/data \
    -v /root/mosquitto/log:/mosquitto/log \
    eclipse-mosquitto
Again, the -v arguments here tell the container which host paths will be mapped to which container paths, so when Mosquitto binary inside container will need to read its “local” /mosquitto/config/mosquitto.conf file, it will actually read the /root/mosquitto/config/mosquitto.conf file in the host filesystem.
Speaking about the config, it needs to be created:
$ sudo nano /root/mosquitto/config/mosquitto.conf
persistence true
persistence_location /mosquitto/data
log_dest file /mosquitto/log/mosquitto.log
Now start the container (not sure why it hasn’t started on docker run, but probably because of the missing config):
$ sudo docker ps
CONTAINER ID   IMAGE                                          COMMAND   CREATED        STATUS       PORTS     NAMES
7e9bc60ef0f8   ghcr.io/home-assistant/home-assistant:stable   "/init"   19 hours ago   Up 4 hours             homeassistant

$ sudo docker start mosquitto
mosquitto

$ sudo docker ps
CONTAINER ID   IMAGE                                          COMMAND                  CREATED         STATUS         PORTS      NAMES
5c0503542640   eclipse-mosquitto                              "/docker-entrypoint.…"   4 minutes ago   Up 5 seconds   1883/tcp   mosquitto
7e9bc60ef0f8   ghcr.io/home-assistant/home-assistant:stable   "/init"                  19 hours ago    Up 4 hours                homeassistant
osmc@vero:~$ mc
Move it to the same network where homeassistant container is:
$ sudo docker inspect -f '{{range.NetworkSettings.Networks}}{{.IPAddress}}{{end}}' mosquitto
172.17.0.2

$ sudo docker network inspect hub
[
    {
        "Name": "hub",
        "...": "...",
        "Containers": {
            "7e9bc60ef0f894eec68eaf784b06c0d4605ee5dc52d5733c9f0394de67a3943c": {
                "Name": "homeassistant",
                "EndpointID": "5a8ddd308055e189ec9a4a37705b150b00aea88e042c2e4d085ec585c35779c8",
                "MacAddress": "02:42:ac:12:00:64",
                "IPv4Address": "172.18.0.100/16",
                "IPv6Address": ""
            }
        },
        "...": {}
    }
]

$ sudo docker network disconnect bridge mosquitto
$ sudo docker network connect hub mosquitto

$ sudo docker network inspect hub
[
    {
        "Name": "hub",
        "...": "...",
        "Containers": {
            "5c0503542640bfc3f8413deb6e1b5c785476783ddbaa385aad4993be28315484": {
                "Name": "mosquitto",
                "EndpointID": "267141eaccc22d8c3f5e97f38069ca83187f8747b9022079eb03eb7140178df4",
                "MacAddress": "02:42:ac:12:00:02",
                "IPv4Address": "172.18.0.2/16",
                "IPv6Address": ""
            },
            "7e9bc60ef0f894eec68eaf784b06c0d4605ee5dc52d5733c9f0394de67a3943c": {
                "Name": "homeassistant",
                "EndpointID": "5a8ddd308055e189ec9a4a37705b150b00aea88e042c2e4d085ec585c35779c8",
                "MacAddress": "02:42:ac:12:00:64",
                "IPv4Address": "172.18.0.100/16",
                "IPv6Address": ""
            }
        },
        "...": {}
    }
]

$ sudo docker inspect -f '{{range.NetworkSettings.Networks}}{{.IPAddress}}{{end}}' mosquitto
172.18.0.2
…Or you could’ve just provided --network hub to docker run on setting up the container.
There is no need to assign a static IP address to it, because homeassistant container will be addressing it by hostname. And actually, let’s check that it is in fact reachable that way:
$ sudo docker exec -it homeassistant bash

7e9bc60ef0f8:/config# ping -c 2 172.18.0.2
PING 172.18.0.2 (172.18.0.2): 56 data bytes
64 bytes from 172.18.0.2: seq=0 ttl=64 time=0.349 ms
64 bytes from 172.18.0.2: seq=1 ttl=64 time=0.327 ms

7e9bc60ef0f8:/config# ping -c 2 mosquitto
PING mosquitto (172.18.0.2): 56 data bytes
64 bytes from 172.18.0.2: seq=0 ttl=64 time=0.293 ms
64 bytes from 172.18.0.2: seq=1 ttl=64 time=0.297 ms

7e9bc60ef0f8:/config# nc mosquitto 1883 < /dev/null
7e9bc60ef0f8:/config# echo $?
1

7e9bc60ef0f8:/config# exit
So it is reachable, however the port 1883 (default MQTT port) isn’t open (as netcat returns non-zero exit code). At first I didn’t understand, why is that, because that port is listed here:
$ sudo docker container ls --format "table {{.ID}}\t{{.Names}}\t{{.Ports}}" -a
CONTAINER ID   NAMES           PORTS
8941202da971   mosquitto       1883/tcp
7e9bc60ef0f8   homeassistant
At the same time, checking for 8123 port on homeassistant from mosquitto container succeeds, even though this port is not listed in the table above:
$ sudo docker exec -it mosquitto sh

/ # nc homeassistant 8123 < /dev/null
/ # echo $?
0

/ # exit
I’m guessing that the ports listed in the table above are just what is specified in the Docker image, which doesn’t necessarily mean that they will be actually open.
Anyway, by default Mosquitto doesn’t seem to be listening on any ports, so you need to explicitly set them in the config:
$ sudo nano /root/mosquitto/config/mosquitto.conf
persistence true
persistence_location /mosquitto/data
log_dest file /mosquitto/log/mosquitto.log

listener 1883 0.0.0.0

listener 9001 0.0.0.0
protocol websockets
and restart the Mosquitto container:
$ sudo docker restart mosquitto
Check the ports again:
$ sudo docker exec -it homeassistant sh

/config # nc mosquitto 1883 < /dev/null
/config # echo $?
0
/config # nc mosquitto 9001 < /dev/null
/config # echo $?
0

/config # exit
Now netcat returns zero for both 1883 and 9001, so the ports are open.
If you had a question about why the listener is set to 0.0.0.0 in the config, as you probably thought that this will make the ports exposed from the host, then worry not, you just got confused like I did, and 0.0.0.0 here is this particular container within the hub network, so it is not the ports of the actual host. You can check for yourself what will happen if you set the listener to 127.0.0.1:
$ sudo nano /root/mosquitto/config/mosquitto.conf
# ...

listener 9001 127.0.0.1
protocol websockets
$ sudo docker restart mosquitto

$ sudo docker exec -it homeassistant sh

/config # nc mosquitto 9001 < /dev/null
/config # echo $?
1

/config # exit
As you can see, binding listener to 127.0.0.1 made that port 9001 to be open only on localhost of the container itself, so now that port is not available for other containers and it isn’t available for the host either (let alone being exposed from the host). And when listener is bound to 0.0.0.0, then this port becomes available for other containers (in that Docker network) and for the host too, but it still isn’t exposed from the host (which you can verify by running ss -lntup). Perfectly splendid, isn’t it. By the way, don’t forget to revert that listener back to 0.0.0.0.
Finally, Mosquitto instance should have authentication:
$ sudo docker exec -it mosquitto sh

/ # mosquitto_passwd -c /mosquitto/config/pswds SOME-USERNAME
Password:
Reenter password:

/ # exit

$ sudo nano /root/mosquitto/config/mosquitto.conf
# ...

listener 9001 0.0.0.0
protocol websockets

allow_anonymous false
password_file /mosquitto/config/pswds
$ sudo docker restart mosquitto
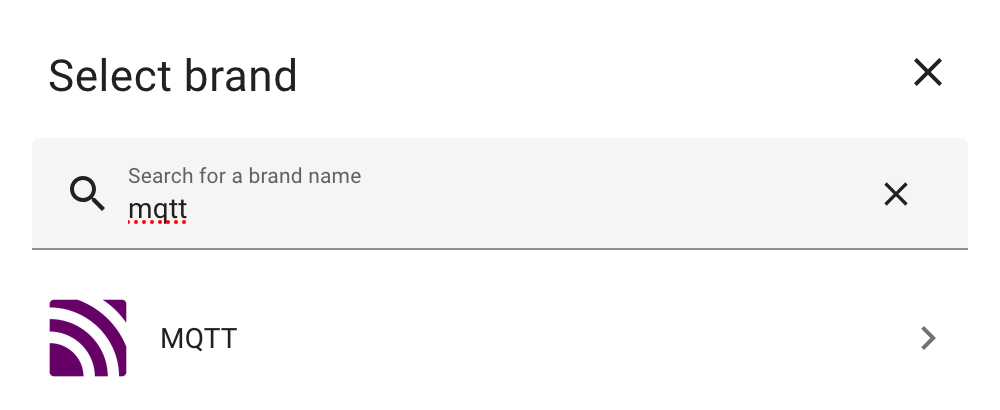
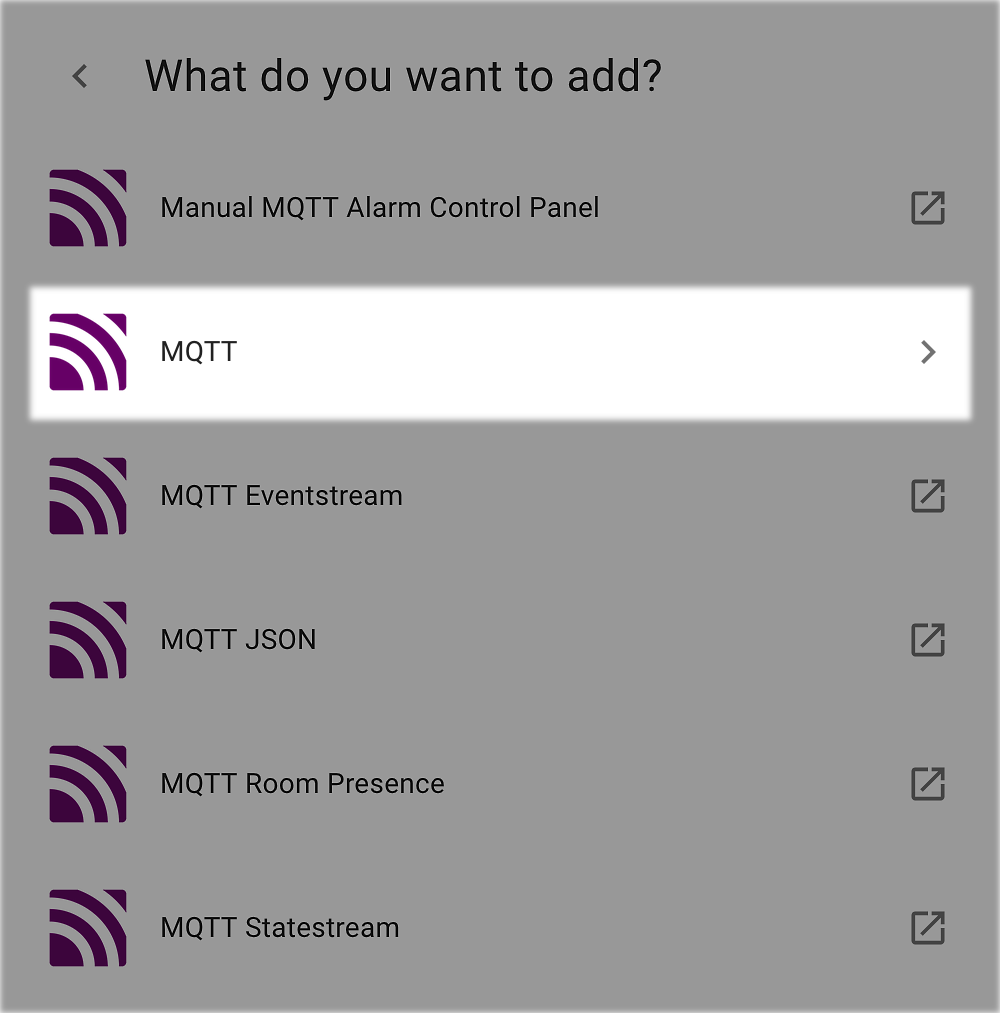
Now it is ready to be added to Home Assistant. Open Settings → Devices & Services → Integrations and click on Add Integration. Search for mqtt:
select MQTT:
and configure it:
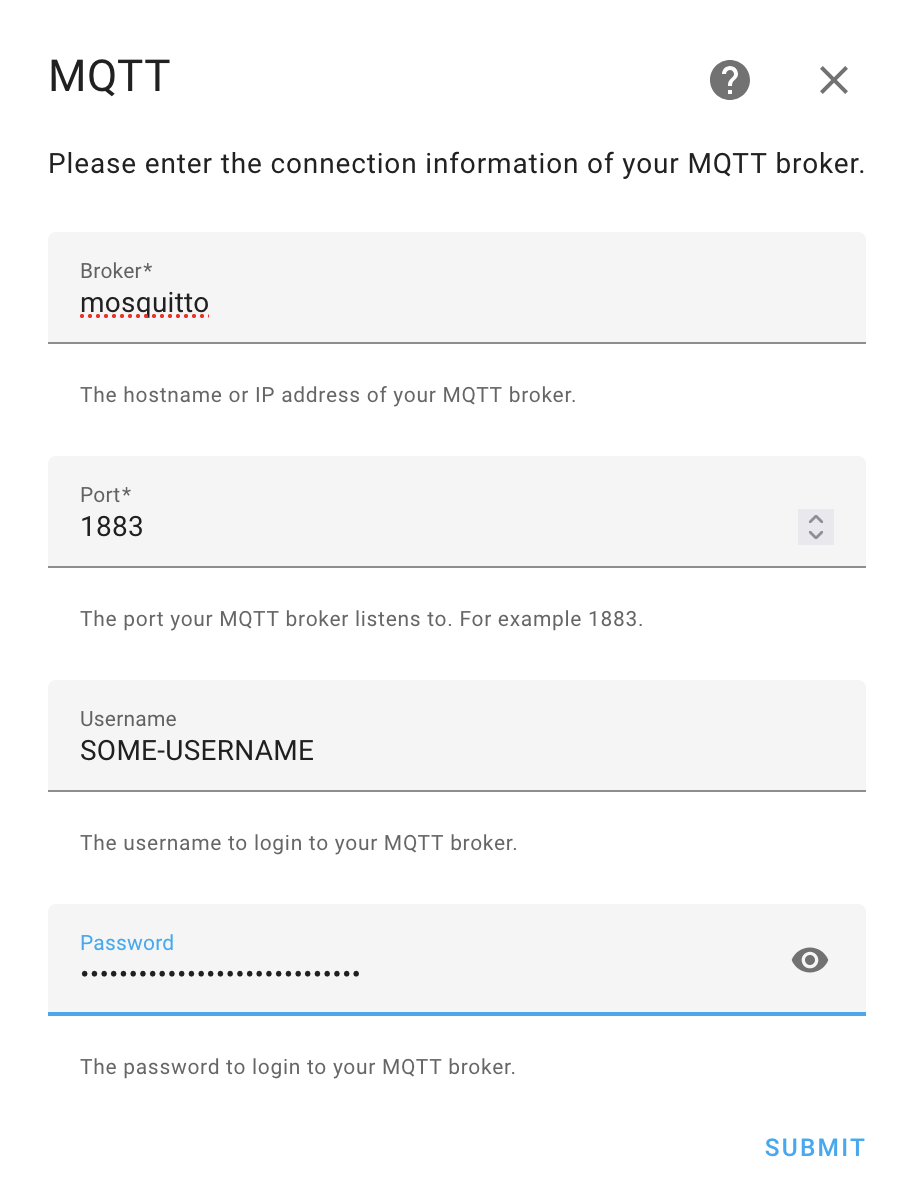
As you can see, since containers are reachable by their hostnames in our network, instead of specifying the mosquitto’s container IP address we can just use its hostname.
On successful configuration the Mosquitto logs (/root/mosquitto/log/mosquitto.log) should get something like:
1721766257: New connection from 172.18.0.100:33859 on port 1883.
1721766257: New client connected from 172.18.0.100:33859 as SOME-ID-HERE (p2, c1, k60, u'SOME-USERNAME').
1721766347: Saving in-memory database to /mosquitto/data/mosquitto.db
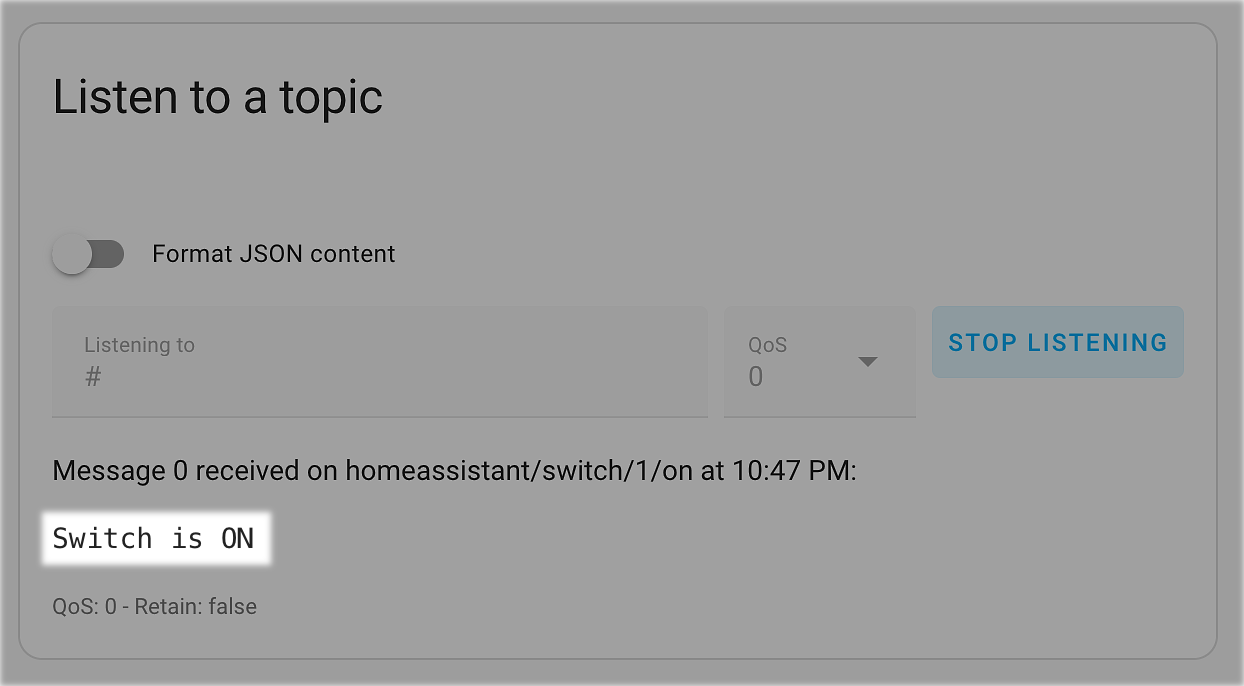
To test that it actually works, go to MQTT settings in your Home Assistant and subscribe to everything by setting a special # topic. Then open mosquitto container shell and publish a message with mosquitto_pub:
$ sudo docker exec -it mosquitto sh

/ # mosquitto_pub -h 127.0.0.1 -t homeassistant/switch/1/on -m "Switch is ON"
Connection error: Connection Refused: not authorised.
Error: The connection was refused.

/ # mosquitto_pub -h 127.0.0.1 -t homeassistant/switch/1/on -m "Switch is ON" -u SOME-USERNAME -P SOME-PASSWORD

/ # exit
You should then see that message in the Home Assistant interface:
Zigbee2MQTT
Now when MQTT broker is running, it’s time to launch Zigbee2MQTT. Create a config:
$ sudo mkdir -p /root/zigbee2mqtt/{data,logs}
$ sudo nano /root/zigbee2mqtt/data/configuration.yaml
# Home Assistant integration (MQTT discovery)
homeassistant: true

# https://zigbee2mqtt.io/guide/configuration/frontend.html
frontend:
  port: 8080
  # the frontend webpage opens without authentication, but it will be "empty" until you enter
  # this authentication token in the browser prompt
  auth_token: YOUR-AUTH-TOKEN

# allow new devices to join (don't forget to set to `false` after you add all your devices)
permit_join: true

mqtt:
  # MQTT base topic for zigbee2mqtt MQTT messages
  base_topic: zigbee2mqtt
  # MQTT server URL (can use the hostname here too)
  server: 'mqtt://mosquitto'
  # MQTT server authentication
  user: SOME-USERNAME
  password: SOME-PASSWORD

serial:
  # where Zigbee adapter is connected to
  port: /dev/ttyACM0

advanced:
  # that way it will generate a random key on the first launch and will put it here
  network_key: GENERATE

  # debug / info / warning / error
  log_level: info
  # log levels for certain namespaces to reduce the traffic
  log_namespaced_levels:
    z2m:mqtt: warning
  log_directory: /app/logs
  log_file: zigbee2mqtt.log
  # rotate log every 10 MB around 3 files
  log_rotation: true
  log_output:
    - console
    - file
Configure and run a Docker container:
$ sudo docker run -d \
    --name zigbee2mqtt \
    --network hub \
    --restart=unless-stopped \
    --device=/dev/serial/by-id/YOUR-ZIGBEE-ADAPTER:/dev/ttyACM0 \
    -v /root/zigbee2mqtt/data:/app/data \
    -v /root/zigbee2mqtt/logs:/app/logs \
    -e TZ=Europe/Amsterdam \
    koenkk/zigbee2mqtt
If you specified incorrect --device path, or if the device (Zigbee adapter/coordinator) is not connected, then you’ll see errors like these in the log:
$ sudo docker container logs zigbee2mqtt
...
info:     z2m: Starting Zigbee2MQTT version 1.39.0 (commit #0326926)
info:     z2m: Starting zigbee-herdsman (0.50.1)
error:    zh:zstack:znp: Failed to determine if path is valid: 'Error: ENOENT: no such file or directory, lstat '/dev/ttyACM0''
info:     zh:zstack:znp: Opening SerialPort with {"path":"/dev/ttyACM0","baudRate":115200,"rtscts":false,"autoOpen":false}
error:    z2m: Error while starting zigbee-herdsman
error:    z2m: Failed to start zigbee
error:    z2m: Check https://www.zigbee2mqtt.io/guide/installation/20_zigbee2mqtt-fails-to-start.html for possible solutions
error:    z2m: Exiting...
error:    z2m: Error: Error: No such file or directory, cannot open /dev/ttyACM0
If you are sure that you specified everything correctly and your device is connected, then check that you have /dev/serial/ at all:
$ ls -lah /dev/serial
If you don’t, then you might need to edit /usr/lib/udev/rules.d/60-serial.rules and apply this fix.
For me that wasn’t the case - I just haven’t connected the adaptor yet. After I did, here’s what dmesg printed out:
$ sudo dmesg -w
...
usb 1-2: new full-speed USB device number 5 using xhci-hcd
usb 1-2: New USB device found, idVendor=1a86, idProduct=55d4
usb 1-2: New USB device strings: Mfr=1, Product=2, SerialNumber=3
usb 1-2: Product: SONOFF Zigbee 3.0 USB Dongle Plus V2
usb 1-2: Manufacturer: ITEAD
usb 1-2: SerialNumber: SERIAL-NUMBER-HERE
cdc_acm 1-2:1.0: ttyACM0: USB ACM device
and I got it in /dev/serial/:
$ ls -lah /dev/serial/by-id/
drwxr-xr-x 2 root root 60 Aug  5 10:17 .
drwxr-xr-x 4 root root 80 Aug  5 10:17 ..
lrwxrwxrwx 1 root root 13 Aug  5 10:17 usb-ITEAD_SONOFF_Zigbee_3.0_USB_Dongle_Plus_V2_SERIAL-NUMBER-HERE-if00 -> ../../ttyACM0

$ ls -lah /dev/serial/by-path/
drwxr-xr-x 2 root root 60 Aug  5 10:17 .
drwxr-xr-x 4 root root 80 Aug  5 10:17 ..
lrwxrwxrwx 1 root root 13 Aug  5 10:17 platform-xhci-hcd.0.auto-usb-0:2:1.0 -> ../../ttyACM0
That usb-ITEAD_SONOFF_Zigbee_3.0_USB_Dongle_Plus_V2_SERIAL-NUMBER-HERE-if00 value is what you need to put into --device mapping on creating/running the container. Since I have already created a container without providing a correct value and I don’t know how to update an already existing container with a correct mapping, I just re-created it:
$ sudo docker stop zigbee2mqtt
$ sudo docker rm zigbee2mqtt

$ sudo docker run -d \
    --name zigbee2mqtt \
    --network hub \
    --restart=unless-stopped \
    --device=/dev/serial/by-id/usb-ITEAD_SONOFF_Zigbee_3.0_USB_Dongle_Plus_V2_SERIAL-NUMBER-HERE-if00:/dev/ttyACM0 \
    -v /root/zigbee2mqtt/data:/app/data \
    -v /root/zigbee2mqtt/logs:/app/logs \
    -e TZ=Europe/Amsterdam \
    koenkk/zigbee2mqtt
Successful launch will manifest itself in the log like this:
info:     z2m: Starting Zigbee2MQTT version 1.39.0 (commit #0326926)
info:     z2m: Starting zigbee-herdsman (0.50.1)
info:     zh:zstack:znp: Opening SerialPort with {"path":"/dev/ttyACM0","baudRate":115200,"rtscts":false,"autoOpen":false}
info:     zh:zstack:znp: Serialport opened
info:     zh:zstack:znp: Writing CC2530/CC2531 skip bootloader payload
info:     zh:zstack:znp: Skip bootloader for CC2652/CC1352
…however, after that I got a different error:
error:    z2m: Error while starting zigbee-herdsman
error:    z2m: Failed to start zigbee
error:    z2m: Check https://www.zigbee2mqtt.io/guide/installation/20_zigbee2mqtt-fails-to-start.html for possible solutions
error:    z2m: Exiting...
error:    z2m: Error: Failed to connect to the adapter (Error: SRSP - SYS - ping after 6000ms)
    at ZStackAdapter.start (/app/node_modules/zigbee-herdsman/src/adapter/z-stack/adapter/zStackAdapter.ts:101:27)
    at Controller.start (/app/node_modules/zigbee-herdsman/src/controller/controller.ts:129:29)
    at Zigbee.start (/app/lib/zigbee.ts:63:27)
    at Controller.start (/app/lib/controller.ts:139:27)
    at start (/app/index.js:154:5)
Possible reasons are listed here, and I suspected that in my case it was an obsolete firmware, but then I saw this video, which is exactly about SONOFF Zigbee 3.0 USB Dongle Plus-E, and there I noticed the adapter: ezsp setting, which I did not have in my config. So I added it:
# ...

serial:
  # where Zigbee adapter is connected to
  port: /dev/ttyACM0
  # if you have SONOFF Zigbee 3.0 USB Dongle Plus-E
  adapter: ezsp
And then it finally launched (almost) fine:
info:     z2m: Starting Zigbee2MQTT version 1.39.0 (commit #0326926)
info:     z2m: Starting zigbee-herdsman (0.50.1)
warning:     zh:ezsp: Deprecated driver 'ezsp' currently in use, 'ember' will become the officially supported EmberZNet driver in next release. If using Zigbee2MQTT see https://github.com/Koenkk/zigbee2mqtt/discussions/21462
error:     zh:ezsp:ezsp: Failure to init network
info:     zh:ezsp:driv: Form network
info:     zh:controller: Wrote coordinator backup to '/app/data/coordinator_backup.json'
info:     z2m: zigbee-herdsman started (reset)
info:     z2m: Coordinator firmware version: '{"meta":{"maintrel":"3 ","majorrel":"6","minorrel":"10","product":8,"revision":"6.10.3.0 build 297"},"type":"EZSP v8"}'
info:     z2m: Currently 0 devices are joined:
warning:     z2m: `permit_join` set to  `true` in configuration.yaml.
warning:     z2m: Allowing new devices to join.
warning:     z2m: Set `permit_join` to `false` once you joined all devices.
info:     z2m: Zigbee: allowing new devices to join.
info:     z2m: Connecting to MQTT server at mqtt://mosquitto
info:     z2m: Connected to MQTT server
info:     z2m: Zigbee2MQTT started!
One of the warnings says that ezsp is a deprecated driver, and instead it should be ember. So I tried that:
# ...

serial:
  # where Zigbee adapter is connected to
  port: /dev/ttyACM0
  # if you have SONOFF Zigbee 3.0 USB Dongle Plus-E
  adapter: ember
but it failed to launch:
info:     z2m: Starting Zigbee2MQTT version 1.39.0 (commit #0326926)
info:     z2m: Starting zigbee-herdsman (0.50.1)
info:     zh:ember: Using default stack config.
info:     zh:ember: ======== Ember Adapter Starting ========
info:     zh:ember:ezsp: ======== EZSP starting ========
info:     zh:ember:uart:ash: ======== ASH NCP reset ========
info:     zh:ember:uart:ash: RTS/CTS config is off, enabling software flow control.
info:     zh:ember:uart:ash: Serial port opened
info:     zh:ember:uart:ash: ======== ASH starting ========
error:     zh:ember:uart:ash: Received ERROR from NCP while connecting, with code=ERROR_EXCEEDED_MAXIMUM_ACK_TIMEOUT_COUNT.
error:     zh:ember:uart:ash: ASH disconnected | NCP status: ASH_NCP_FATAL_ERROR
error:     zh:ember:uart:ash: Error while parsing received frame, status=ASH_NCP_FATAL_ERROR.
info:     zh:ember:uart:ash: ======== ASH NCP reset ========
info:     zh:ember:uart:ash: ======== ASH starting ========
info:     zh:ember:uart:ash: ======== ASH connected ========
info:     zh:ember:uart:ash: ======== ASH started ========
info:     zh:ember:ezsp: ======== EZSP started ========
error:     z2m: Error while starting zigbee-herdsman
error:     z2m: Failed to start zigbee
error:     z2m: Check https://www.zigbee2mqtt.io/guide/installation/20_zigbee2mqtt-fails-to-start.html for possible solutions
error:     z2m: Exiting...
error:     z2m: Error: NCP EZSP protocol version of 8 does not match Host version 13
    at EmberAdapter.emberVersion (/app/node_modules/zigbee-herdsman/src/adapter/ember/adapter/emberAdapter.ts:1714:19)
    at EmberAdapter.initEzsp (/app/node_modules/zigbee-herdsman/src/adapter/ember/adapter/emberAdapter.ts:893:9)
    at EmberAdapter.start (/app/node_modules/zigbee-herdsman/src/adapter/ember/adapter/emberAdapter.ts:2722:24)
    at Controller.start (/app/node_modules/zigbee-herdsman/src/controller/controller.ts:129:29)
    at Zigbee.start (/app/lib/zigbee.ts:63:27)
    at Controller.start (/app/lib/controller.ts:139:27)
    at start (/app/index.js:154:5)
From what I see here, to make it work with ember, apparently I need flash my Zigbee adapter with a different/newer firmware. However, for now I decided not to, and I just reverted the config back to ezsp, as that one seemed to be already working as it is.
To access the frontend I exposed its port (8080 by default) from the host the same way I did it with Home Assistant container (static IP and reverse proxy):
$ sudo docker network disconnect hub zigbee2mqtt
$ sudo docker network connect --ip 172.18.0.101 hub zigbee2mqtt
$ sudo docker inspect -f '{{range.NetworkSettings.Networks}}{{.IPAddress}}{{end}}' zigbee2mqtt
172.18.0.101

$ sudo cp /etc/nginx/sites-available/{homeassistant,zigbee2mqtt}
$ sudo nano /etc/nginx/sites-available/zigbee2mqtt
map $http_upgrade $connection_upgrade {
    default upgrade;
    '' close;
}

server {
    # again, doesn't have to be exactly 8080
    listen 8080 ssl;

    ssl_certificate /opt/certificates/fullchain.pem;
    ssl_certificate_key /opt/certificates/key.pem;

    location / {
        proxy_pass http://172.18.0.101:8080;
        proxy_http_version 1.1;
        proxy_set_header Upgrade $http_upgrade;
        proxy_set_header Connection $connection_upgrade;
        proxy_set_header Host $host;
        proxy_cache_bypass $http_upgrade;
    }
}
$ sudo ln -s /etc/nginx/sites-{available,enabled}/zigbee2mqtt
$ sudo systemctl restart nginx.service
Once I’ve logged-in to my Zigbee2MQTT frontend, I could see that my Zigbee adapter/coordinator revision is 6.10.3.0 build 297:
but I have no idea how to check if that is the latest available (or how to update it to the latest). I’ve seen several GiHub repositories with some firmwares, but I can’t tell which of them is the official one, and in general distributing firmware binaries via GitHib seems very bizarre to me. Either way, there is no pressure, as it seems to work fine with the current firmware.
Now you can start adding devices to grow your Zigbee network. To add a new device, put it (the device) into pairing mode and wait for it to appear on the Devices page of your Zigbee2MQTT frontend:
Once the device is paired, Zigbee adapter/coordinator hardware will be communicating with it over Zigbee and will be forwarding its data to Home Assistant via MQTT; and the other way around, commands from Home Assistant well be going through MQTT broker to Zigbee2MQTT, which will be transmitting them to devices over Zigbee by coordinator.
Below there will be examples for some of the devices that I have.
Plugs
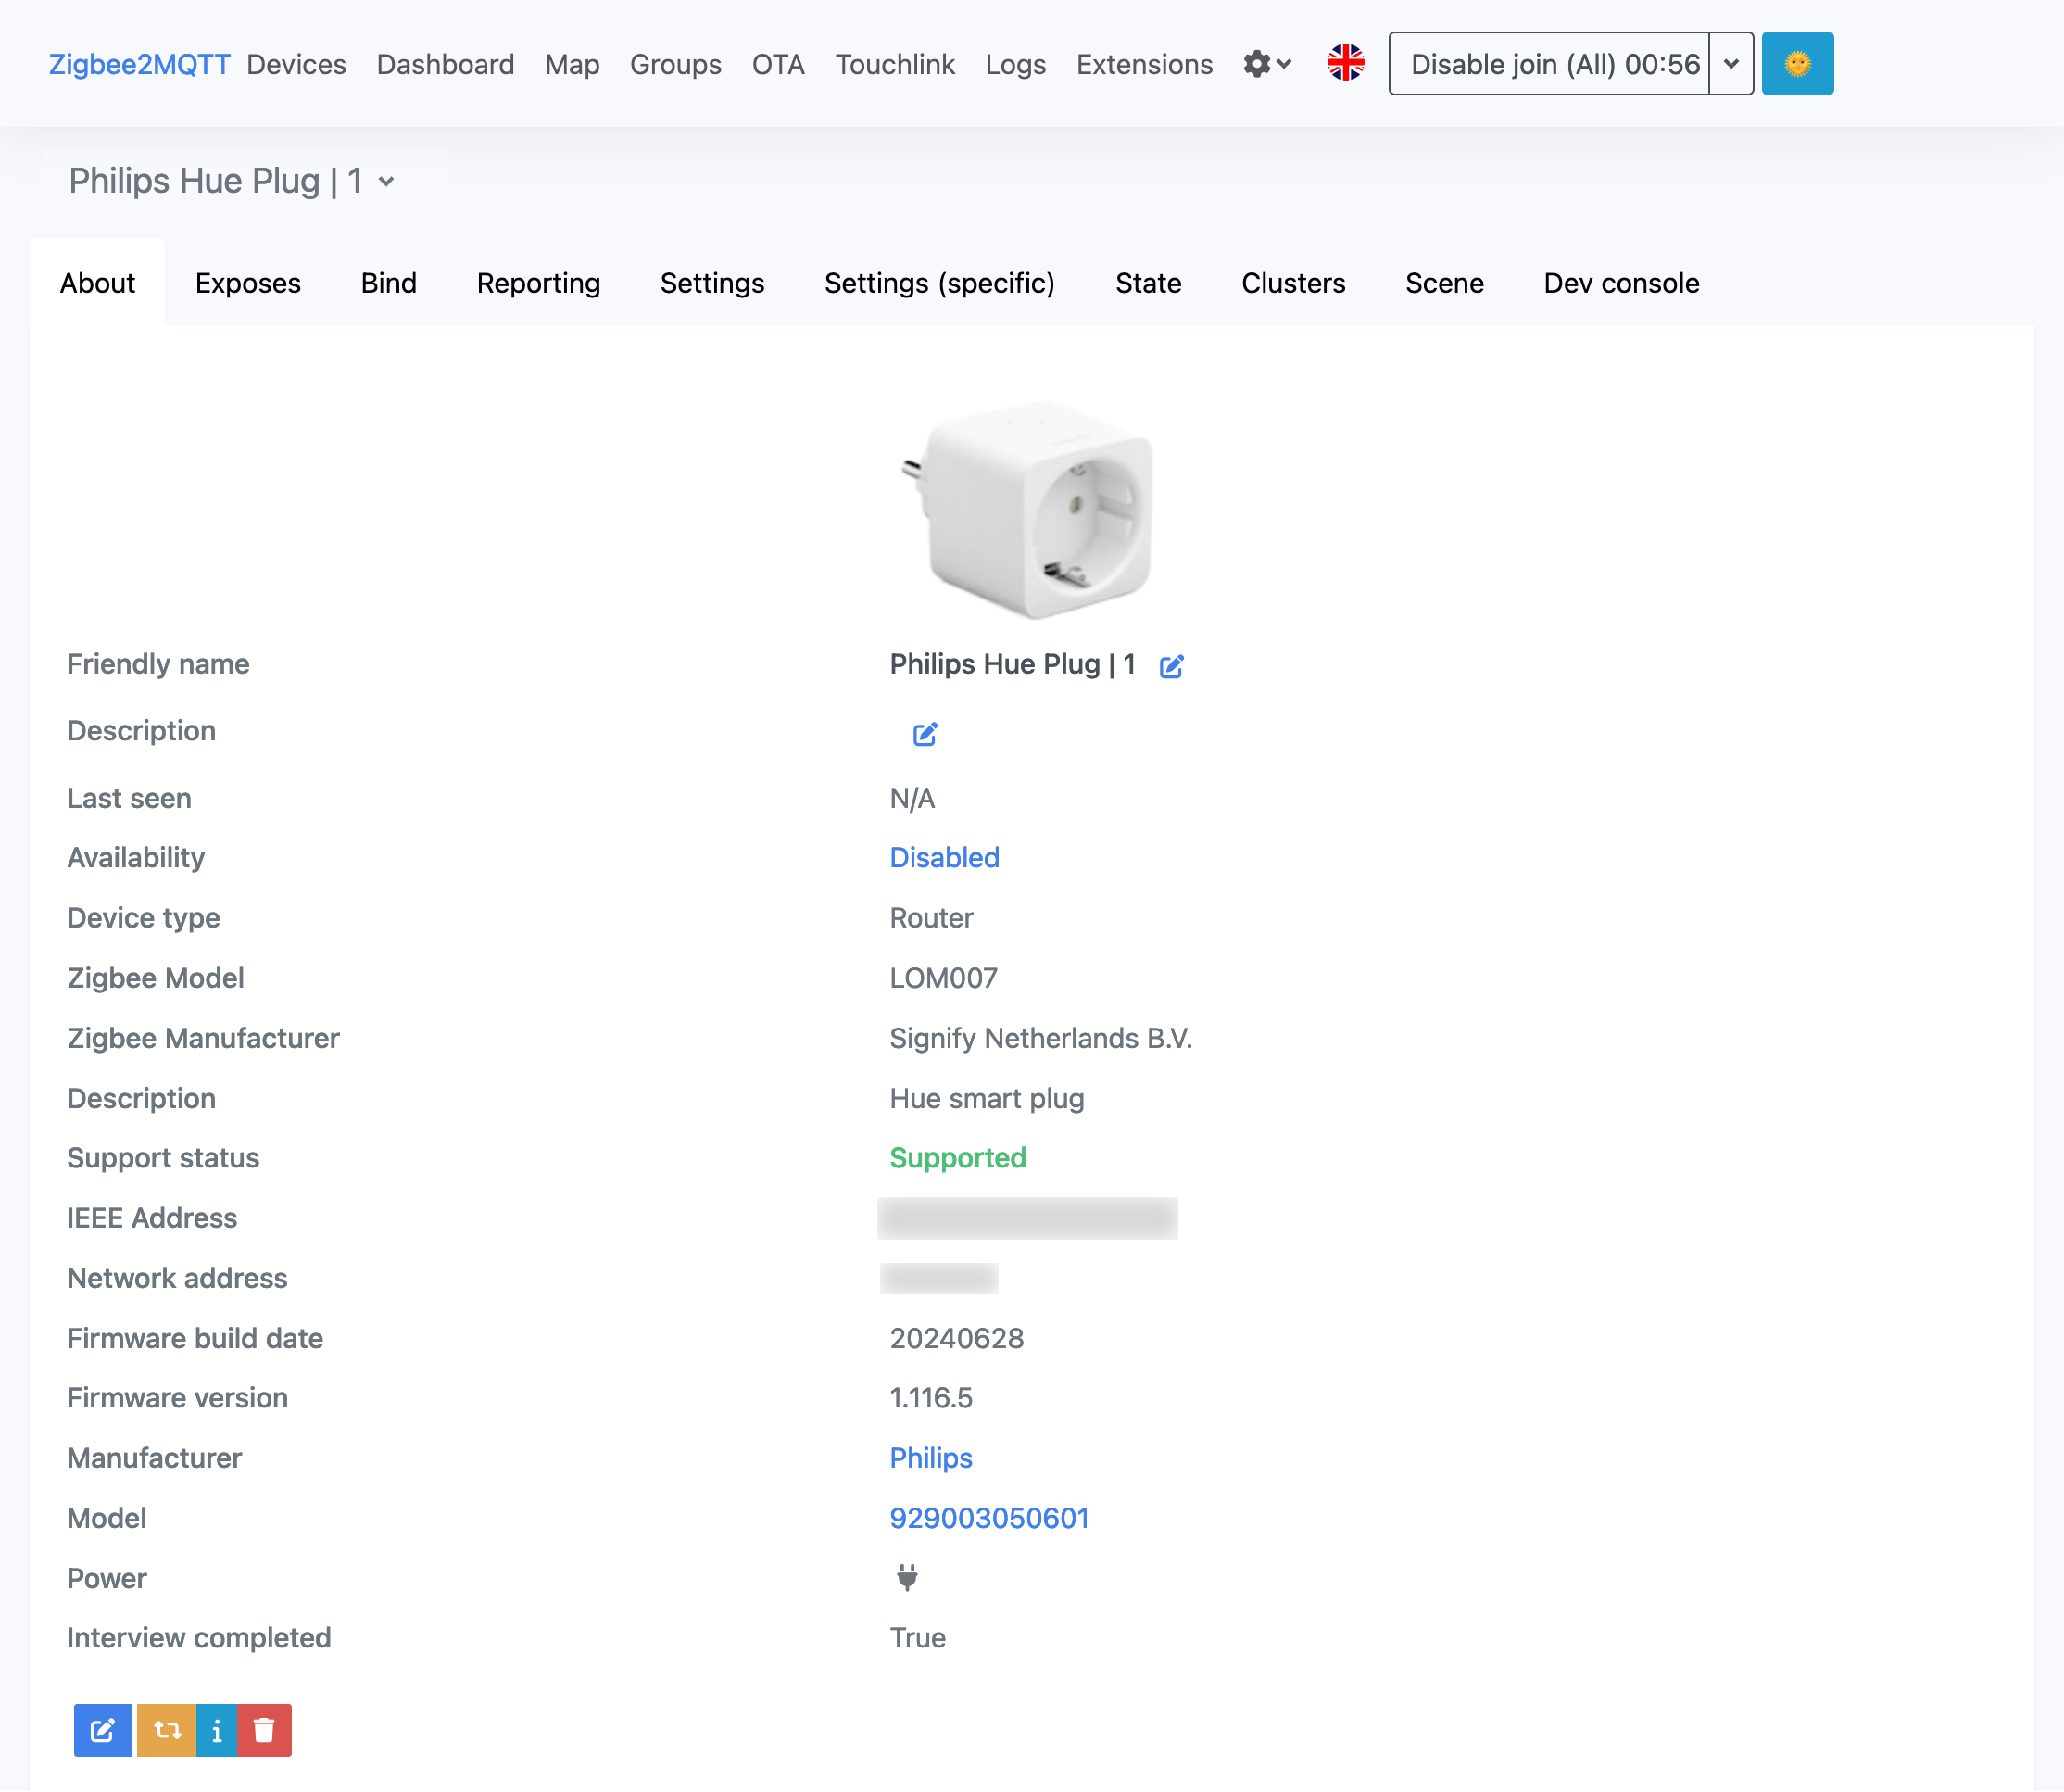
Philips Hue Smart Plug
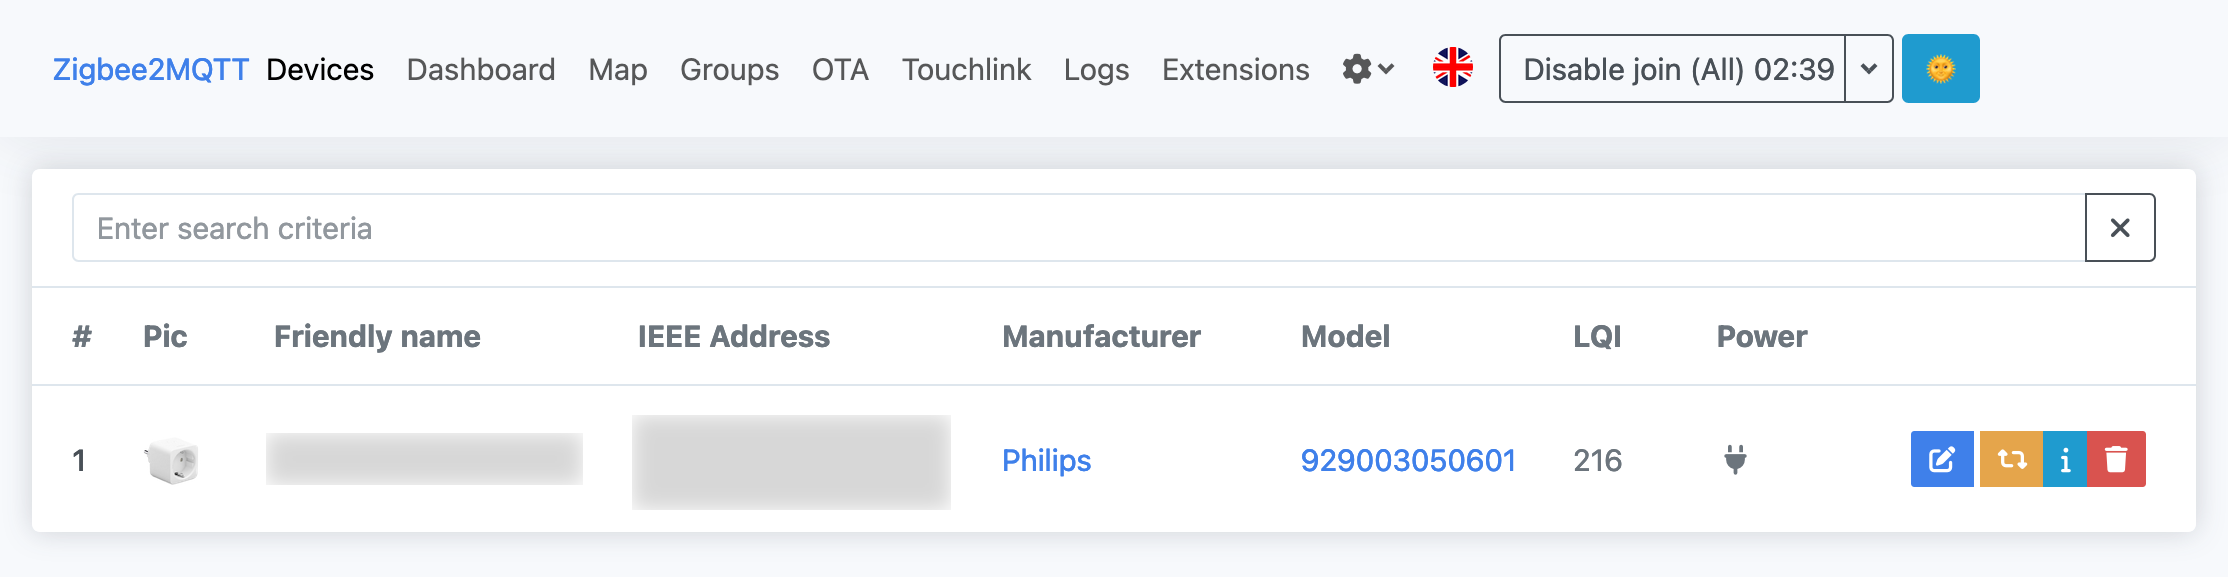
Philips has a whole family of smart home devices, which is called Philips Hue, and out of those I only have a Philips Hue Smart Plug (database) for now:
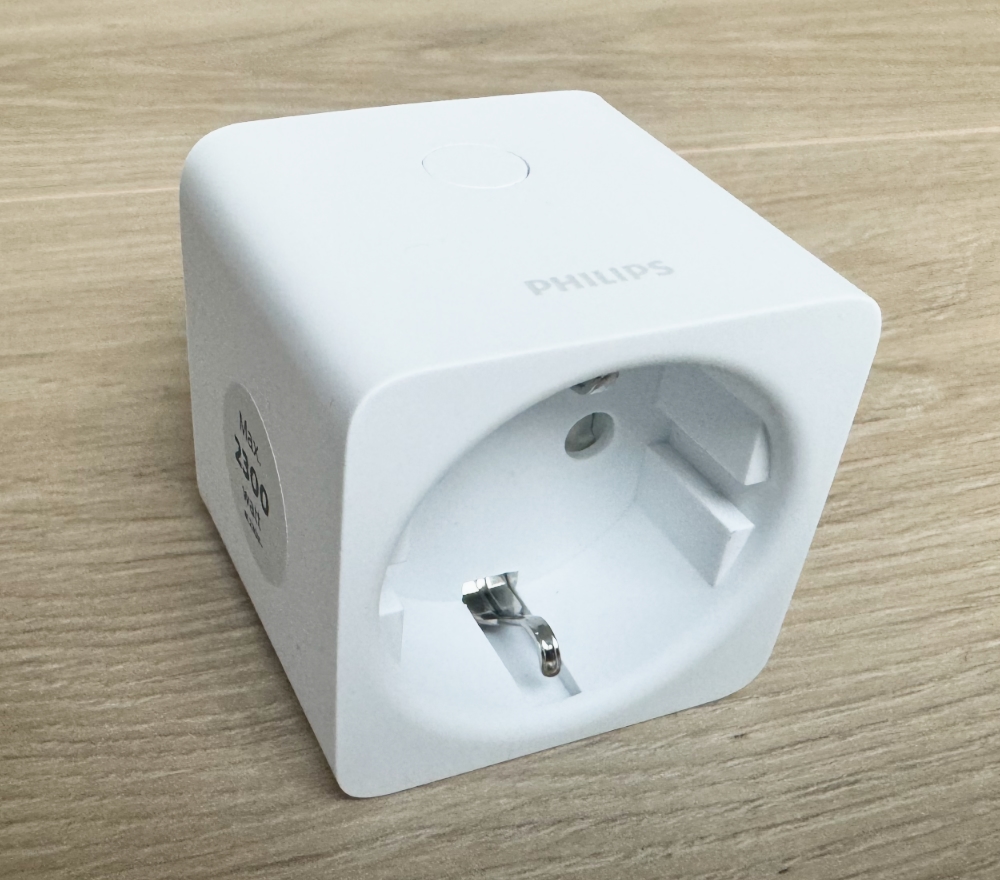
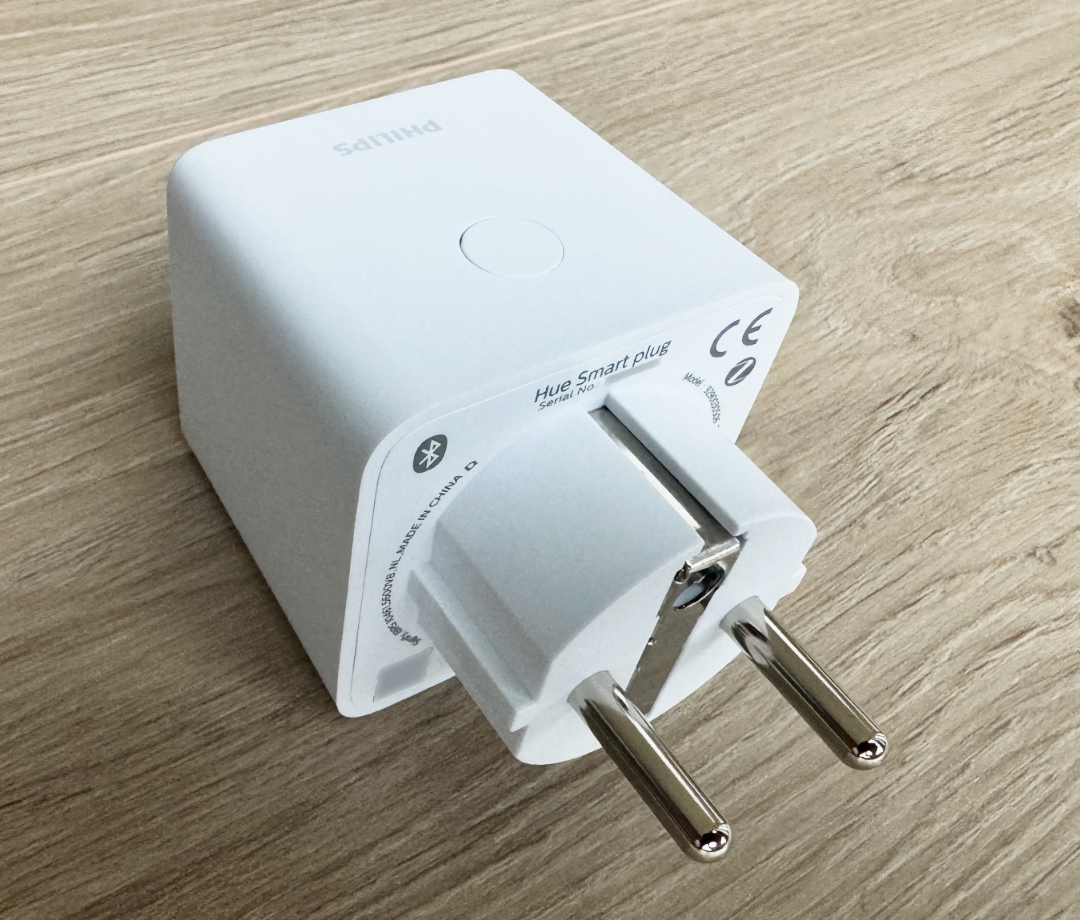
To put it into pairing mode, plug it into a power socket, wait for the front indicator to turn off, press and hold the button on the side and wait for the indicator to blink with orange for 5 or more times. Shortly after that it should appear in the list of devices in Zigbee2MQTT frontend.
The pairing happens automatically, you don’t need to do anything, just watch the pop-ups. Once the device is paired, here’s how its page will look like (here I have already renamed it):
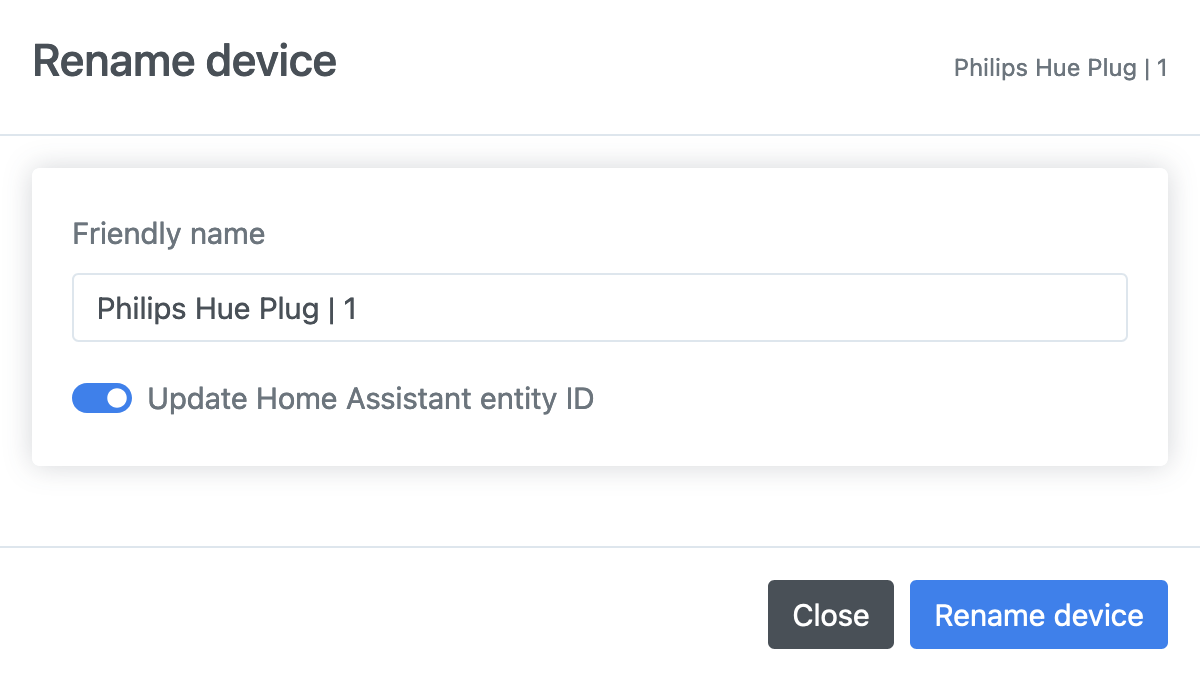
To easily find it in Home Assistant, rename it from the default name to something meaningful and update the Home Assistant entity ID too:
Then it should appear in Home Assistant list of devices under that exact name:
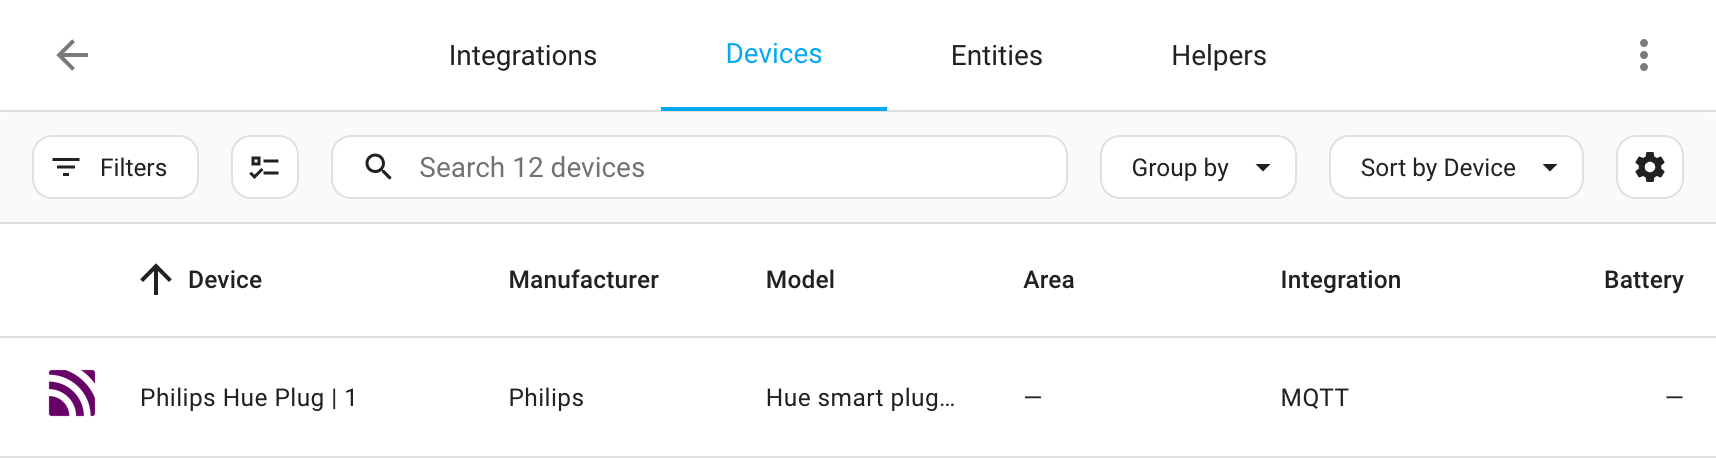
At this point you can already turn it on and off from Home Assistant and use it in your automation routines.
Sadly, this particular “smart” plug is rather “dumb”, as it only has on/off capabilities with no energy meter/counter:
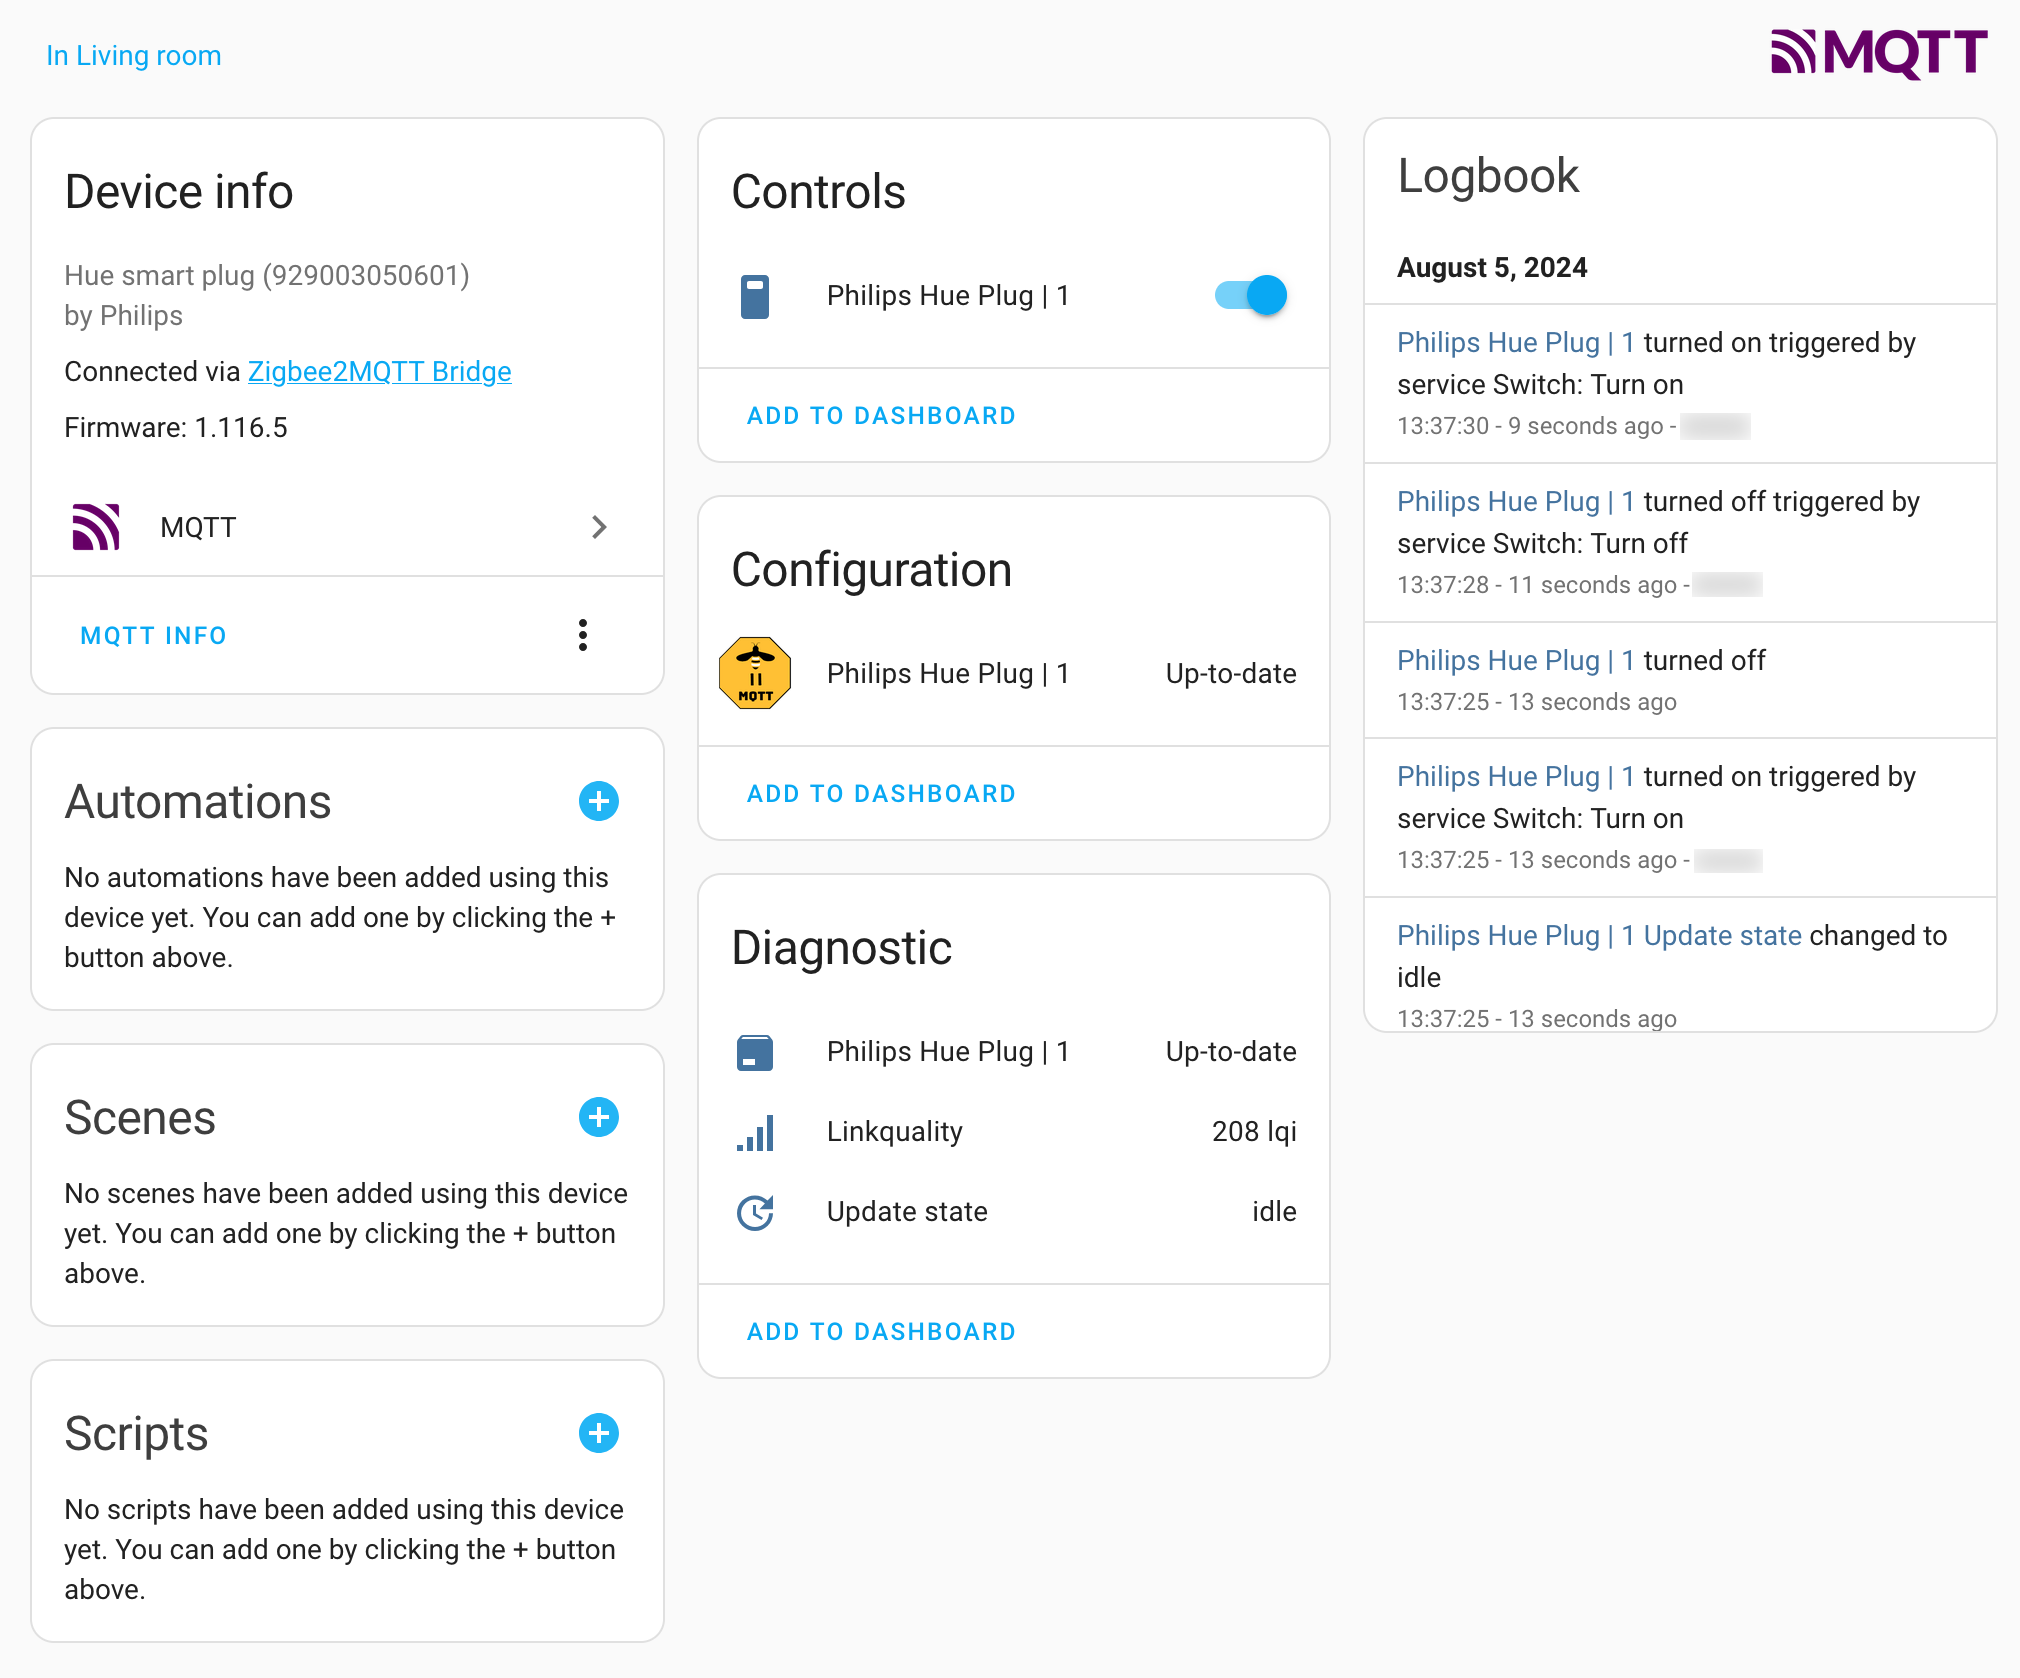
But that is actually fine, because it costs less than the alternatives with energy meter - 300 NOK versus 400+ NOK - which builds up to a significant difference if you need to buy several of those.
Frient Smart Plug Mini 2
There is another smart plug - Frient Smart Plug Mini 2 (or Develco, according to the database):
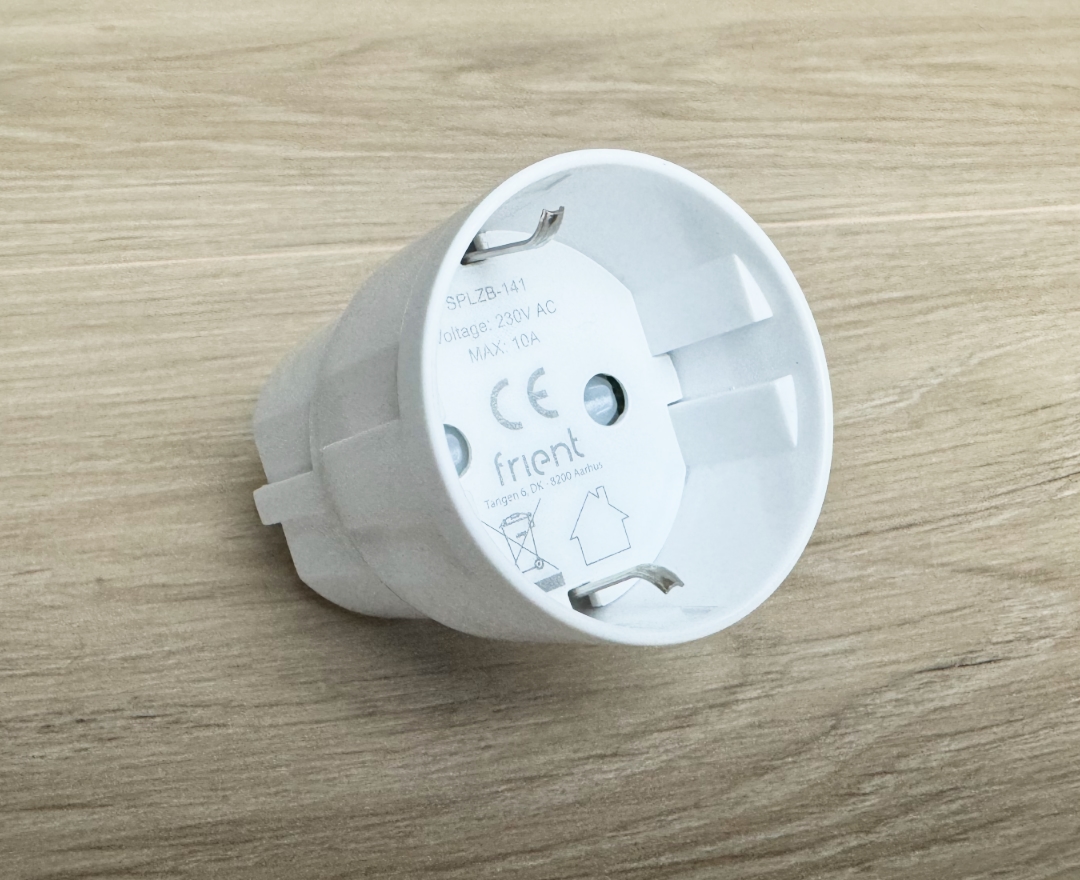
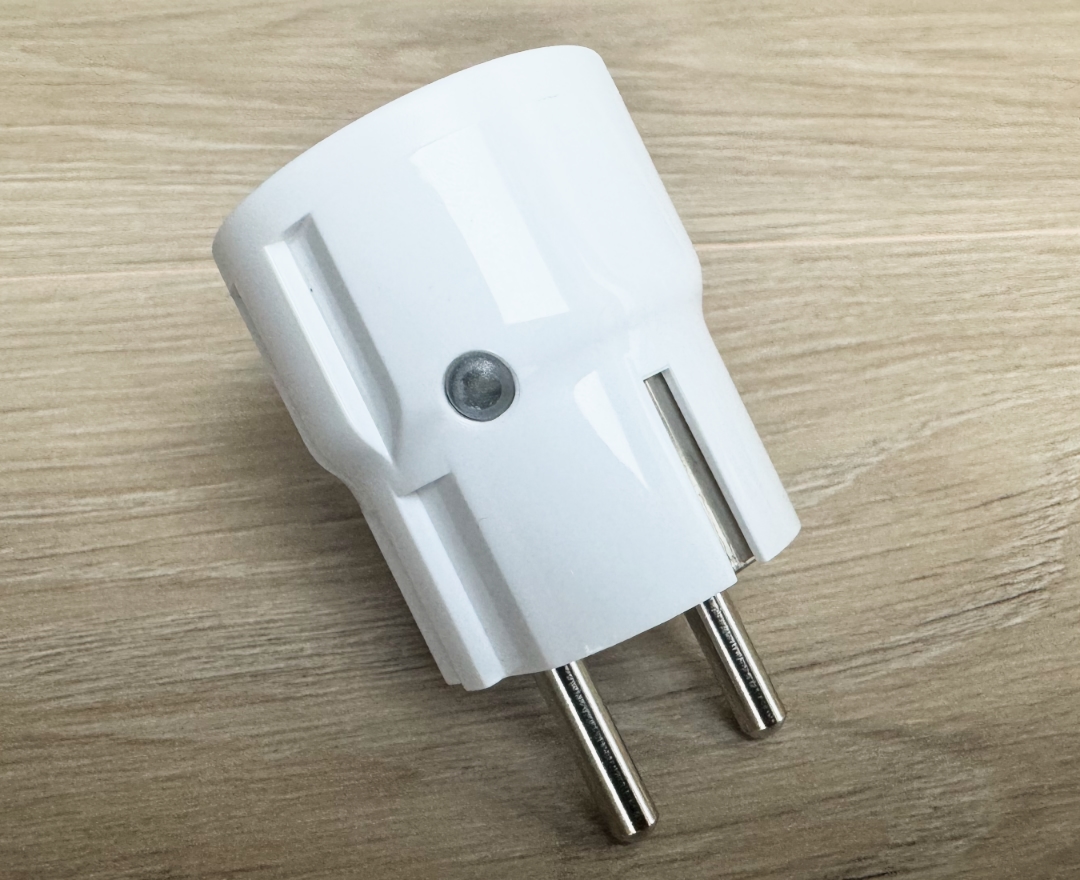
And this one is equiped with an energy meter/counter, so it is “smarter” than the one from Philips, but it is also more expensive (about 500 NOK) and unglier too, so I don’t think I’ll buy more of these.
The pairing should be trivial: when it is not part of any network, it enters the pairing mode automatically. If not, try pressing the button on the side for 5 or more seconds, or/and re-plug it to a power socket.
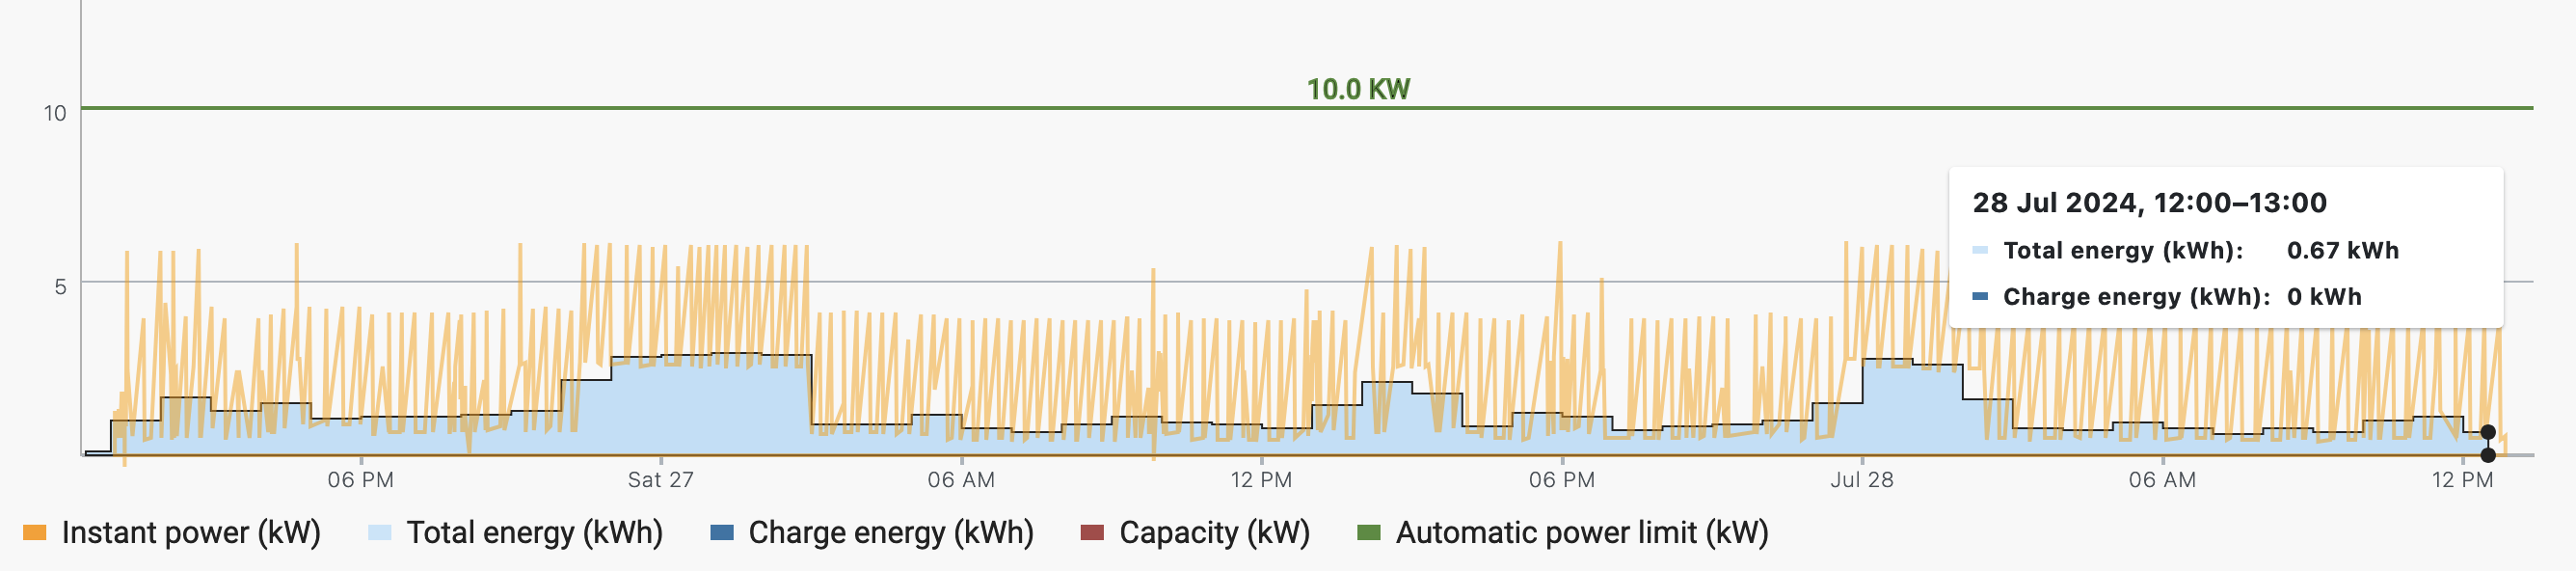
Once Zigbee2MQTT pairs with it, here are the metrics it will expose:
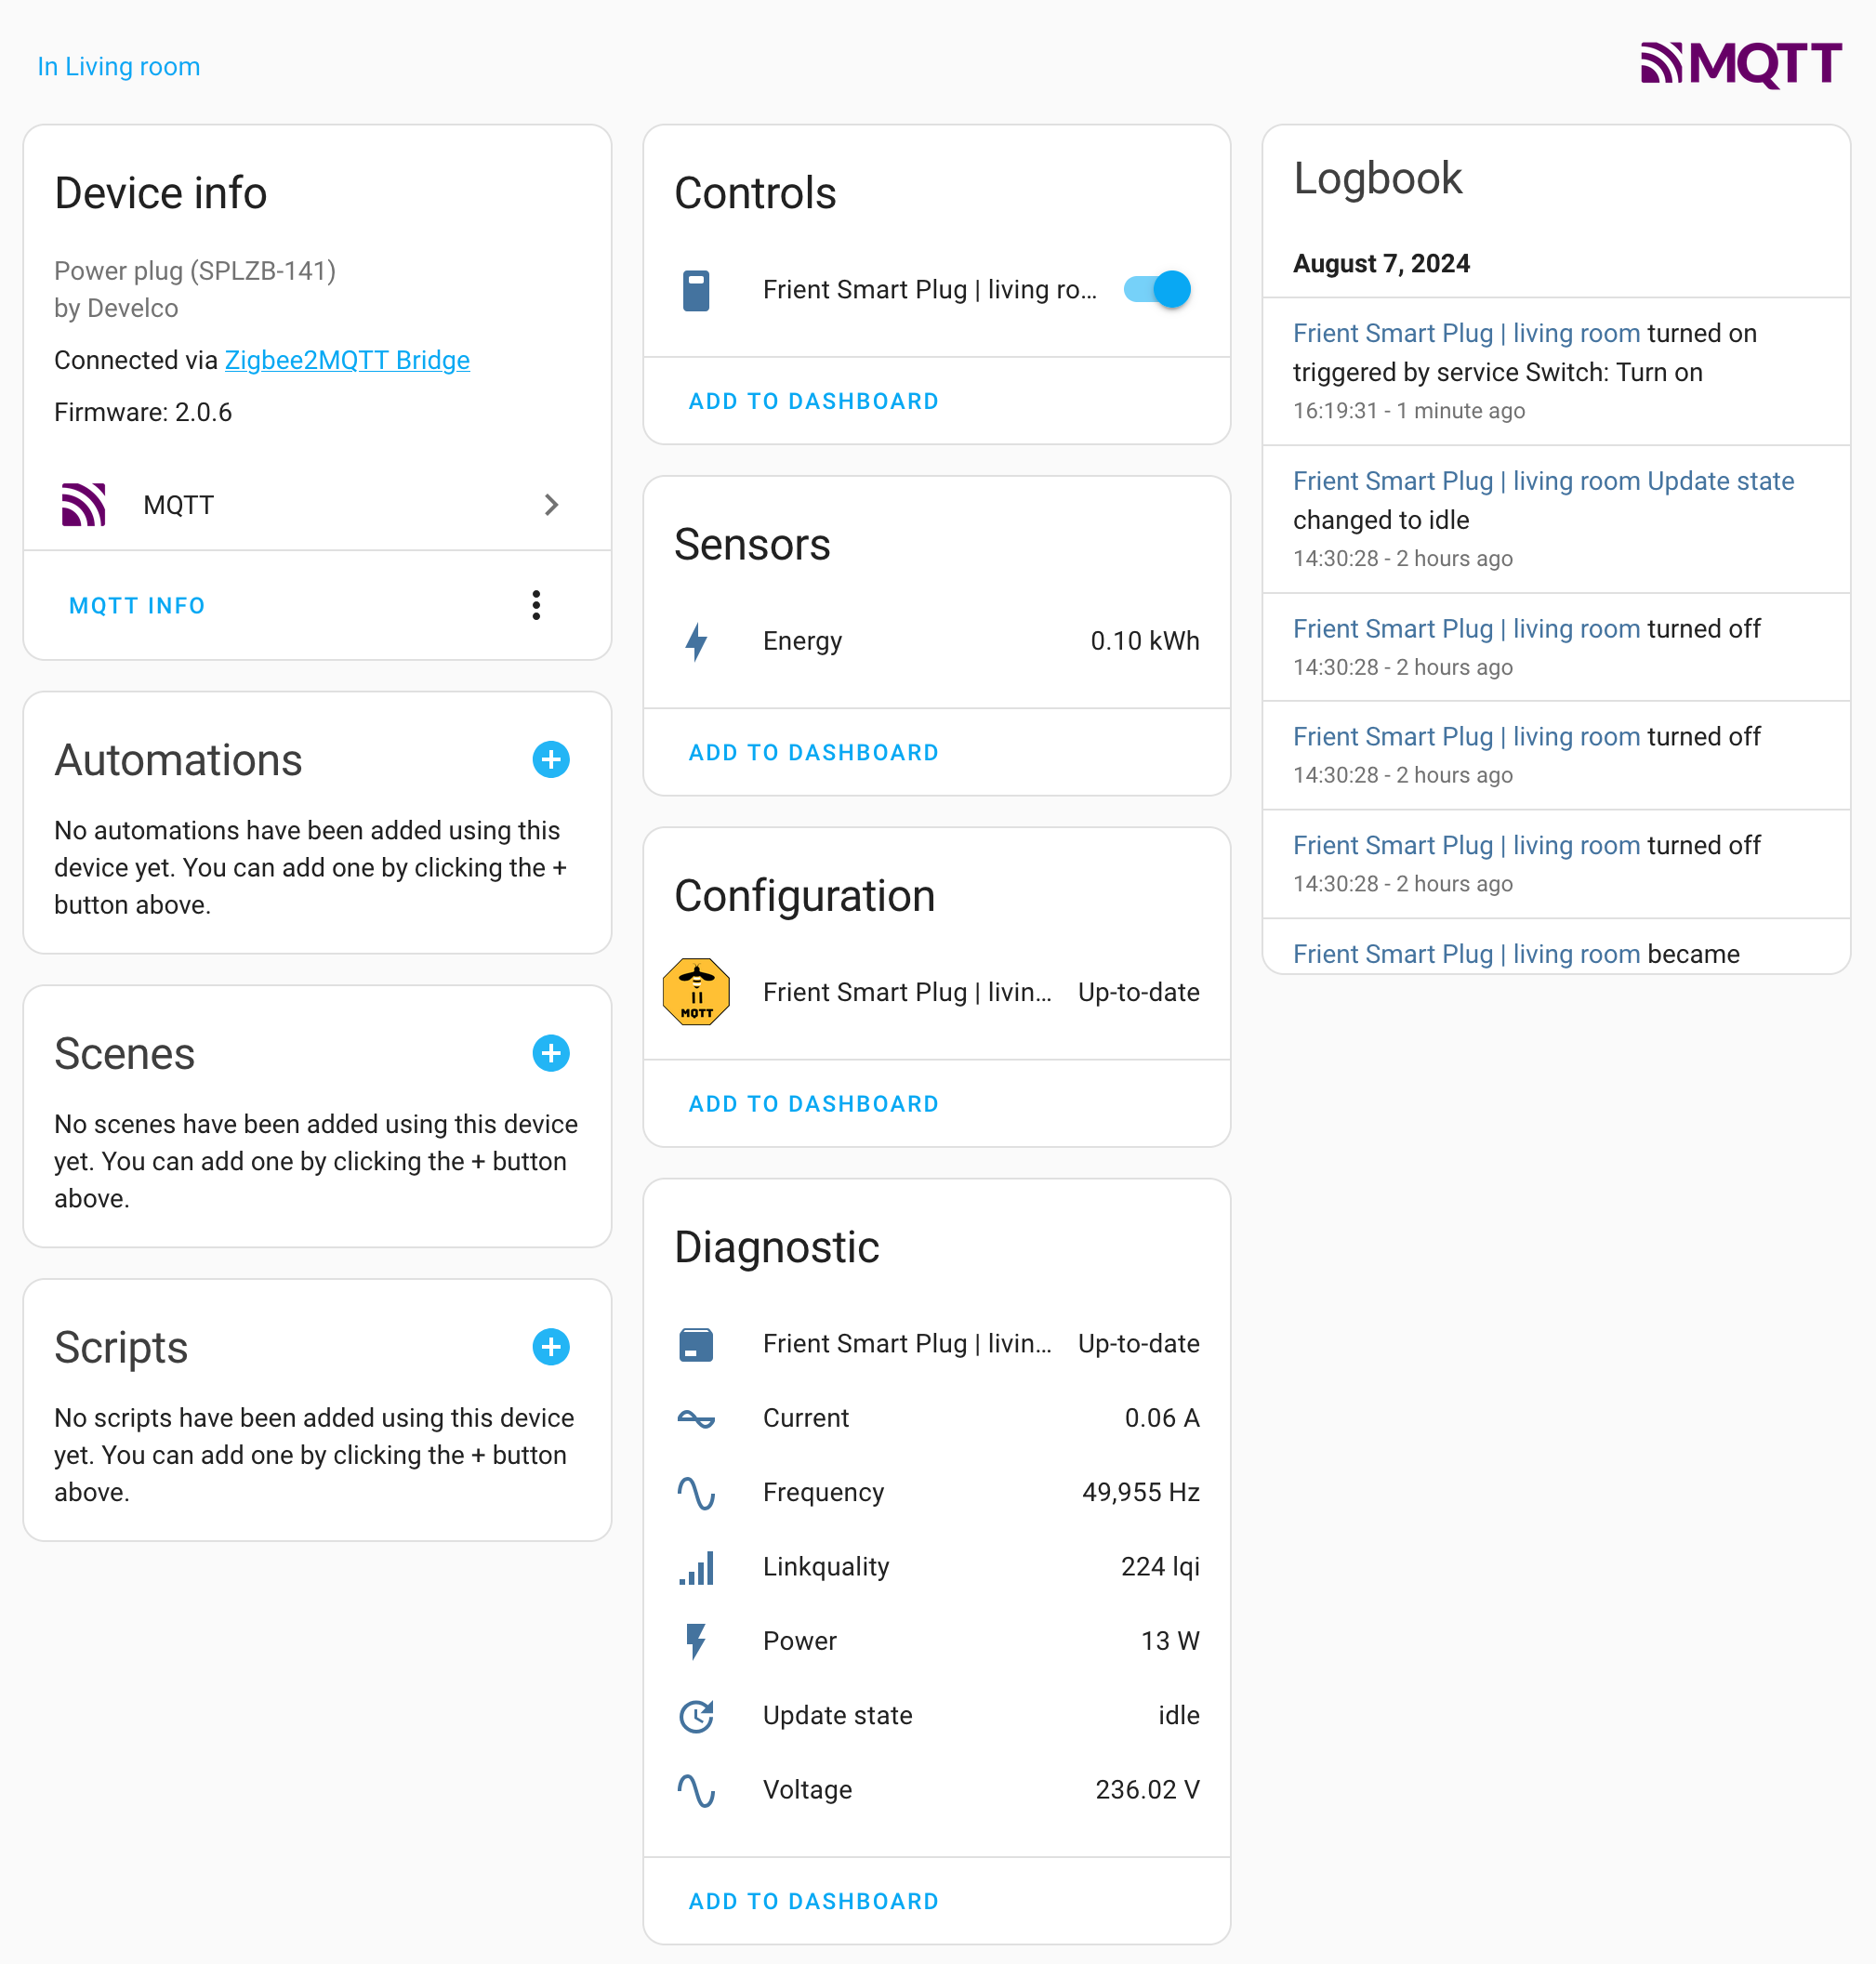
So it is immediate power consumption, total amount of power already consumed, voltage, frequency and others. As with any other value in Home Assistant, you can get a historical chart of changes, for example here’s one for voltage:

So that’s already quite a lot to play with, as you can create scripts and automations to perform various actions based on any of those metrics.
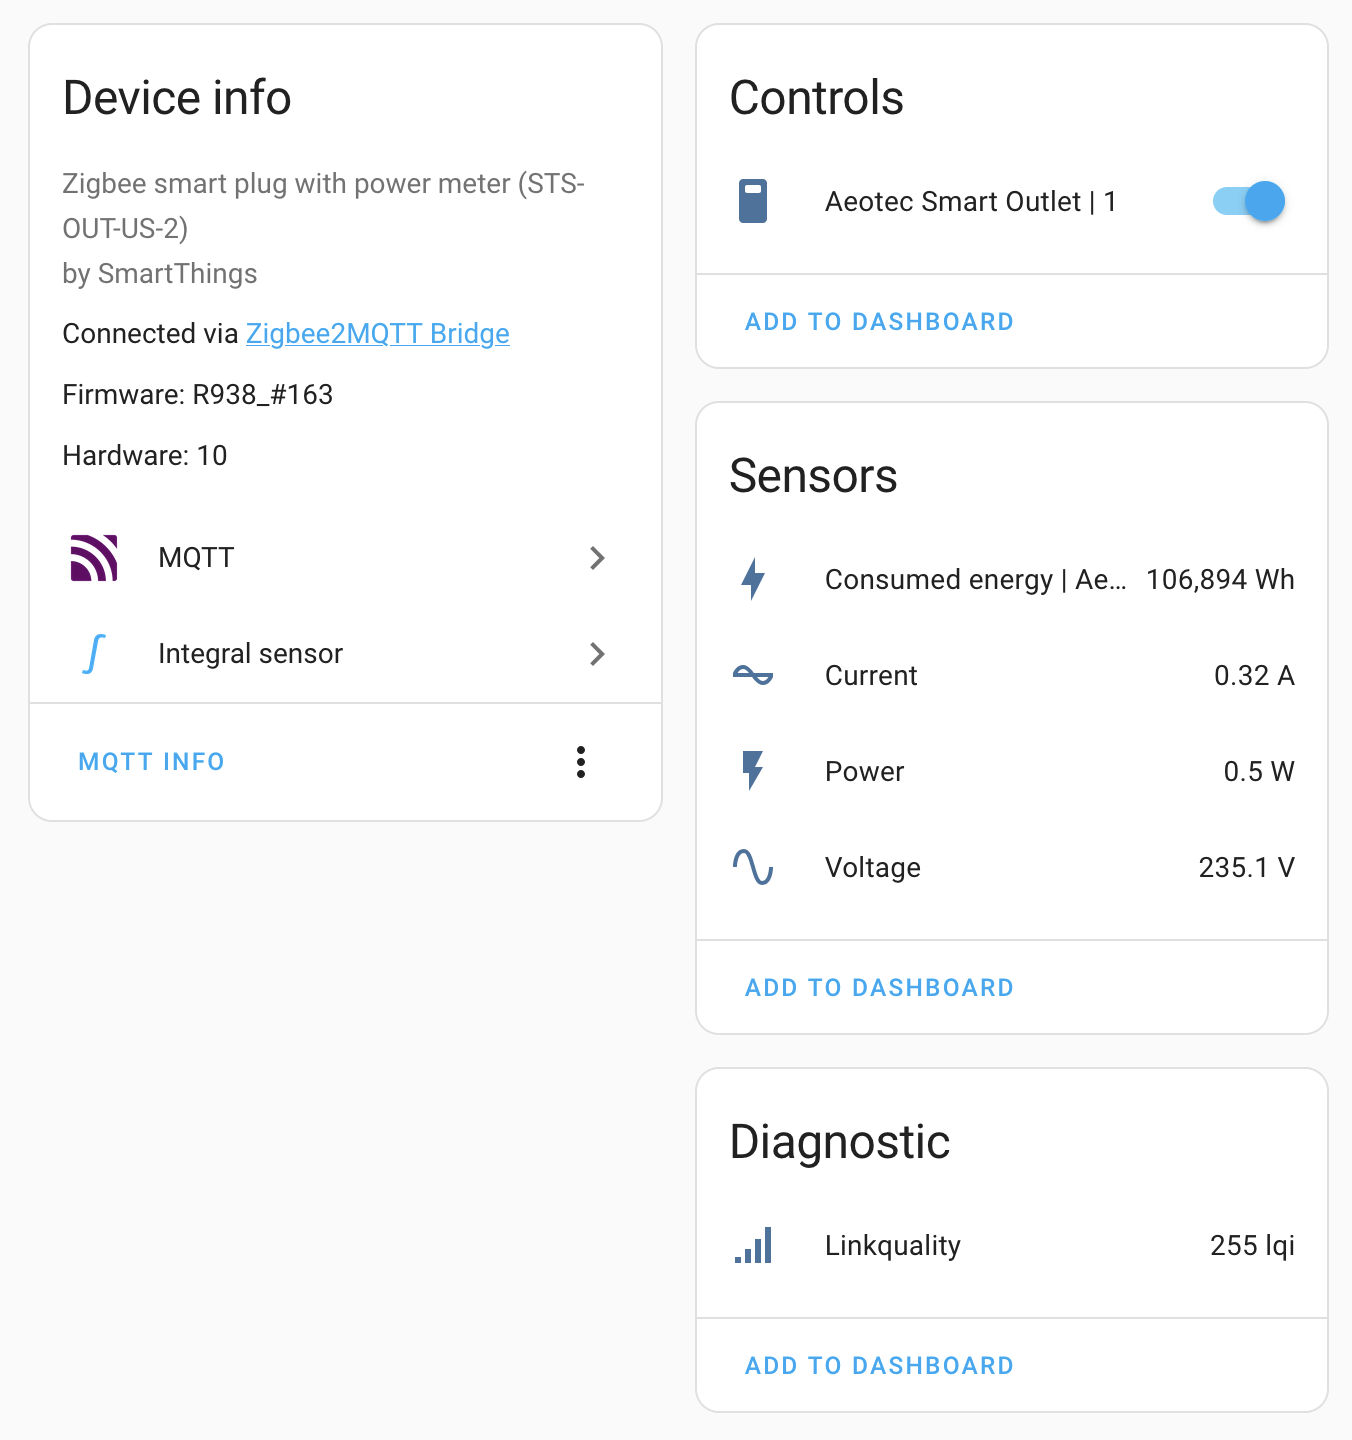
Aeotec / SmartThings smart plug
There is another smart plug with energy meter from Aeotec (seems to be SmartThings before, according to the database). It costs even more than the one from Frient, but I was lucky to get a couple of 50% discounted outlet units.


Also unlike the one from Frient, this one does not expose a ready to use energy sensor. It only exposes the power metric, so you’ll need to create an integral sensor helper:
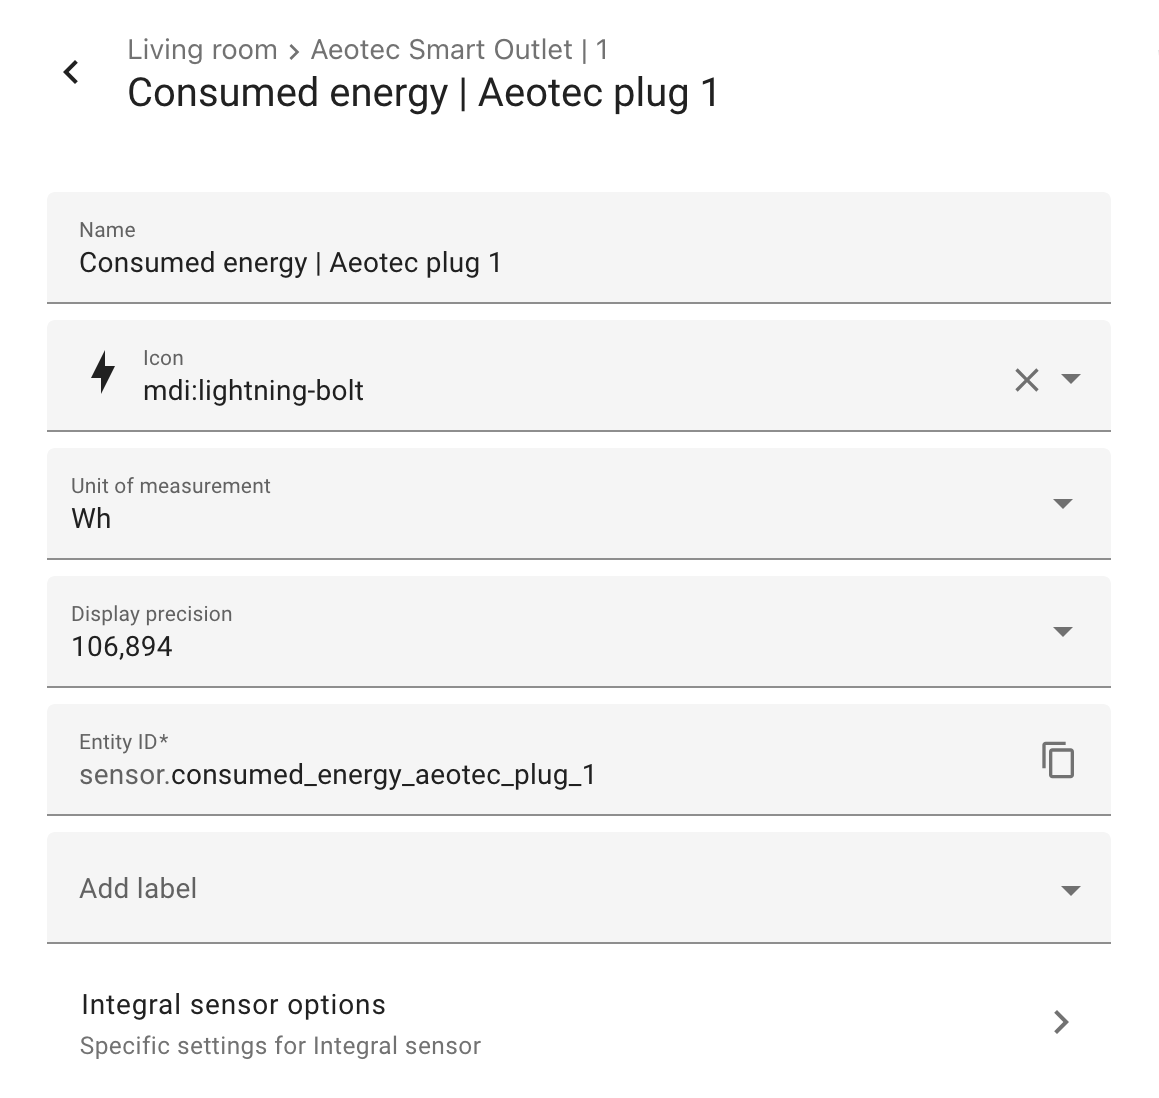
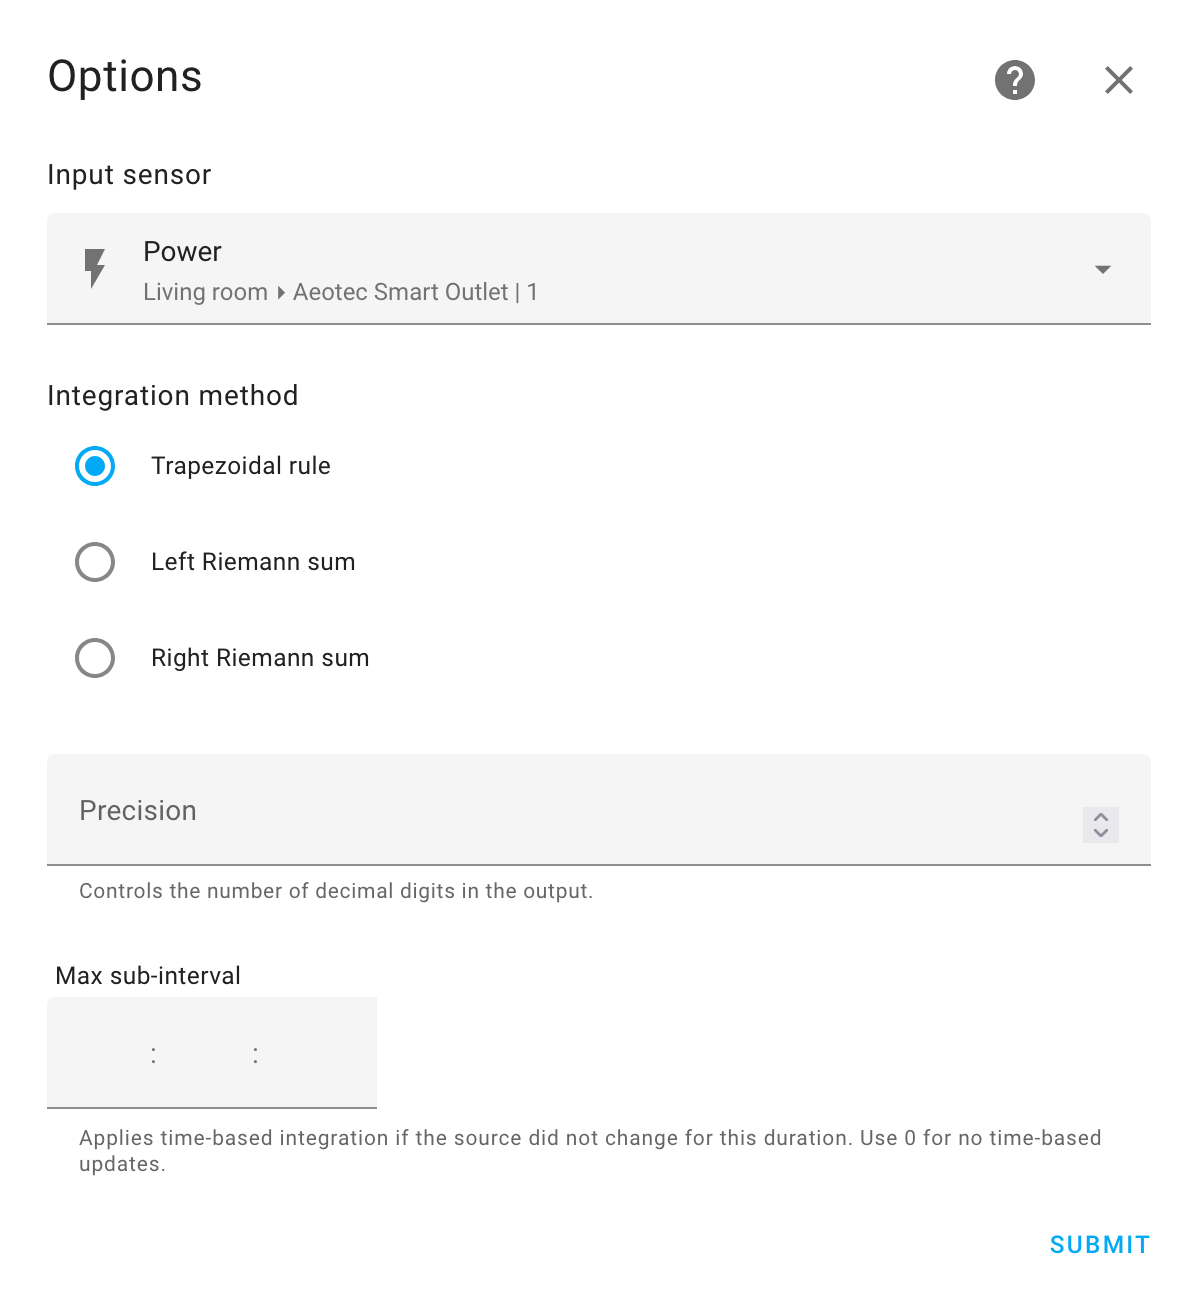
And then you’ll get it among the rest of the device metrics:
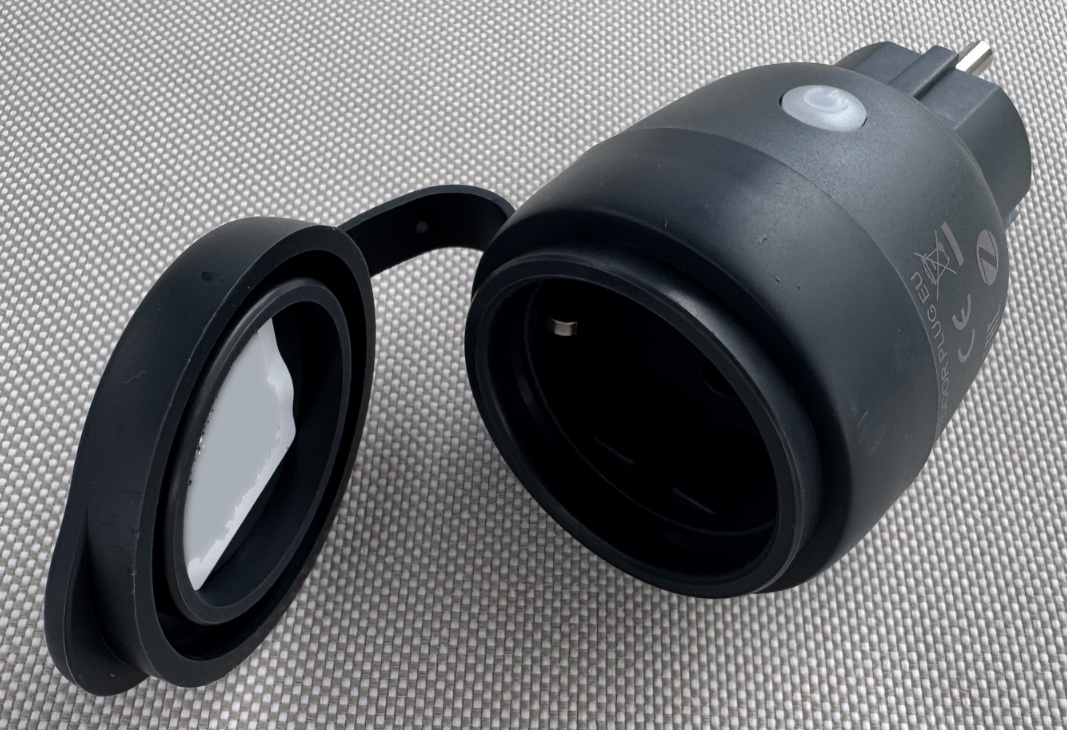
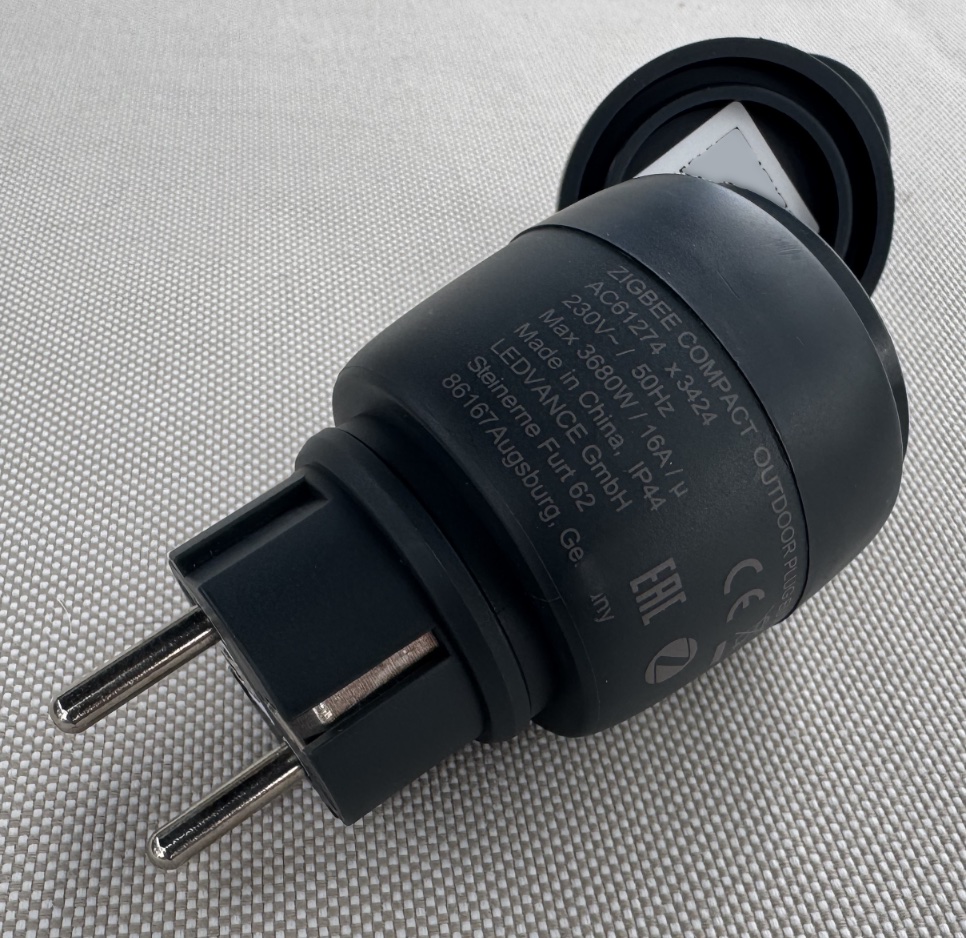
LEDVANCE SMART+ Compact outdoor plug
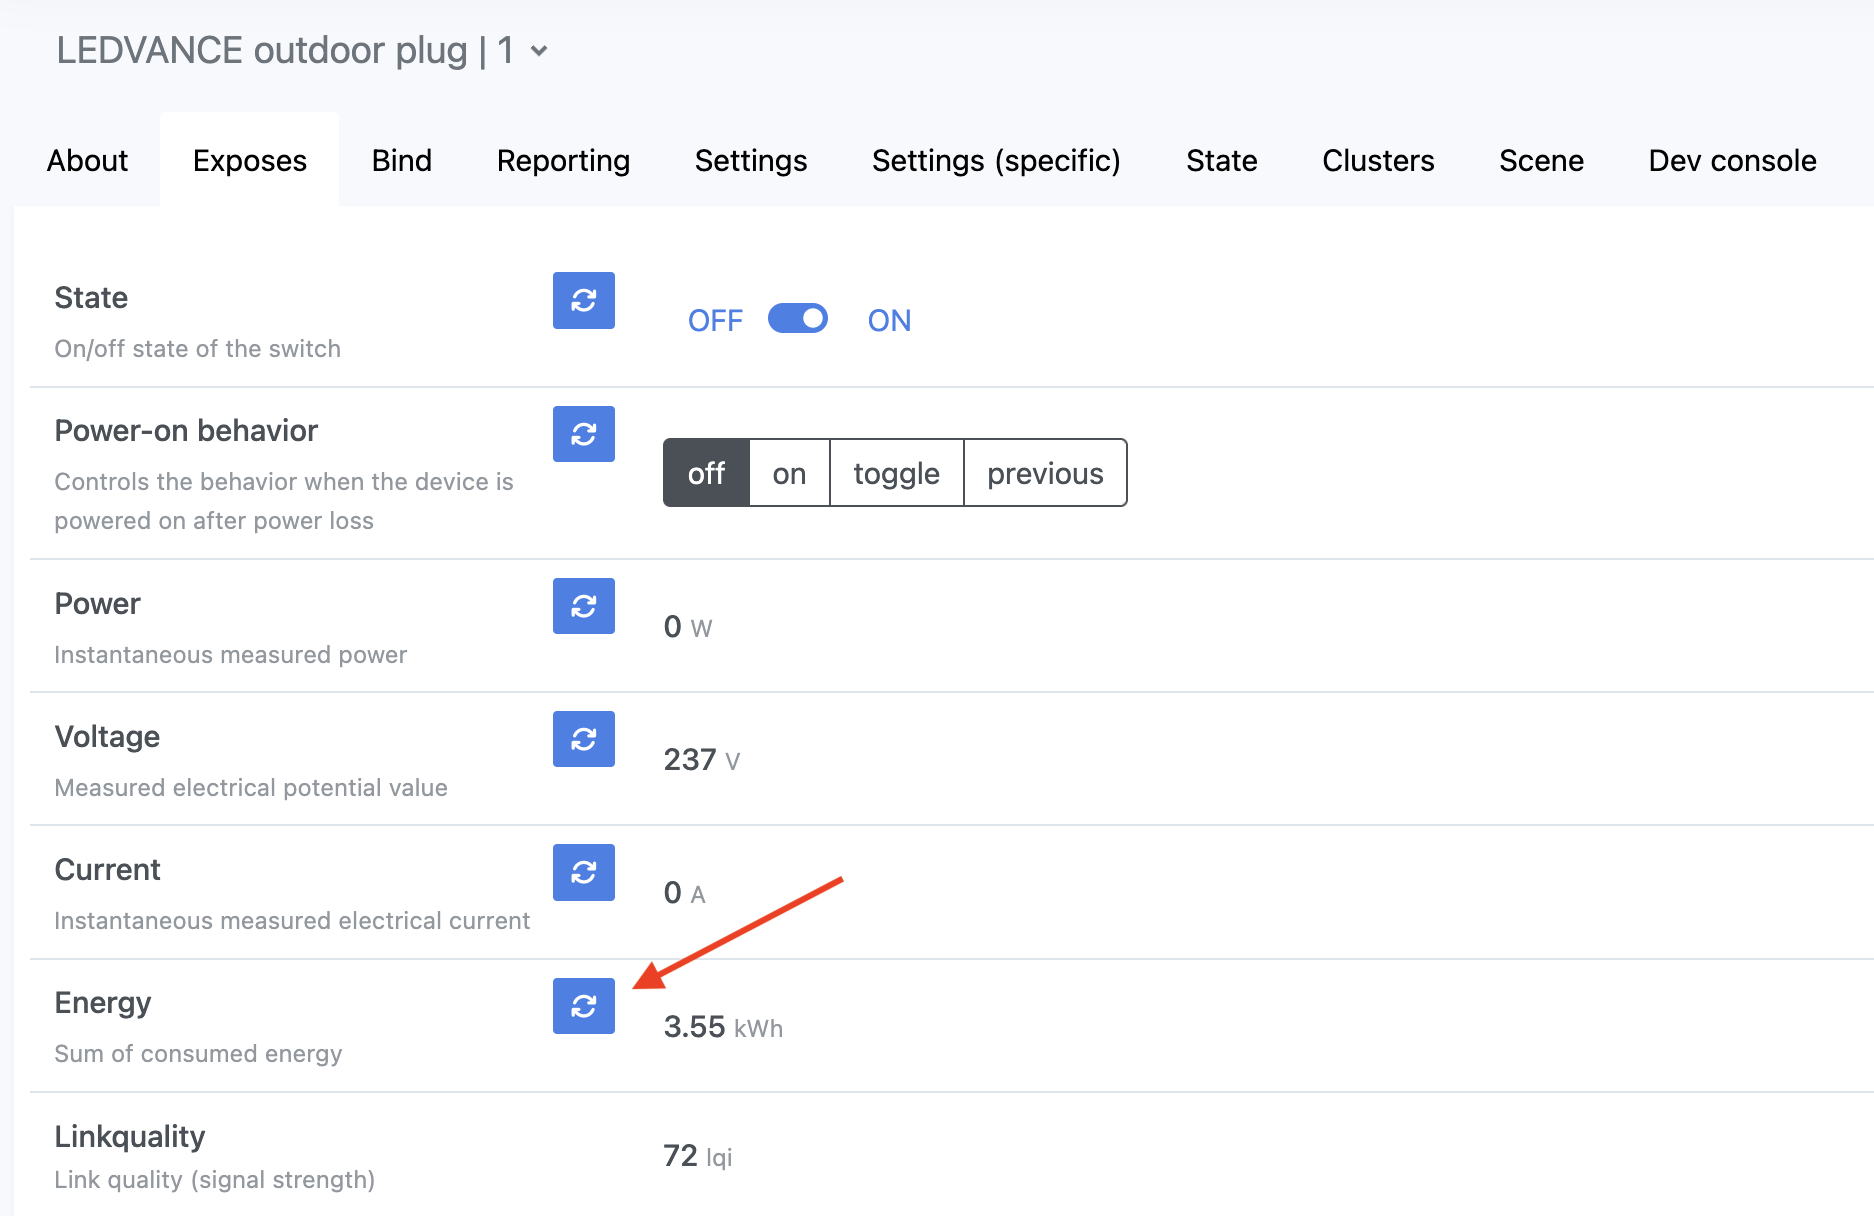
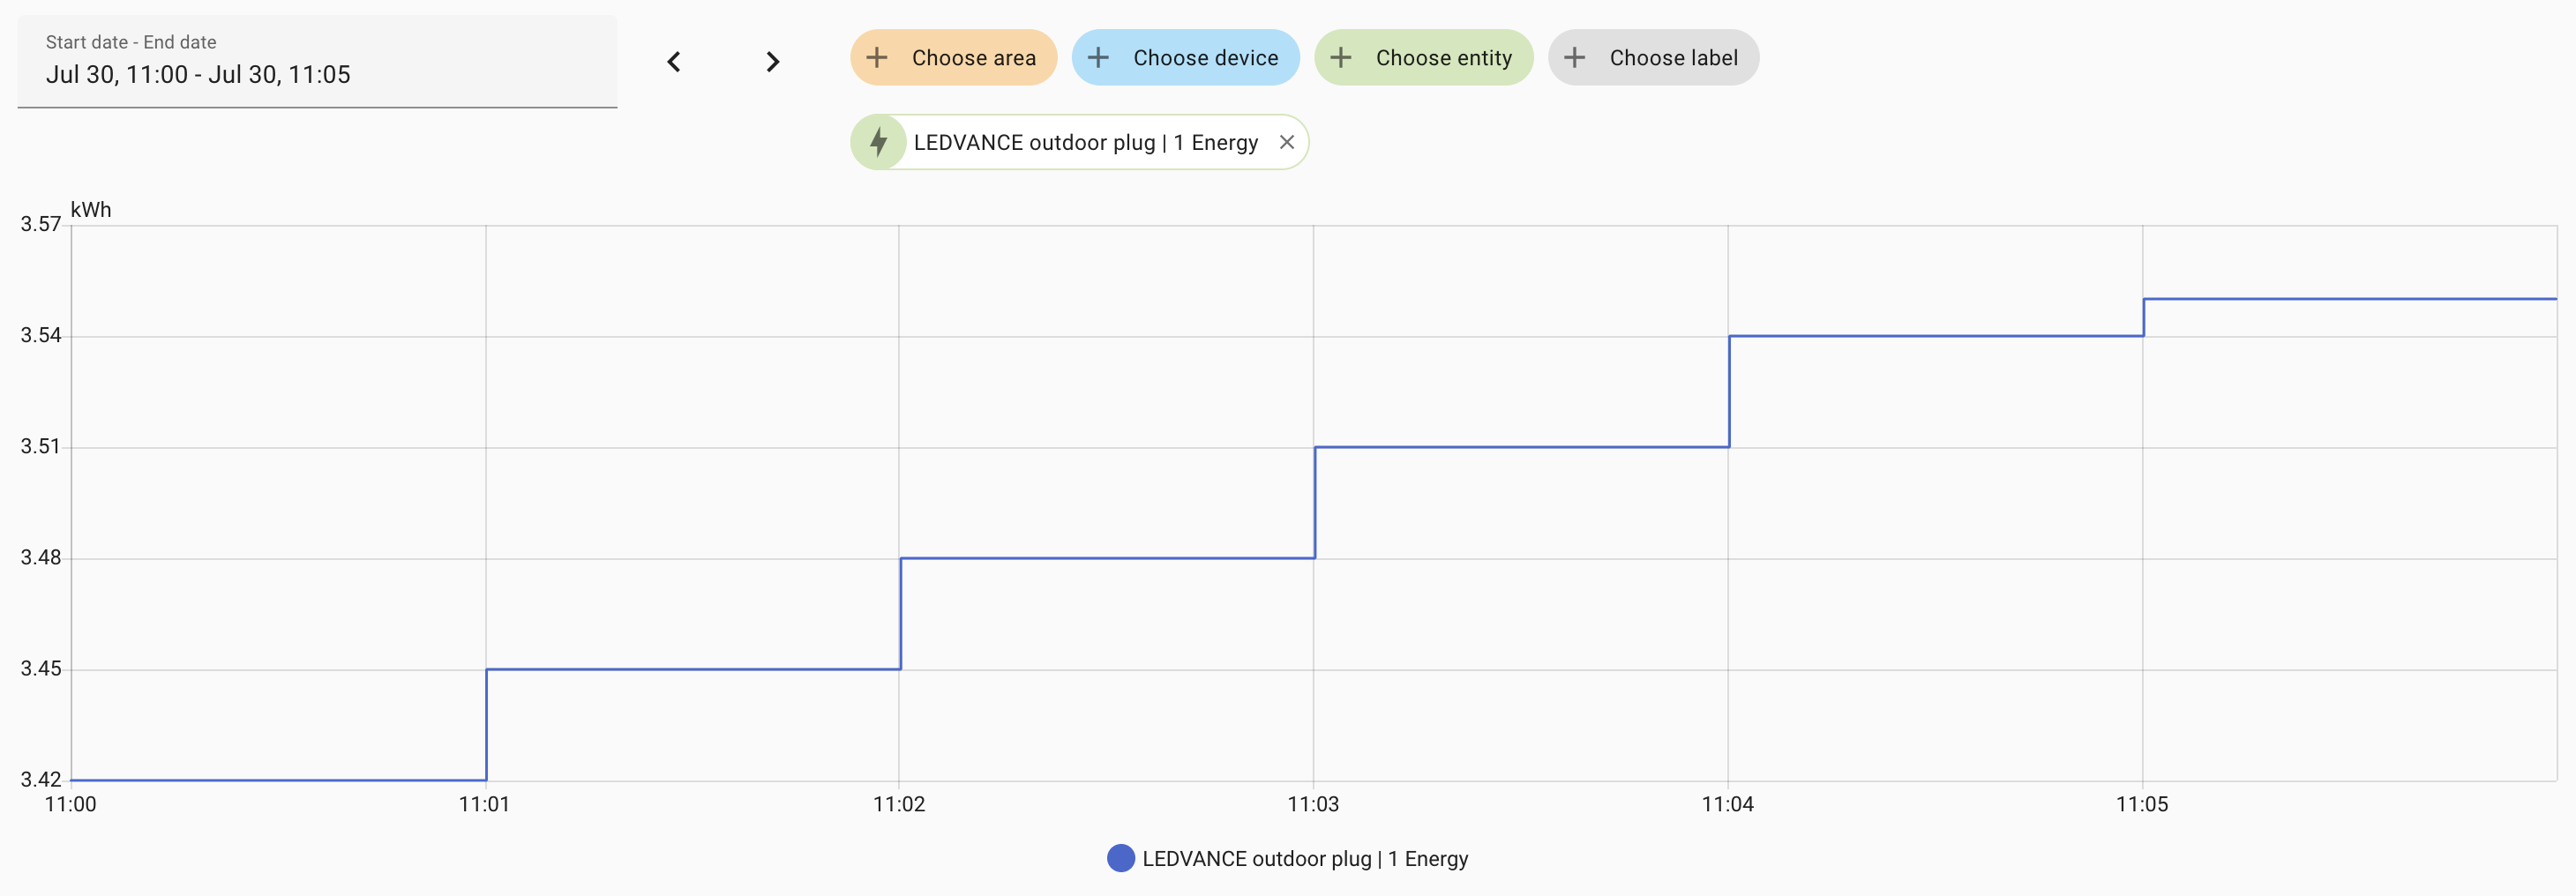
There is also a weather-proof (IP44) plug from LEDVANCE (database) for connecting various outdoor equipment (such as a patio heater). This one has an energy meter too, which does not require creating an integral sensor helper (unlike Aeotec).
A nice one indeed, but unfortunately it has a problem of not updating the energy metric, unless you manually click on the refresh button in Zigbee2MQTT web-interface:
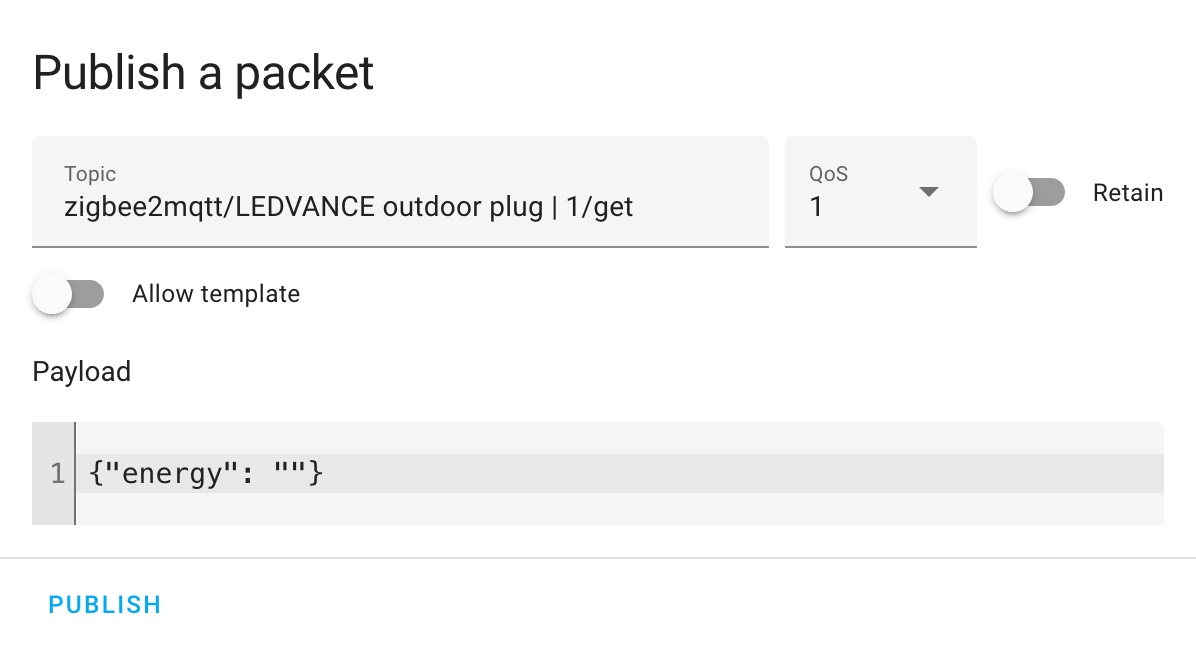
or trigger the update by publishing an MQTT message to its topic:
Obviously, nobody is going to do this manually, so here’s an automation for triggering the update via MQTT every minute:
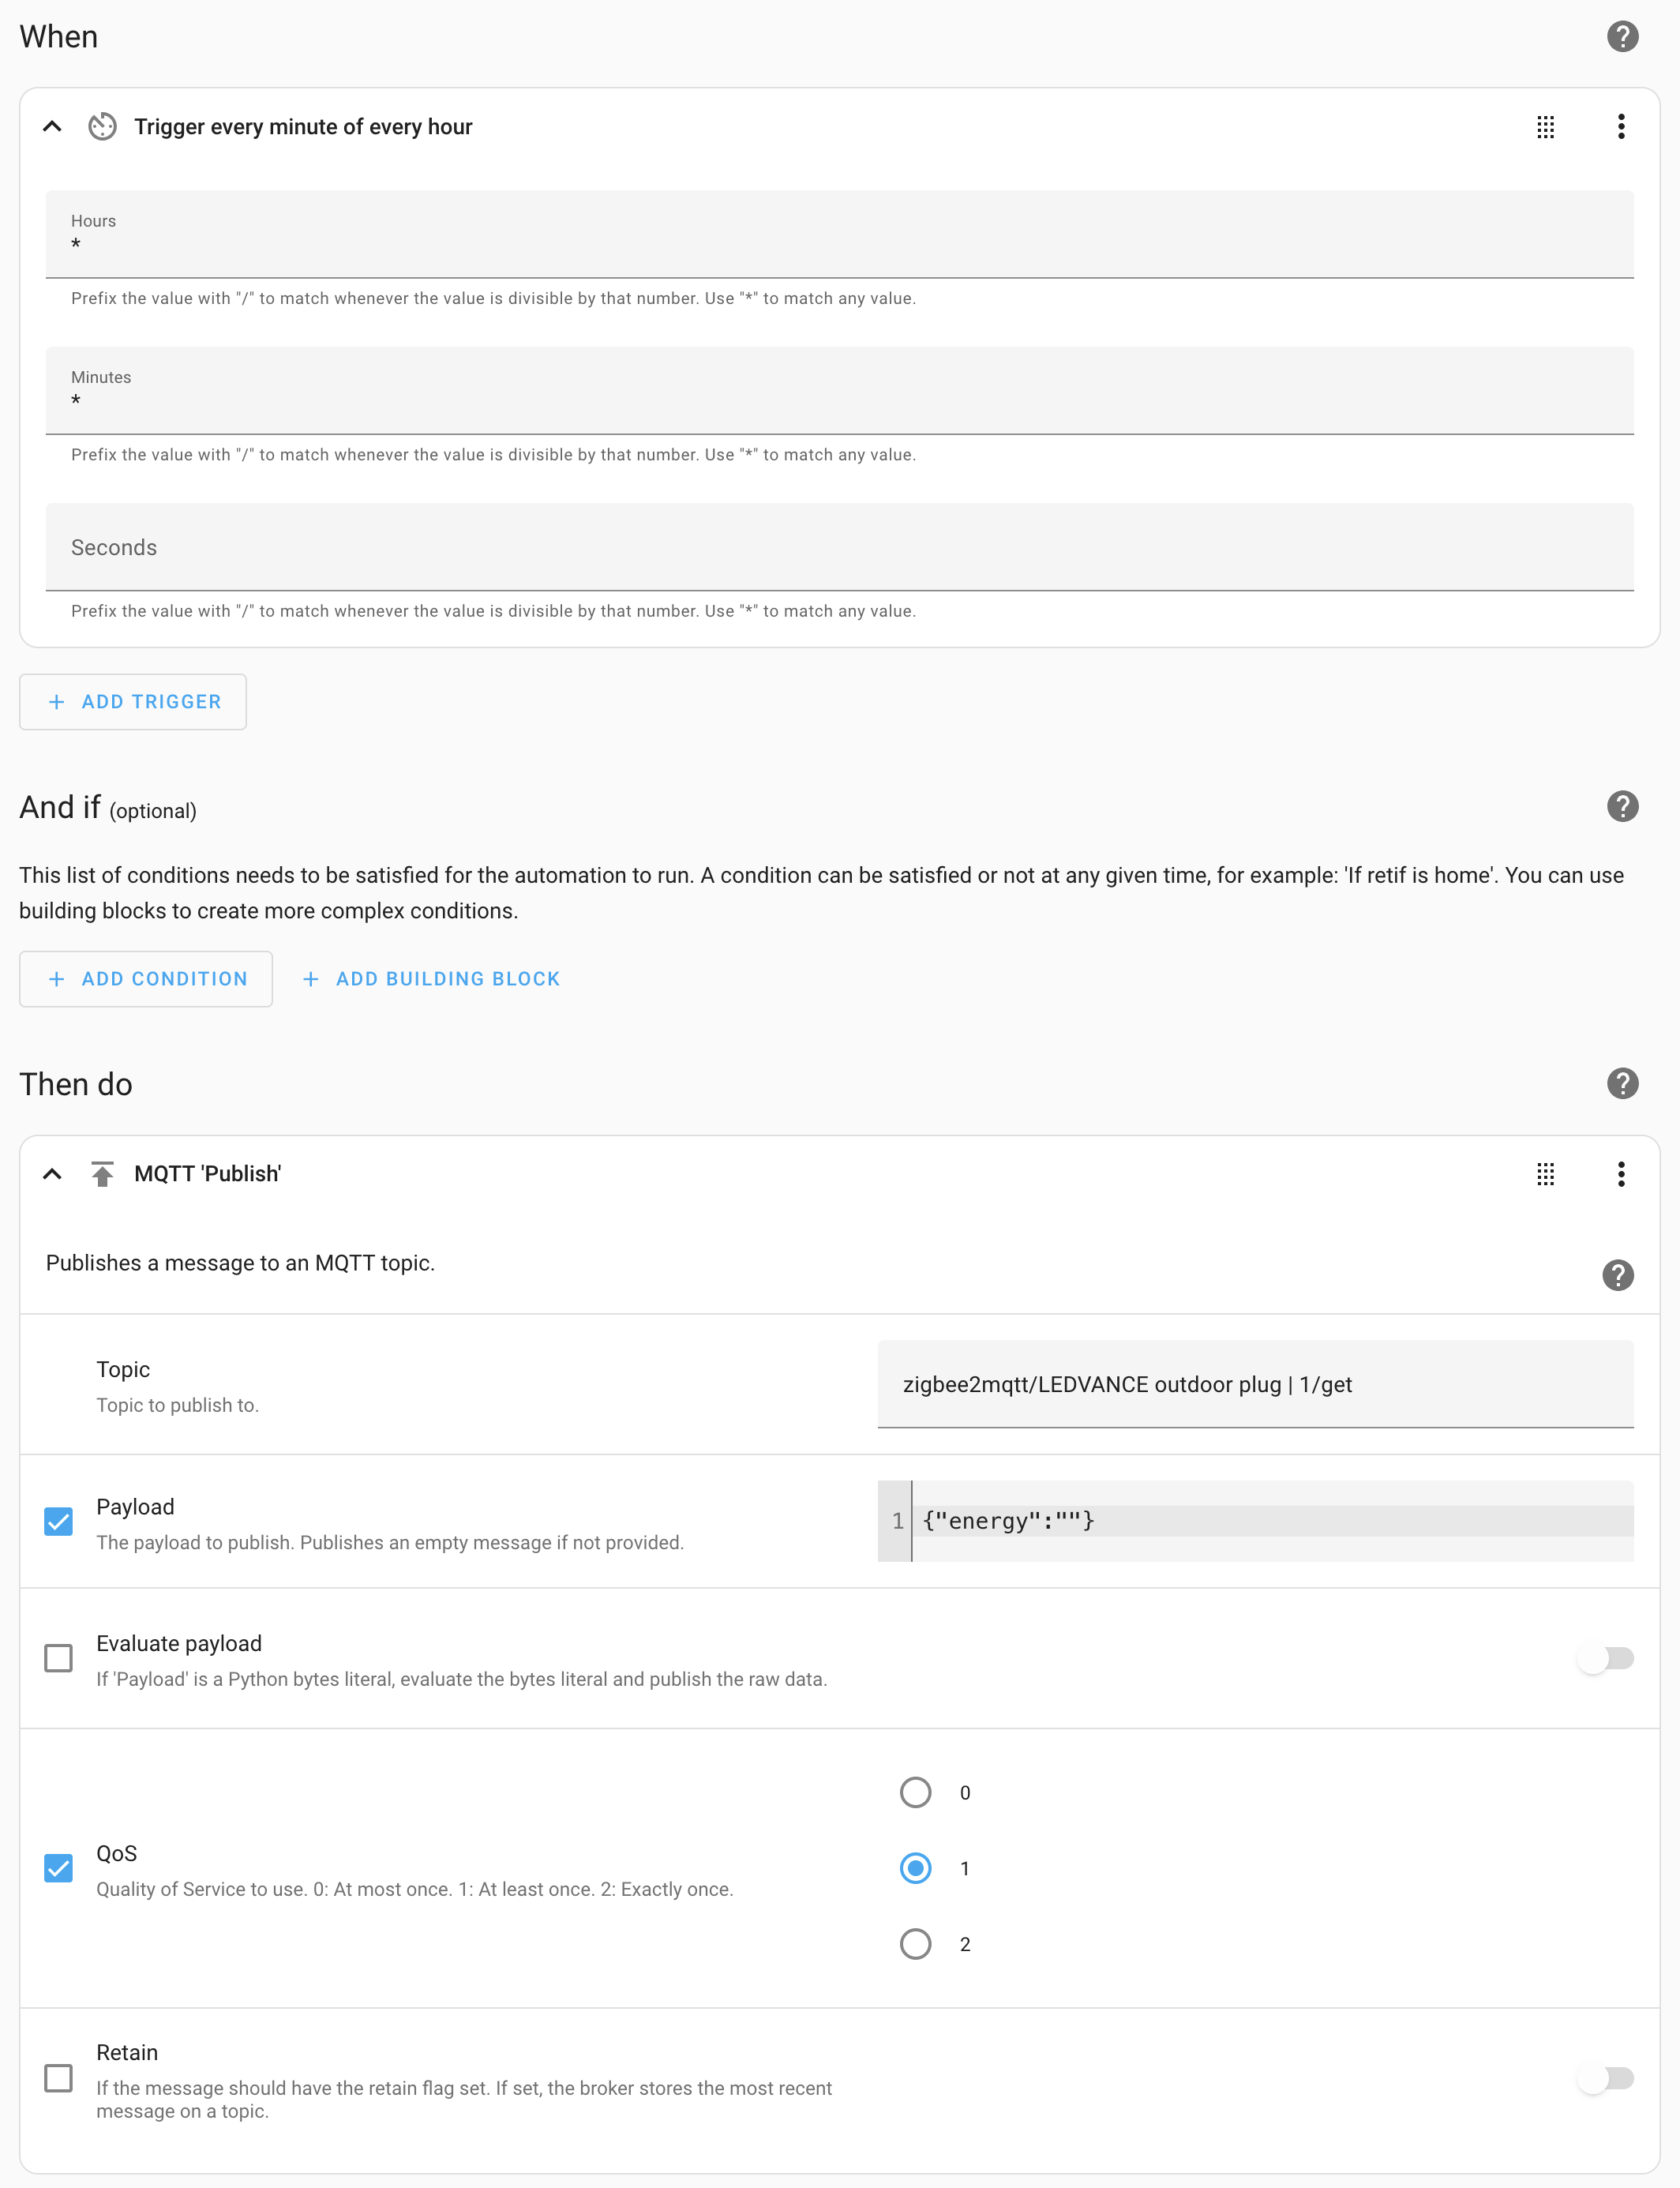
and the same in YAML:
triggers:
  - trigger: time_pattern
    hours: "*"
    minutes: "*"
conditions: []
actions:
  - action: mqtt.publish
    metadata: {}
    data:
      qos: "1"
      topic: zigbee2mqtt/LEDVANCE outdoor plug | 1/get
      payload: "{\"energy\":\"\"}"
mode: single
To verify that it works you can listen to the topic in MQTT:
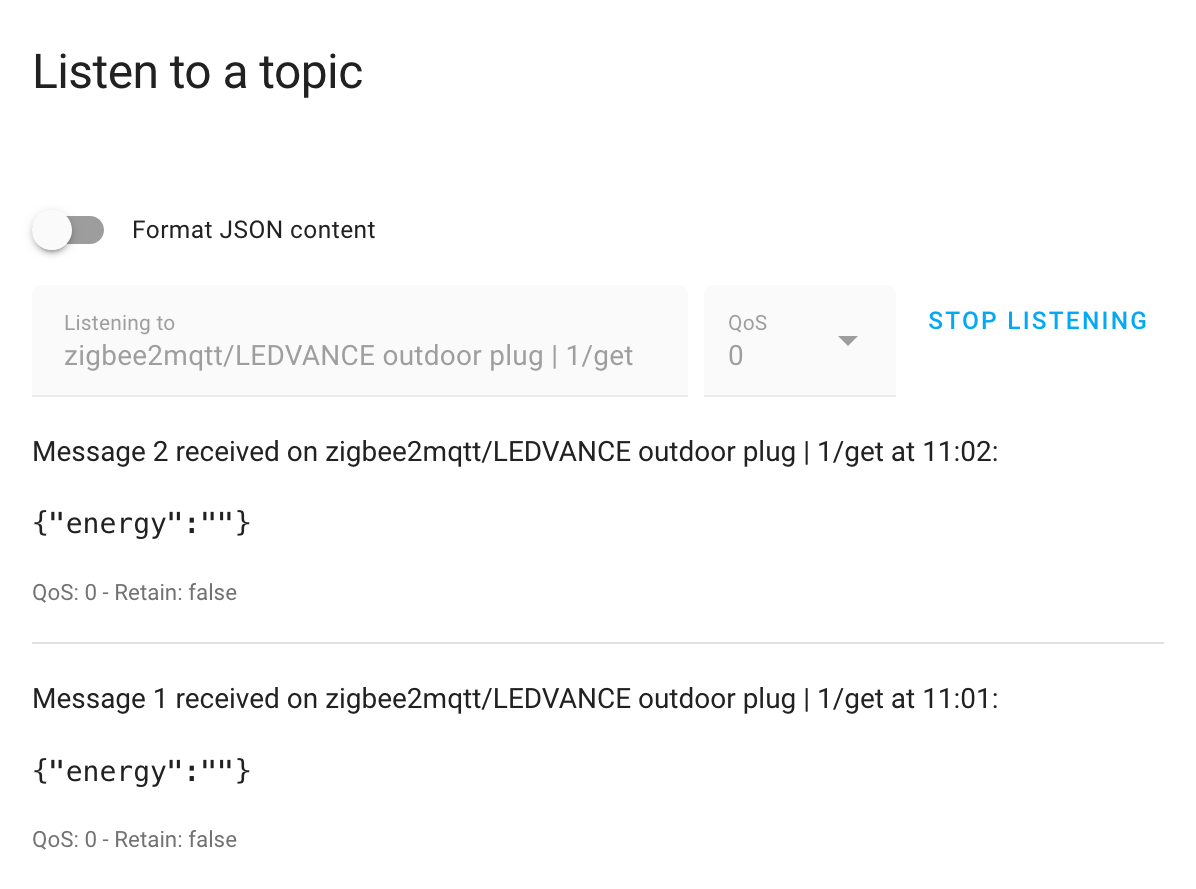
and of course you should see the energy value changing every minute (if there is an active consumer plugged-in):
Hopefully, LEDVANCE will fix this problem in the plug firmware, although at the moment it didn’t seem to have OTA updates supported in Zigbee2MQTT. But when I checked some months later after updating Zigbee2MQTT to a newer version, OTA updates appeared in there, and I got a notification about an available update in Home Assistant, which I started installing right away:
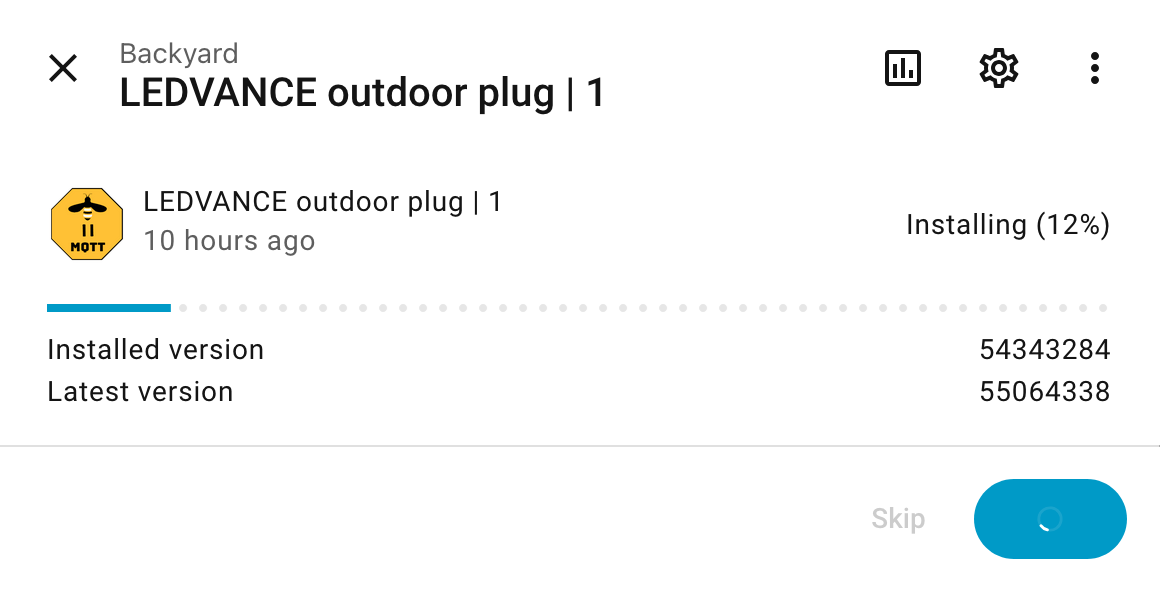
Looking at the changelog for the updates, I saw that something related seemed to have been fixed already in the March 2025 update (while I was struggling with it in July 2025):
echo 'Their backend requires POST'
$ curl -X POST https://update.ledvance.com/firmware-overview/releasenotes?name=PLUG_COMPACT_EU_EM_T-0x00E6-0x033D3674-MF_DIS.OTA
RELEASE NOTES - PLUG_COMPACT_EU_EM_T-0x00E6-0x033D3674-MF_DIS.OTA
Date: Thursday, 13 March 2025

1.Support real-time power, current, and voltage report.
2.Support total power consumption statistics feature to track energy usage.
3.Support power-on on/off configuration, allowing users to set initial operating state when power-on.
but even after updating to the latest available firmware (and disabling the automation for querying energy values) the issue remained, so I still was not getting auto-updating energy (or any other) readings, and so I still have to rely on my additional automation to poll for new values every minute.
IKEA INSPELNING
At some point later IKEA suddenly released their own smart plug (database) with energy meter (which also does not require adding an integral sensor helper), and for such a good price (at least two times cheaper than competition) that I have immediately bought 5 items (after waiting for them to return back in stock, as the initial batch with even lower price was sold out very fast).
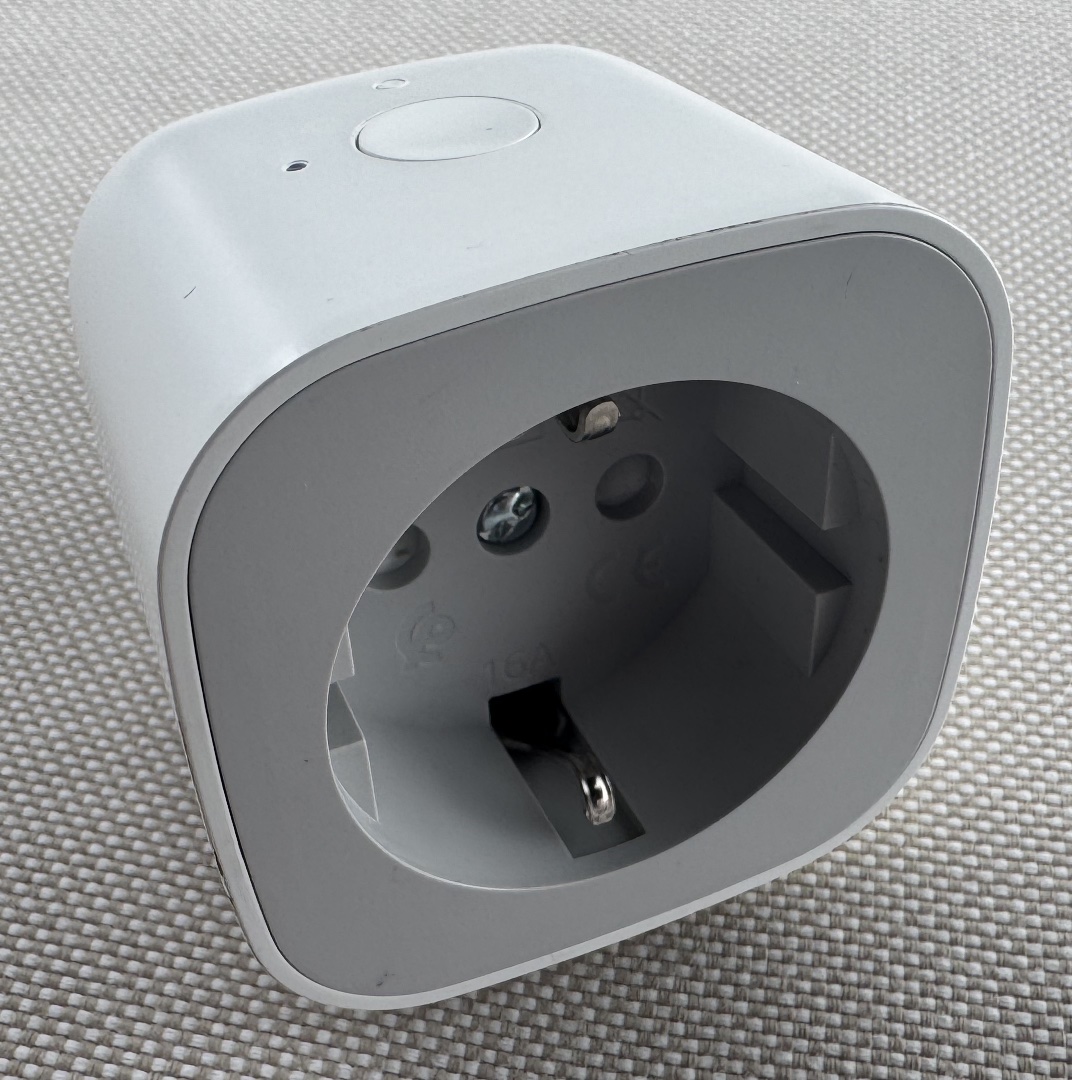

They simply just work out of the box (with OTA updates too), no fiddling required:
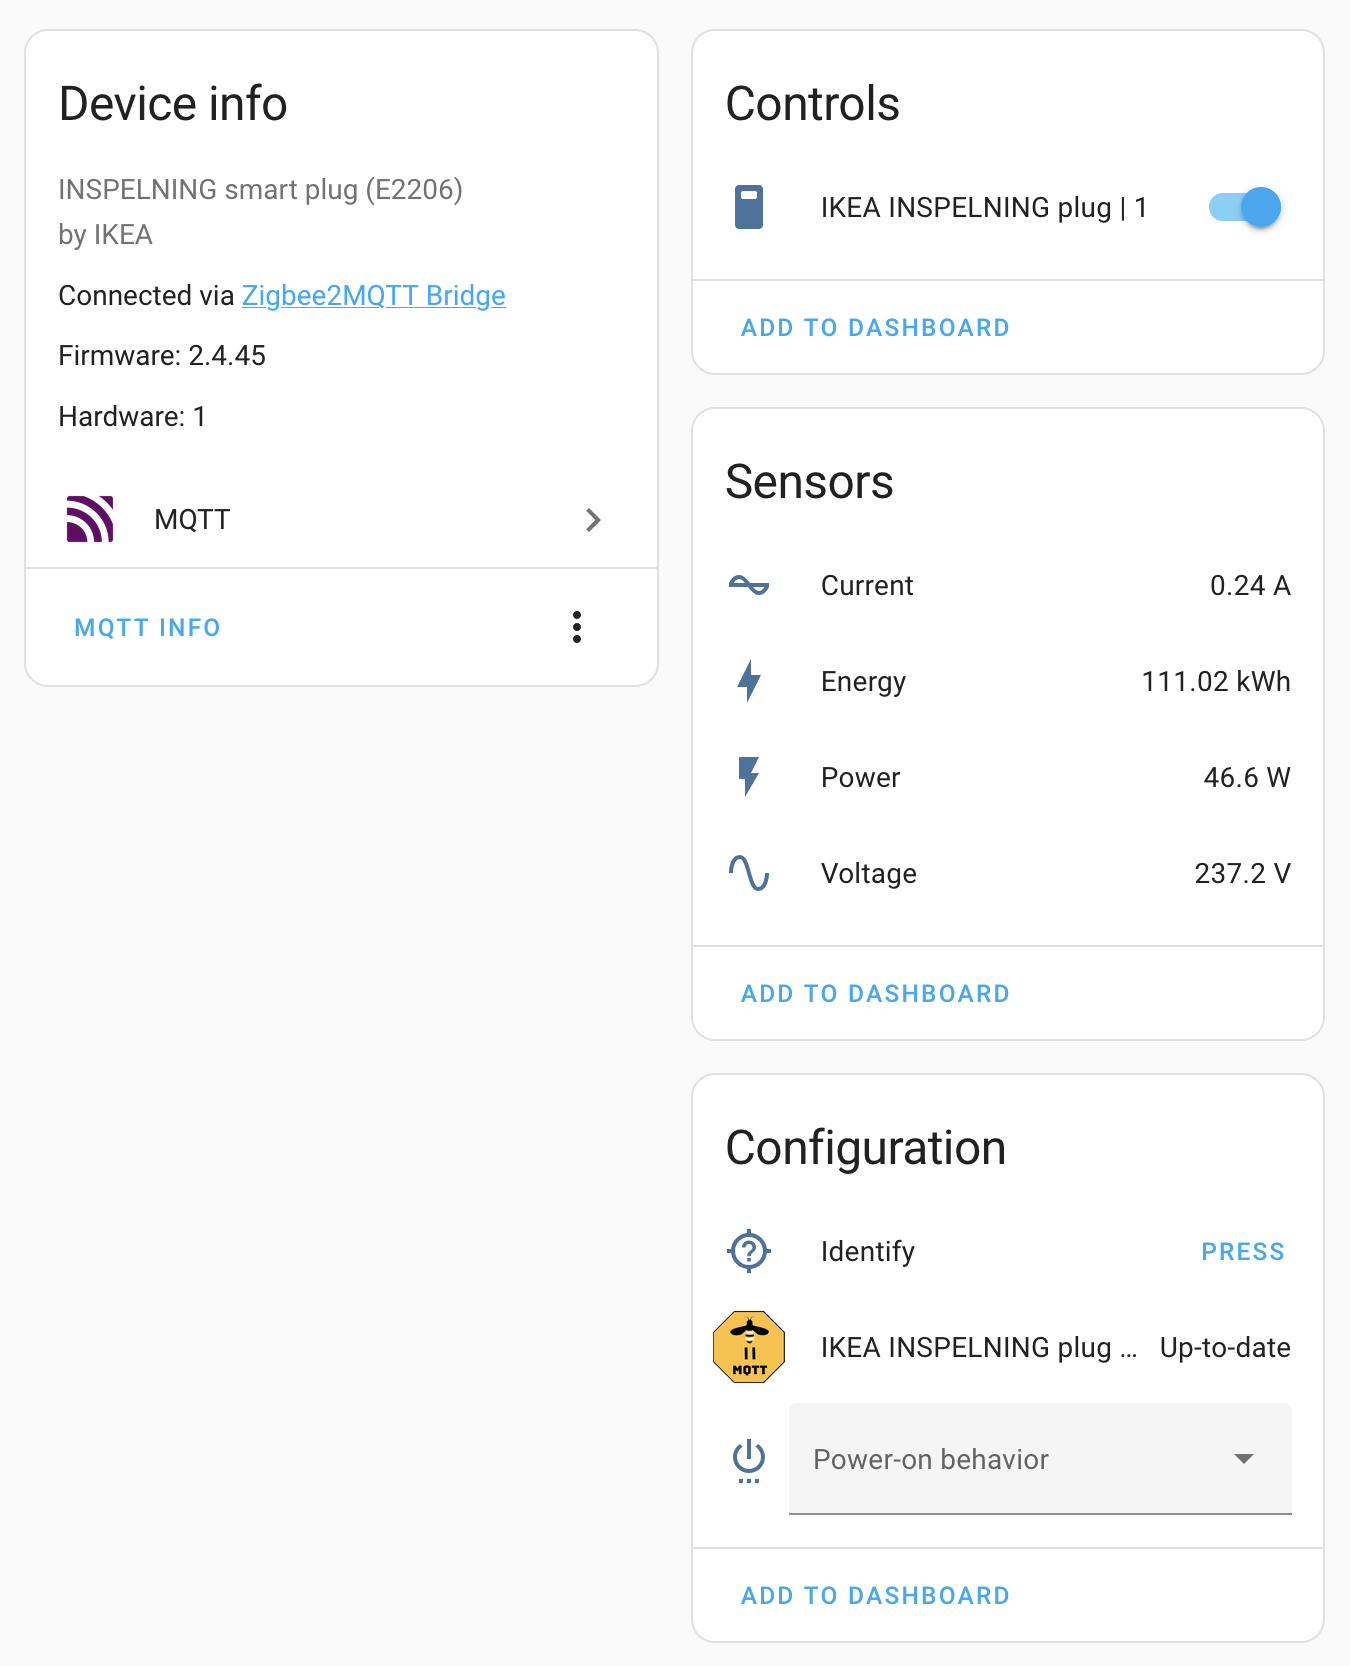
So I’d say these are the best smart plugs available for home automation at the moment.
Controls
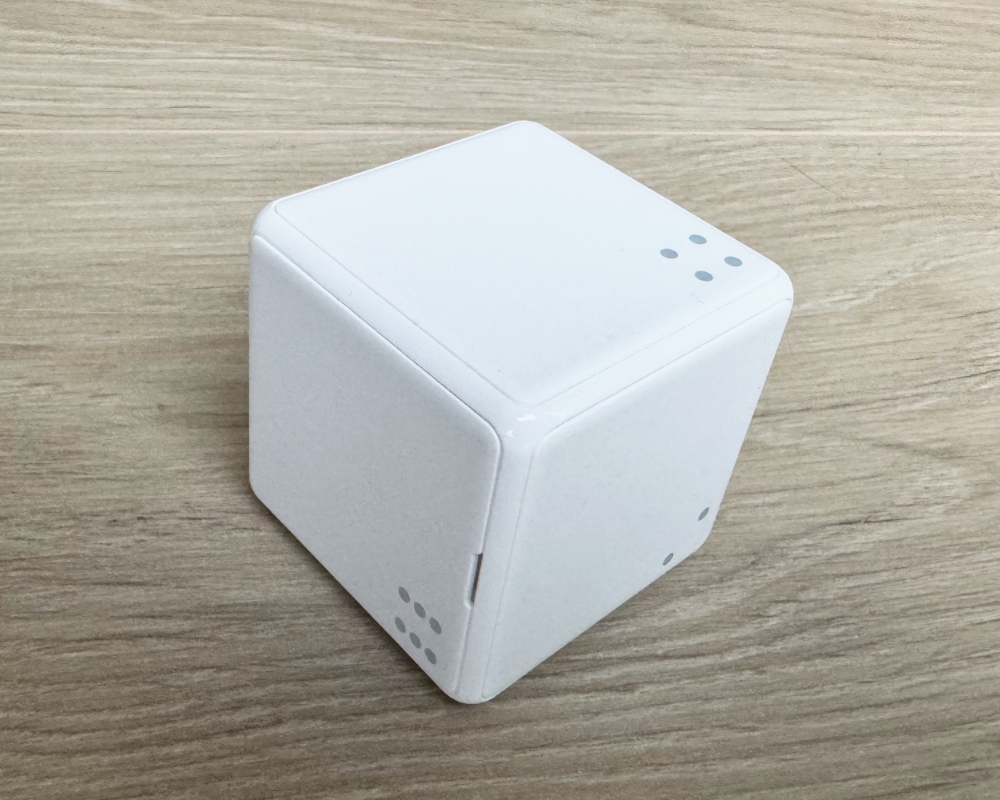
Aqara Cube T1 Pro
That little thing (database) is fantastic:
Say you’d like to have a physical button, which would control the lights, so you could just press it instead of reaching to your phone/computer with Home Assistant client application/browser. And then maybe you’d also like to have a dimmer for the lights, and maybe yet another button for controlling a power plug, and so on and so on. Every such Zigbee-capable button/dimmer would cost you some noticable amount of money, plus they would be piling up on your table, so that doesn’t scale very well, does it.
But what if instead of having several such buttons/dimmers you could have just one device that could somehow act as several “buttons”. And Aqara Cube is exactly that: it can trigger at the very least 18 actions (3 for each side: tapping, rotating clockwise and rotating counterclockwise) - but actually more, because there are also actions for pushing, resting, holding, throwing, shaking, flipping 90/180 degrees and more. And all that for the price of less than one physical button.
To state the obvious, you do not need the Aqara hub or anything else to interface with it, as Zigbee2MQTT can pair with it directly just fine. Take off the top side cover/plate and hold the link button for 5 seconds. Once it is paired, don’t put the plate back just yet - I would recommend you to switch the cube to Action mode. That is done by sending the “operation” command to it, either from Zigbee2MQTT device page or from Home Assistant device page. For this to take effect immediately (otherwise it “syncs” once per hour?), press the link button once, and then you can put the plate back.
Here’s a very basic automation that you can make with the cube:
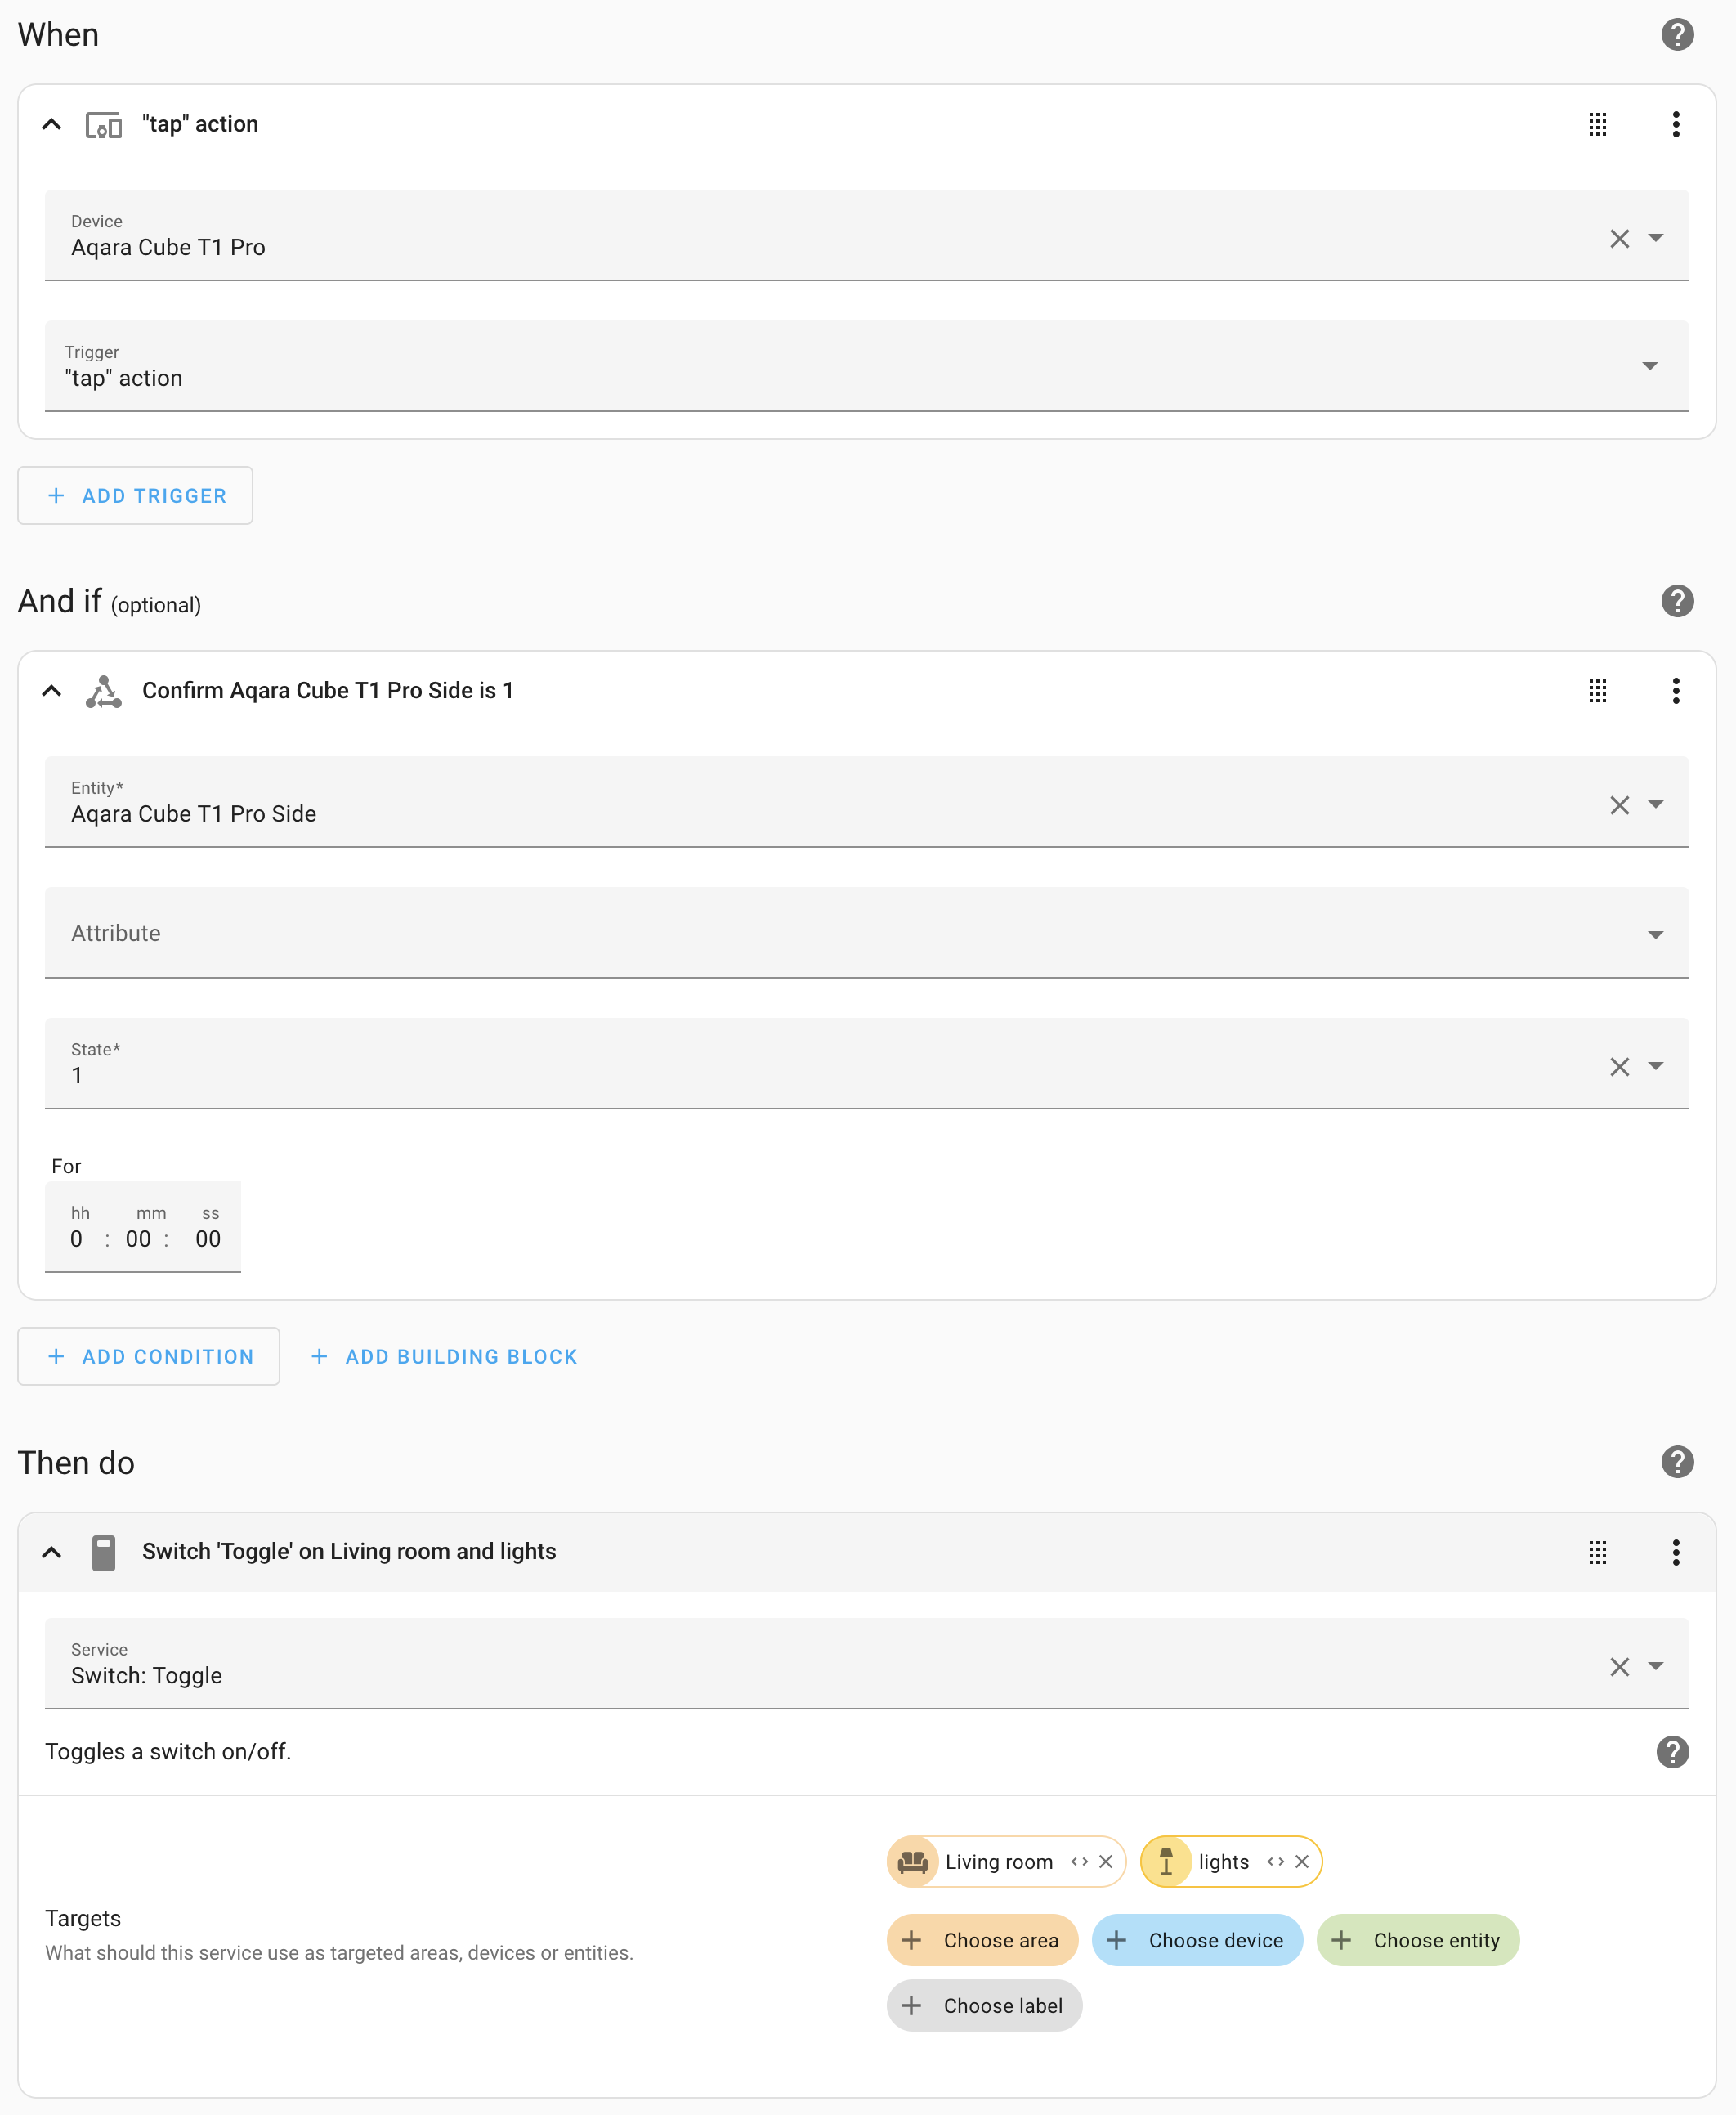
So whenever I double-tap the cube on the table (or wherever it is), while its top side is 1, all the devices labeled with lights in the Living room area will be toggled on/off.
Here it is a code too:
alias: 💡 1 | Toggle lights on 2nd floor
description: ""
trigger:
  - platform: device
    domain: mqtt
    device_id: AQARA-CUBE-DEVICE-ID-HERE
    type: action
    subtype: tap
condition:
  - condition: state
    entity_id: sensor.aqara_cube_t1_pro_side
    state: "1"
action:
  - service: switch.toggle
    metadata: {}
    data: {}
    target:
      area_id: living_room
      label_id: lights
mode: single
There will be some more automation examples later.
IKEA remote controls
Speaking about buttons/controls, it is impossible to ignore the remote controls from IKEA:
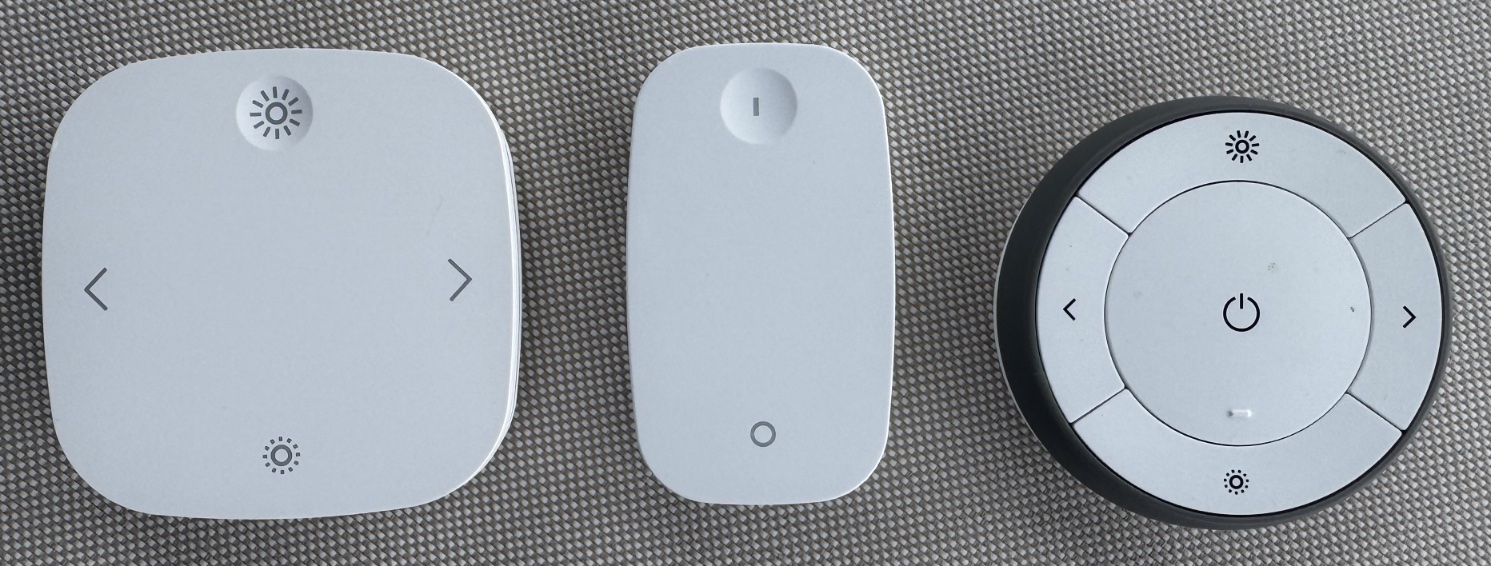
Such inexpensive and versatile remote controls can probably be considered as a must-have thing for your home automation. There are several of them available, and I have these ones:
Aside from the normal short press action every(?) button also has a long press action, so the total amount of actions per control is at least twice the number of buttons that it has. That is really great for creating automations.
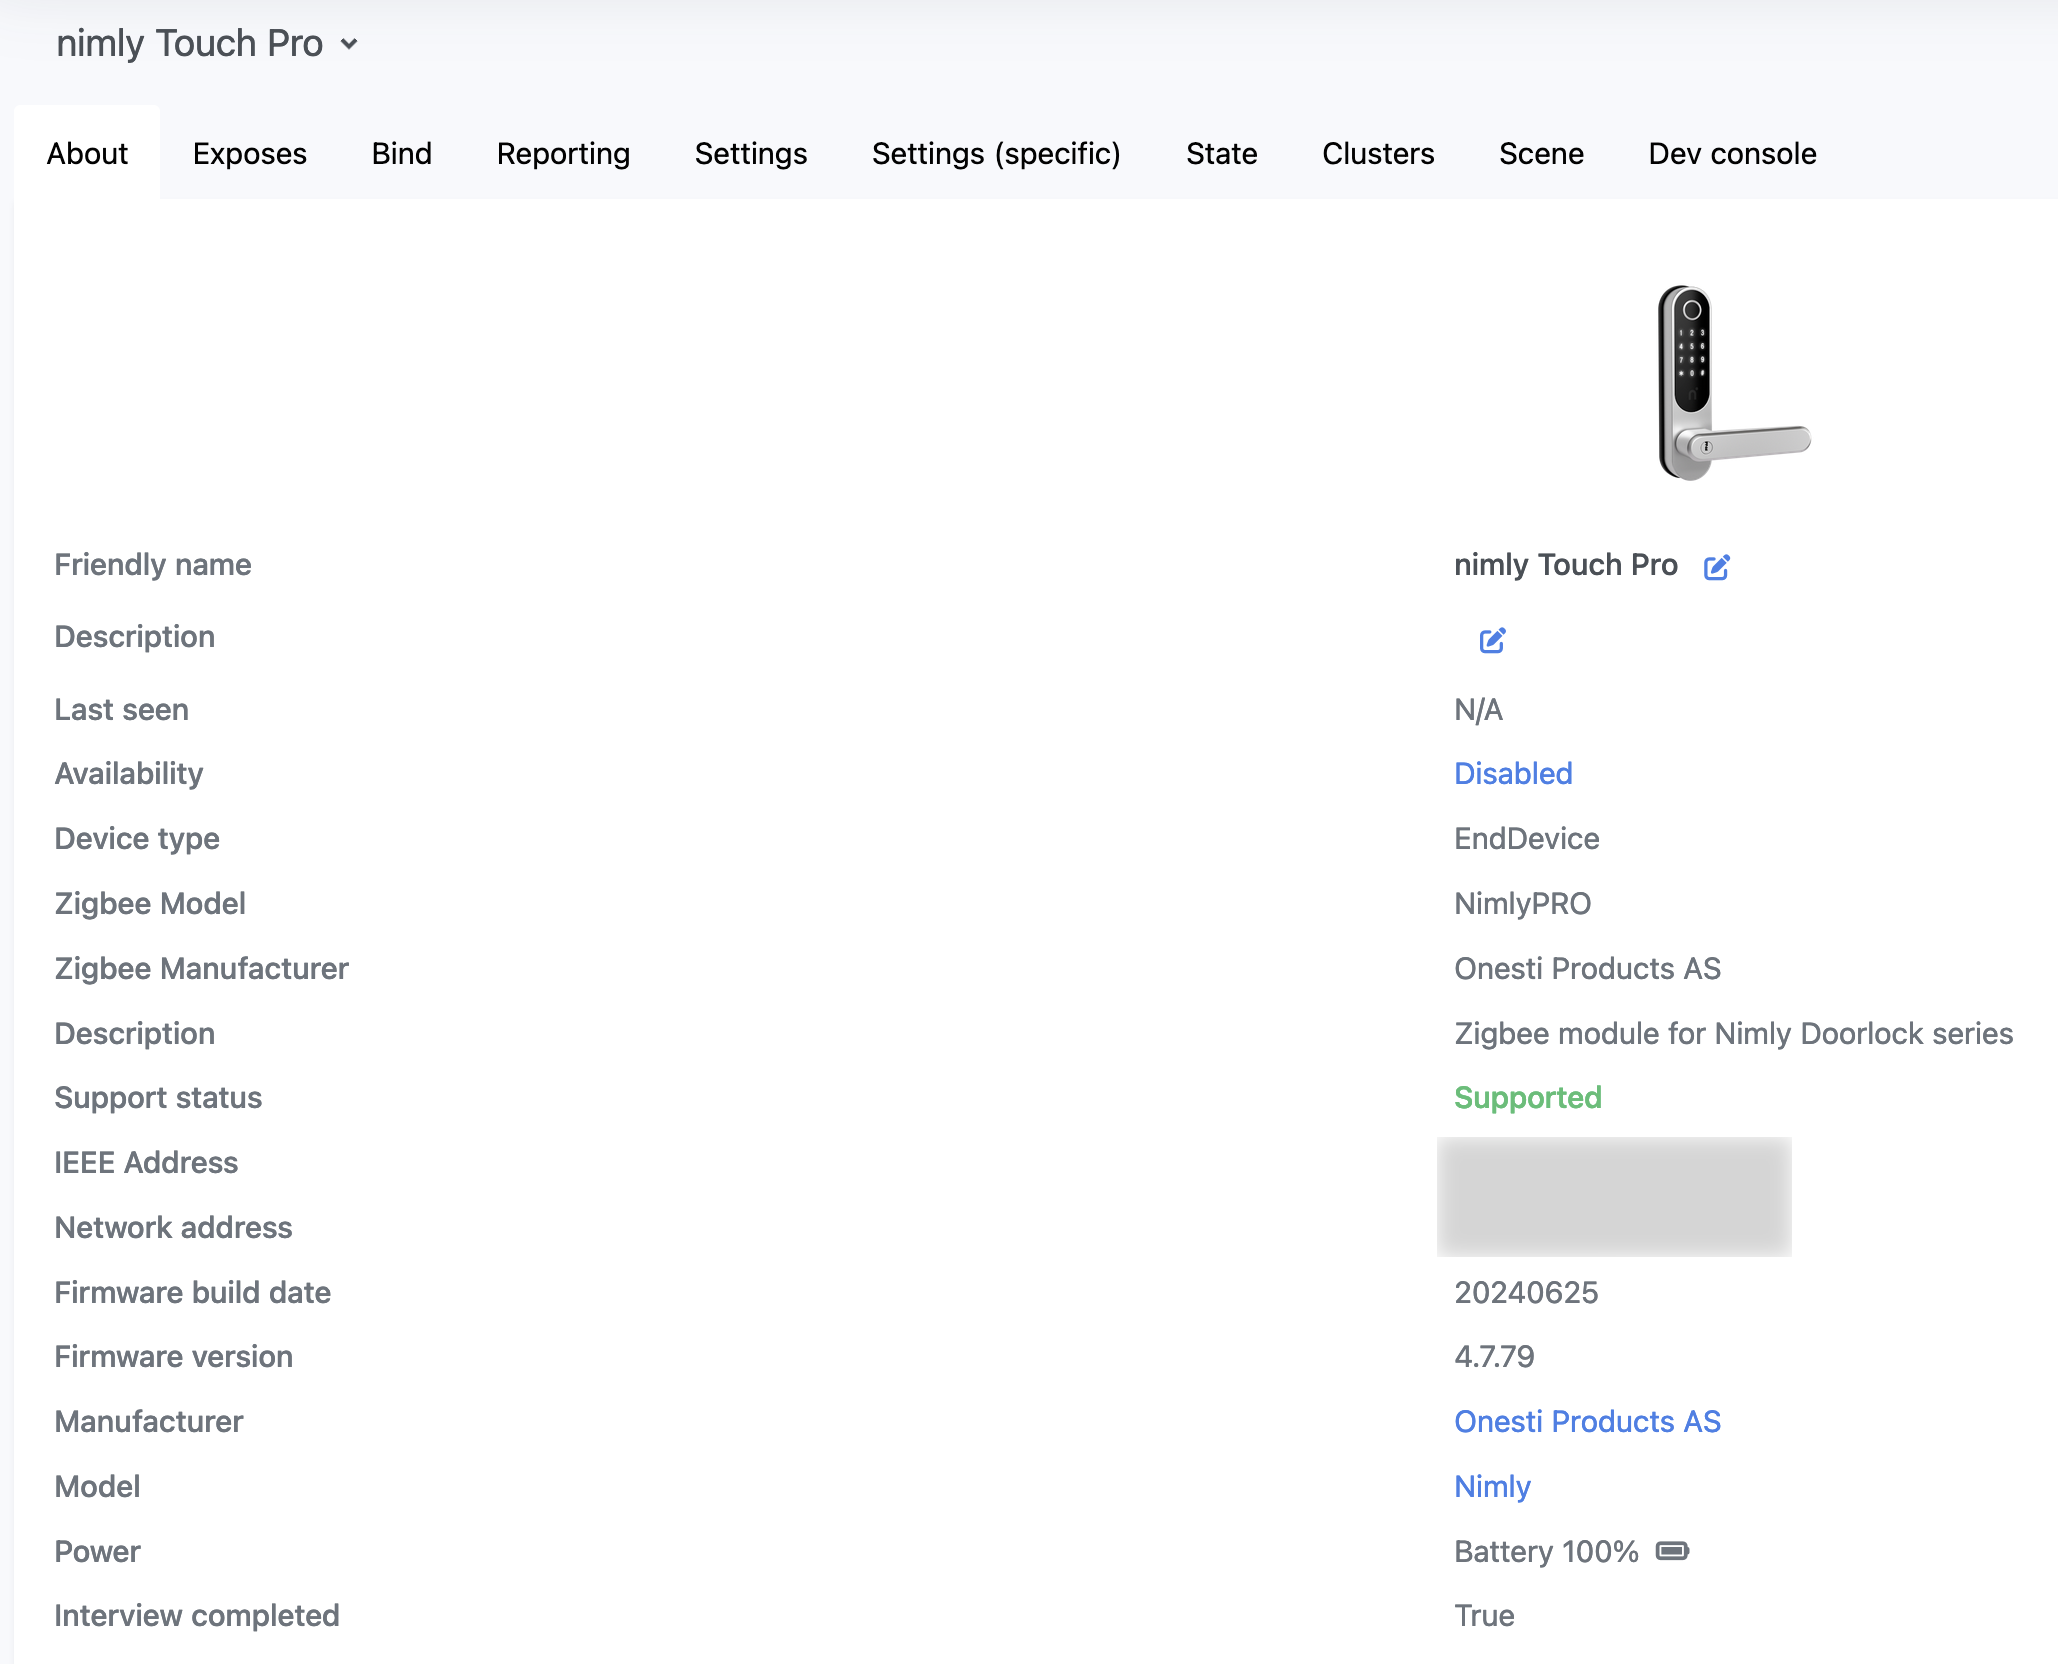
nimly Connect Module
I’ve got a nimly Touch Pro lock with a nimly Connect Module (database). The module allows you to control the lock remotely, so you can lock/unlock it, change some settings, get information about what method was last used to unlock it (fingerprint, token, pin-code) and which user did it.
The lock itself is great, but I’ve had some problems with the module. It is actually my 3rd module already, as the first two had certain defects (first one was loosing connection and second one was draining the batteries), and nimly people are graciously sending me replacements. The current module that I got has firmware build date 20240625 with version 4.7.79, and finally everything seems to be good with this one.
Initially I’ve been using the modules with Homely, but I wasn’t entirely satisfied with the functionality exposed in Homely application, so I decided to connect it to Home Assistant instead. The pairing with Zigbee2MQTT went fine, the module got interviewed and marked as supported:
I also got it in Home Assistant, but nothing seemed to actually work. The commands that I tried to send to it (such as lock/unlock) were failing, as there was no reaction on the lock itself, and the logs had errors like:
zh:ezsp:ezsp: Frame changeSourceRouteHandler parsing error: RangeError: Attempt to access memory outside buffer bounds at new NodeError (node:internal/errors:405:5) at boundsError (node:internal/buffer:86:11) at Buffer.readUInt16LE (node:internal/buffer:245:5) at Buffer.readUIntLE (node:internal/buffer:182:17) at Function.deserialize (/app/node_modules/zigbee-herdsman/src/adapter/ezsp/driver/types/basic.ts:19:67) at new EZSPFrameData (/app/node_modules/zigbee-herdsman/src/adapter/ezsp/driver/ezsp.ts:180:54) at /app/node_modules/zigbee-herdsman/src/adapter/ezsp/driver/ezsp.ts:154:23 at Array.every (<anonymous>) at Function.createFrame (/app/node_modules/zigbee-herdsman/src/adapter/ezsp/driver/ezsp.ts:148:15) at Ezsp.onFrameReceived (/app/node_modules/zigbee-herdsman/src/adapter/ezsp/driver/ezsp.ts:439:35)
zh:ezsp:ezsp: Unparsed frame 0xc4. Skipped
z2m: Publish 'set' 'state' to 'nimly Touch Pro' failed: 'Error: ZCL command IEEE-ADDRESS-HERE/11 closuresDoorLock.lockDoor({"pincodevalue":""}, {"timeout":10000,"disableResponse":false,"disableRecovery":false,"disableDefaultResponse":true,"direction":0,"srcEndpoint":null,"reservedBits":0,"manufacturerCode":null,"transactionSequenceNumber":null,"writeUndiv":false}) failed (Timeout - 57813 - 11 - 52 - 257 - 0 after 10000ms)'
Also its sensors were reporting None in Home Assistant:
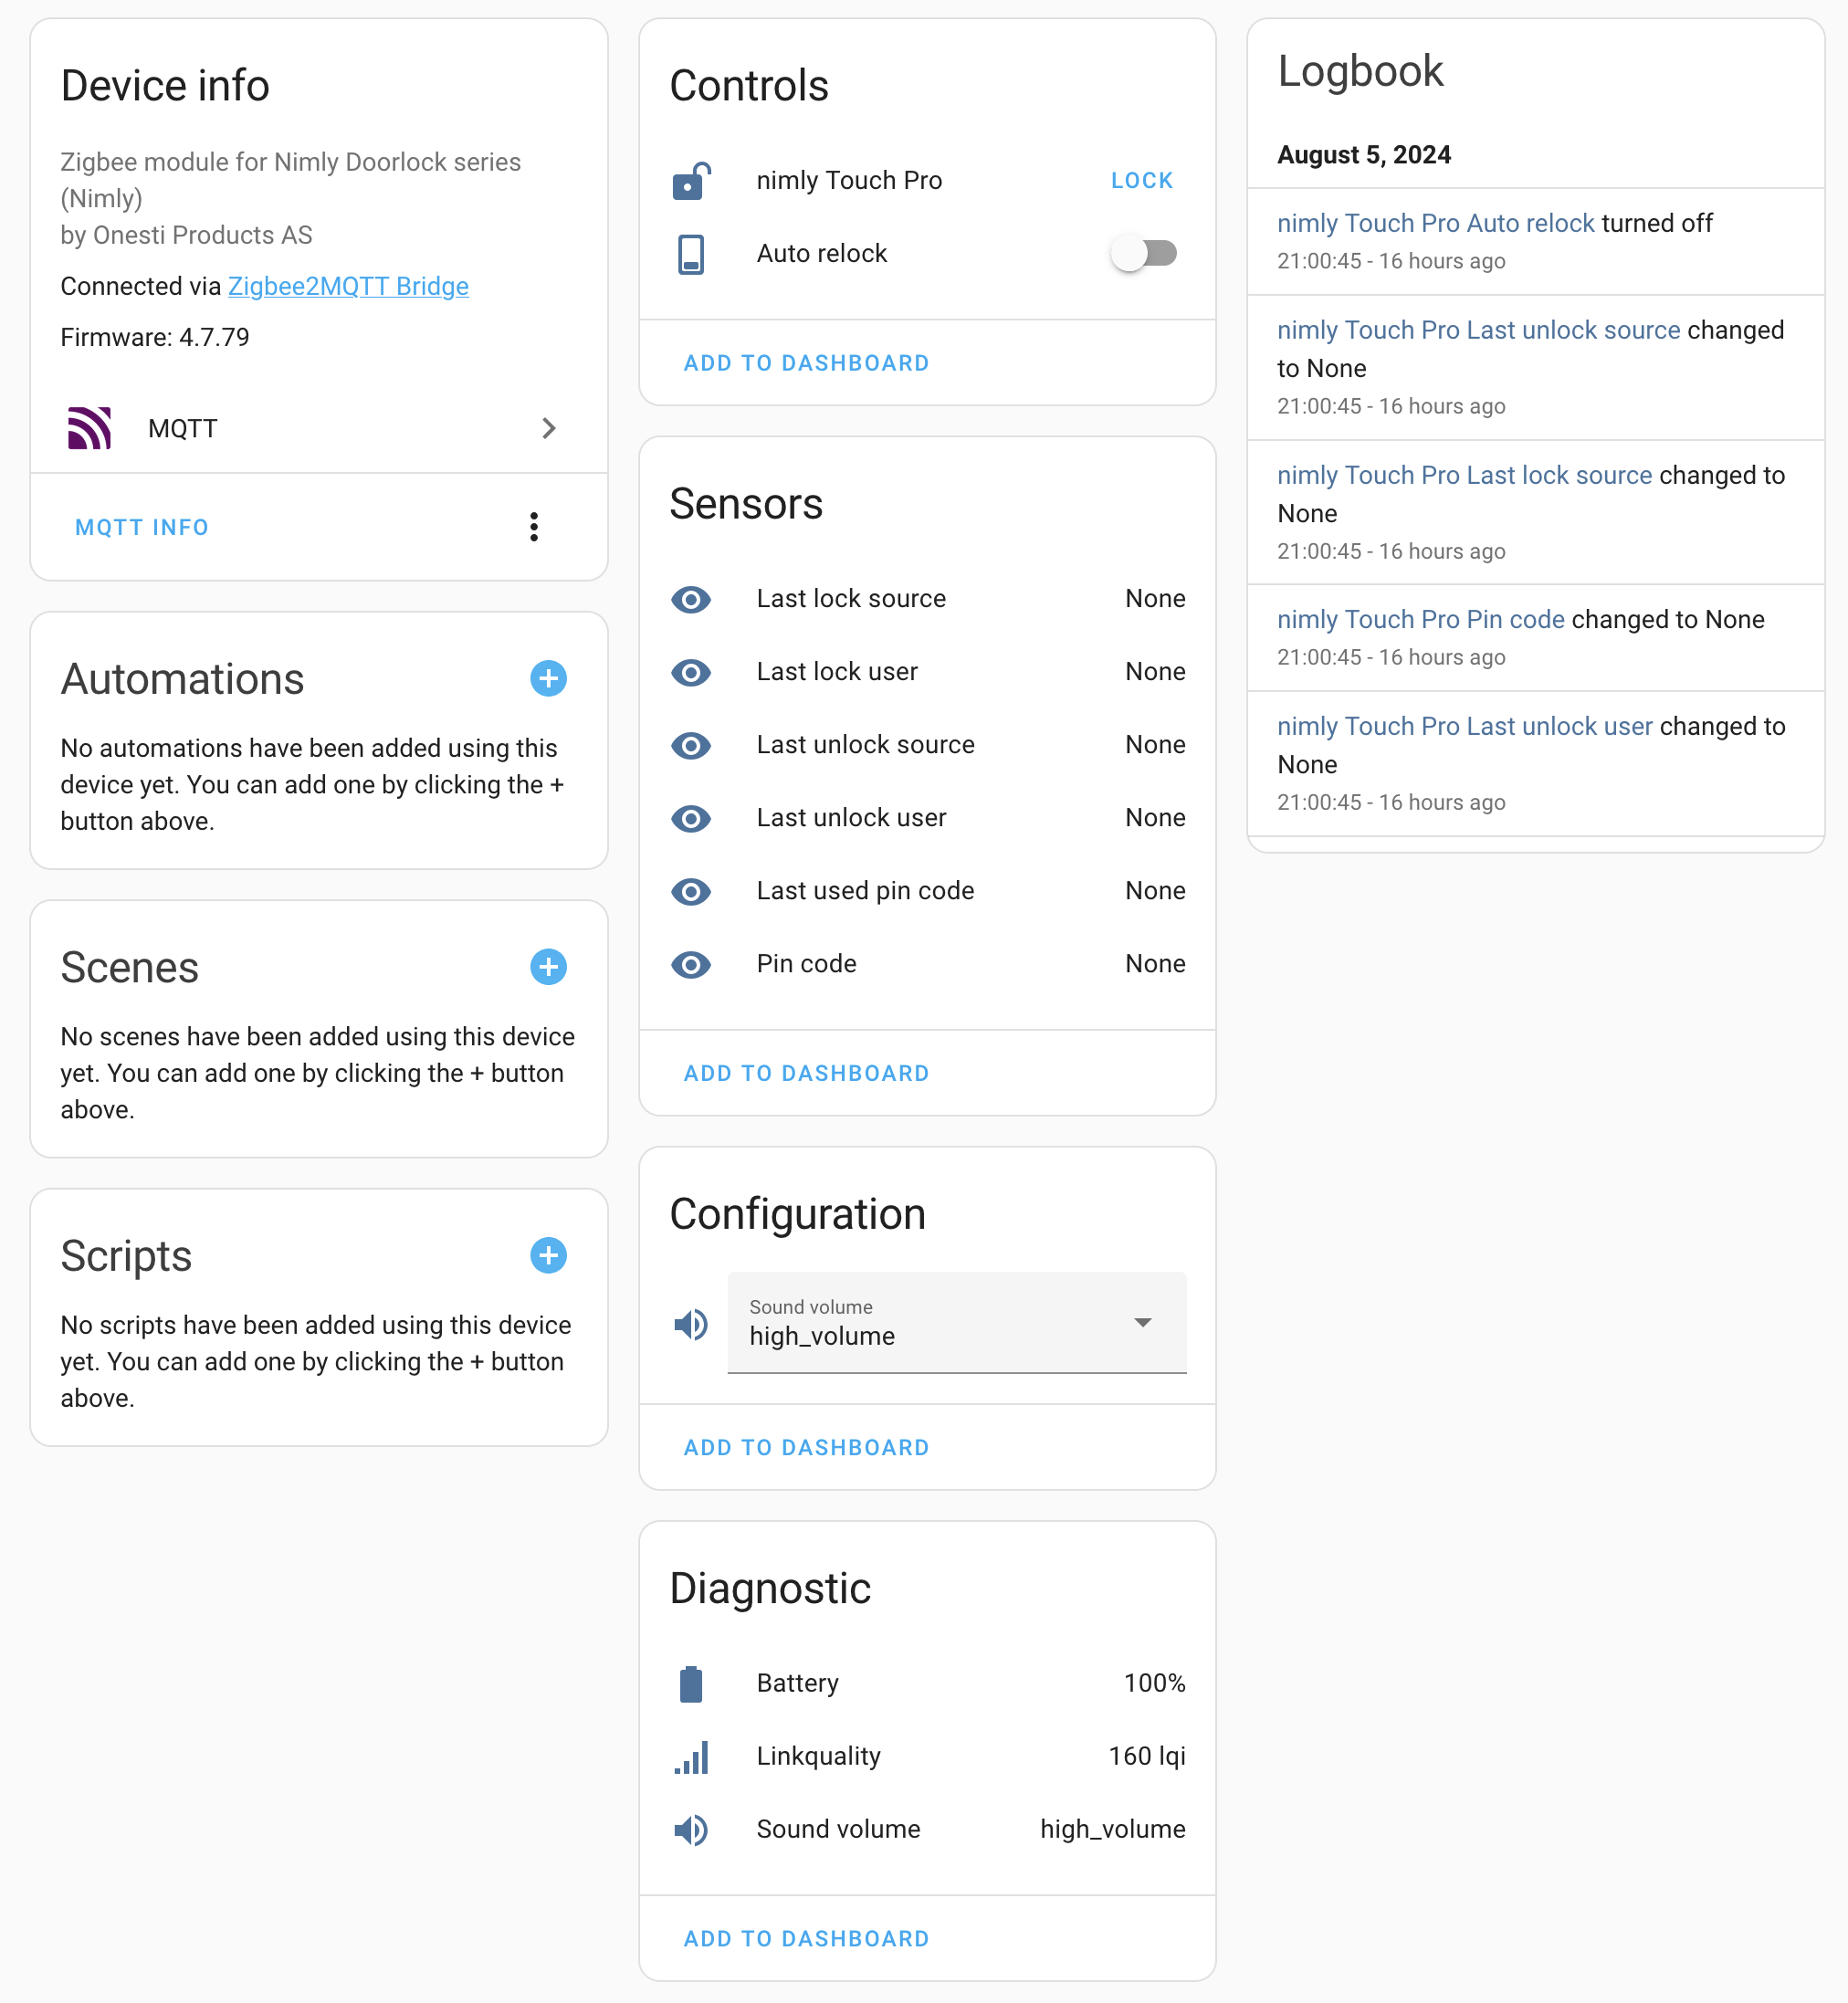
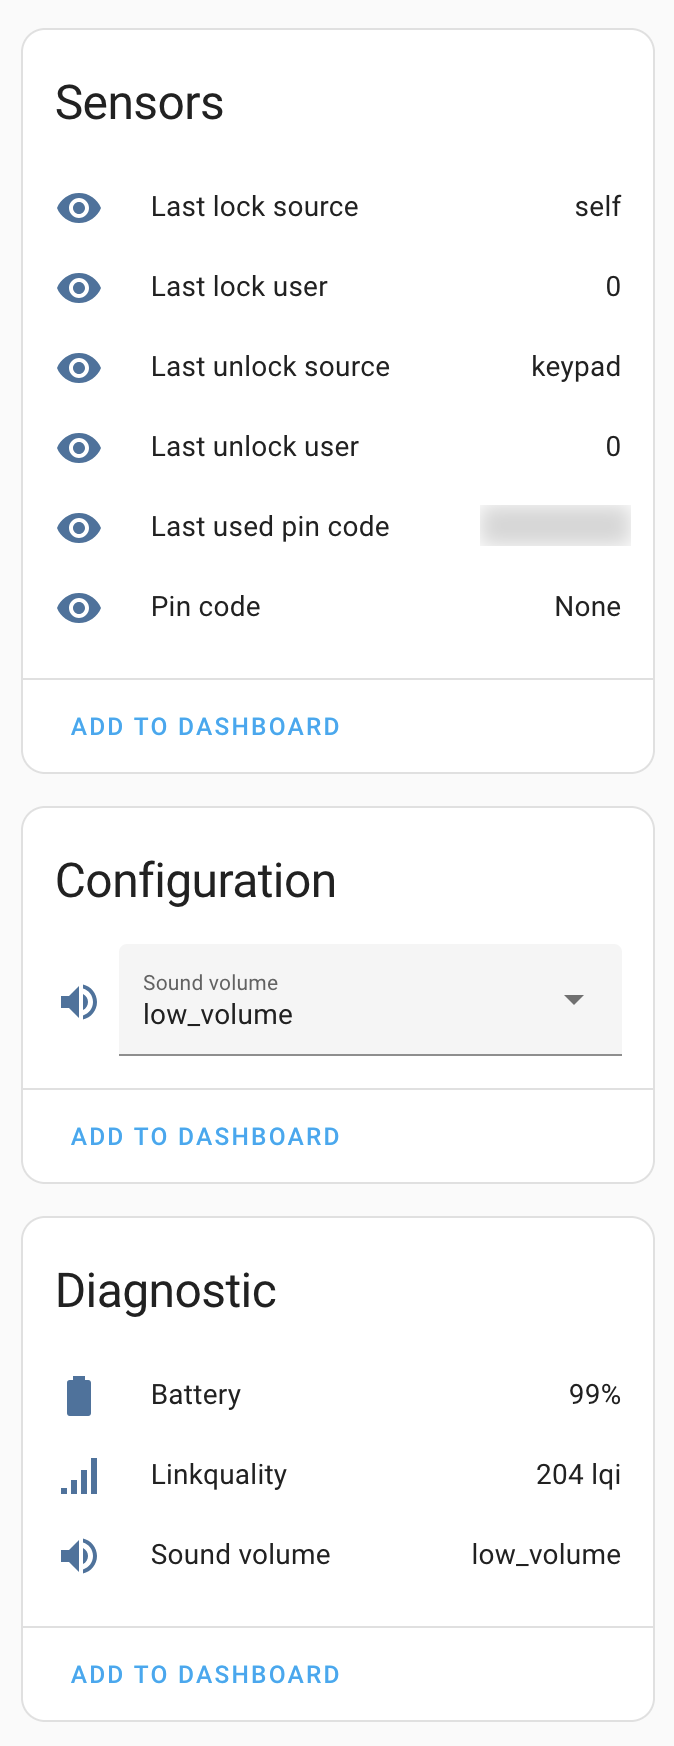
Before trying anything else I tried to simply re-pair it (force-remove, re-insert the batteries and add it back again), and this time it got successfully added with everything working (even though there were still the same errors in the logs):
Now that there is a possibility to remotely control such a critical piece of hardware as main door lock, you can quite literally be hacked - just like in the movies. How exciting is that!
Lamps
IKEA Tradfri E27
As it turned out, IKEA bulbs, which I have already been using for a couple of years, are also Zigbee-enabled, so they can be connected to a Zigbee network without their remote control.
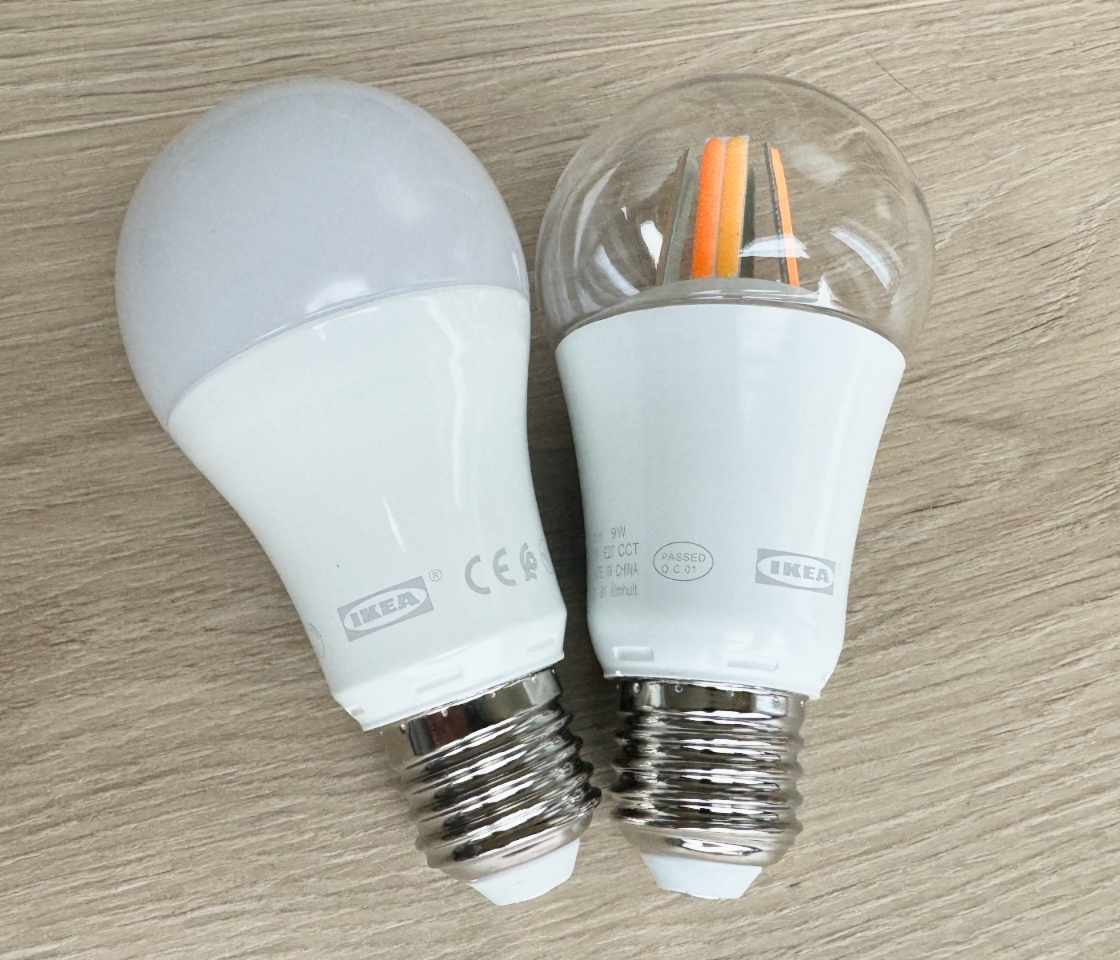
I have these models:
To put a bulb into pairing mode, turn it off and on for 5 times, and on the 6th time keep it on. It should start doing a certain lighting pattern, meaning that it is now discoverable by a Zigbee coordinator.
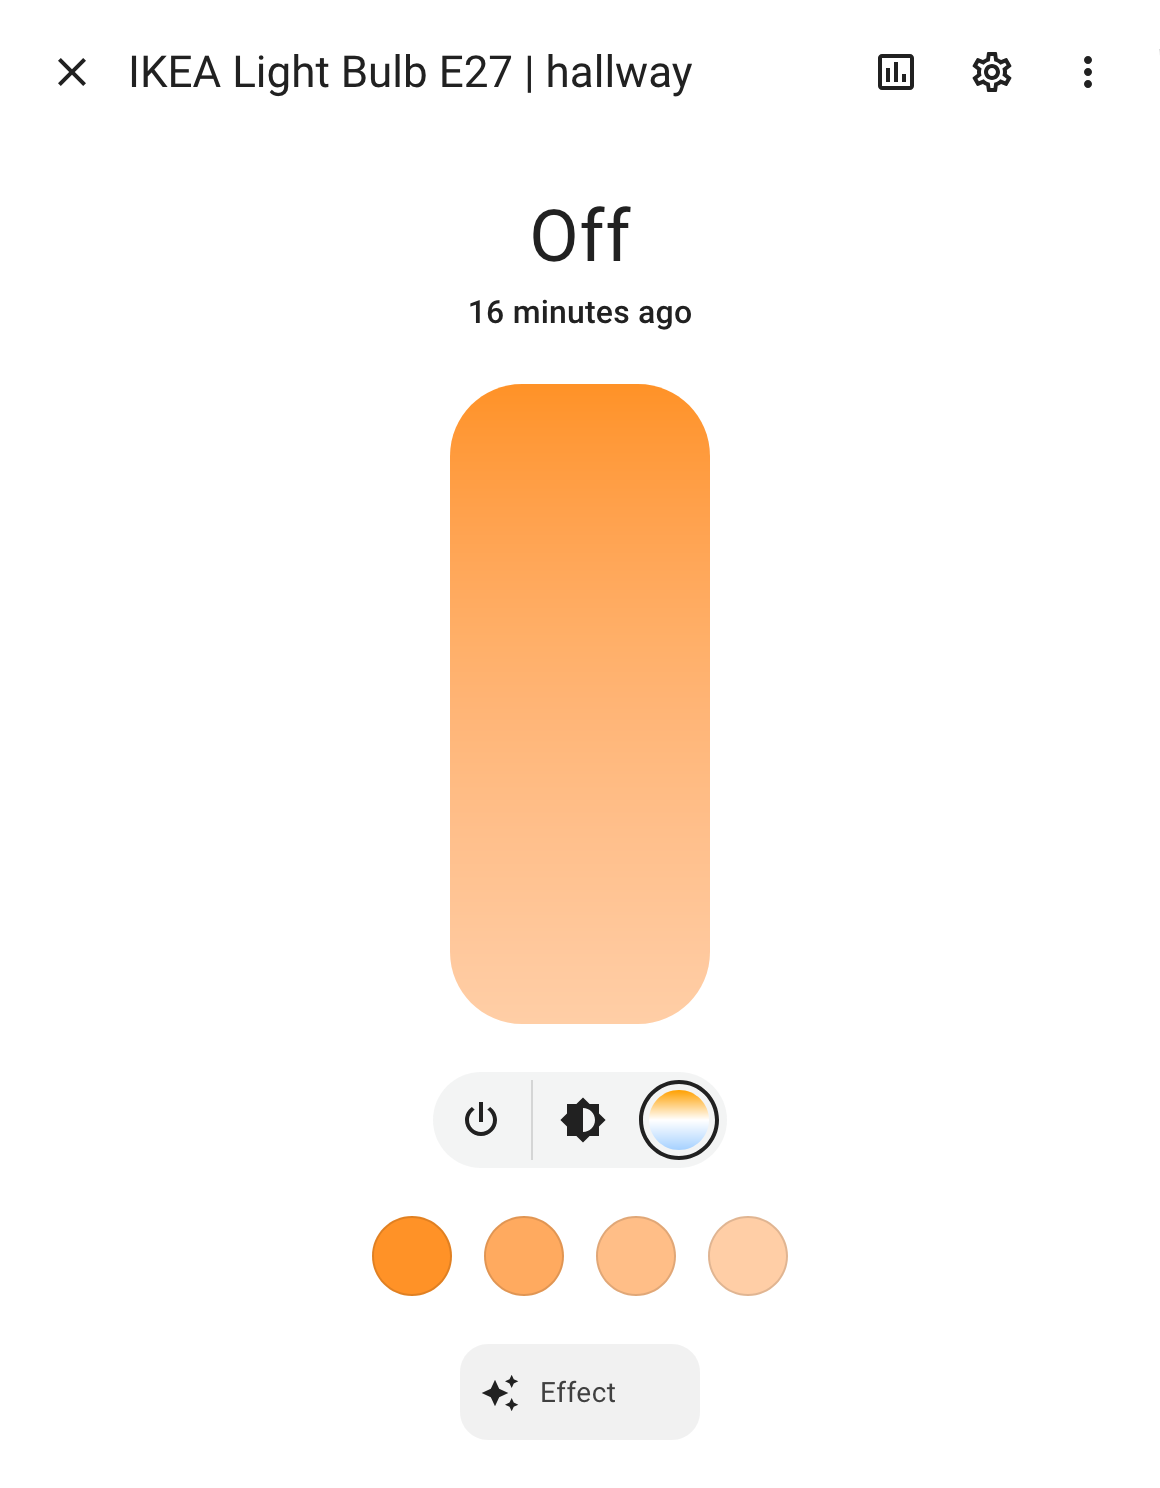
Once added, here’s how it looks in Home Assistant:
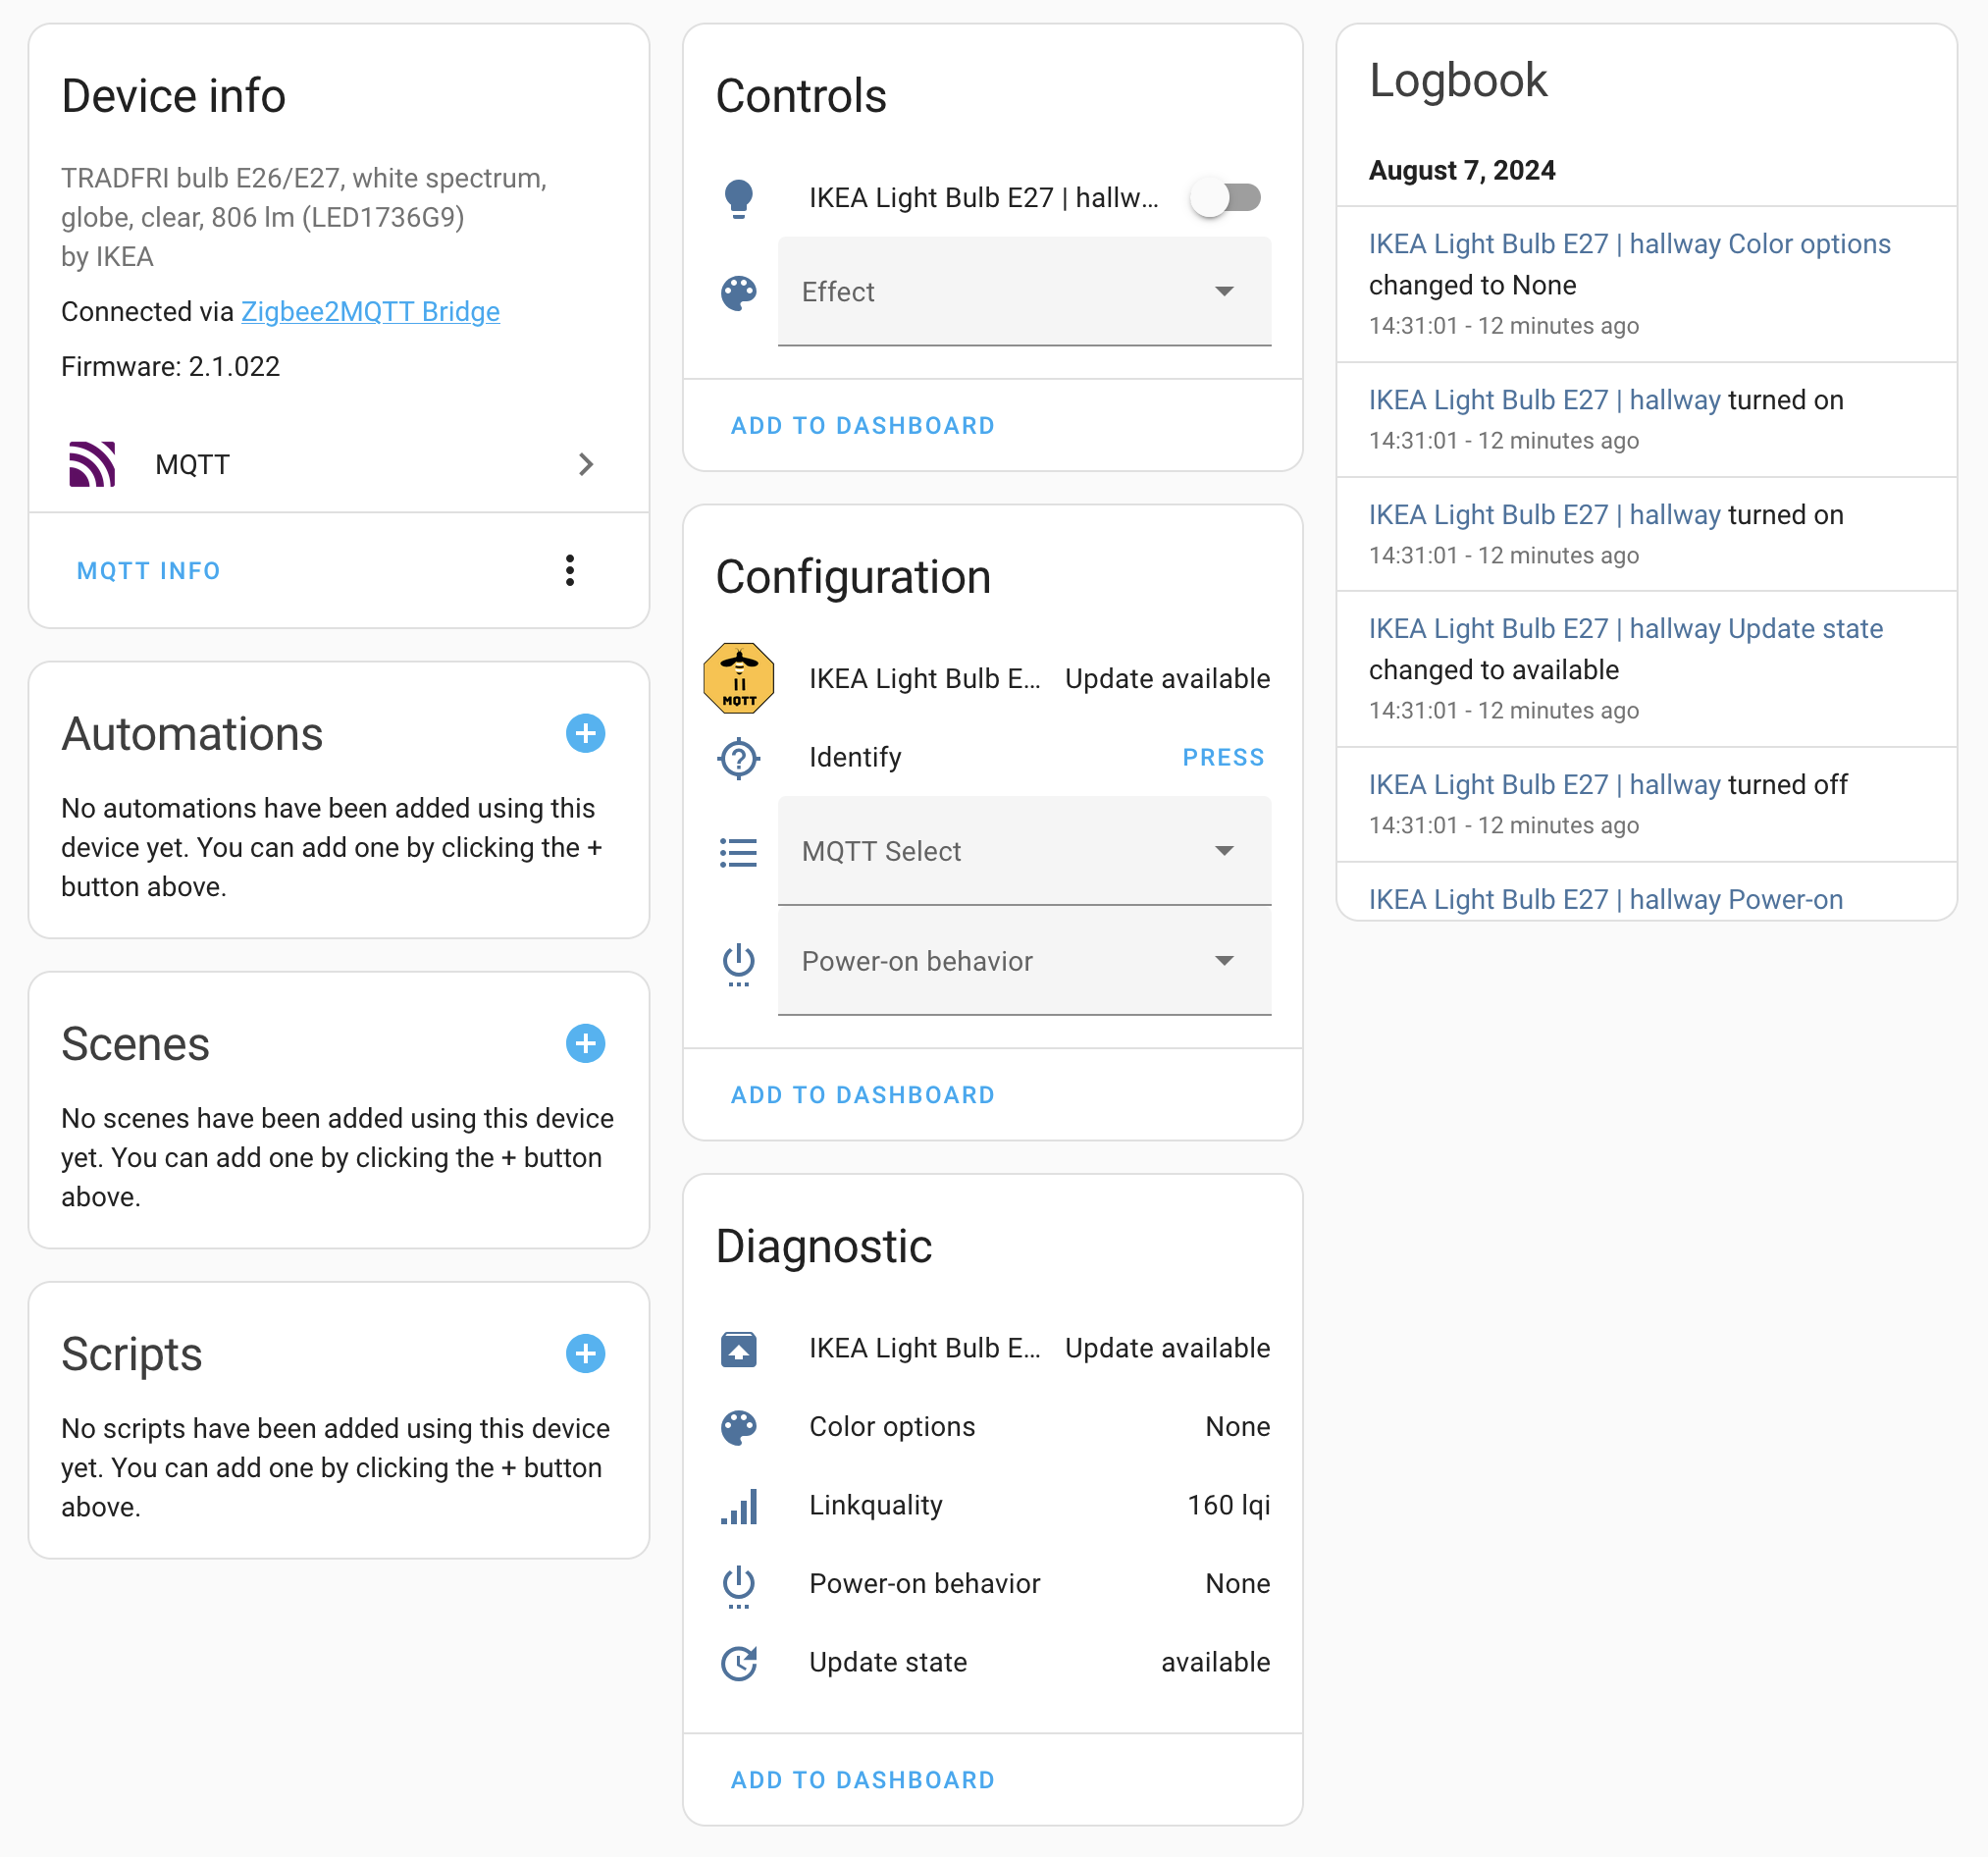
The controls are great, you can set not only brightness but the color temperature too, plus there are several effects available:
As a very nice surprise, these bulbs also act as Zigbee signal repeaters/extenders, so they allow you to place other devices farther away from the coordinator/hub. And I forgot to mention that smart power plugs (Philips and Frient) also act as network extenders, so that is probably the case for many power-connected devices.
Having smart bulbs (and/or dumb lamps connected to smart plugs), one can create the following basic automation for turning on the (appropriately labeled) lights in one of the rooms on schedule:
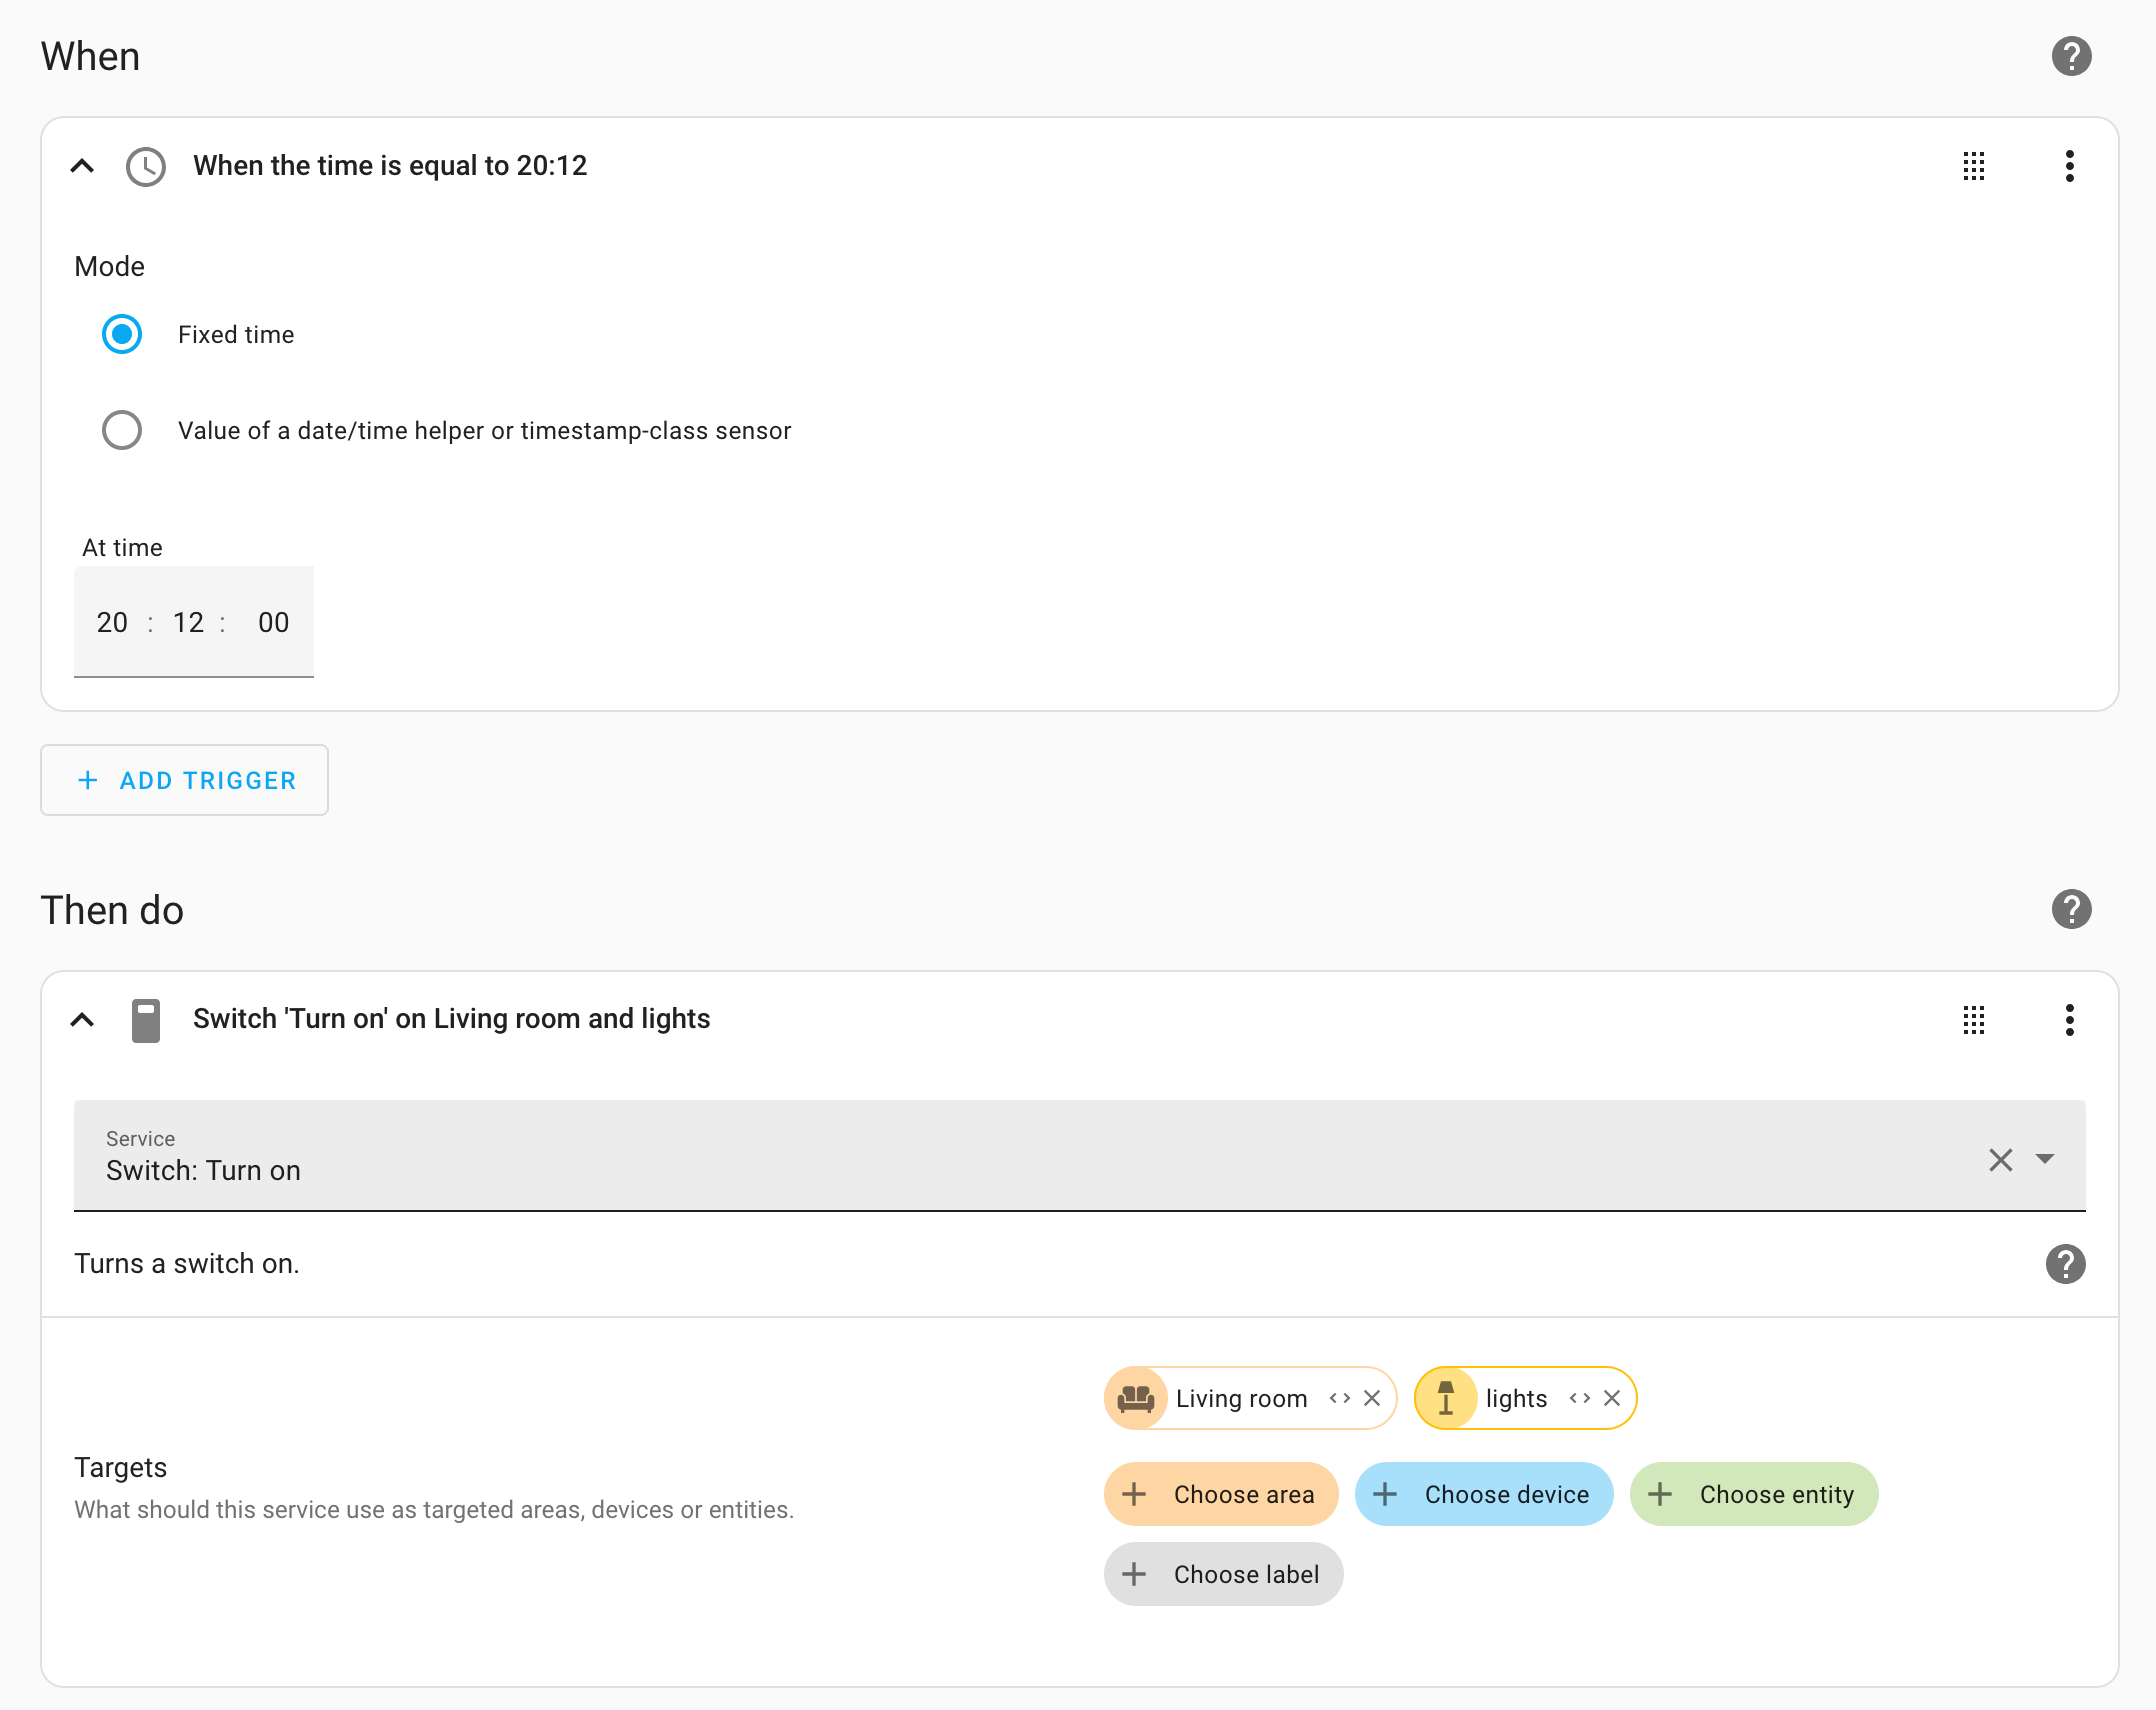
It will work with bulbs and plugs, despite them being different types of devices, because they all support switch actions.
Here’s also this automation as code:
alias: Turn ON lights on 2nd floor
description: ""
trigger:
  - platform: time
    at: "20:12:00"
condition: []
action:
  - service: switch.turn_on
    metadata: {}
    data: {}
    target:
      area_id: living_room
      label_id: lights
mode: single
And it will be trivial to create a similar automation for turning the lights off.
Sensors
Third Reality garage door tilt sensor
A useful tilt sensor (database) to warn about garage door being left open.
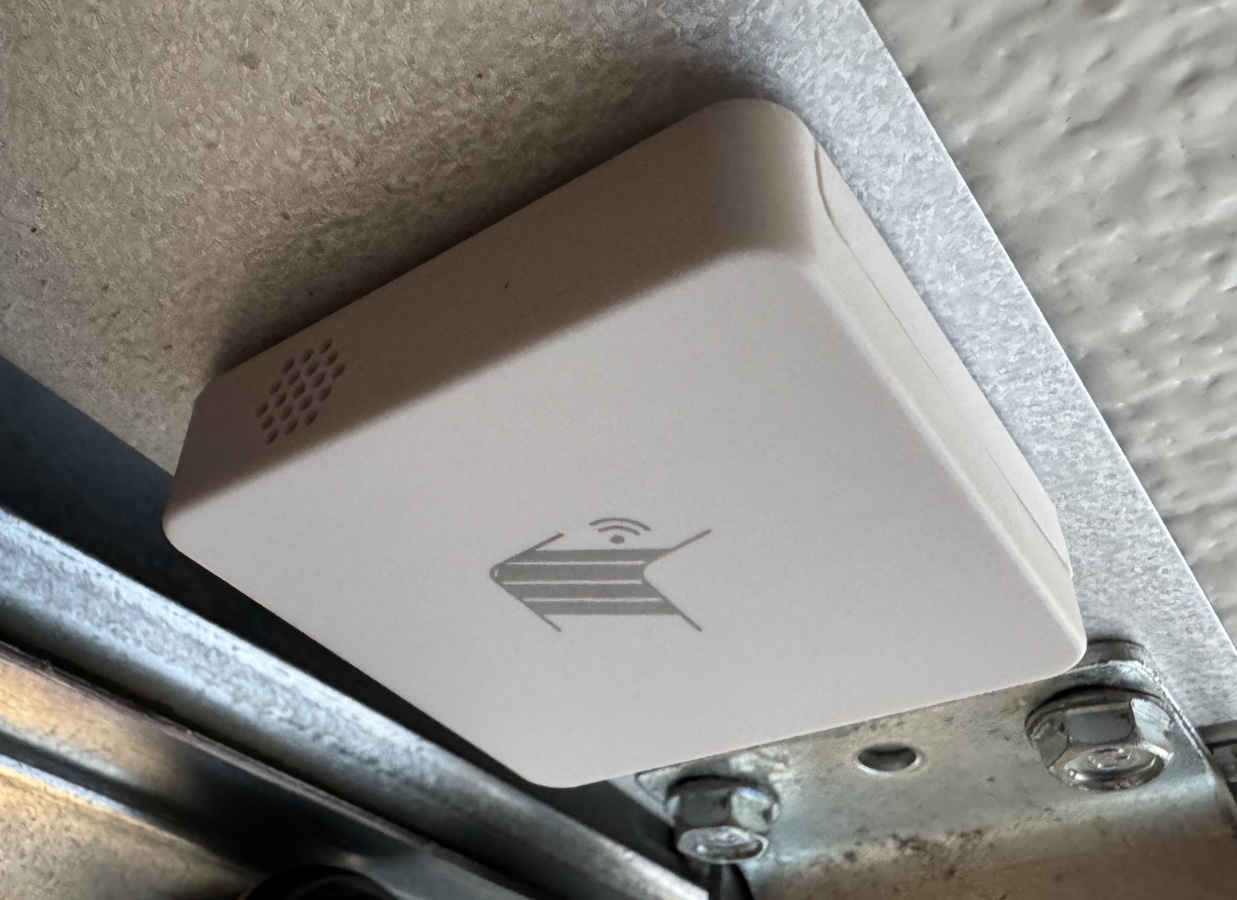
For example, if you drive away somewhere and forget to close your garage door, you probably would want to get notified about that. So one thing you need is a sensor that would report that the door is open and second thing is sending a notification after it has been open for longer than a certain period of time.
Setting-up an automation that would send a notification after some period of time is rather trivial, but the complicating factor here is that you drove away from your home, so you are now on mobile internet outside of your house local network. So the notification will have to be via some online service, such as Telegram bot. No need to create a service and implement any commands, just get the token, send /start to the bot and then test it with cURL:
$ curl -s -X POST -H "Content-Type: application/json" \
    -d '{"chat_id": "CHAT-ID-OR-CHANNEL-NAME", "text": "ololo"}' \
    https://api.telegram.org/YOUR-TELEGRAM-BOT-TOKEN/sendMessage
Then add a RESTful Command in your configuration.yaml:
rest_command:
  telegram_notification:
    url: "https://api.telegram.org/YOUR-TELEGRAM-BOT-TOKEN/sendMessage"
    method: POST
    headers:
      Content-Type: "application/json"
    payload: '{"chat_id": "{{ chat_id }}", "text": "{{ msg }}", "parse_mode": "HTML", "disable_web_page_preview": "true"}'
    verify_ssl: true
    timeout: 10
and after reloading the configuration you can use it in an automation:

here it is also in YAML:
triggers:
  - type: opened
    device_id: DEVICE-ID
    entity_id: ENTITY-ID
    domain: binary_sensor
    trigger: device
    for:
      hours: 0
      minutes: 10
      seconds: 0
conditions: []
actions:
  - variables:
      notification_msg: "⚠️ garage door has been <b>open</b> for 10 minutes"
  - alias: Telegram notification to me
    action: rest_command.telegram_notification
    metadata: {}
    data:
      chat_id: "MY-TELEGRAM-CHAT-ID"
      msg: "{{ notification_msg }}"
  - alias: Telegram notification to my boyfriend
    action: rest_command.telegram_notification
    metadata: {}
    data:
      chat_id: "MY-BOYFRIEND-TELEGRAM-CHAT-ID"
      msg: "{{ notification_msg }}"
mode: single
Now if the garage done has been open for more than 10 minutes, me and my boyfriend will both receive a Telegram notification about that. Naturally, instead of individual notifications to each person it could just as well be a group chat or a channel - that way there will be no need to send the same notification more than once.
But a single notification might not be enough, especially if you are driving and missed it, so you might want to keep sending them until the door gets closed. For that you’d need to:
- Create a helper timer (5 minutes or whichever) and two new automations to start/stop that timer when the garage door opens/closes;
- Change your existing automation trigger to that timer state becoming
Idle; - Add a condition to perform actions only if the door is open, otherwise everything will get executed on the door being closed as well (because the timer will get stopped and become
Idle); - Add an action to start that timer again after sending notifications.
The message text can be then a bit more informative, such as stating when the door was opened and how much time has passed since then. So the updated automation would look like this:
alias: Гаражная дверь открыта
description: ""
triggers:
  - trigger: state
    entity_id:
      - timer.garage_door_open
    to: idle
conditions:
  - type: is_open
    condition: device
    device_id: DEVICE-ID
    entity_id: ENTITY-ID
    domain: binary_sensor
actions:
  - variables:
      notification_msg: >
        {% set openedAt =
        as_timestamp(states.binary_sensor.third_reality_garage_door_contact.last_changed)
        %} ⚠️ garage door has been <b>open</b> since <code>{{ openedAt |
        timestamp_custom('%Y-%m-%d %H:%M:%S') }}</code>, that's already <code>{{
        timedelta(seconds=(as_timestamp(now()) - openedAt)|int) }}</code> by now
  - alias: Telegram notification to me
    # ...
  - alias: Telegram notification to my boyfriend
    # ...
  - action: timer.start
    metadata: {}
    data: {}
    target:
      entity_id: timer.garage_door_open
mode: single
Home Assistant Community Store
To further extend Home Assistant capabilities, you can add Home Assistant Community Store (HACS) to it.
The HACS is supposed to be installed into /path/to/home-assistant/config/custom_components/, which in case of Docker container would mean creating this folder inside the container, but fortunately we have already mounted/mapped this path on container creation, and it points to /root/homeassistant/ in the host filesystem.
As for the installation itself, yet again it is expected that you will download and run their script, but this time I couldn’t tolerate that, so I just picked out the relevant commads from it. Essentially, it just downloads a ZIP archive and extracts it to /path/to/home-assistant/config/custom_components/hacs/:
$ cd /tmp
$ wget "https://github.com/hacs/integration/releases/latest/download/hacs.zip"

$ export HOMEASSISTANT_PATH="/root/homeassistant"
$ sudo ls -L1a $HOMEASSISTANT_PATH
automations.yaml
blueprints
.cloud
configuration.yaml
deps
.HA_VERSION
home-assistant.log
home-assistant.log.1
home-assistant.log.fault
home-assistant_v2.db
home-assistant_v2.db-shm
home-assistant_v2.db-wal
scenes.yaml
scripts.yaml
secrets.yaml
.storage
tts
$ sudo cat $HOMEASSISTANT_PATH/.HA_VERSION && echo
2024.7.3

$ sudo mkdir -p "$HOMEASSISTANT_PATH/custom_components/hacs"
$ sudo unzip /tmp/hacs.zip -d $HOMEASSISTANT_PATH/custom_components/hacs
Restart the container:
$ sudo docker restart homeassistant
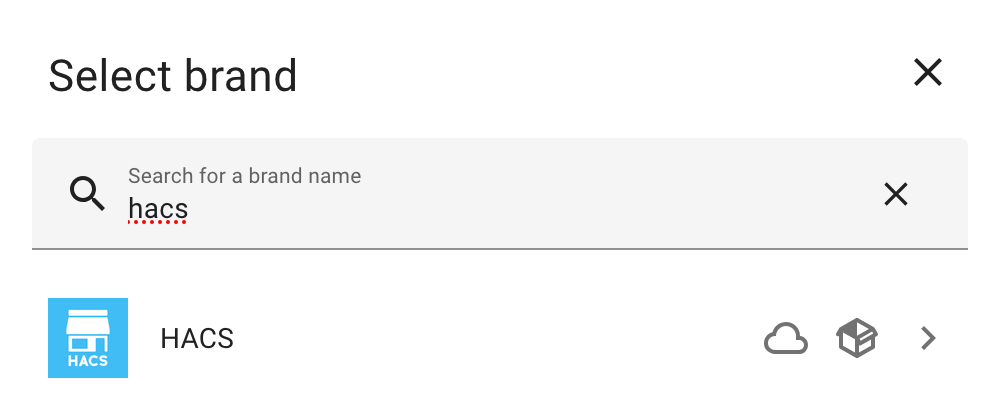
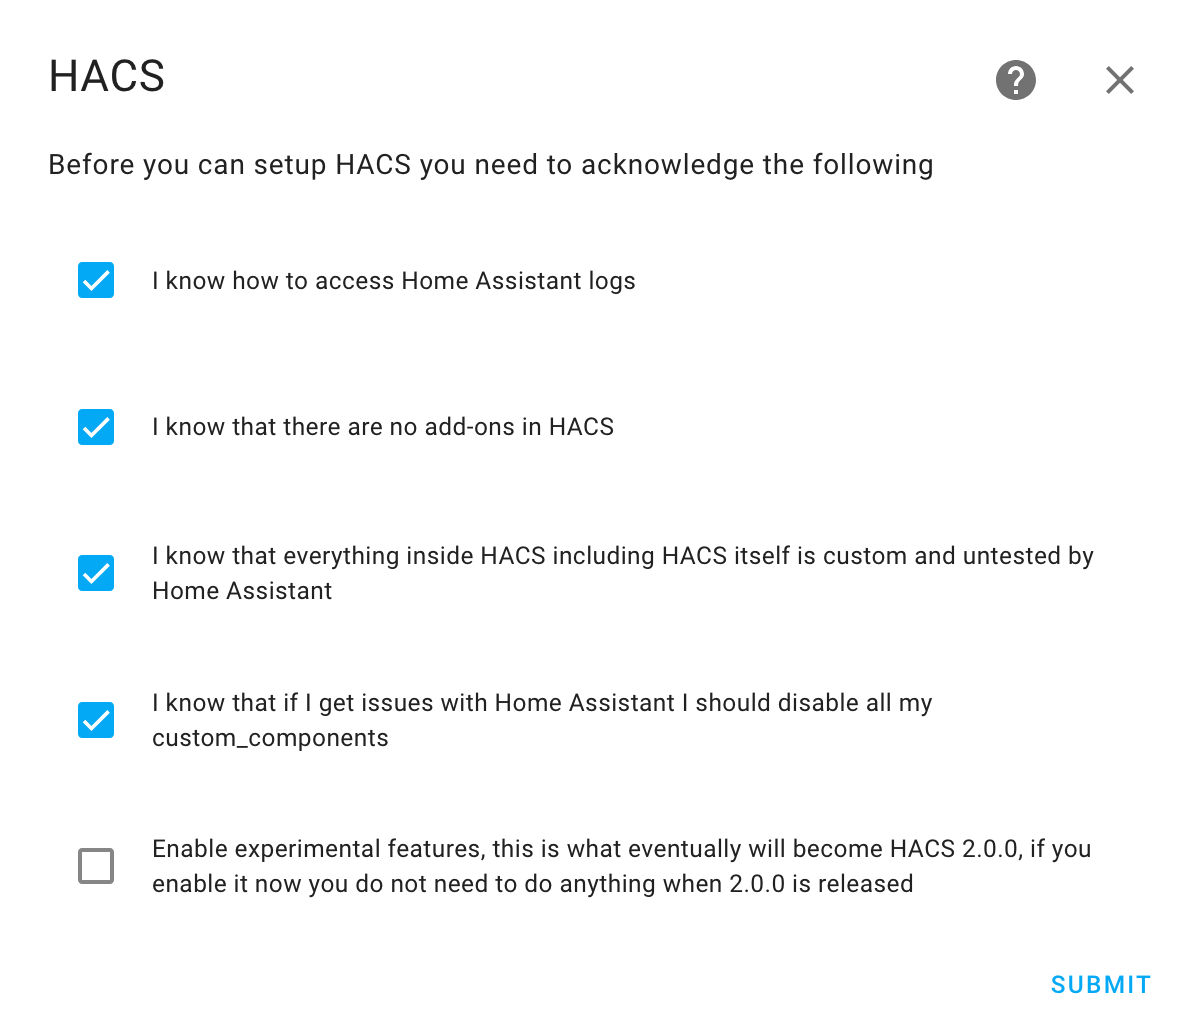
And then you should get HACS available in the integrations list:
I did not enable experimental features, just in case:
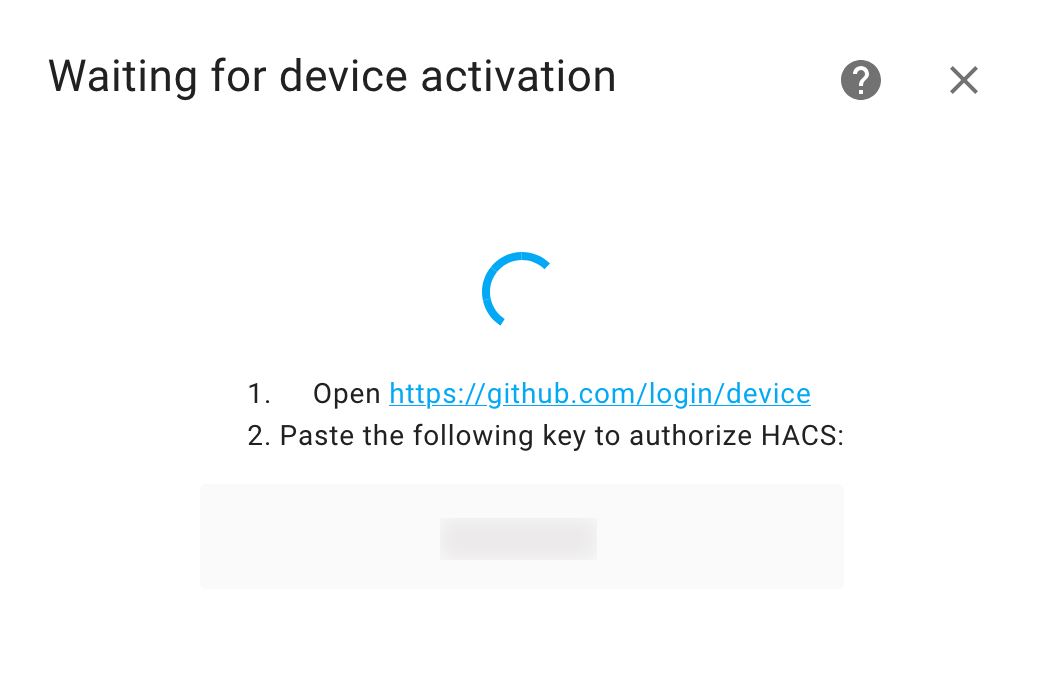
The next step was concerning, as it required to authorize with GitHub. I have no idea why does it need that, but at least it seems to only request “limited access to your public data”, which is probably fine, so I authorized it:
After configuration was done, the HACS entry was added to the side panel:
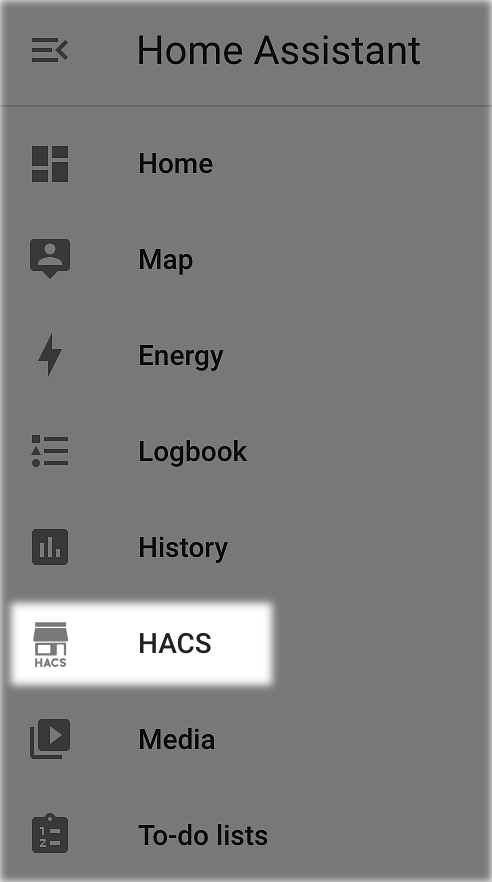
…although without icon at first, but after reloading the page with clearing cache it did appear. This “reloading with clearing the cache” you will very often see being mentioned in Home Assistant documentation and forum.
With HACS being integrated in your Home Assistant, you can add even more devices and sensors to it.
Integrations
Combined the default catalogue and HACS offer a great number of integrations available. I’ll describe the ones I’ve got to use so far.
Dyson HP09
I have a Dyson HP09 purifier/fan/heater:

And I wanted to check if it is possible to get its sensors data and maybe control the device too. Turns out, someone already did that.
To install it, search for “dyson” in HACS. After the installation:
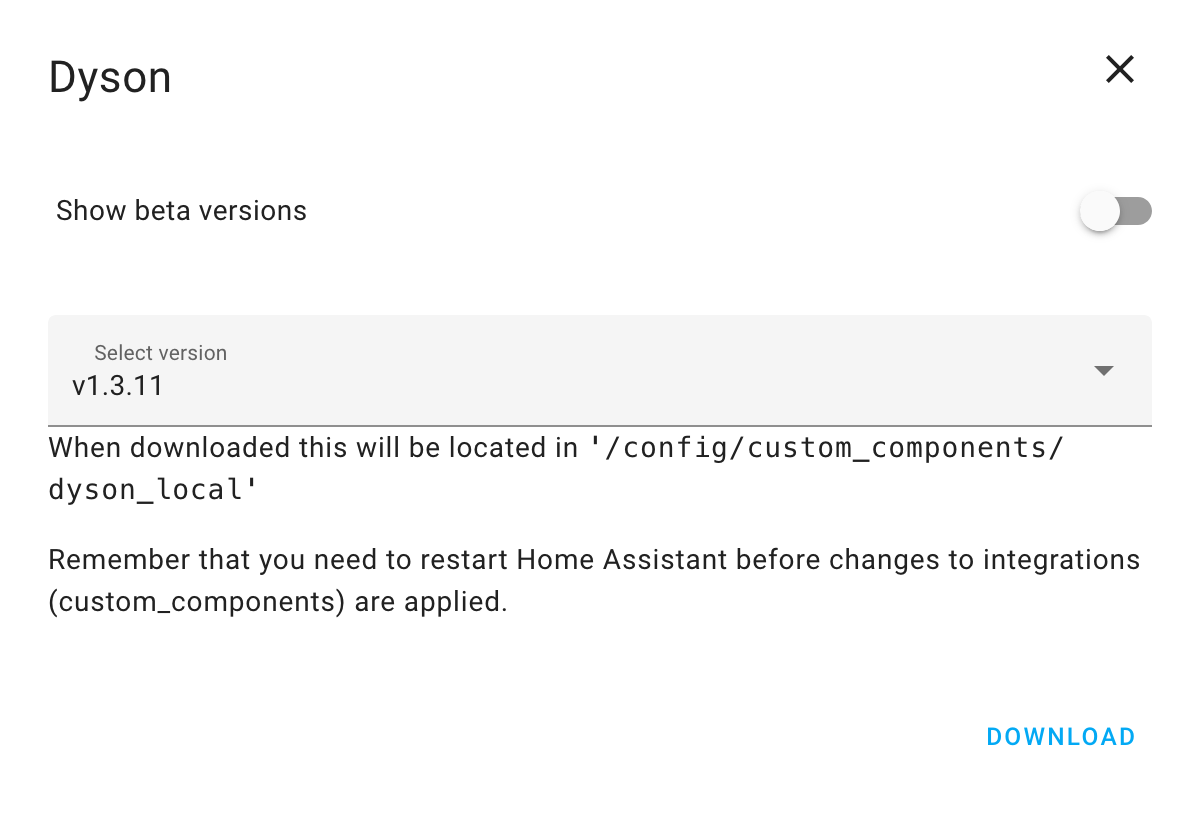
and Home Assistant restart, Dyson became available in the integrations/devices.
To configure it you will need to provide its IP address, which means that you’ll need to assign a static one in your home network DHCP, and also Vero V (or whatever you are using as your Home Assistant hub) and Dyson both need to be in the same network (which is a bummer, because I prefer to keep such devices in a separate isolated network). If it keeps failing to connect to the Dyson, that could be because of the old DHCP lease, so try to power off the Dyson completely, unplug the power cable, wait a bit and power it back on.
In connection methods I chose the Dyson account:
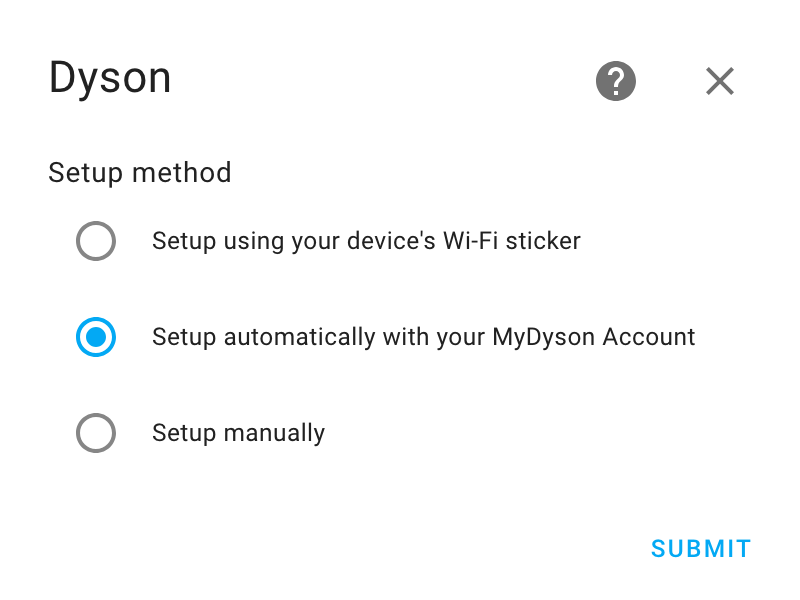
Once the device is added, you can remove your Dyson account credentials from the integration entries and restart Home Assistant. From what I understood, Dyson runs its own MQTT server, which this integration uses to communicate with the device over the local network (no Zigbee involved, obviously), so without the internet, which is great.
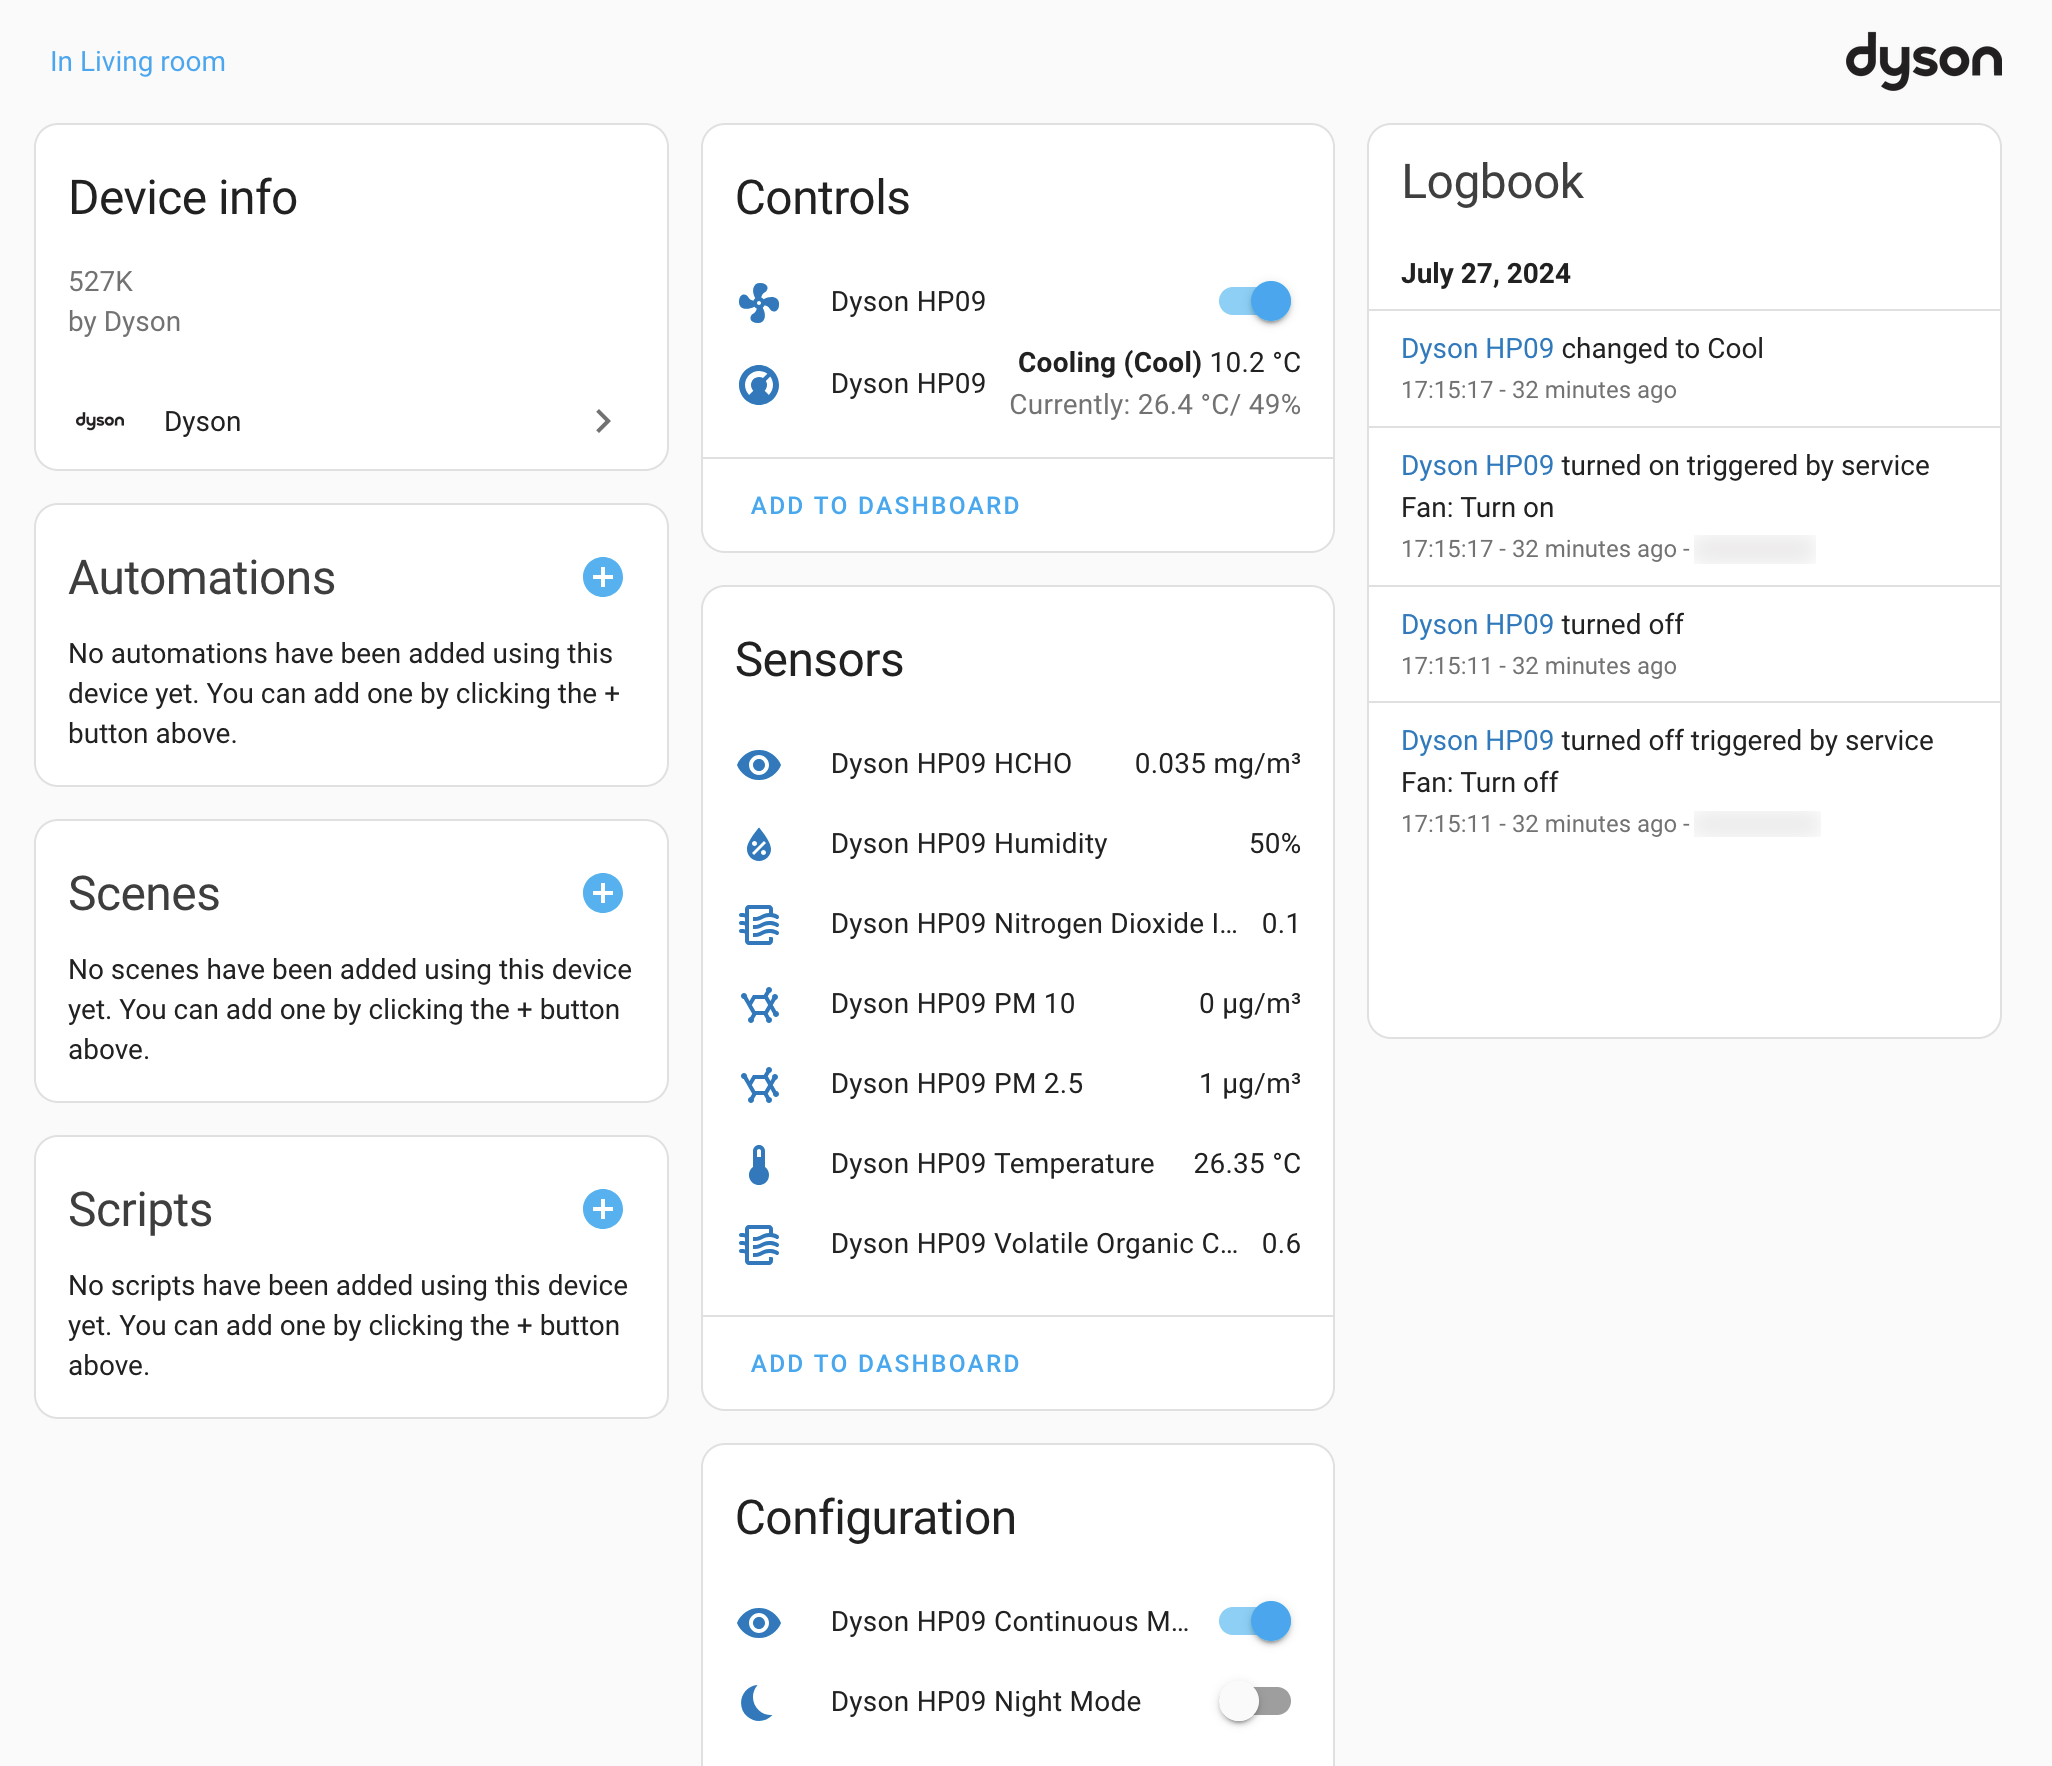
At first Home Assistant was showing just some basic controls, like the fan speed, direction and oscillation:

which was quite good already, but still pretty underwhelming, as I was expecting to get all of its marvelous data such as temperature, humidity, air quality metrics and the rest. But then a couple of minutes later I got everything, so it probably just doesn’t arrive all at once:
At this point you should once again think about securing your Home Assistant instance, because a malicious person may be able to remotely switch your fan into the heating mode, and that can be up to 2.5 kWh of energy consumption alone (and with great power comes great electricity bill), not to mention your room being overheated, which might in turn cause some other damage.
Controlling Dyson with Aqara Cube
Here is another example of how great the Aqara Cube is. So I want to toggle Auto/Normal mode of the fan by tapping the cube when the side 6 is up:
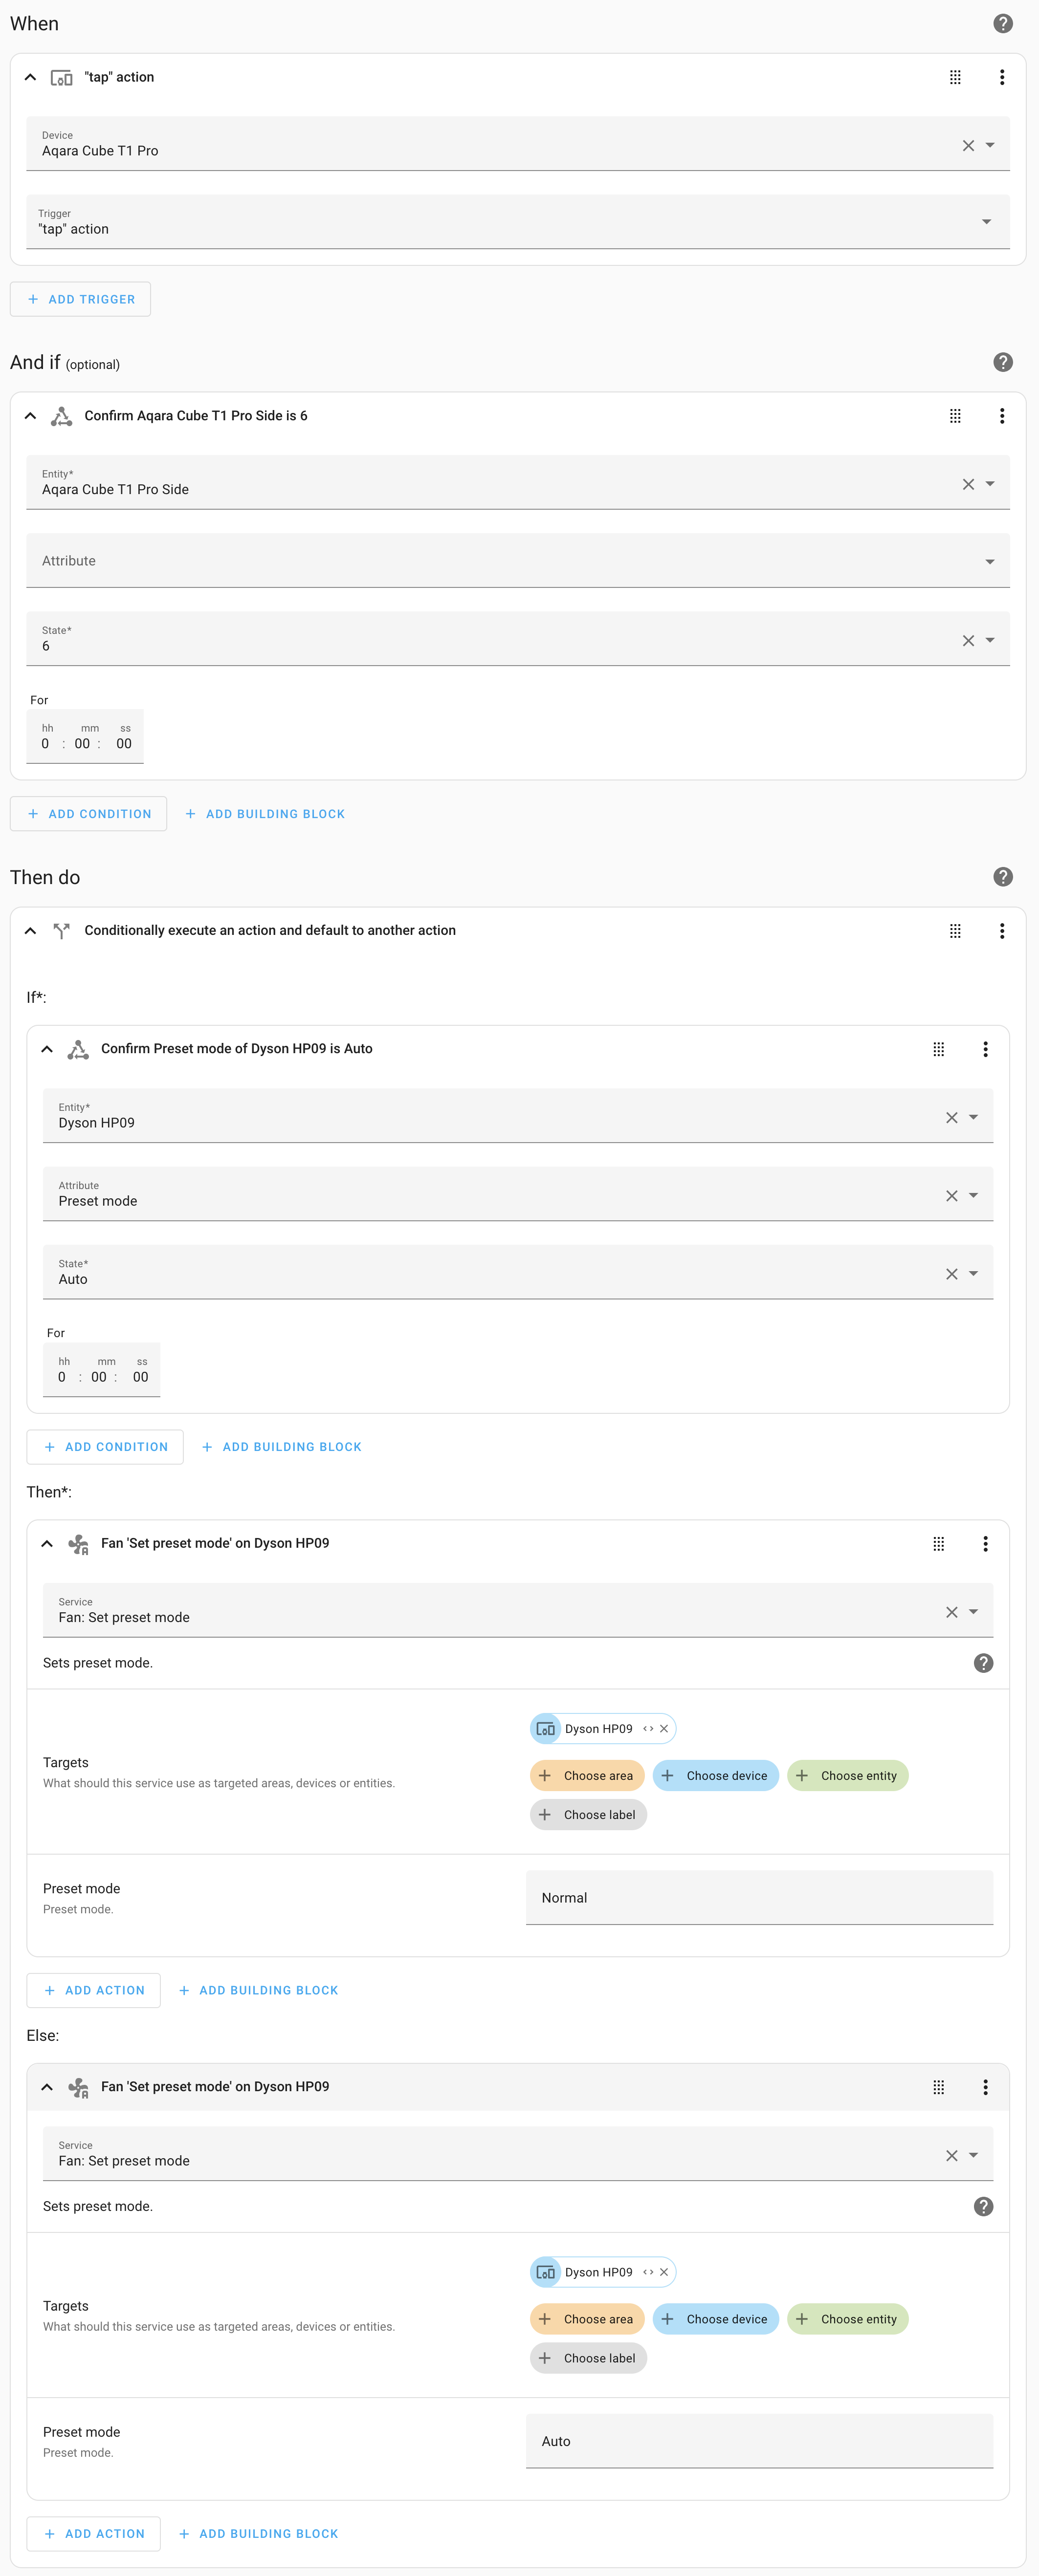
Here’s the same as code:
alias: 🪭 6 | Toggle Auto/Normal mode
description: ""
trigger:
  - platform: device
    domain: mqtt
    device_id: AQARA-CUBE-DEVICE-ID-HERE
    type: action
    subtype: tap
condition:
  - condition: state
    entity_id: sensor.aqara_cube_t1_pro_side
    state: "6"
action:
  - if:
      - condition: state
        entity_id: fan.dyson_hp09
        attribute: preset_mode
        state: Auto
    then:
      - service: fan.set_preset_mode
        metadata: {}
        data:
          preset_mode: Normal
        target:
          device_id: DYSON_DEVICE_ID_HERE
    else:
      - service: fan.set_preset_mode
        metadata: {}
        data:
          preset_mode: Auto
        target:
          device_id: DYSON_DEVICE_ID_HERE
mode: single
And it works, it bloody works, what sorcery is this.
I have also created automations for setting certain fan speeds on rotating the cube with the 6 side up, but those are too trivial to be shown here, you can easily create those yourself.
Zaptec
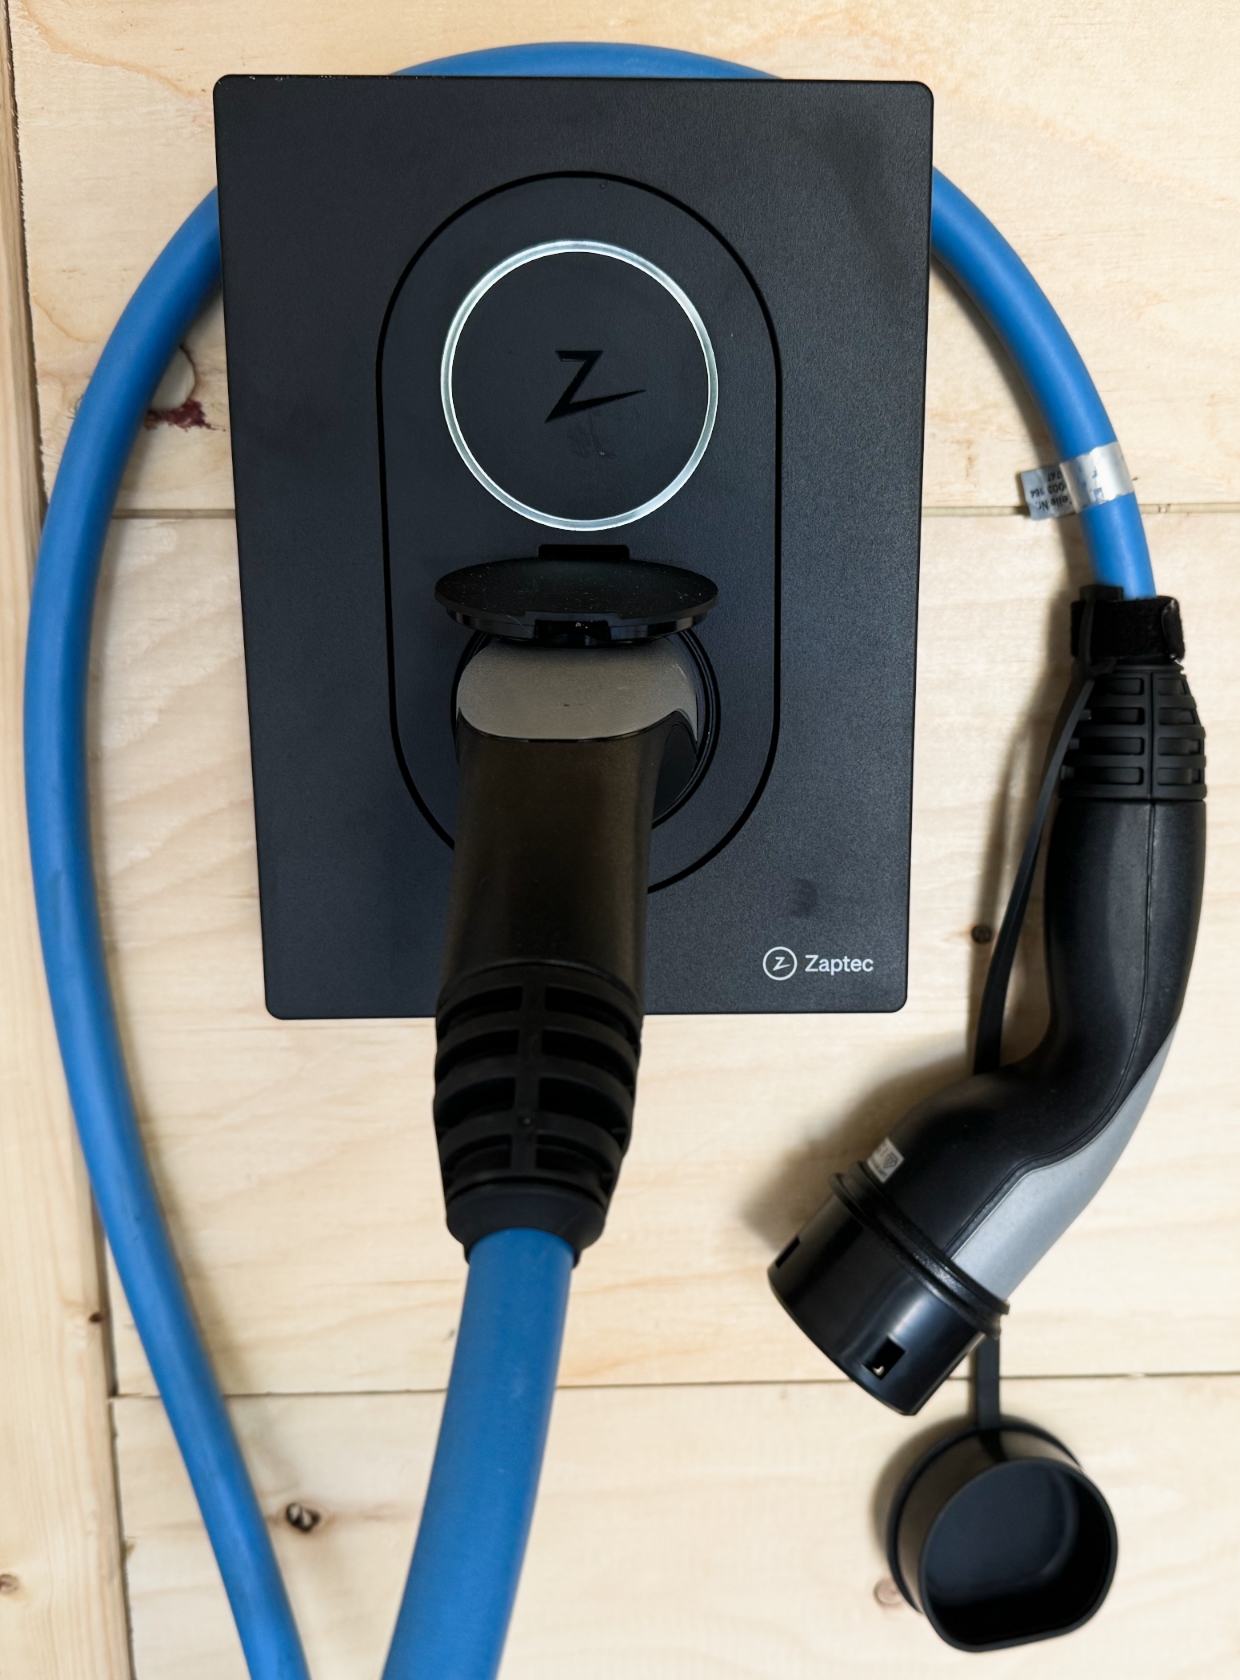
I also have a Zaptec Go charger for my electric car:
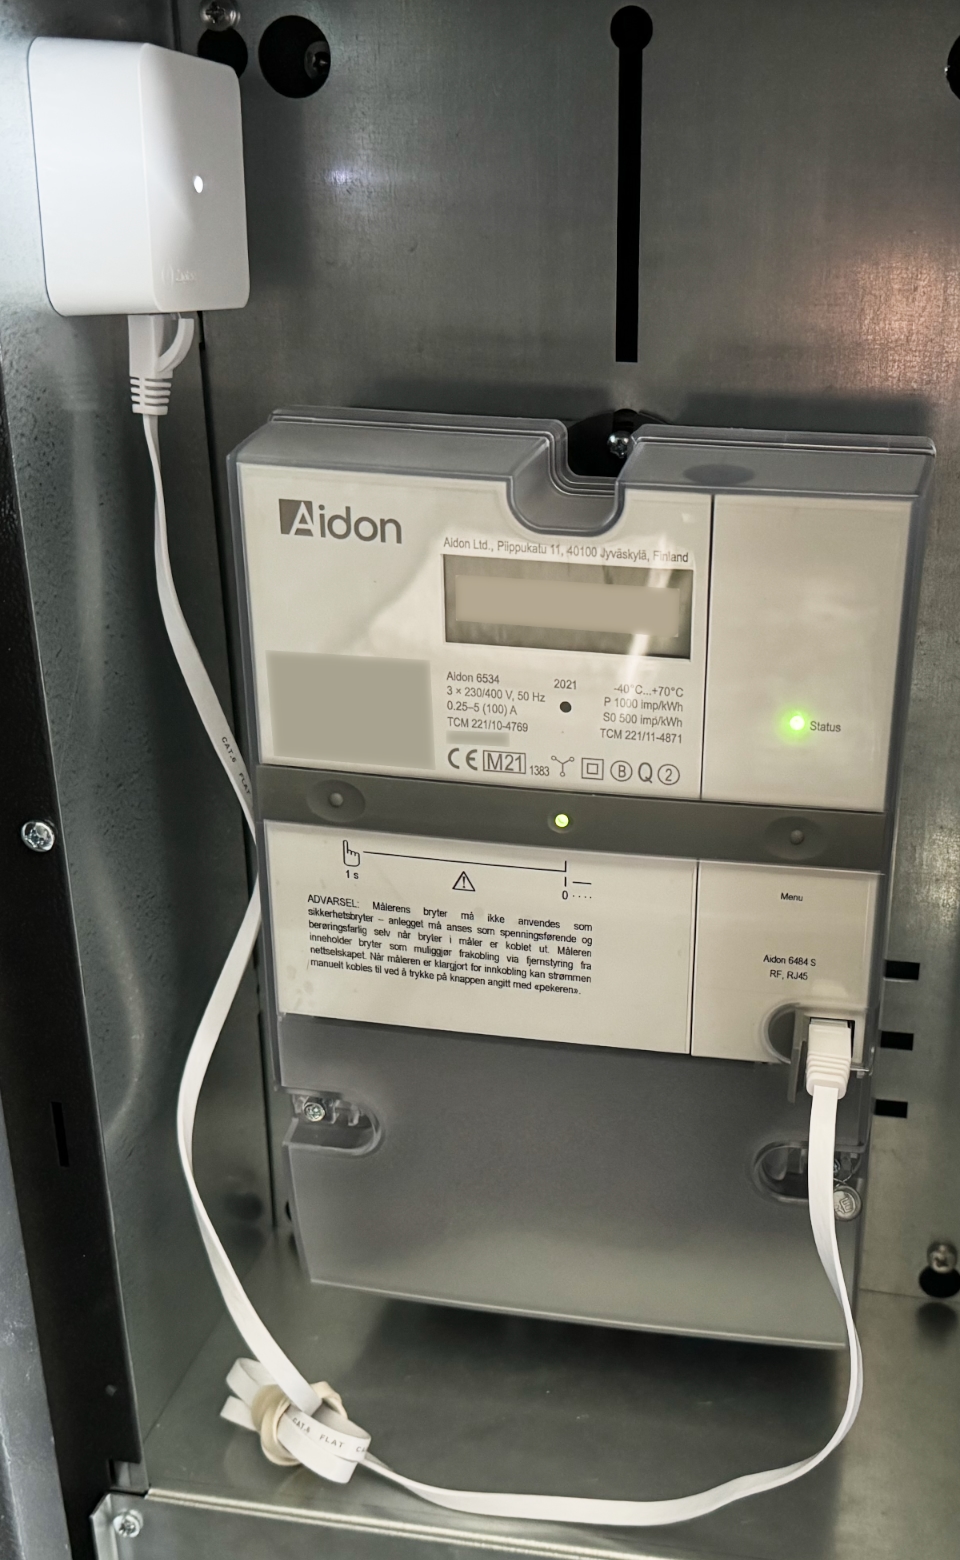
along with Zaptec Sense (HAN-port module):
And since Zaptec has a REST API, I was hoping that it would be possible to get some of the charging/power metrics in Home Assistant. And what would you know, someone has already done that too.
This integration is also installed via HACS by searching for “zaptec”, and as usual you will need to restart Home Assistant after the installation. After that it will become available in the list of integrations.
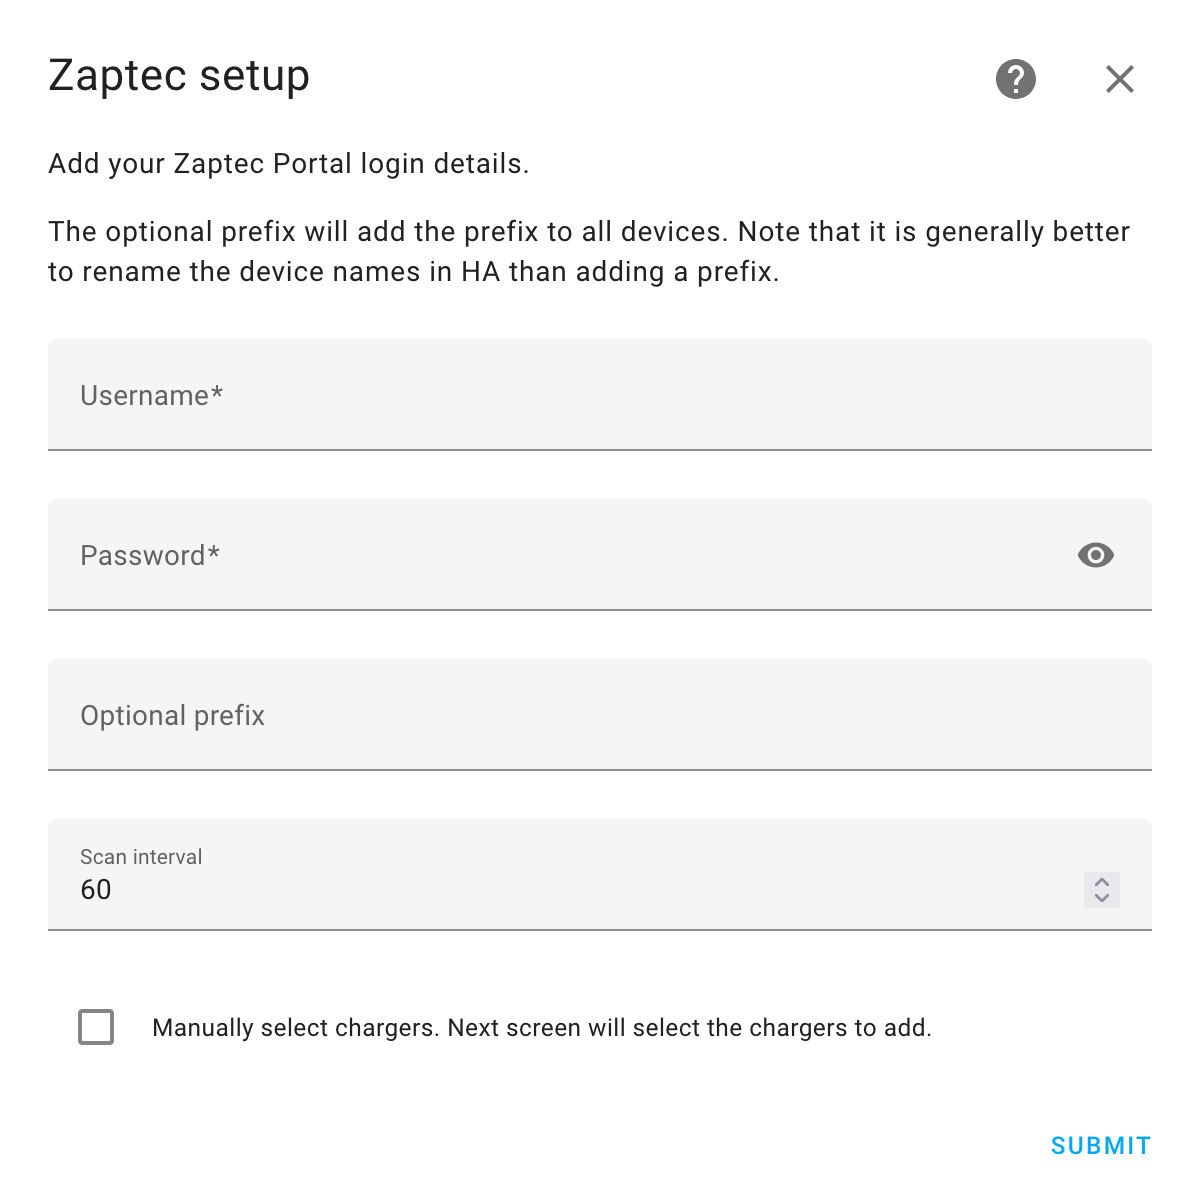
Since neither(?) of Zaptec devices expose a local API, all the REST API HTTP requests are sent to Zaptec server over the internet, so there is no Zigbee involved here either. For the integration to work you need to provide it with your Zaptec Portal credentials:
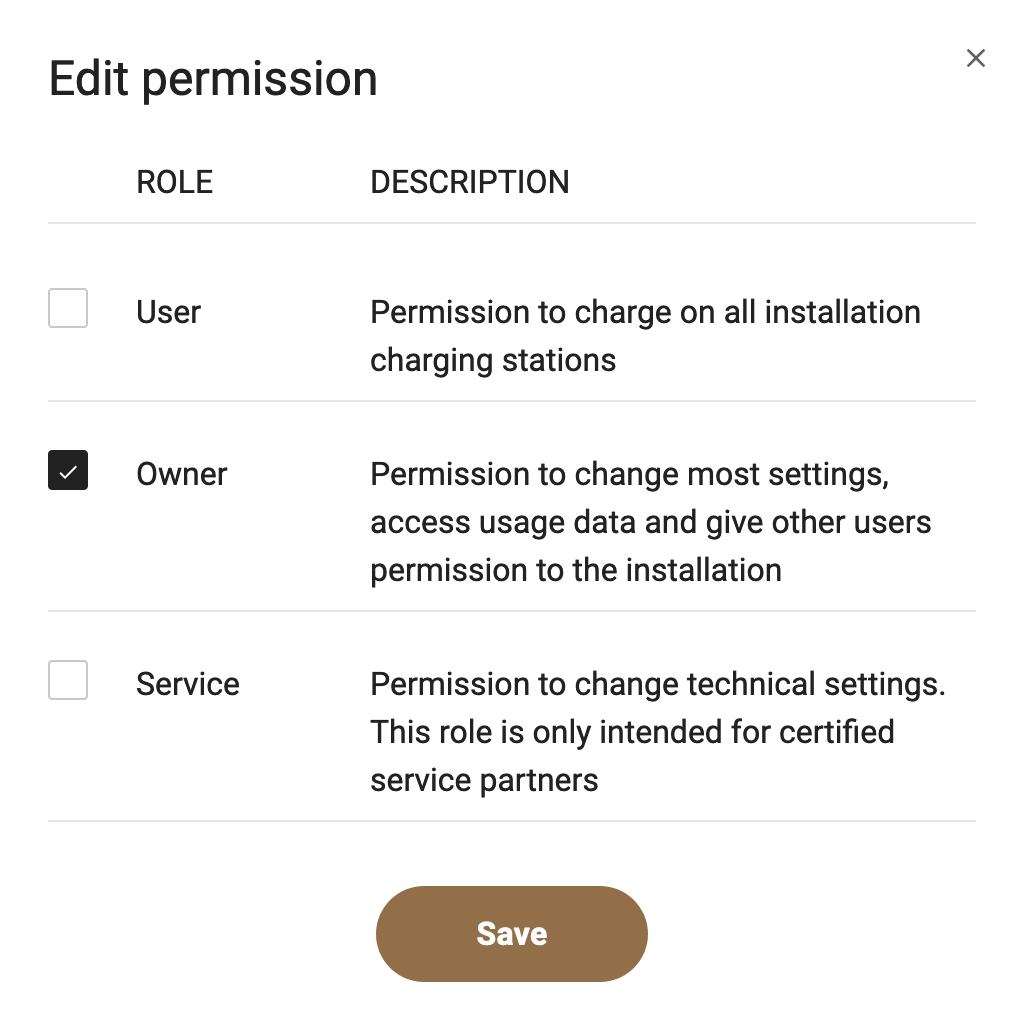
I created a separate user for this, hoping that it will be a non-owner type of user, but unfortunately no, with the current set of roles you’ll have to grant that user the owner role too:
After the successful configuration you will get a lot of metrics:
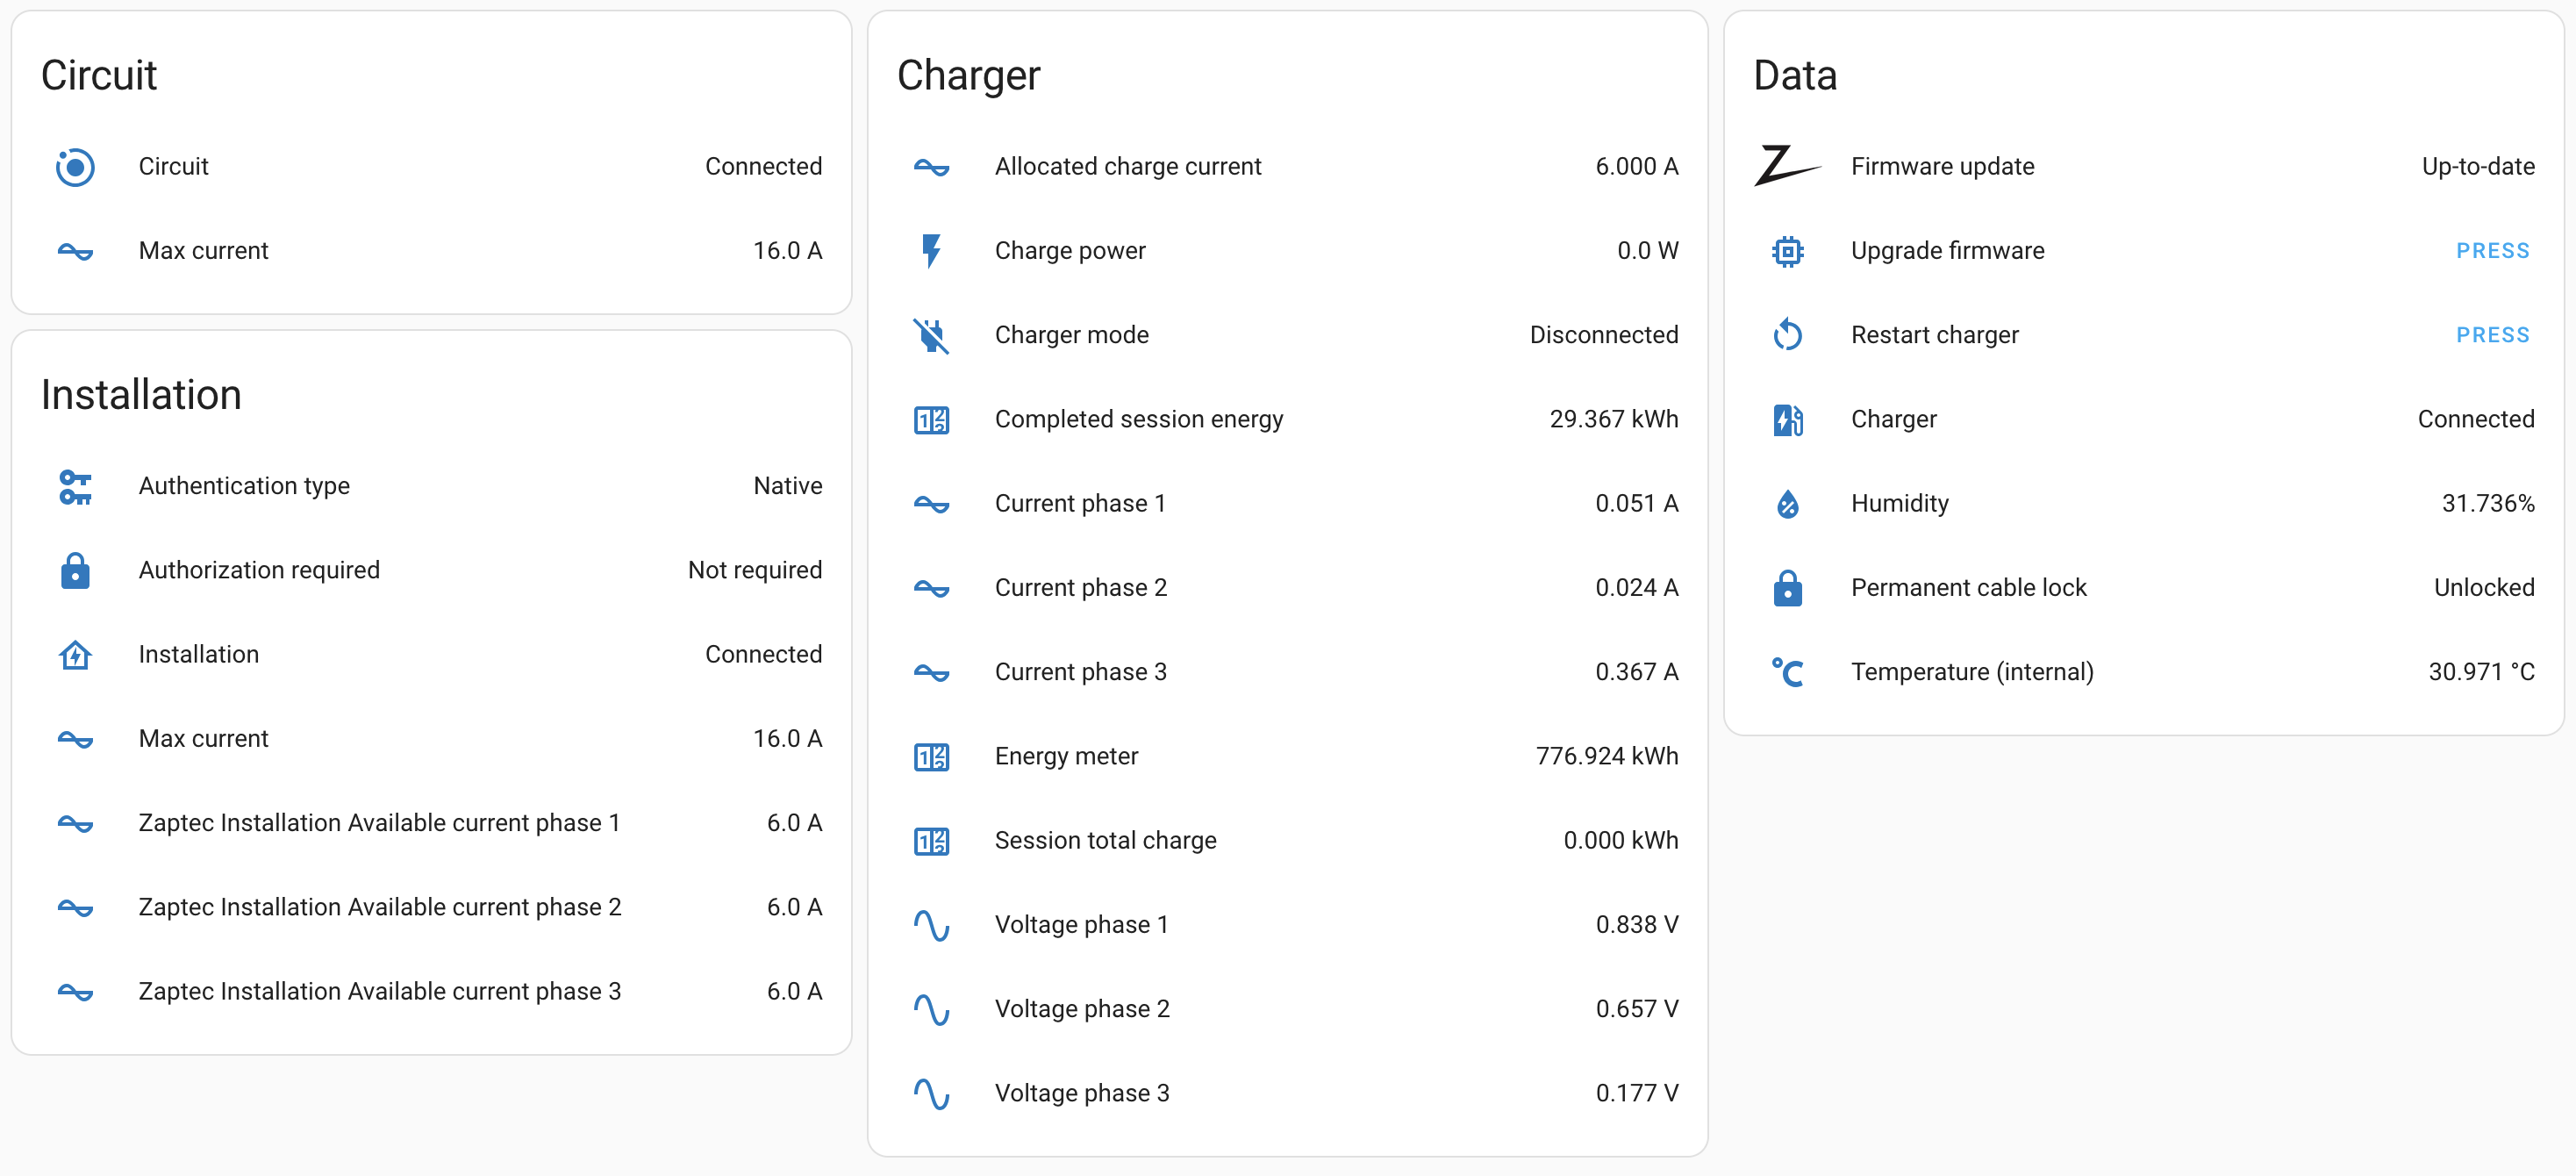
…But unfortunately there is no data from Zaptec Sense. Among other things it provides a total household power consumption, which you can view at your Zaptec Portal:
And it would be very useful to have that data in Home Assistant too.
I’ve submitted a feature request for this, but it isn’t really within the scope of this particular integration, so I will probably have to implement it myself.
Nord Pool electricity prices
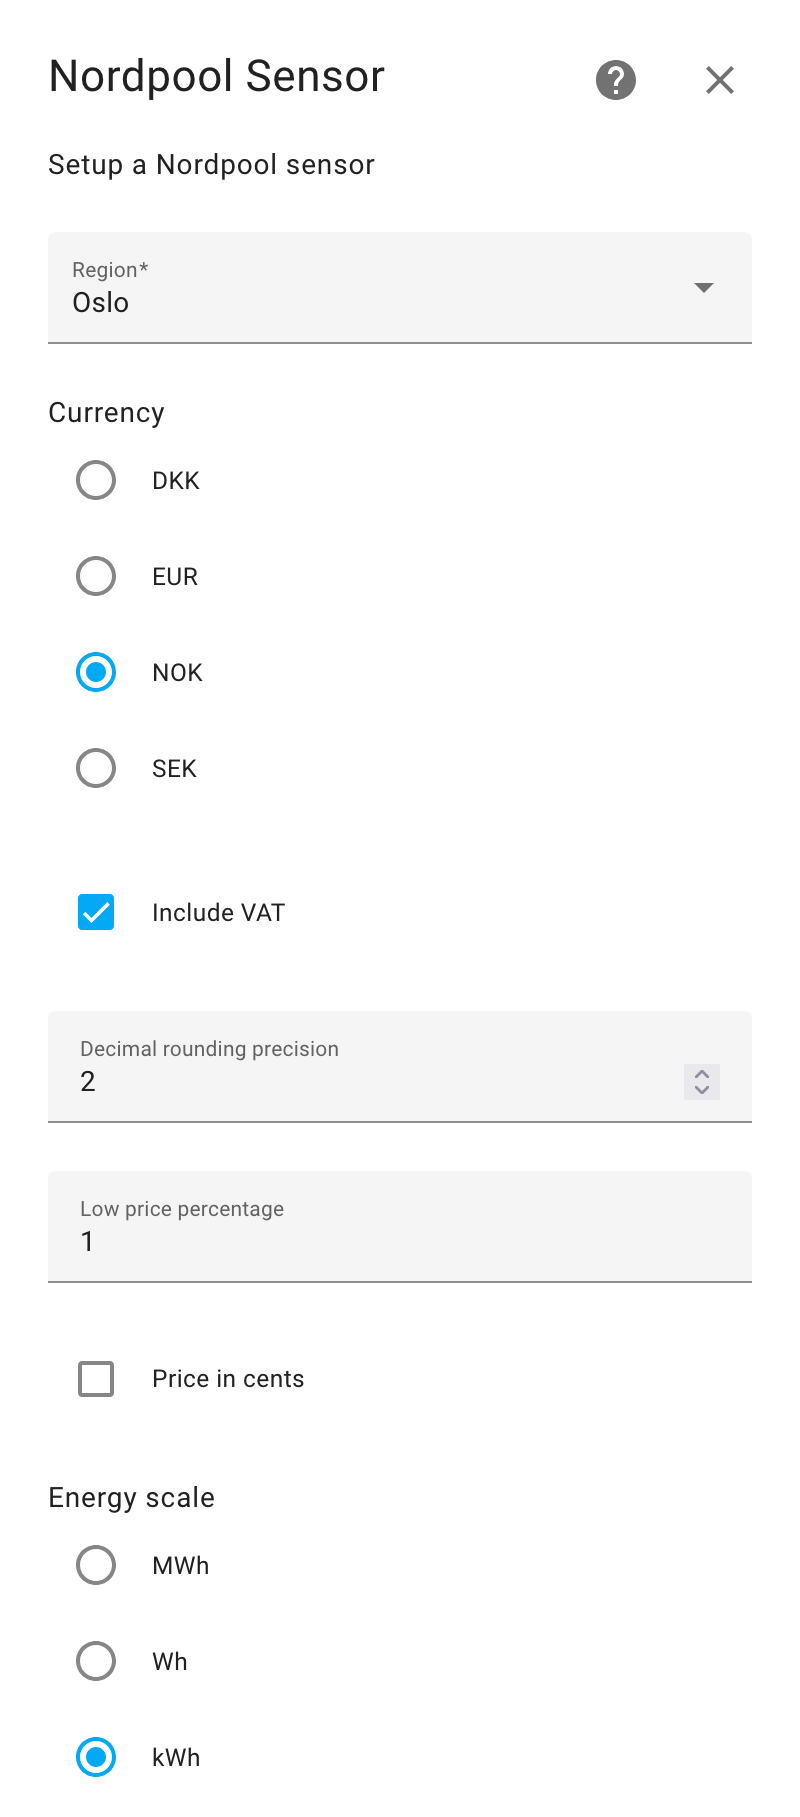
In some countries it is possible to get per-hour electricity prices for today an tomorrow, which is a nice metric to have in Home Assistant. Surely enough, someone has already done that too.
Installation procedure is the same, just search for “nordpool” in HACS. For configuration you will need to provide your zone/region (here are the norwegian zones, and you should have yours stated in the electricity invoices that you receive from your power supplier):
But getting plain price values is no fun, we want a chart, and for that there is a yet another HACS repository - ApexCharts Card. Having installed that, you will be able to create a chart like this one:
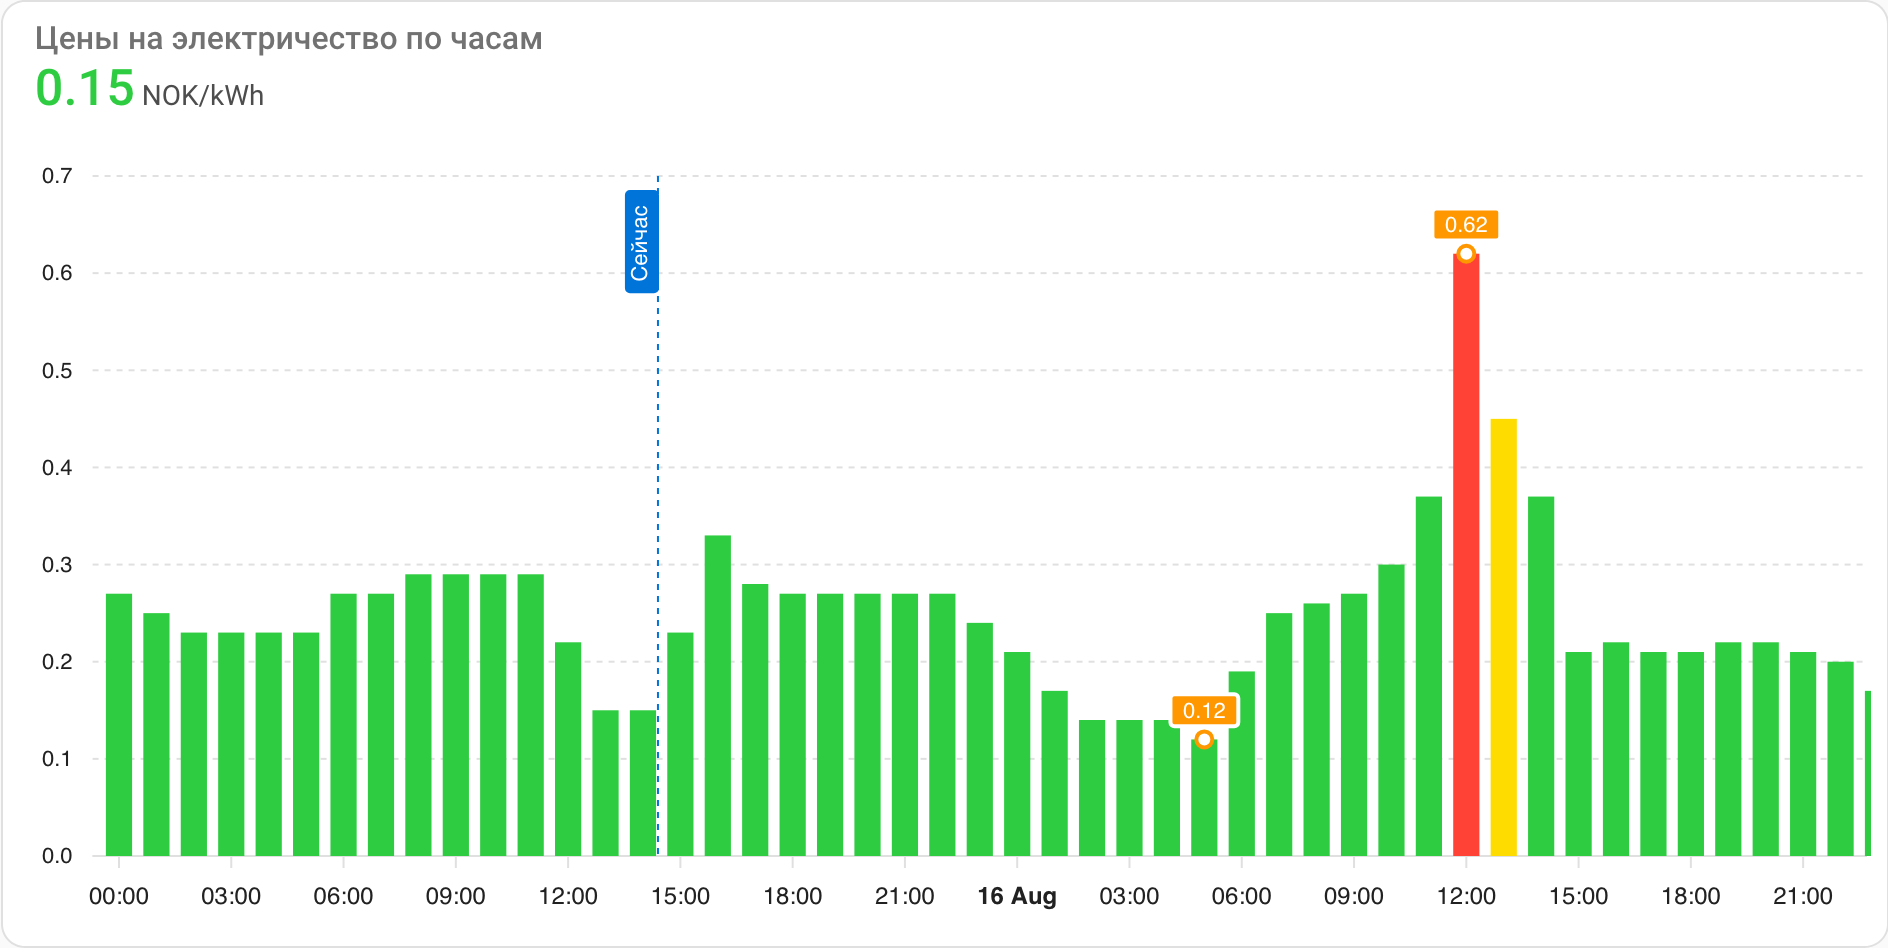
The code for it:
type: custom:apexcharts-card
graph_span: 46h
header:
  title: Цены на электричество по часам
  show: true
  show_states: true
  colorize_states: true
span:
  start: day
now:
  show: true
  label: Сейчас
  color: '#0074D9'
experimental:
  color_threshold: true
series:
  - entity: sensor.nordpool_kwh_oslo_nok_2_10_025
    name: Цена
    type: column
    float_precision: 2
    color_threshold:
      - value: 0
        color: '#2ECC40'
      - value: 0.4
        color: '#FFDC00'
      - value: 0.6
        color: '#FF4136'
    show:
      extremas: true
      header_color_threshold: true
      name_in_header: false
      in_header: raw
    data_generator: >
      return [...entity.attributes.raw_today,
      ...entity.attributes.raw_tomorrow].map((item) =>
        [Date.parse(item.start), item.value]);
apex_config:
  chart:
    height: 400px
  tooltip:
    x:
      show: false
And not just that, you can also add some Markdown cards to print out the prices highlights, for example:
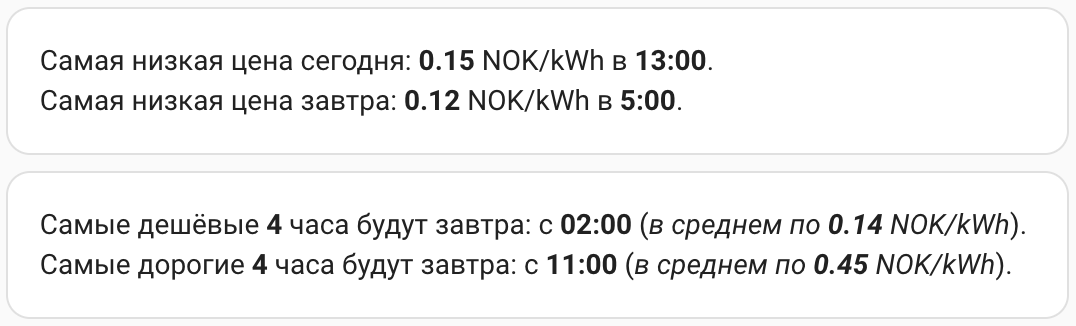
The code for it (based on someone else’s code that I found in this thread):
type: vertical-stack
cards:
  - type: markdown
    alignment: justify
    content: >-
      {% set priceListToday =
      state_attr('sensor.nordpool_kwh_oslo_nok_2_10_025', 'today')[00:23] %} {%
      set dateListToday = state_attr('sensor.nordpool_kwh_oslo_nok_2_10_025',
      'raw_today')[00:23] %} {% set minPriceToday = min(priceListToday) %} {%
      set minIndexToday = priceListToday.index(minPriceToday) %} {% set
      minDateTimeStrToday = dateListToday[minIndexToday].start | string %} {%
      set minDateTimeToday= strptime(minDateTimeStrToday[0:19], '%Y-%m-%d
      %H:%M:%S') %}
      Самая низкая цена сегодня: **{{ minPriceToday }}**
      NOK/kWh в **{{ minDateTimeToday.hour }}:00**.

      {% if state_attr('sensor.nordpool_kwh_oslo_nok_2_10_025','tomorrow') |
      length > 1 %} {% set priceListTomorrow =
      state_attr('sensor.nordpool_kwh_oslo_nok_2_10_025', 'tomorrow')[00:23] %}
      {% set dateListTomorrow =
      state_attr('sensor.nordpool_kwh_oslo_nok_2_10_025', 'raw_tomorrow')[00:23]
      %} {% set minPriceTomorrow = min(priceListTomorrow) %} {% set
      minIndexTomorrow = priceListTomorrow.index(minPriceTomorrow) %} {% set
      minDateTimeStrTomorrow = dateListTomorrow[minIndexTomorrow].start | string
      %} {% set minDateTimeTomorrow = strptime(minDateTimeStrTomorrow[0:19],
      '%Y-%m-%d %H:%M:%S') %}
      Самая низкая цена завтра: **{{ minPriceTomorrow
      }}** NOK/kWh в **{{ minDateTimeTomorrow.hour }}:00**. {% else %} *На
      завтра цен пока нет.* {% endif %}
  - type: markdown
    alignment: justify
    content: >-
      {% set iterativesum = namespace(iter=[]) %} {% set lowestiter =
      namespace(kr=2) %} {% set timelowest = namespace(hr=2) %} {% set
      highestiter = namespace(kr=0) %} {% set timehighest = namespace(hr=0) %}
      {% set num_hours = 4 | int %} {% set nordpoolentity =
      'sensor.nordpool_kwh_oslo_nok_2_10_025' %} {% set timemapper = { 0:
      '00:00', 1 : '01:00', 2 : '02:00', 3 : '03:00', 4 : '04:00', 5 : '05:00',
      6 : '06:00', 7 : '07:00', 8 : '08:00', 9 : '09:00', 10 : '10:00', 11 :
      '11:00', 12 : '12:00', 13 : '13:00', 14 : '14:00', 15 : '15:00', 16 :
      '16:00', 17 : '17:00', 18 : '18:00', 19 : '19:00', 20 : '20:00', 21 :
      '21:00', 22 : '22:00', 23 : '23:00', 24 : '00:00', 25 : '01:00', 26 :
      '02:00', 27 : '03:00', 28 : '04:00', 29 : '05:00', 30 : '06:00', 31 :
      '07:00', 32 : '08:00', 33 : '09:00', 34 : '10:00', 35 : '11:00', 36 :
      '12:00', 37 : '13:00', 38 : '14:00', 39 : '15:00', 40 : '16:00', 41 :
      '17:00', 42 : '18:00', 43 : '19:00', 44 : '20:00', 45 : '21:00', 46 :
      '22:00', 47 : '23:00', 48 : '0:00', } %} {% set prices =
      namespace(price=[]) %} {% set prices.price = prices.price +
      state_attr(nordpoolentity, 'today') %} {%- if
      state_attr(nordpoolentity,'tomorrow') | length == 1 -%} *На завтра цен
      пока нет.* {% else %} {% set prices.price = prices.price +
      state_attr(nordpoolentity, 'tomorrow') %} {% endif %} {%- for n in
      range(prices.price|length -num_hours +1) -%} {%- set tempsum=
      namespace(temp=0) -%} {%- for i in range(num_hours) -%} {%- set
      tempsum.temp = tempsum.temp + prices.price[n+i] -%} {% endfor -%} {% set
      iterativesum.iter = iterativesum.iter + [tempsum.temp] -%} {% endfor -%}
      {% for iter in iterativesum.iter -%} {%- if loop.index > now().hour -%}
      {%- if iter < lowestiter.kr | float -%} {%- set lowestiter.kr = iter |
      float -%} {%- set timelowest.hr = loop.index -1 -%} {%- endif -%} {%- if
      iter > highestiter.kr | float -%} {%- set highestiter.kr = iter | float
      -%} {%- set timehighest.hr = loop.index -1 -%} {%- endif -%} {%- endif -%}
      {% endfor -%}

      Самые дешёвые **{{num_hours}}** часа {% if (timelowest.hr <
      24) %}сегодня{% else %}будут завтра{% endif %}: с
      **{{timemapper[timelowest.hr]}}** (*в среднем по
      **{{"%.2f"|format(lowestiter.kr/num_hours)}}** NOK/kWh*).

      Самые дорогие **{{num_hours}}** часа {% if (timehighest.hr < 24)
      %}сегодня{% else %}будут завтра{% endif %}: с
      **{{timemapper[timehighest.hr]}}** (*в среднем по
      **{{"%.2f"|format(highestiter.kr/num_hours)}}** NOK/kWh*).
Sorry for the russian parts (if it is of any comfort, the original code was in finnish language) and especially for the ugly formatting, but Home Assistant keeps reformatting the code on saving the card, so there is no point in trying to make it look nice.
LG webOS Smart TV and Wake-on-LAN
One of the (very few) good things about modern TVs being “smart” is that they expose certain APIs, and for LG TVs in particular (I have one of those) Home Assistant offers LG webOS Smart TV integration.
But to be able to send commands to your TV, you need to make sure that it is on (and turn it on, if it isn’t). Good news is that LG TVs support Wake-on-LAN, and from what I could find in the TV settings, it is enabled in two places, and you need to enable it in both. The first place is this explicitly named setting inside Support → IP Control Settings:
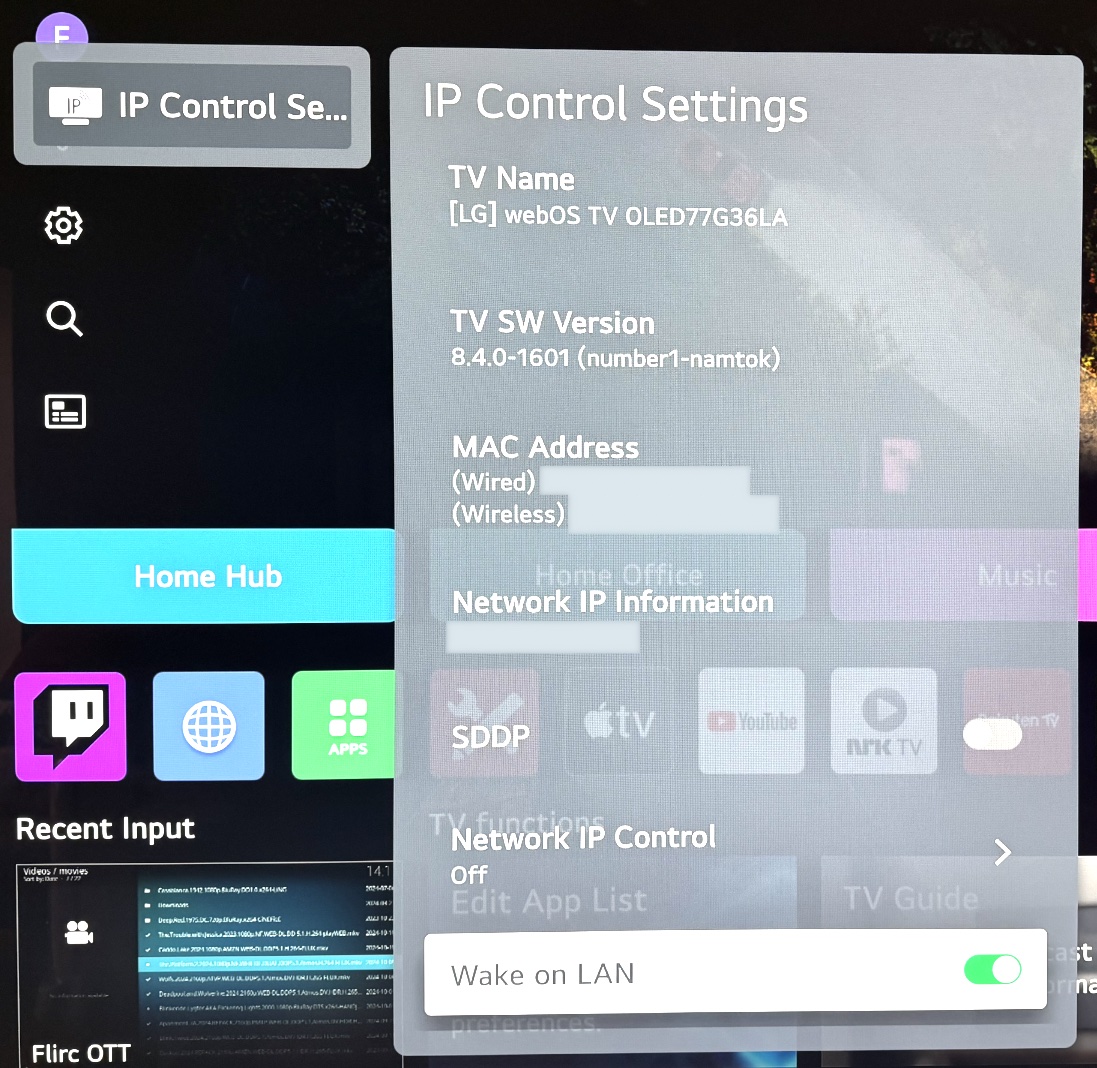
And the second place is in General → External Devices → TV On With Mobile (note the excellent job LG’s QA is doing on GUI testing, and people are paying 4500 USD to see this absence of a whitespace before openning brackets):
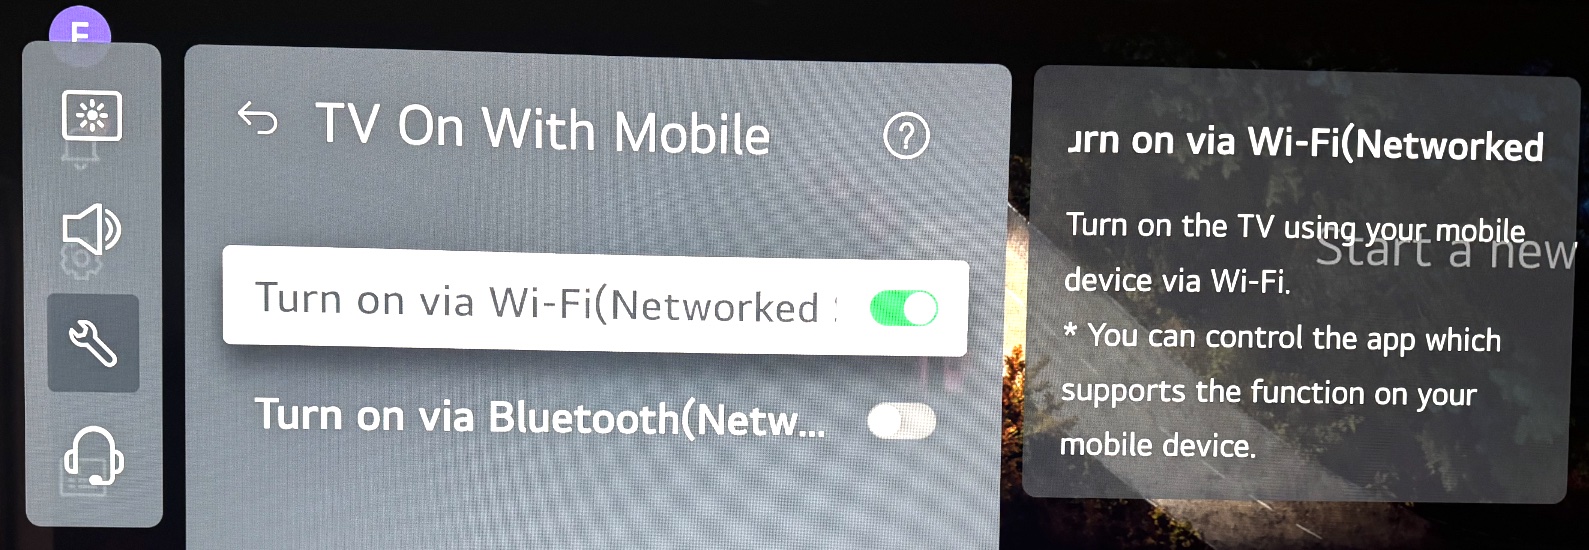
Don’t let “Wi-Fi” here confuse you - this setting applies to the Ethernet connection too, because without this setting being enabled my cable-connected TV did not react to Wake-on-LAN requests.
To verify that it works at all, execute the following (replace AA:BB:CC:DD:EE:FF with your actual TV’s MAC address):
$ sudo apt install wakeonlan

$ wakeonlan -i 192.168.1.255 AA:BB:CC:DD:EE:FF
Sending magic packet to 192.168.1.255:9 with AA:BB:CC:DD:EE:FF
The -i 192.168.1.255 is optional, because it will manage to find the broadcast address on its own.
If your TV did turn on after that, then you can proceed, but if not, then first you’ll have to figure out why it didn’t work. Perhaps you ran wakeonlan on a host that belongs to a different network, or maybe you haven’t enabled all the Wake-on-LAN-related settings on your TV.
Speaking about host not belonging to the same network where your TV is - that is exactly the case with Home Assistant running in a Docker container, as Docker containers network is isolated from the host network, so they cannot reach hosts in your home network. This is quite obvious and very much expected, but I totally forgot about it and have spent a lot of time trying to figure out why none of my Wake-on-LAN scripts/automations worked, until I realized that this was the reason.
And one of the solutions here is to create a named pipe, which will allow to send data from Home Assistant container to the host environment, where it will be then passed to wakeonlan call. Hopefully, exposing a named pipe like that doesn’t also introduce any security issues.
At first I created the pipe in /root/homeassistant/ (because I reckoned that in this case I would not need to map this location with -v):
$ sudo mkfifo /root/homeassistant/wolpipe
Check the access rights for it:
$ sudo stat -c %a /root/homeassistant/wolpipe
644
If it isn’t 644, then make it so:
$ sudo chmod 644 /root/homeassistant/wolpipe
Next create a systemd service to listen for Wake-on-LAN requests from that pipe:
$ sudo nano /etc/systemd/system/docker-wol.service
[Unit]
Description=Listen for Wake-On-LAN from Docker via pipe

[Service]
Restart=always
User=nobody
Group=nogroup
ExecStart=/usr/bin/wakeonlan -f /root/homeassistant/wolpipe

[Install]
WantedBy=multi-user.target
$ sudo systemctl enable docker-wol
Created symlink /etc/systemd/system/multi-user.target.wants/docker-wol.service → /etc/systemd/system/docker-wol.service.
$ sudo systemctl start docker-wol

$ sudo systemctl status docker-wol
● docker-wol.service - Listen for Wake-On-LAN from Docker via pipe
     Loaded: loaded (/etc/systemd/system/docker-wol.service; enabled; vendor preset: enabled)
     Active: failed (Result: exit-code) since Sat 2024-10-12 16:48:27 CEST; 36s ago
    Process: 16159 ExecStart=/usr/bin/wakeonlan -f /root/homeassistant/wolpipe (code=exited, status=13)
   Main PID: 16159 (code=exited, status=13)

Oct 12 16:48:27 vero systemd[1]: docker-wol.service: Scheduled restart job, restart counter is at 5.
Oct 12 16:48:27 vero systemd[1]: Stopped Listen for Wake-On-LAN from Docker via pipe.
Oct 12 16:48:27 vero systemd[1]: docker-wol.service: Start request repeated too quickly.
Oct 12 16:48:27 vero systemd[1]: docker-wol.service: Failed with result 'exit-code'.
Oct 12 16:48:27 vero systemd[1]: Failed to start Listen for Wake-On-LAN from Docker via pipe.
So the service failed to start. Checking the logs:
$ journalctl -u docker-wol.service
...
Oct 12 16:48:26 vero wakeonlan[16150]: open : Permission denied at /usr/bin/wakeonlan line 138.
shows that there are some access problems, which is very likely because /root/homeassistant/wolpipe is inside root folder, and nobody does not have access there. Don’t know what I expected.
So I re-created the pipe in a different location and granted nobody access to it:
$ sudo rm /root/homeassistant/wolpipe
$ sudo mkfifo /opt/wolpipe
$ sudo chown nobody:root /opt/wolpipe

$ sudo nano /etc/systemd/system/docker-wol.service
# ...
ExecStart=/usr/bin/wakeonlan -f /opt/wolpipe
# ...
And that worked out fine:
$ sudo systemctl daemon-reload
$ sudo systemctl restart docker-wol.service

$ sudo systemctl status docker-wol.service
● docker-wol.service - Listen for Wake-On-LAN from Docker via pipe
     Loaded: loaded (/etc/systemd/system/docker-wol.service; enabled; vendor preset: enabled)
     Active: active (running) since Sat 2024-10-12 19:51:22 CEST; 3s ago
   Main PID: 16451 (wakeonlan)
      Tasks: 1 (limit: 3659)
     Memory: 1.4M
     CGroup: /system.slice/docker-wol.service
             └─16451 /usr/bin/perl -w /usr/bin/wakeonlan -f /opt/wolpipe

Oct 12 19:51:22 vero systemd[1]: Started Listen for Wake-On-LAN from Docker via pipe.
However, in the logs there was this warning:
$ journalctl -u docker-wol.service | tail -2
Oct 12 19:51:21 vero systemd[1]: /etc/systemd/system/docker-wol.service:6: Special user nobody configured, this is not safe!
Oct 12 19:51:22 vero systemd[1]: Started Listen for Wake-On-LAN from Docker via pipe.
As a remedy to that, I replaced User=nodoby with DynamicUser=yes in /etc/systemd/system/docker-wol.service and also returned the pipe file back to root, just in case:
$ sudo chown root:root /opt/wolpipe
And since /opt/wolpipe is not inside /root/homeassistant/, it needs to be mapped with -v, so I had to re-create the container:
$ sudo docker stop homeassistant
$ sudo docker rm homeassistant

$ sudo docker run -d \
    --name homeassistant \
    --restart=unless-stopped \
    --network hub \
    --ip 172.18.0.100 \
    -e TZ=Europe/Amsterdam \
    -v /root/homeassistant:/config \
    -v /opt/wolpipe:/config/wolpipe \
    ghcr.io/home-assistant/home-assistant:stable
Check what you have in the /config/ now:
$ sudo docker exec -it homeassistant bash

# pwd
/config

# ls -L1
automations.yaml
blueprints
configuration.yaml
custom_components
deps
home-assistant.log
home-assistant.log.1
home-assistant.log.fault
home-assistant_v2.db
home-assistant_v2.db-shm
home-assistant_v2.db-wal
image
scenes.yaml
scripts.yaml
secrets.yaml
templates.yaml
tts
wolpipe
www
Here it is! Now try to send the command:
# echo 'AA:BB:CC:DD:EE:FF' > /config/wolpipe

# exit
And the TV should turn on. Hallelujah.
In order to control it with utmost convenience from Home Assistant dashboards, add a custom switch entity to your configuration.yaml:
wake_on_lan: # enable waking devices by sending a magic network packet

shell_command:
  wol_lg_oled_g3: "/bin/echo 'AA:BB:CC:DD:EE:FF' > /config/wolpipe"

switch:
  - platform: template
    switches:
      lg_oled_g3:
        friendly_name: "LG OLED G3"
        value_template: "{{ is_state('media_player.lg_oled_g3', 'on') }}"
        turn_on:
          - action: shell_command.wol_lg_oled_g3
        turn_off:
          - service: media_player.turn_off
            data:
              entity_id: media_player.lg_oled_g3
        icon_template: >-
          {% if is_state('media_player.lg_oled_g3', 'on') %}
            mdi:television
          {% else %}
            mdi:television-off
          {% endif %}
And then you will be able to add it to your dashboards as a button:
type: button
entity: switch.lg_oled_g3
tap_action:
  action: toggle
name: LG OLED G3
show_name: true
show_icon: true
show_state: true
Here’s how it looks when TV is off:
and when TV is on:

Webhooks
This isn’t very specific to running Home Assistant in a Docker container, but I thought I’ll share this anyway.
So, Home Assistant has a webhooks functionality, which you can use as an automation trigger. The webhooks you’ll create will have the route of https://YOUR-VERO-IP:8123/api/webhook/SOME-UNIQUE-ID, where SOME-UNIQUE-ID can be anything you want: a completely random set of characters or a human-readable identifier.
Here’s a screenshot of an example webhook trigger in an automation:
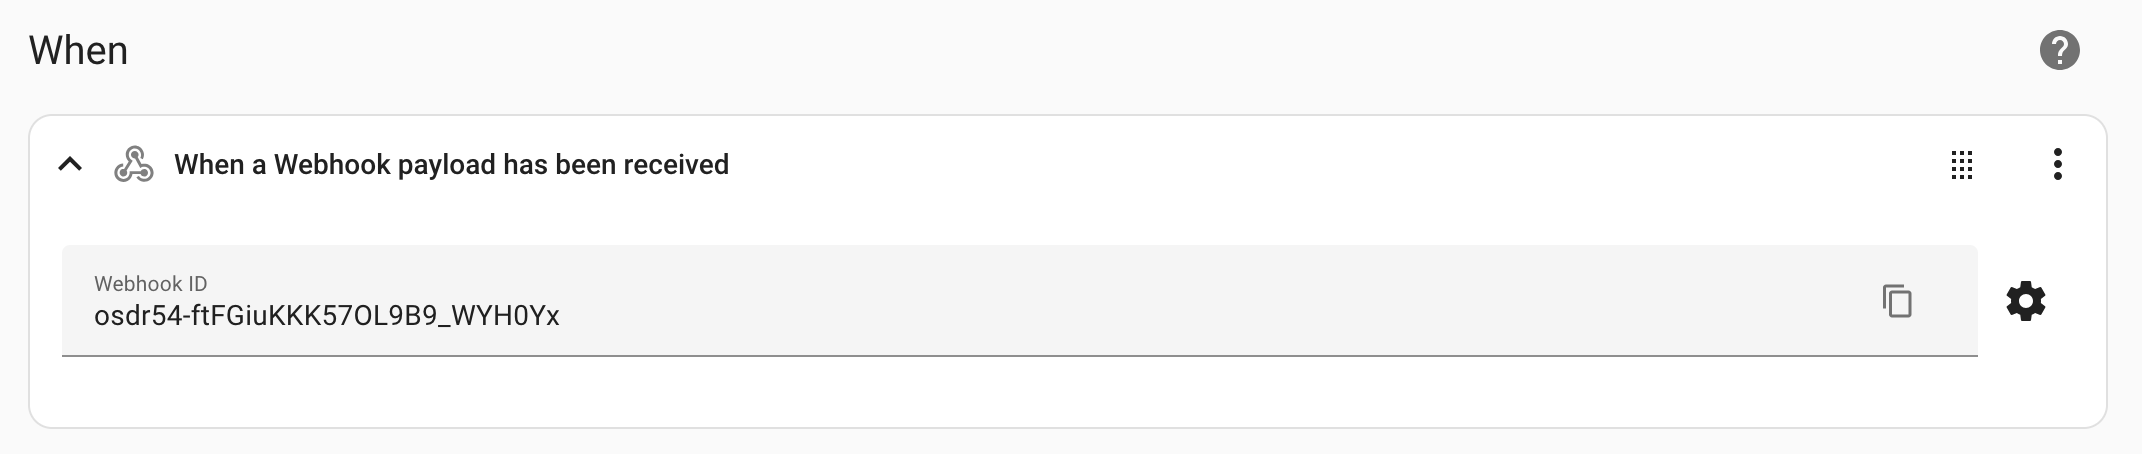
and also here it is in YAML:
triggers:
  - trigger: webhook
    allowed_methods:
      - POST
    local_only: true
    webhook_id: osdr54-ftFGiuKKK57OL9B9_WYH0Yx
Now you can add whatever action you’d like in that automation, such as turning on the lights in some room, and then every time this webhook would trigger, that room lights will be turning on (or off). To trigger this webhook you’d need to send the following POST request from any other device in your local network:
$ curl -X POST -k https://YOUR-VERO-IP:8123/api/webhook/osdr54-ftFGiuKKK57OL9B9_WYH0Yx
The -k argument is here to skip the verification of our self-signed certificate.
Sending data with a webhook
Webhooks can also contain a JSON payload, which makes them even more useful. In particular, you can create a virtual template sensor to monitor whatever metric you’d like.
For example, I have a Raspberry Pi device running some services, and I would like to monitor its temperature. Since Raspberry Pi isn’t really a Zigbee-enabled thermometer that could be added to Home Assistant by the usual means, the other way you can get its temperature is by submitting it with a webhook.
To begin with, the POST request with a JSON payload would look like this:
$ curl -X POST \
    -H "Content-Type: application/json" -d '{"temperature":50}' -k \
    https://YOUR-VERO-IP:8123/api/webhook/monitoring-raspberry-temperature
Like I said, the monitoring-raspberry-temperature value can be anything, so you might prefer to use human-readable identifiers (but don’t neglect the security aspect).
The temperature of Raspberry Pi running Raspbian (Raspberry Pi OS) can be queried like this:
$ vcgencmd measure_temp | awk -F "[=']" '{print($2)}'
60.4
Combining everything together, the final command (using jq to format the JSON payload/body) will be this:
$ jq -nc --argjson msg \
    $(vcgencmd measure_temp | awk -F "[=']" '{print($2)}') '{"temperature":$msg}' \
    | curl -X POST \
    -H "Content-Type: application/json" -d @- -k \
    https://YOUR-VERO-IP:8123/api/webhook/monitoring-raspberry-temperature
Note the --argjson, because if you use the --arg instead, then the temperature value will be in quotes:
jq -nc --argjson msg $(vcgencmd measure_temp | awk -F "[=']" '{print($2)}') '{"temperature":$msg}'
{"temperature":57.6}

$ jq -nc --arg msg $(vcgencmd measure_temp | awk -F "[=']" '{print($2)}') '{"temperature":$msg}'
{"temperature":"57.6"}
which will fail on parsing into a float value.
Last thing to do on the Raspberry Pi side is to put this command into a cron task (or maybe a systemd service), so it would automatically execute as frequently as you want it to (once per minute seems often enough).
On the Home Assistant side you need to create a template sensor for receiving those temperature values. This is done by editing the templates.yaml (/root/homeassistant/templates.yaml or wherever you have it), as those can’t(?) be created via the web GUI. And then there are two ways for updating that sensor value:
- An automation’s action to dispatch an event with the webhook data, which is then received by the sensor;
- anticipating your question, no, it isn’t fekking possible to “simply” set the state of a sensor with an automation’s action, because one does not simply update sensor vales;
- A “direct” webhook trigger-based sensor.
Automation and dispatched event
A sensor getting the data from an event trigger can be defined like this:
- triggers:
  - trigger: event
    event_type: new_raspberry_pi_temperature_value
  sensor:
    - name: "Raspberry Pi temperature"
      unique_id: "raspberry_pi_temperature"
      unit_of_measurement: "°C"
      state: "{{ trigger.event.data.state }}"
As you can see, sensor gets its state from an event. And that event will be dispatched by the automation, so that needs to be created too, and it will be triggered by our webhook:
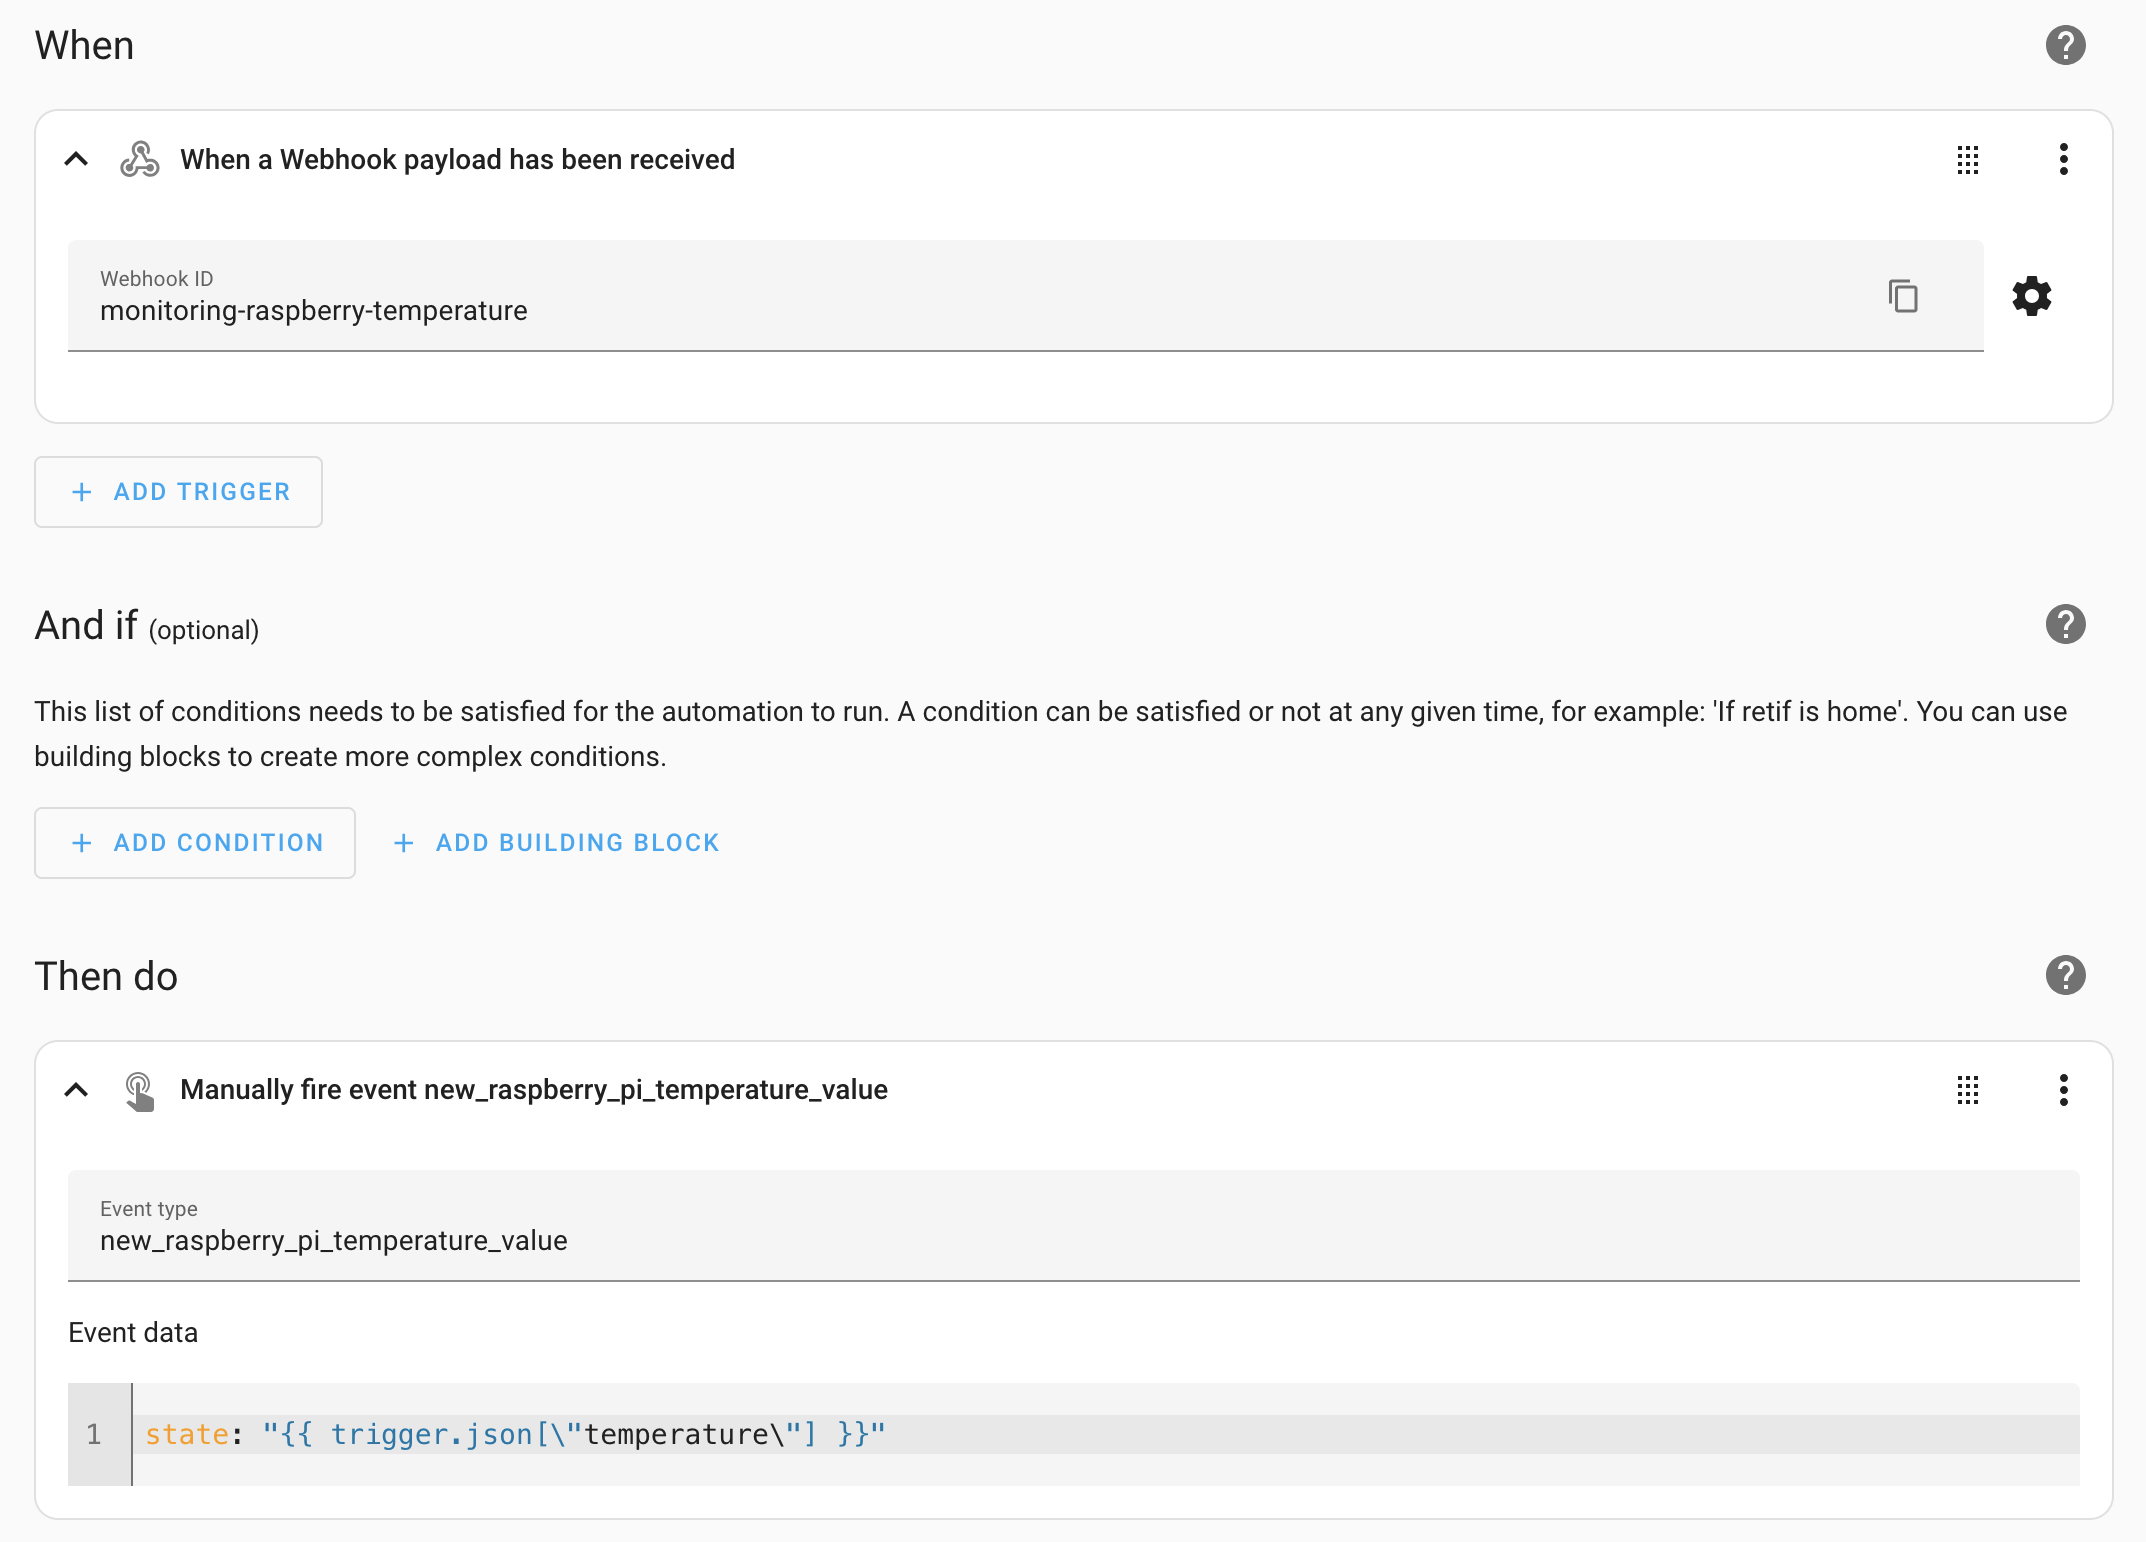
also here it is in YAML:
triggers:
  - trigger: webhook
    allowed_methods:
      - POST
    local_only: true
    webhook_id: monitoring-raspberry-temperature
conditions: []
actions:
  - event: new_raspberry_pi_temperature_value
    event_data:
      state: "{{ trigger.json[\"temperature\"] }}"
mode: single
After reloading the templates (or restarting the entire Home Assistant instance), the sensor will start getting updates from the temperature values reported by Raspberry Pi:
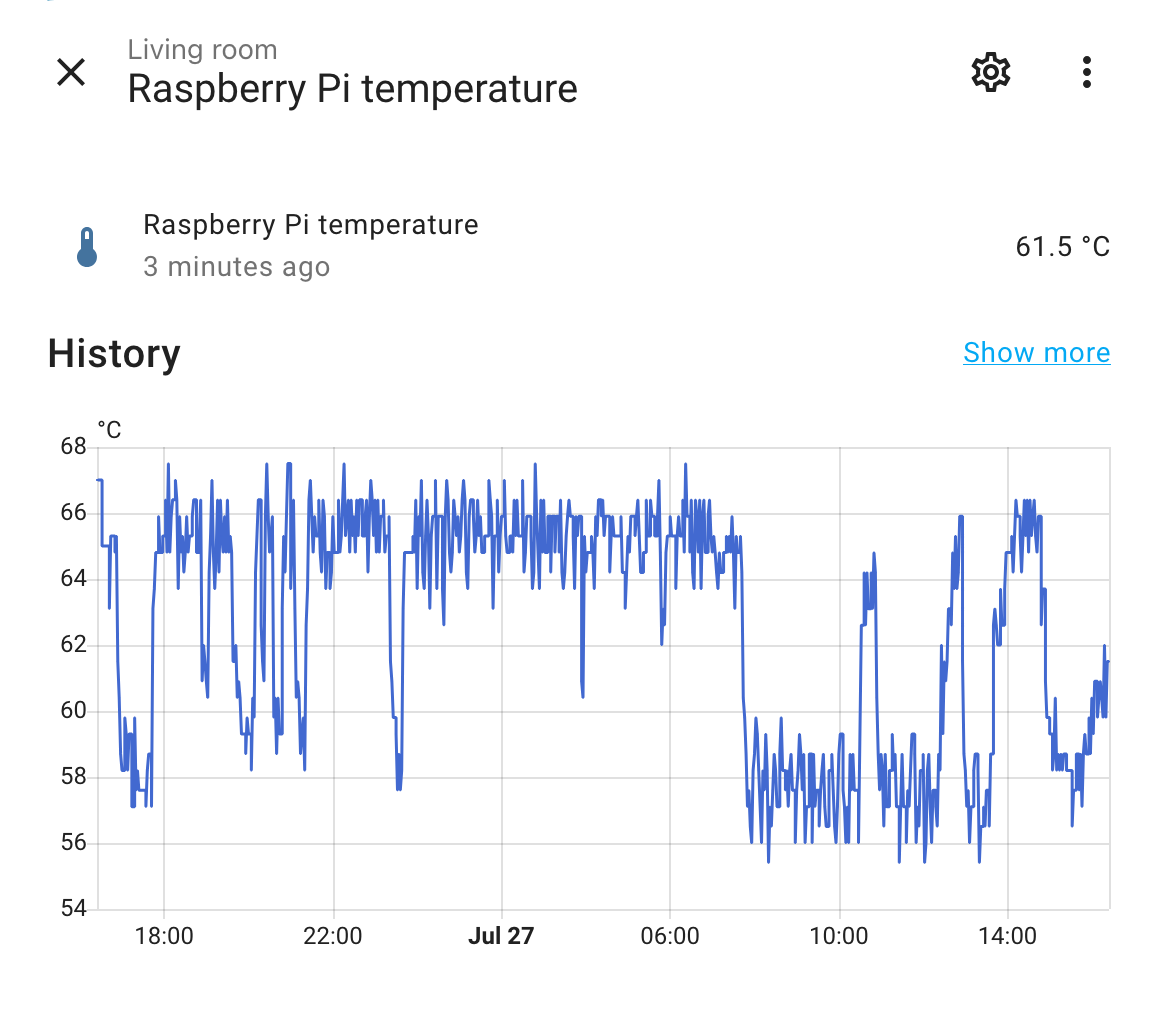
Direct webhook trigger-based sensor
This one looks almost the same way, but now instead of an event the trigger is a webhook and the value is extracted directly from the JSON payload:
- triggers:
  - trigger: webhook
    webhook_id: "monitoring-raspberry-temperature"
  sensor:
    - name: "Raspberry Pi temperature"
      unique_id: "raspberry_pi_temperature"
      unit_of_measurement: "°C"
      state: "{{ trigger.json.temperature }}"
And this is it, no need to create an automation and nothing else needs to be done (aside from reloading the templates).
So I can say that there is no point in using automations for this at all, as webhook trigger-based sensor involves less moving parts and is easier/quicker to set-up. Automations would make sense only if it was possible to simply set template sensor value/state directly from actions, but…
Using data from different triggers for different sensors
Oh yeah, that was quite a WTF moment for me. As you can see in the examples above, sensor is attached to its trigger and it gets the data from trigger.json.temperature. But what if there will be more than one trigger? How does sensor know which trigger.json.temperature is from what trigger?
At first I naively tried to do the following:
triggers:
  - trigger: webhook
    webhook_id: my-super-secret-webhook-1
  - trigger: webhook
    webhook_id: my-super-secret-webhook-2

sensor:
  - name: "Webhook Temperature 1"
    unique_id: "webhook_temperature_1"
    state: "{{ trigger.json.temperature }}"
    unit_of_measurement: °C
  - name: "Webhook Temperature 2"
    unique_id: "webhook_temperature_2"
    state: "{{ trigger.json.temperature }}"
    unit_of_measurement: °C
But sending a POST request to either of the webhooks:
$ curl -X POST \
    -H "Content-Type: application/json" \
    -d '{"temperature":5}' \
    https://YOUR-VERO-IP:8123/api/webhook/my-super-secret-webhook-1 # or my-super-secret-webhook-2
was updating both sensors:

I couldn’t figure out how to resolve this, so I posted a question at the Home Assistant forum, and from there I learned that first of all I was lacking the understanding of dictionaries and lists in YAML and more importantly the fact that templates.yaml format can be either of those (u fukken wat). Secondly, such triggers and sensor should be “grouped” in a “tandem”, like so:
- triggers:
  - trigger: webhook
    webhook_id: my-super-secret-webhook-1
  sensor:
    - name: "Webhook Temperature 1"
      unique_id: "webhook_temperature_1"
      state: "{{ trigger.json.temperature }}"
      unit_of_measurement: "°C"

- triggers:
  - trigger: webhook
    webhook_id: my-super-secret-webhook-2
  sensor:
    - name: "Webhook Temperature 2"
      unique_id: "webhook_temperature_2"
      state: "{{ trigger.json.temperature }}"
      unit_of_measurement: "°C"
As you can see, the sections here start with -, which means that the file is now using the lists format. I had it in dictionary format before, so I had to update all my other sections in the file to the lists format too.
Now sending a POST request to my-super-secret-webhook-1 webhook updates only the webhook_temperature_1 sensor, and my-super-secret-webhook-2 webhook updates only the webhook_temperature_2 sensor.
And obviously the same applies if you’ll decide to go the way of using automations and dispatched events, because those event-based triggers would also need to be “grouped” with their sensors.
But quite honestly, it all feels like a crutch. Especially that it seems to be impossible to create more than one such trigger/sensor “tandem” using the dictionary format in templates.yaml.
Organizing dashboards layout
Also nothing specific to using Docker here, but eventually you’ll probably want to change the dashboards layout, in particular almost immediately I wanted to have a 2-column layout with the second column being wider. And surprisingly, that isn’t wasn’t possible/trivial to do out of the box.
Until there was a way, one could use the layout-card frontend plugin, which can be installed via HACS. It probably offers more than what I am using it for, but for me the grid layout was enough, so now I can organize my cards like this:
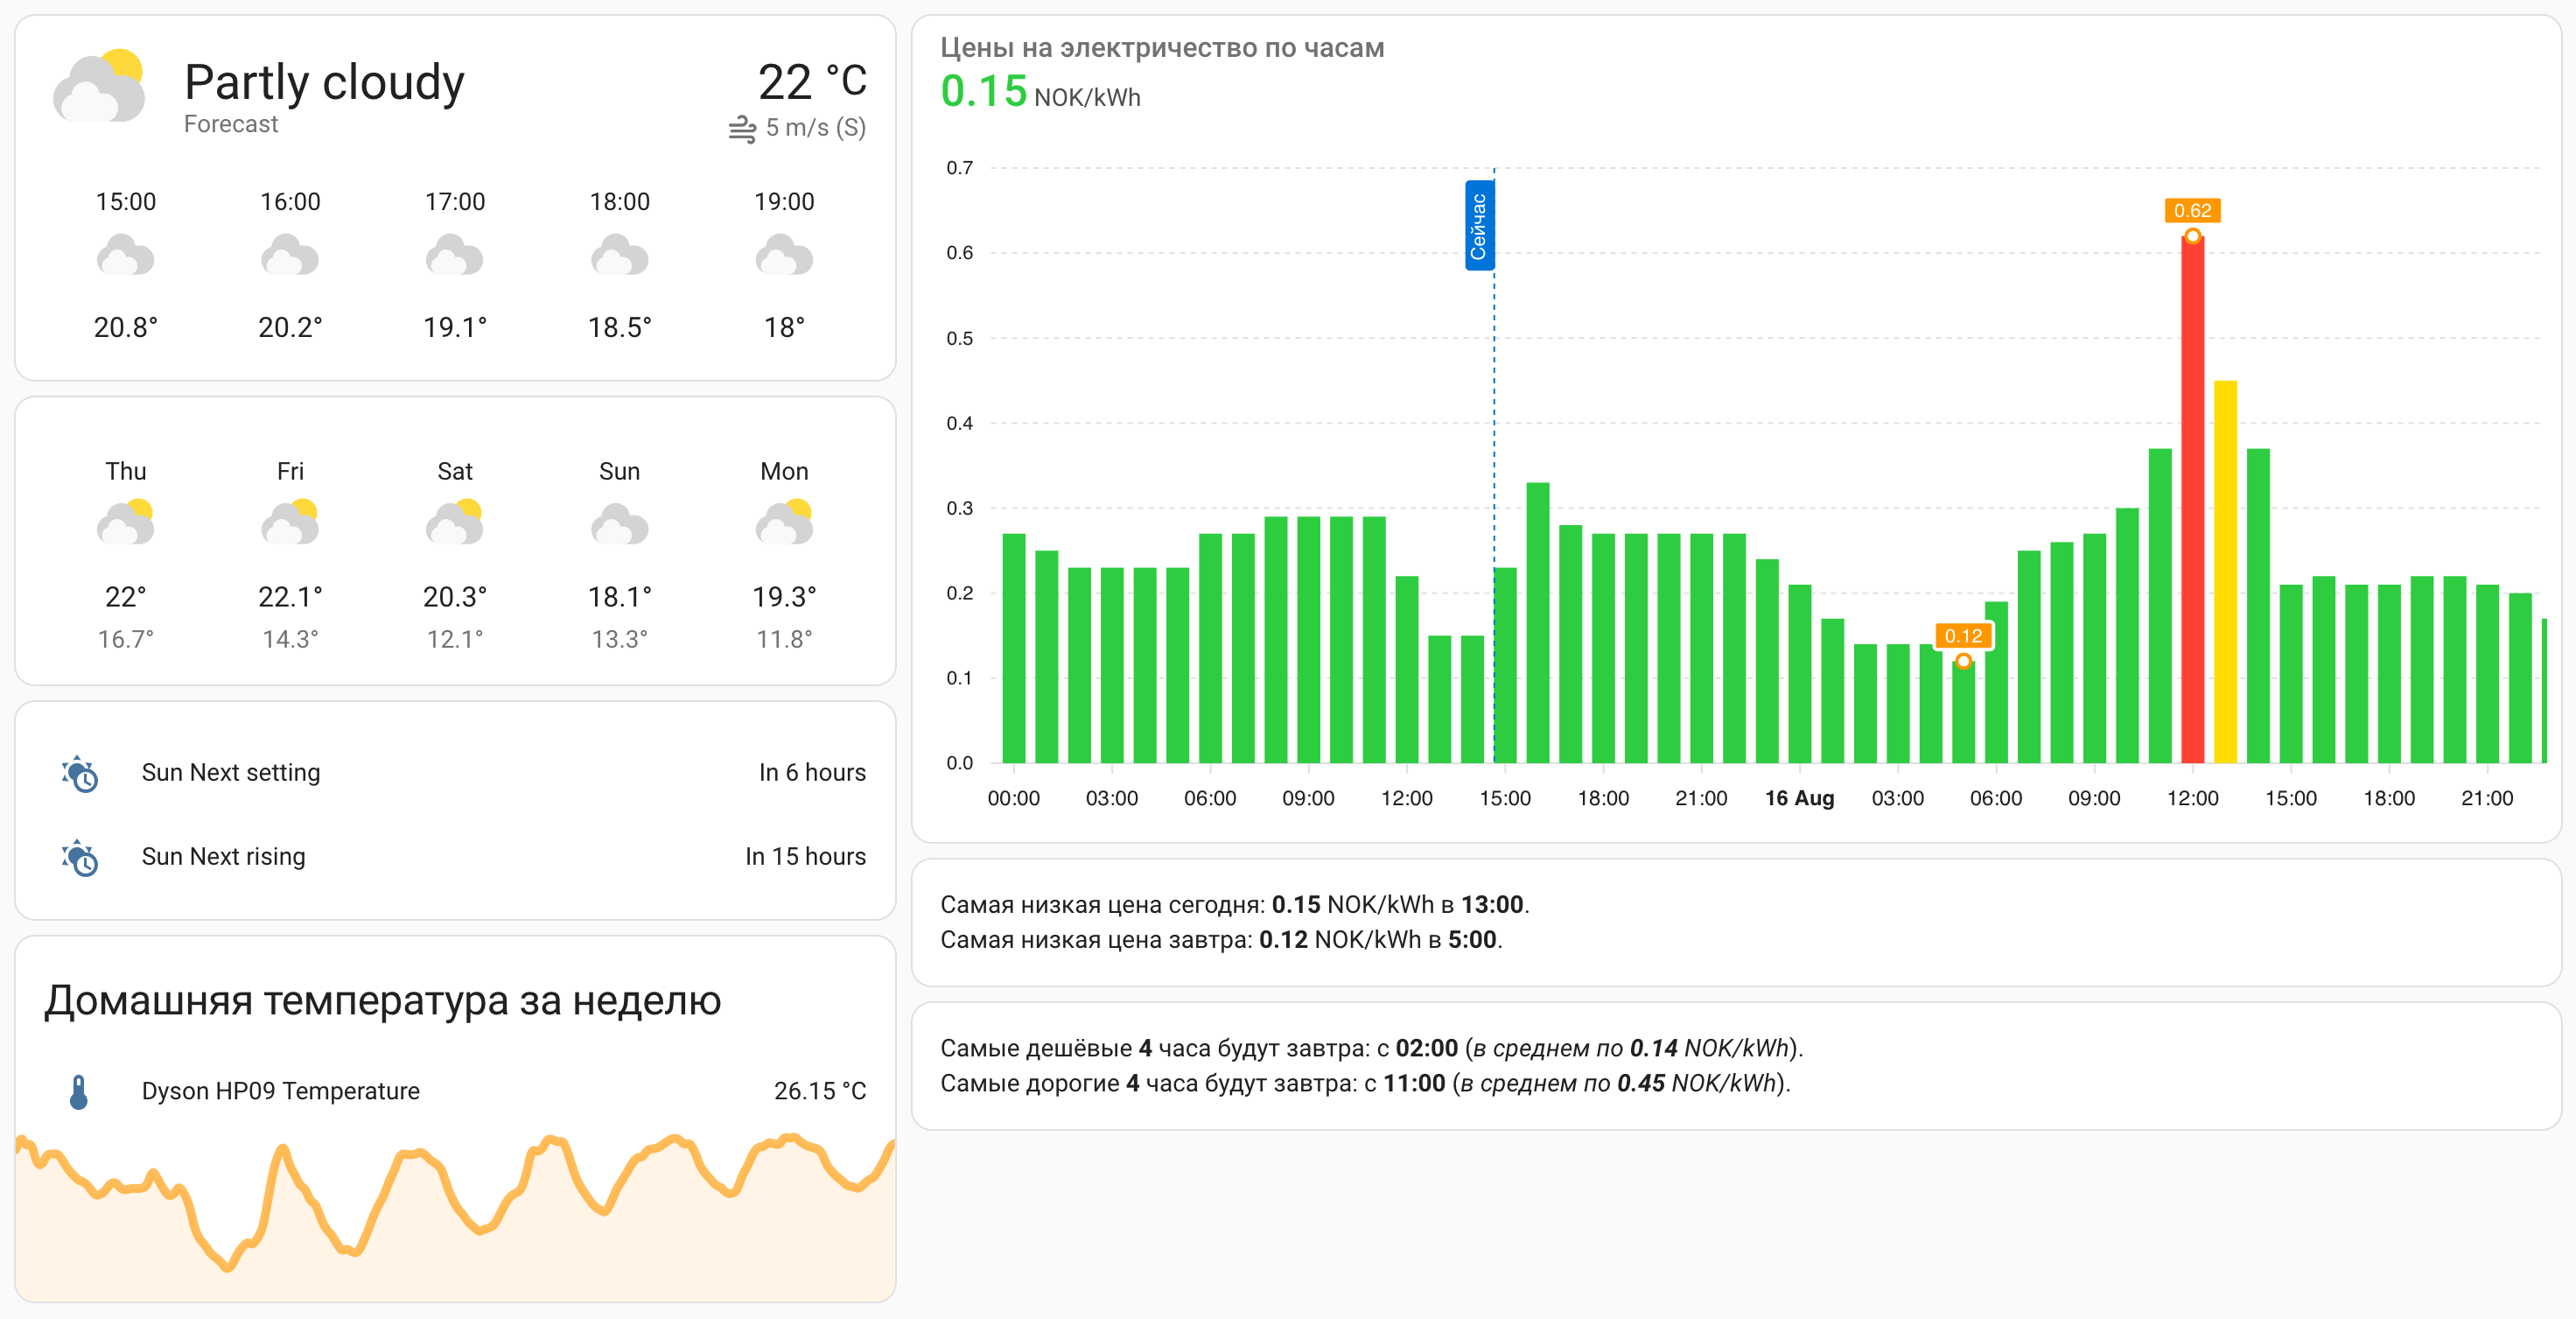
The code for this:
views:
  - title: Home
    cards:
      - ...
      - ...
    type: custom:grid-layout
    layout:
      grid-template-columns: 35% auto
      grid-template-rows: auto
      mediaquery:
        '(max-width: 800px)':
          grid-template-columns: 100%
So I survived with that for a bit (never figured out how to have more than one mediaquery), and then Home Assistant added sections, which brought very nice layouting capabilities:
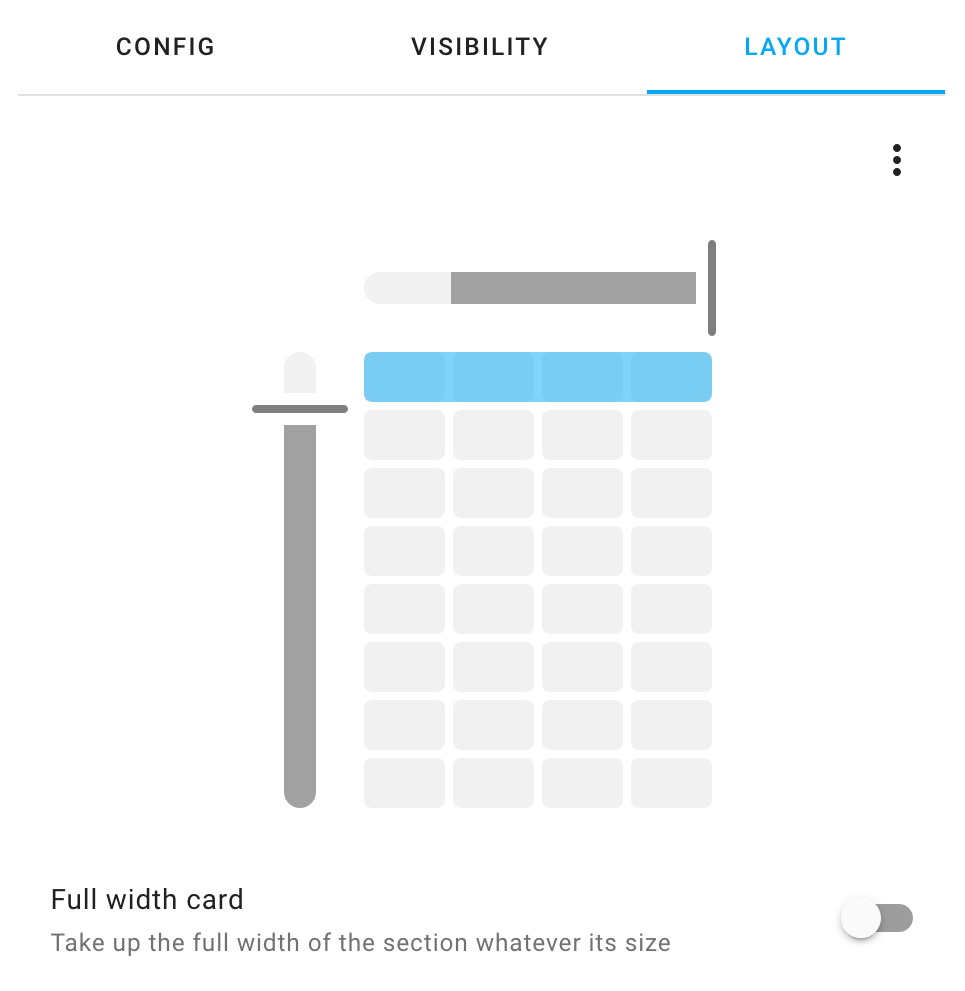
Using sections, here’s how I could arrange the dashboard at full width with 3 columns:
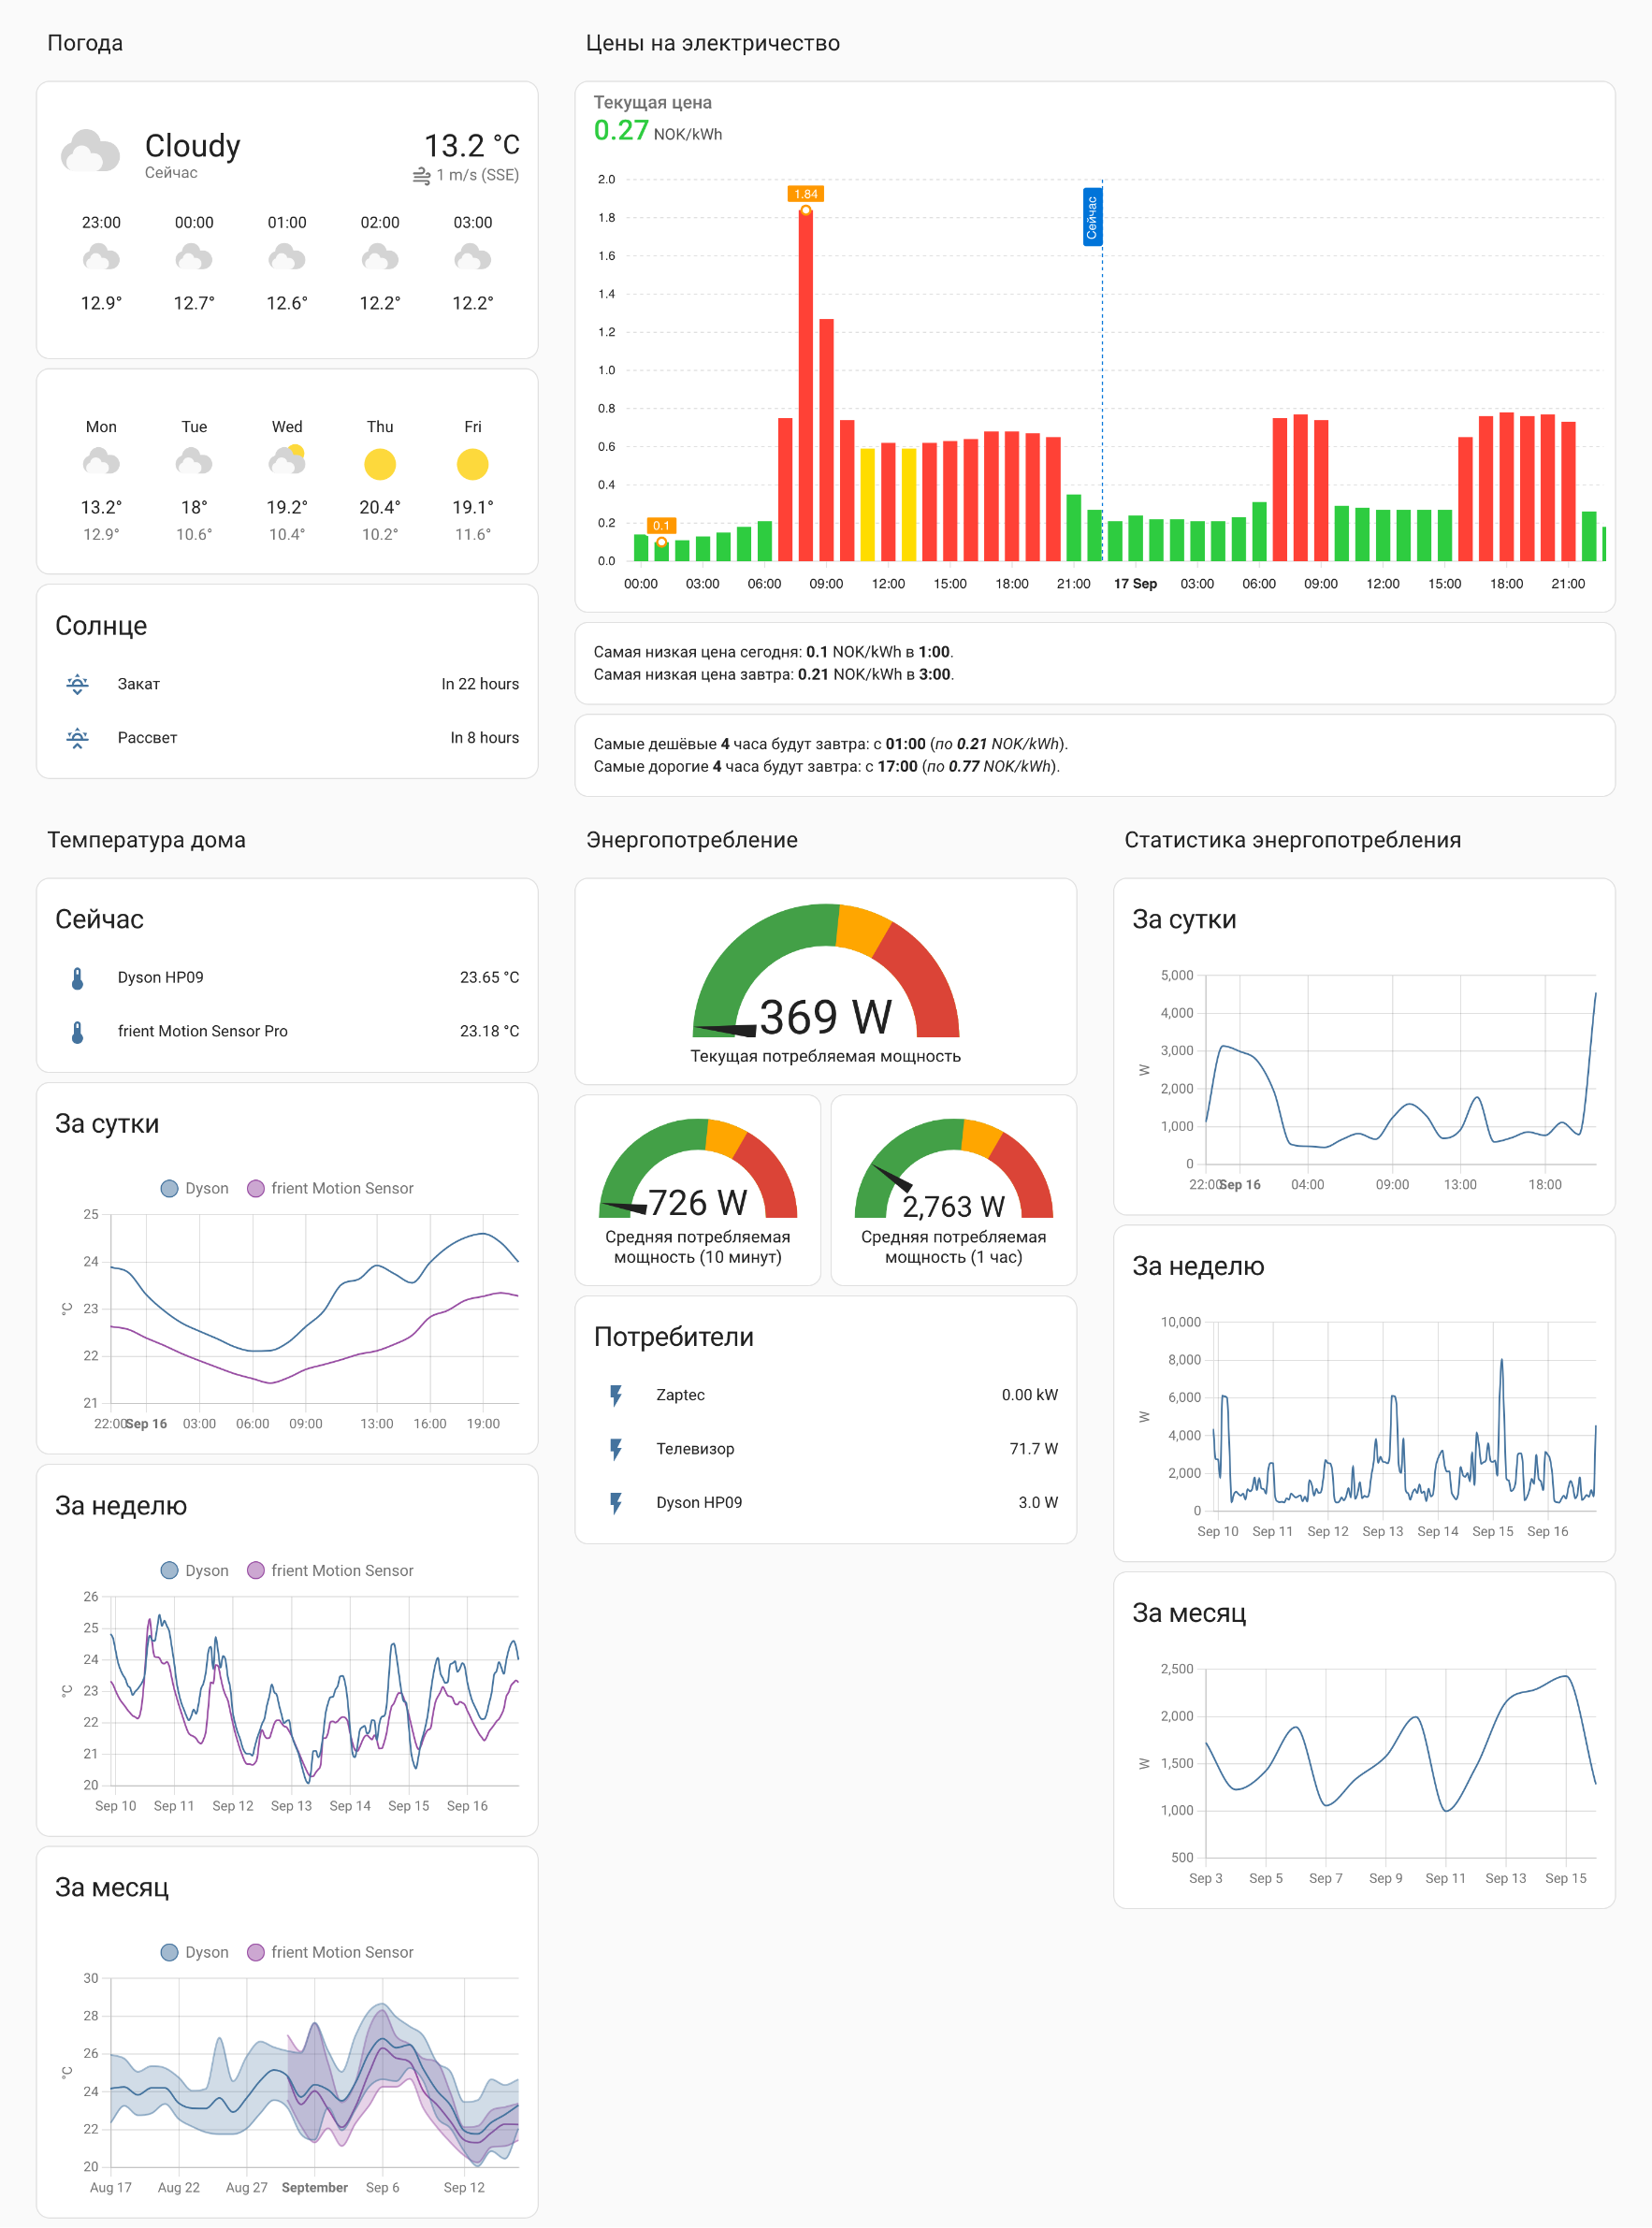
and here’s how it automatically rearranges in 2 columns on narrower screens:
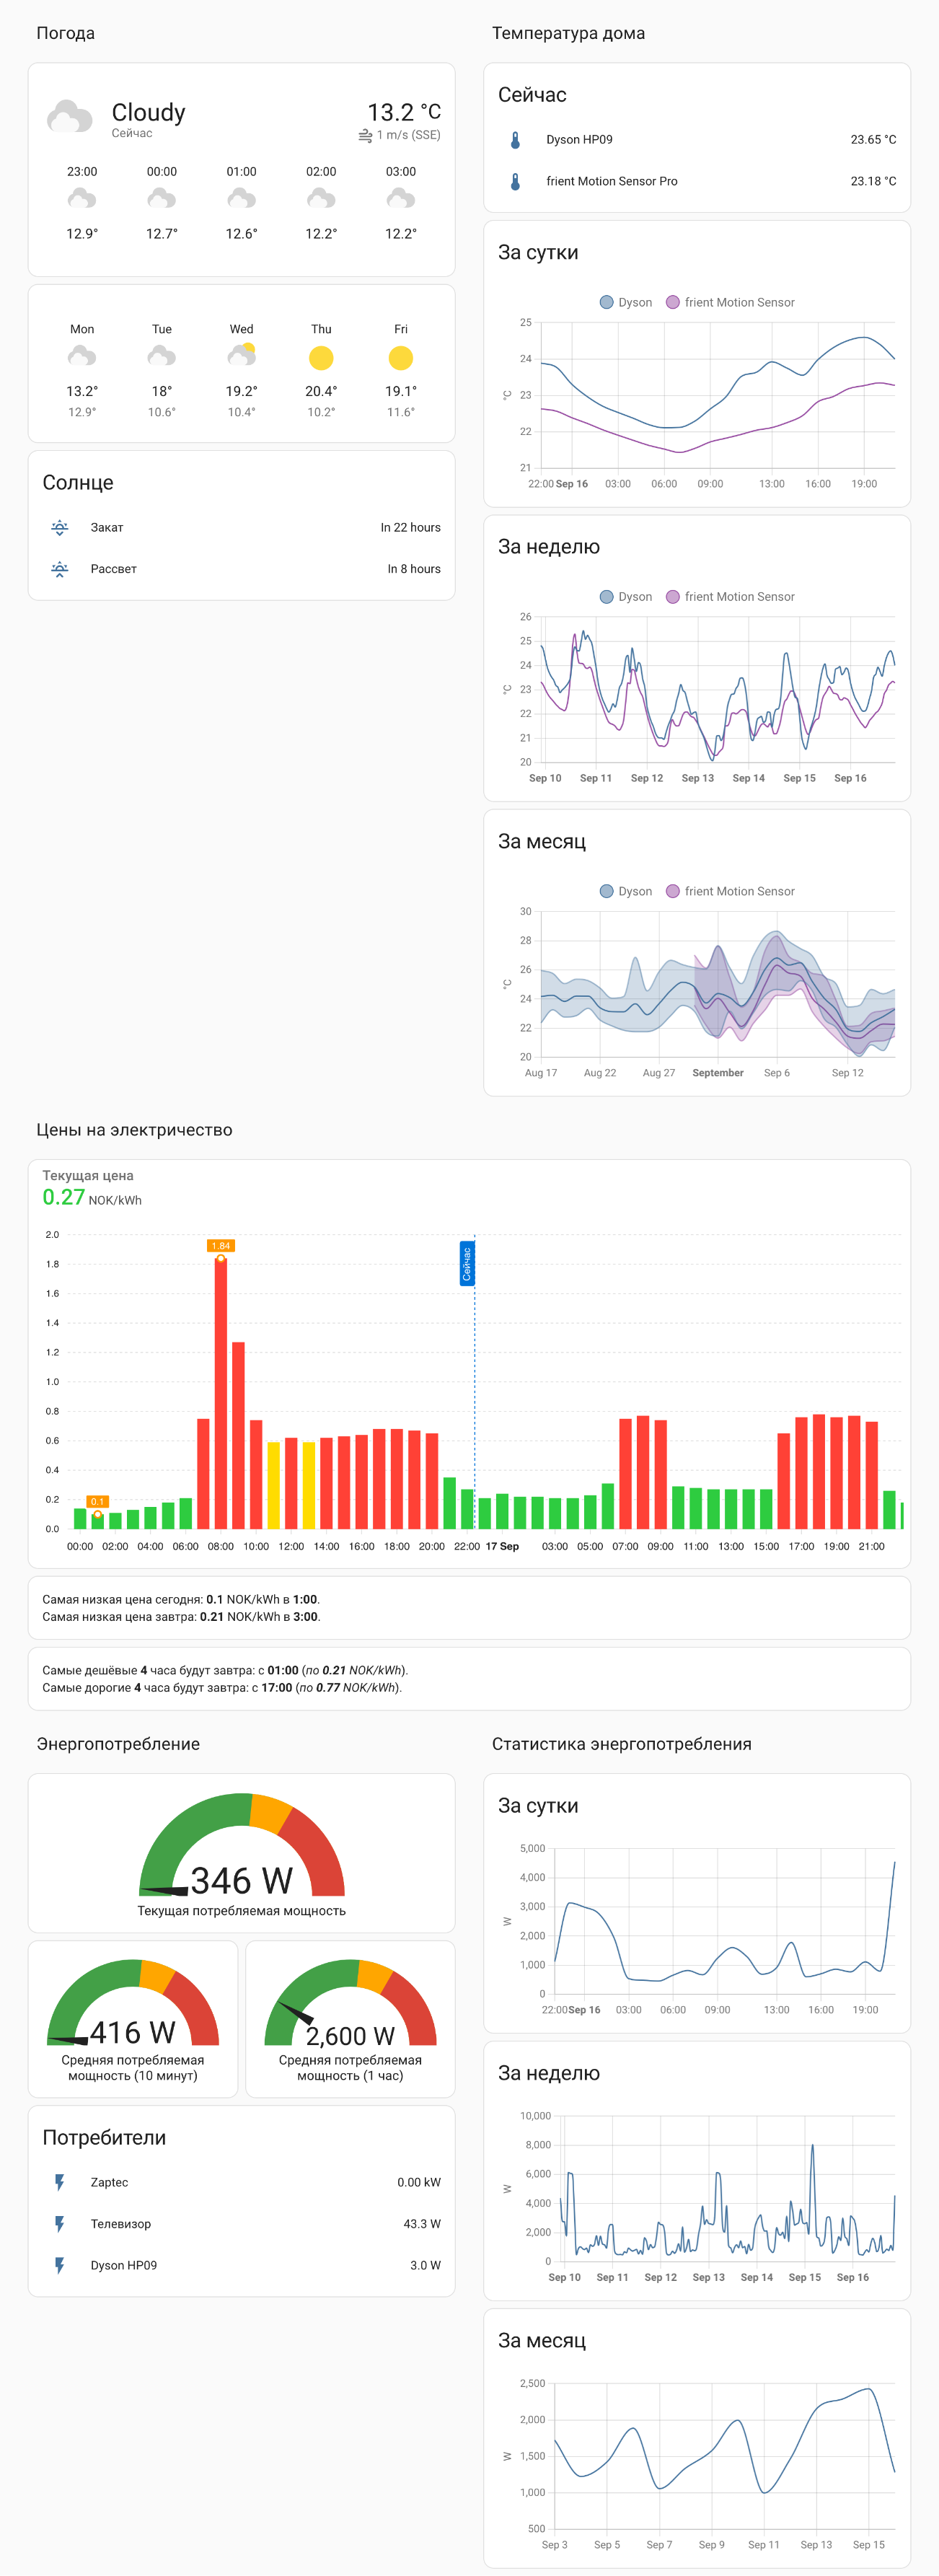
It also rearranges into 1 column on even narrower screens, but that would be a one kilometer long screenshot, so I won’t put it here.
So I switched to sections and deleted the layout-card plugin.
Maintenance
Backups
Having configured so many things, you should definitely think about backups.
I’ve come up with the following script:
$ mkdir /root/_backups
$ sudo nano /root/_backups/backup.sh
#!/bin/bash

dt="$(date +%Y.%m.%d-%H%M%S)"
backupname="vero-backup_$dt"
workingdir="/root/_backups/$backupname"
mkdir -p $workingdir

# Home Assistant and friends
tar -czf $workingdir/home-assistant.tar.gz \
    /root/homeassistant \
    /root/mosquitto \
    /root/zigbee2mqtt

# NGINX
tar -czf $workingdir/nginx.tar.gz \
    /etc/nginx/sites-available/* \
    /etc/nginx/mime.types \
    /etc/nginx/nginx.conf

# OSMC (given that it makes backups in this folder)
cp /home/osmc/backups/* $workingdir/

# cron
cp /var/spool/cron/crontabs/* $workingdir/

# the script itself
cp /root/_backups/backup.sh $workingdir/
and made it run on schedule:
$ sudo crontab -e
1 1 */20 * * /root/_backups/backup.sh
# or with Healthchecks reporting: https://github.com/retifrav/scraps/blob/master/_linux/installing-healthchecks/index.md
#1 1 */20 * * /root/_backups/backup.sh > /dev/null 2>&1 && /usr/bin/curl -X POST -fsS -m 10 --retry 5 -o /dev/null https://healthchecks.YOUR.DOMAIN/ping/ID/vero-backup
It would also be a good idea to upload/download the backups from the device to some reliable external storage.
Before making a backup, you might want to stop the containers, so files wouldn’t change during the backup procedure:
$ sudo docker stop $(sudo docker ps -aq)
$ sudo /root/_backups/backup.sh
$ sudo docker start $(sudo docker ps -aq)
Updating
In general, the procedure of updating something (that is run in a Docker container) is to get the latest Docker image and re-create the container. So with Home Assistant as an example in my particular network setup (note the --network and --ip arguments), the steps would be:
$ echo "Stop all the containers for making a backup"
$ sudo docker stop $(sudo docker ps -aq)
$ sudo /root/_backups/backup.sh

$ echo "Remove the existing Home Assistant container"
$ sudo docker rm homeassistant
$ echo "Get the latest image"
$ sudo docker pull ghcr.io/home-assistant/home-assistant:stable
$ echo "Re-create the container"
$ sudo docker run -d \
    --name homeassistant \
    --network hub \
    --ip 172.18.0.100 \
    --restart=unless-stopped \
    -e TZ=Europe/Amsterdam \
    -v /root/homeassistant:/config \
    -v /opt/wolpipe:/config/wolpipe \
    -p 1400:1400 \
    ghcr.io/home-assistant/home-assistant:stable
$ echo "If it fails with no matching manifest, then instead of :stable you will need to find the latest tag version that is still supported for your target architecture"

$ echo "Start all the containers back: `sudo docker start $(sudo docker ps -aq)`"
$ echo "...unless you'd like to update other images too"
As you already know, thanks to Home Assistant data being stored in a mapped volume location, it is totally fine to destroy and re-create its container literally whenever, which makes updating Home Assistant a very simple procedure.
Updating other images goes the same way (assuming that you have already stopped their containers). Here’s for Mosquitto:
$ sudo docker rm mosquitto
$ sudo docker pull eclipse-mosquitto:latest
$ sudo docker run -d \
    --name mosquitto \
    --network hub \
    --restart=unless-stopped \
    -e TZ=Europe/Amsterdam \
    -v /root/mosquitto/config:/mosquitto/config \
    -v /root/mosquitto/data:/mosquitto/data \
    -v /root/mosquitto/log:/mosquitto/log \
    eclipse-mosquitto
and here’s for Zigbee2MQTT:
$ sudo docker rm zigbee2mqtt
$ sudo docker pull ghcr.io/koenkk/zigbee2mqtt:latest
$ sudo docker run -d \
    --name zigbee2mqtt \
    --network hub \
    --ip 172.18.0.101 \
    --restart=unless-stopped \
    --device=/dev/serial/by-id/usb-ITEAD_SONOFF_Zigbee_3.0_USB_Dongle_Plus_V2_20240218135838-if00:/dev/ttyACM0 \
    -e TZ=Europe/Amsterdam \
    -v /root/zigbee2mqtt/data:/app/data \
    -v /root/zigbee2mqtt/logs:/app/logs \
    ghcr.io/koenkk/zigbee2mqtt
Performance monitoring with btop
As a bonus part, I wanted to install btop tool for watching the system CPU load.
There is no(?) pre-built package for btop on Debian, so I had to build it from sources, and for that it needs some tools and dependencies to be installed first, out of which CMake I also had to build from sources, because packaged version 3.18.4 is a bit old, and btop requires at least 3.24:
$ sudo apt install build-essential libssl-dev ninja-build

$ cd ~/downloads
$ wget https://github.com/Kitware/CMake/releases/download/v3.30.2/cmake-3.30.2.tar.gz
$ tar -xvf ./cmake-3.30.2.tar.gz
$ rm ./cmake-3.30.2.tar.gz
$ mv ./cmake-3.30.2 ~/programs/cmake

$ cd ~/programs/cmake
$ ./bootstrap
$ make -j$(nproc)
$ sudo make install
Then building btop itself:
$ cd ~/programs
$ git clone https://github.com/aristocratos/btop
$ cd ./btop
$ git checkout v1.3.2
$ mkdir build && cd $_
$ cmake -G Ninja -DCMAKE_BUILD_TYPE=Release -DBTOP_GPU=0 ..
$ cmake --build .
$ sudo cmake --install .

$ cd ~
$ btop --version
btop version: 1.3.2
To measure the CPU load, I kept it monitoring the system performance for several minutes while playing a 4K movie and running Docker containers with Home Assistant and its components:
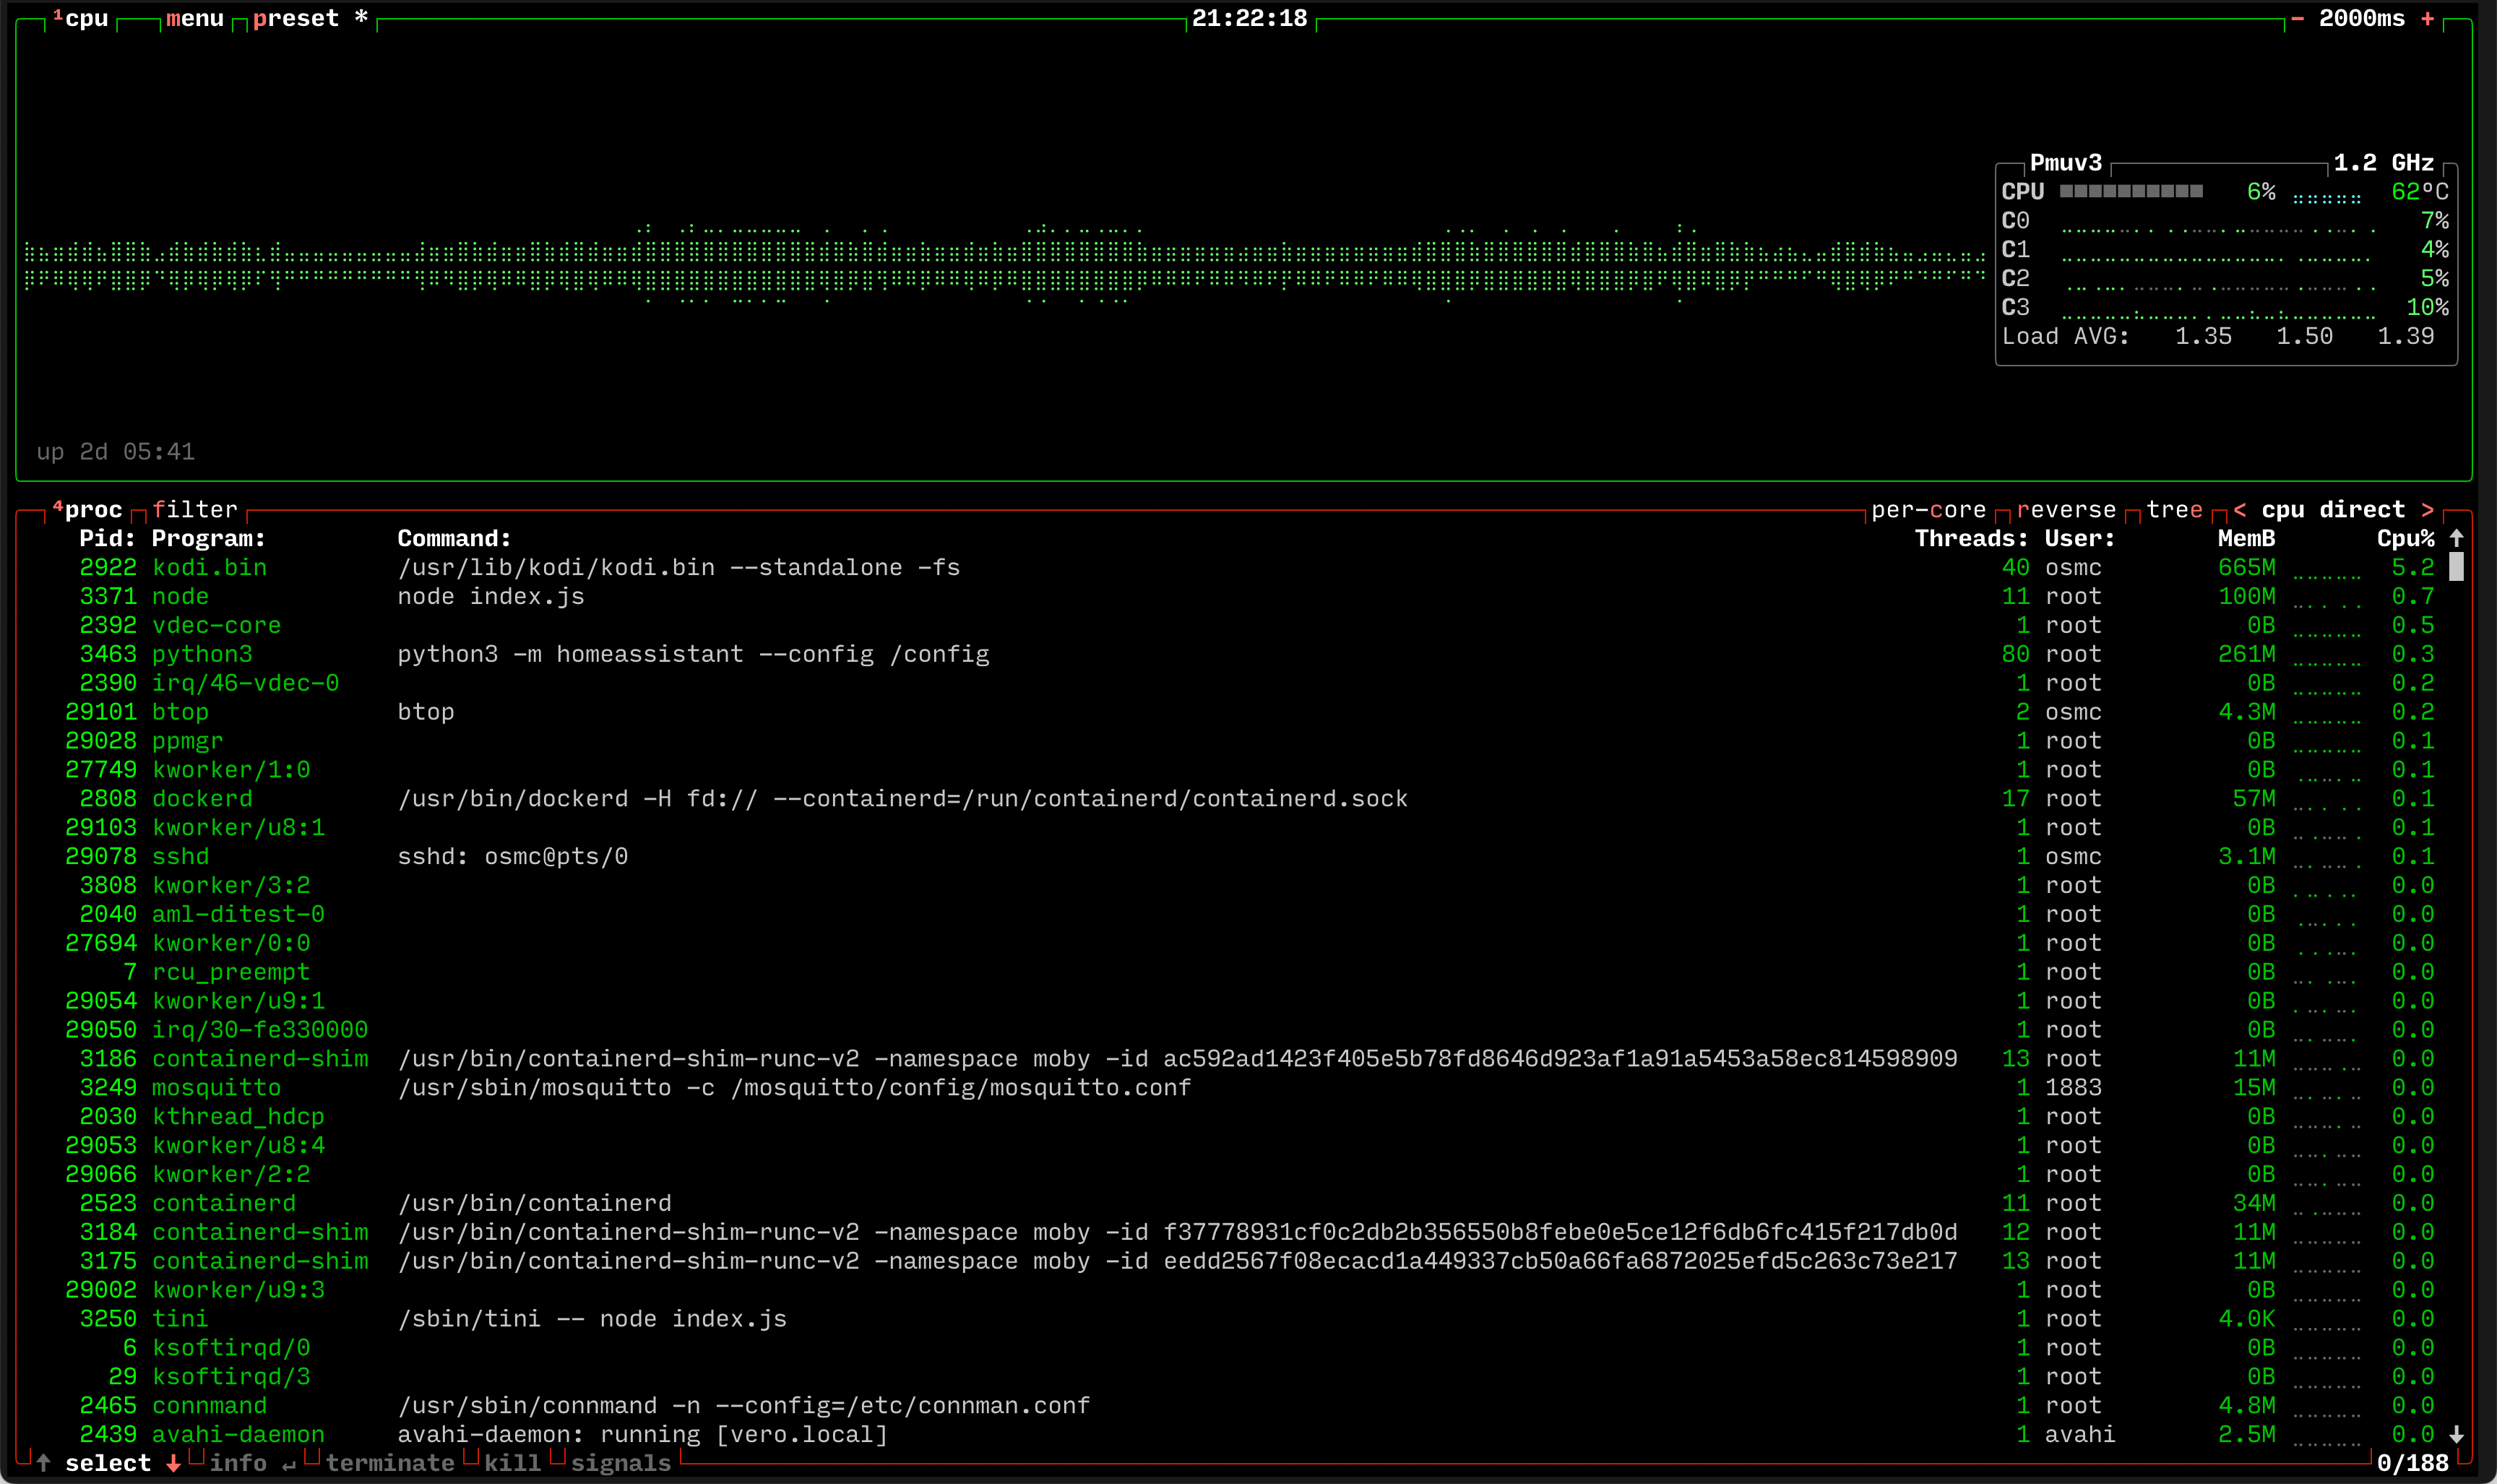
And it barely broke any sweat.
Updates
2025-09-02 | Installing Docker from APT repository
Like I said, installing anything via a script from the internet is a condemned practice, so I was happy to learn that Docker now has an APT repository. It could have always been the case, but I am almost sure that it wasn’t there when I was looking.
First they recommend to uninstall “unofficial” (as they call them) packages that could have been installed from default repositories:
$ for pkg in docker.io docker-doc docker-compose docker-compose-v2 podman-docker containerd runc; \
    do sudo apt remove $pkg; done
Then you can add their repository to your system sources:
$ sudo apt update
$ sudo apt install ca-certificates curl
$ stat -c %a /etc/apt/keyrings
755
$ sudo curl -fsSL https://download.docker.com/linux/ubuntu/gpg -o /etc/apt/keyrings/docker.asc
$ sudo chmod a+r /etc/apt/keyrings/docker.asc
$ echo \
    "deb [arch=$(dpkg --print-architecture) signed-by=/etc/apt/keyrings/docker.asc] https://download.docker.com/linux/debian $(. /etc/os-release && echo "${VERSION_CODENAME}") stable" | \
    sudo tee /etc/apt/sources.list.d/docker.list > /dev/null
And install Docker:
$ sudo apt update
$ sudo apt install docker-ce docker-ce-cli containerd.io

$ docker --version
Docker version 28.3.3, build 980b856
They also recommend installing docker-buildx-plugin and docker-compose-plugin, but those aren’t really needed. Or at least I’ve never needed them yet.
2025-12-07 | 32-bit hosts have been deprecated
One of the updates brought this warning:
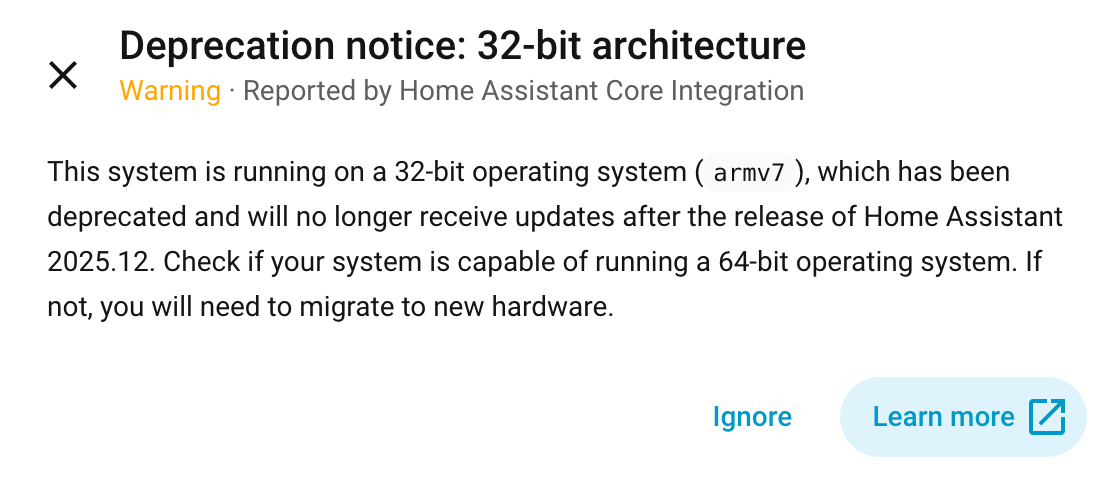
Also as text:
This system is running on a 32-bit operating system (armv7), which has been deprecated and will no longer receive updates after the release of Home Assistant 2025.12. Check if your system is capable of running a 64-bit operating system. If not, you will need to migrate to new hardware.
I’ve been ignoring it for months, but today I decided to finally deal with it.
So, it claims that my host is apparently x32, which is very surprising to see, because Vero V CPU is x64:
$ uname -m
aarch64

$ lscpu
Architecture:        aarch64
Byte Order:          Little Endian
CPU(s):              4
On-line CPU(s) list: 0-3
Thread(s) per core:  1
Core(s) per socket:  4
Socket(s):           1
Vendor ID:           ARM
Model:               0
Model name:          Cortex-A55
Stepping:            r2p0
CPU max MHz:         2004.0000
CPU min MHz:         1000.0000
BogoMIPS:            48.00
Flags:               fp asimd evtstrm aes pmull sha1 sha2 crc32 atomics fphp asimdhp asimddp
But as it turns out, it is actually a 32-bit userland OS on a 64-bit kernel, which this output apparently confirms:
$ dpkg-architecture --query DEB_HOST_ARCH
armhf
I swear to god, every day I am dealing with software is a day when I am learning something new, and almost always it happens against my will. I don’t consider myself to be a total stranger to GNU/Linux, but I have never heard about such a thing as some fucking “useland”, let alone a miraculous possibility for it to have a different architecture.
Anyway, this made me realise that I have a x32 variant of Docker too:
$ sudo apt install file
$ file $(which docker)
/usr/bin/docker: ELF 32-bit LSB pie executable, ARM, EABI5 version 1 (SYSV), dynamically linked, interpreter /lib/ld-linux-armhf.so.3, BuildID[sha1]=b0ba3b879f2499d945afd5aca44f687fd0e2b447, for GNU/Linux 3.2.0, with debug_info, not stripped
And that apparently happened because the installation script checks for the architecture with:
$ dpkg --print-architecture
armhf
Having browsed the OSMC forum, I’ve read that it is actually planned to switch to this x64 “userland” thingy, so that’s good news, but the timeline for that is unclear. I also saw that Vero V is in fact capable of runing x64 executables already, even with this x32 “userland”, so I probably could have just tried to reinstall the Docker using a hardcoded x64 architecture in /etc/apt/sources.list.d/docker.list.
But first I thought maybe I can just try to keep Docker x32 and instead specify the image architecture with --platform, like this:
$ sudo docker pull \
    --platform linux/arm64 \
    ghcr.io/home-assistant/home-assistant:stable

$ sudo docker images
REPOSITORY                              TAG       IMAGE ID       CREATED         SIZE
ghcr.io/home-assistant/home-assistant   stable    ba578e7d7f0d   25 hours ago    2.13GB
ghcr.io/home-assistant/home-assistant   <none>    25fc72175cde   4 weeks ago     1.79GB
ghcr.io/koenkk/zigbee2mqtt              latest    38f62b6e76eb   5 weeks ago     129MB
eclipse-mosquitto                       latest    2e7c3a53ef6d   4 months ago    8.79MB

$ sudo docker image inspect --format '{{.Architecture}}' 25fc72175cde
arm

$ sudo docker image inspect --format '{{.Architecture}}' ba578e7d7f0d
arm64
Okay, so then adding the same --platform linux/arm64 would probably get the container to run with x64 image:
$ sudo docker stop homeassistant
$ sudo docker rm homeassistant
$ sudo docker run -d \
    --name homeassistant \
    --platform linux/arm64 \
    --network hub \
    --ip 172.18.0.100 \
    --restart=unless-stopped \
    -e TZ=Europe/Amsterdam \
    -v /root/homeassistant:/config \
    -v /opt/wolpipe:/config/wolpipe \
    ghcr.io/home-assistant/home-assistant:stable
And it did execute that, but the container did not actually work, as it was constantly restarting with no logs or errors reported anywhere:
$ sudo docker ps
CONTAINER ID   IMAGE                        COMMAND                  CREATED         STATUS                            PORTS      NAMES
6d14ede11ff9   ba578e7d7f0d                 "/init"                  2 minutes ago   Restarting (159) 16 seconds ago              homeassistant
dd5854612e36   ghcr.io/koenkk/zigbee2mqtt   "docker-entrypoint.s…"   4 weeks ago     Up 5 minutes                                 zigbee2mqtt
e1a65d0a6cfd   eclipse-mosquitto            "/docker-entrypoint.…"   4 weeks ago     Up 5 minutes                      1883/tcp   mosquitto
So apparently this naive approach doesn’t work, and one really has to install exactly x64 Docker. Since I installed mine with the script, then re-installation procedure was:
$ sudo apt remove \
    docker-ce \
    docker-ce-cli \
    containerd.io \
    docker-compose-plugin \
    docker-ce-rootless-extras \
    docker-buildx-plugin
$ sudo apt autoremove
$ sudo rm -rf /var/lib/docker

$ echo 'Placing hardcoded architecture into APT sources list'
$ echo \
    "deb [arch=arm64 signed-by=/etc/apt/keyrings/docker.asc] https://download.docker.com/linux/debian $(. /etc/os-release && echo $VERSION_CODENAME) stable" | \
    sudo tee /etc/apt/sources.list.d/docker.list > /dev/null

$ sudo apt update
$ sudo apt install \
    docker-ce \
    docker-ce-cli \
    containerd.io

$ docker --version
Docker version 29.1.2, build 890dcca

$ file $(which docker)
/usr/bin/docker: ELF 64-bit LSB pie executable, ARM aarch64, version 1 (SYSV), dynamically linked, interpreter /lib/ld-linux-aarch64.so.1, BuildID[sha1]=cc104f6c0020a2200f4a18532bd71ff63fc9f0bf, with debug_info, not stripped
That all went fine, except that the service was dead, because there was something wrong with containerd:
$ sudo systemctl status docker.service
...
Active: failed (Result: exit-code)

$ journalctl -u docker.service
...
failed to start daemon: failed to get containerd plugins: Unavailable: connection error: desc = "transport: Error while dialing: dial unix:///run/containerd/containerd.sock: timeout
So I checked the containerd.service logs, and it says there that the executable has crashed:
$ journalctl -u containerd.service
...
Starting containerd container runtime...
SIGILL: illegal instruction
PC=0x5563010310 m=0 sigcode=1
instruction bytes: 0x0 0x6 0x38 0xd5 0xe0 0x7 0x0 0xf9 0xc0 0x3 0x5f 0xd6 0x0 0x0 0x0 0x0
And actually even trying to simply run containerd directly causes the crash already:
$ file $(which containerd)
/usr/bin/containerd: ELF 64-bit LSB pie executable, ARM aarch64, version 1 (SYSV), dynamically linked, interpreter /lib/ld-linux-aarch64.so.1, BuildID[sha1]=610634625a29564945088f195339fc0d2e086623, for GNU/Linux 3.7.0, stripped

$ containerd --help
SIGILL: illegal instruction
PC=0x556756d310 m=0 sigcode=1
instruction bytes: 0x0 0x6 0x38 0xd5 0xe0 0x7 0x0 0xf9 0xc0 0x3 0x5f 0xd6 0x0 0x0 0x0 0x0
...
Soooo that’s it then, no way to proceed. I reverted back to x32 Docker and I guess I’ll be just waiting for OSMC to switch to that x64 “userland” thing. Or maybe even consider using a different host for Home Assistant, especially that it probably isn’t very good for the eMMC storage to be handling tasks outside of OSMC direct purpose of simly running Kodi.
2025-12-22 | Sonos integration with IKEA SYMFONISK
I wanted to be able to play sound alers for various events, for example when a camera detects movement, or maybe when total energy consumption in the house exceeds 10 kW, or some other event that requires immediate attention.
Since I am hosting Home Assistant on Vero V that is connected to TV, I thought that I can just plug-in some additional speakers to the player via 3.5 mm jack and play sounds with aplay, but that did not work out:
- The sound comes from both TV speakers via HDMI and those external speakers via 3.5 mm jack, and I could not make it output only from the external speakers;
- If Kodi is already playing something, then
aplaywill refuse to play anything, saying thatDevice or resource busy.
So I abandonned the idea for some time, but then I found out that instead of connecting external speakers to the device I could just use a network speaker such as Sonos, which Home Assistant even has a default integration for. The Sonos speakers in particular are quite expensive, even the lowest tier models, so I was hesitant, but then I discovered that IKEA SYMFONISK series is actually re-branded Sonos speakers made in collaboration with IKEA, and those are more affordable (and look better too).
Too bad that IKEA-Sonos collaboration ended in May 2025, and I got to know all that only some months after the fact, when almost all of them went out of stock, so I could only get my hands on this IKEA SYMFONISK lamp (the light bulb on photo is not from IKEA):

Adding Sonos speaker to Home Assistant
Having bought the device, I tried to add it to Home Assistant with the Sonos integration, but it told me that there are no devices available. As it turned out, to be able to auto-discover Sonos devices, Home Assistant needs to have access to the host network, but my instance is running in a Docker container inside a bridge network. In addition to that, Home Assistant also needs to expose 1400 port for Sonos devices to be able to talk back to it.
I was almost ready to move Home Assistant container to the host network, but then I noticed that it is still possible to make it all work as it is by simply specifying the Sonos device IP address manually in configuration.yaml:
sonos:
  media_player:
    hosts:
      - 192.168.1.60
    advertise_addr: 192.168.1.35
Here 192.168.1.60 is the IP address of my Sonos speaker and 192.168.1.35 is the IP address of my Vero V host, which is supposedly for Home Assistant to announce/advertise it to Sonos, although I am not sure if that is actually needed.
As for the port - that is simply a matter of adding -p 1400:1400 on container creation. To verify that you have it open, you can run the following command:
$ sudo ss -lntup | grep 1400
0.0.0.0:1400       0.0.0.0:*    users:(("docker-proxy",pid=3453,fd=7))
      *:1400             *:*    users:(("docker-proxy",pid=3459,fd=7))
Playing media from Home Assistant on Sonos speaker
There are several ways of adding media files to Home Assistant media library, and the easiest might be simply mapping the container paths with -v /path/to/your/music:/media, where /path/to/your/music could be local media files or a mounted Samba share from NAS.
And I was able to play my music files from Home Assistant on the Media tab in web-browser, so that part was good, but I could not play anything on Sonos:

I couldn’t find any error messages, so I had no clue what is wrong, and only by accident I noticed that when Sonos mobile application is open then it actually shows error messages in there every time playback is failing to execute from Home Assistant:
Couldn't play "Something.flac?authSig=SOME-TOKEN"
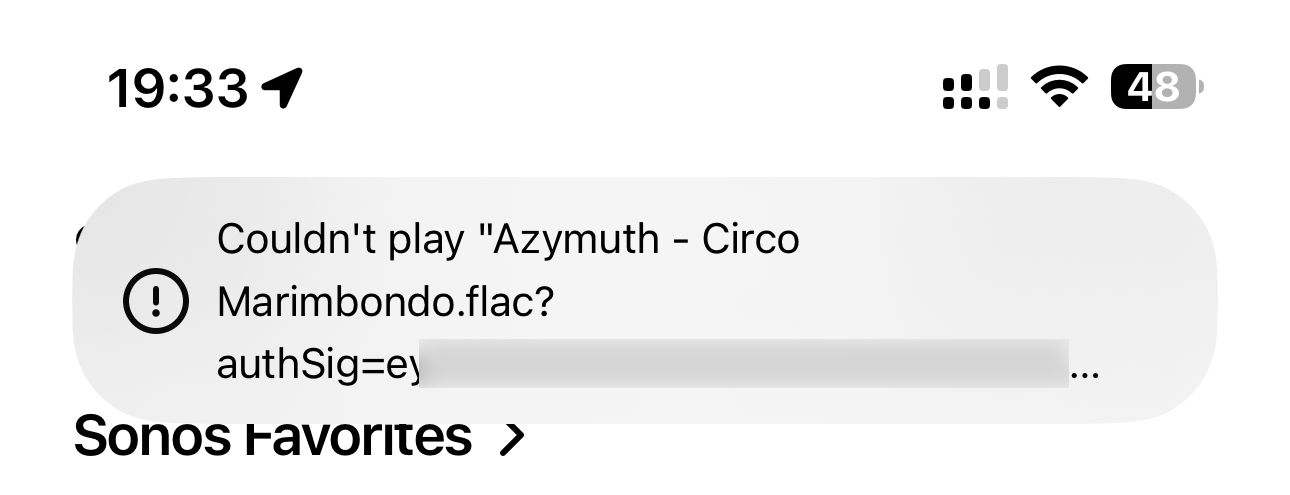
So I got an error message, buy it wasn’t helpful at all.
Having spent some time trying different things, I stumbled about some forum thread, where someone mentioned self-signed certificates, and only then realized that this was the actual reason, because I do use a self-signed certificate to serve my Home Assistant instance via HTTPS in my local network. So then the solution would be to either (get a proper certificate or) disable HTTPS for Home Assistant or serve media files via HTTP. Since I only needed to play small sound alerts, I went with the latter and simply added a config to NGINX to serve static files from /var/www/html/media/sounds/:
server {
    listen 80;
    listen [::]:80;

    charset utf-8;

    root /var/www/html;

    index index.html;

    location / {
        try_files $uri $uri/ =404;
    }
}
Then to use that in automations I can add the following action:
- action: media_player.play_media
  metadata: {}
  data:
    media:
      media_content_id: http://192.168.1.35/media/sounds/some.mp3
      media_content_type: music
    announce: true
  target:
    entity_id: media_player.sonos
For example, I’ve assigned an IKEA remote control button to start/stop playing current media (such as online radio) on Sonos speaker, and actions in that automation are accompanied with sound alerts to confirm that the command has been successfully executed:
alias: Sonos | Play/pause
description: ""
triggers:
  - domain: mqtt
    device_id: IKEA-REMOTE-CONTROL-ID
    type: action
    subtype: "on"
    trigger: device
conditions: []
actions:
  - if:
      - condition: state
        entity_id: media_player.sonos
        state:
          - playing
    then:
      - action: media_player.media_pause
        metadata: {}
        data: {}
        target:
          entity_id: media_player.sonos
      - action: media_player.play_media
        metadata: {}
        data:
          media:
            media_content_id: http://192.168.1.35/media/sounds/intel.mp3
            media_content_type: music
          announce: true
        target:
          entity_id: media_player.sonos
    else:
      - action: media_player.play_media
        metadata: {}
        data:
          media:
            media_content_id: http://192.168.1.35/media/sounds/radio-mayak.mp3
            media_content_type: music
          announce: true
        target:
          entity_id: media_player.sonos
      - delay:
          hours: 0
          minutes: 0
          seconds: 5
          milliseconds: 0
      - action: media_player.media_play
        metadata: {}
        data: {}
        target:
          entity_id: media_player.sonos
mode: single
And here it is in action:
If video doesn't play in your browser, you can download it here.


