C++ library in an Android application
We have a C++ library, which our customers are using on a variety of platforms. Mainly in desktop applications on Windows, Mac OS and GNU/Linux, but there are also web-applications (for which we compile it into WebAssembly with Emscripten), and now we got a request to make it work in Android applications too (or rather to provide a binding/wrapper).

This particular example will be about a Kotlin-based application. I don’t know what would be different in case of a Java-based application, but I suppose that principal things should be more or less the same in both.
Some years ago I’ve briefly touched the topic of building applications for Android, but there it was done with Qt, and most of the complexity was graciously hidden from me by Qt Creator, which was auto-magically compiling my C++/QML application sources into the final APK without me knowing anything about the actual process.
Environment and versions
This is what I had when I was working on the example project:
- Mac OS
13.6.3- on MacBook Pro with Apple M2 Pro
- Android Studio
2023.1.1Patch 1- runtime
17.0.7aarch64
- runtime
- Android SDK
14.0- API
34
- API
- NDK
25.1.8937393 - CMake
3.28.1
Installation
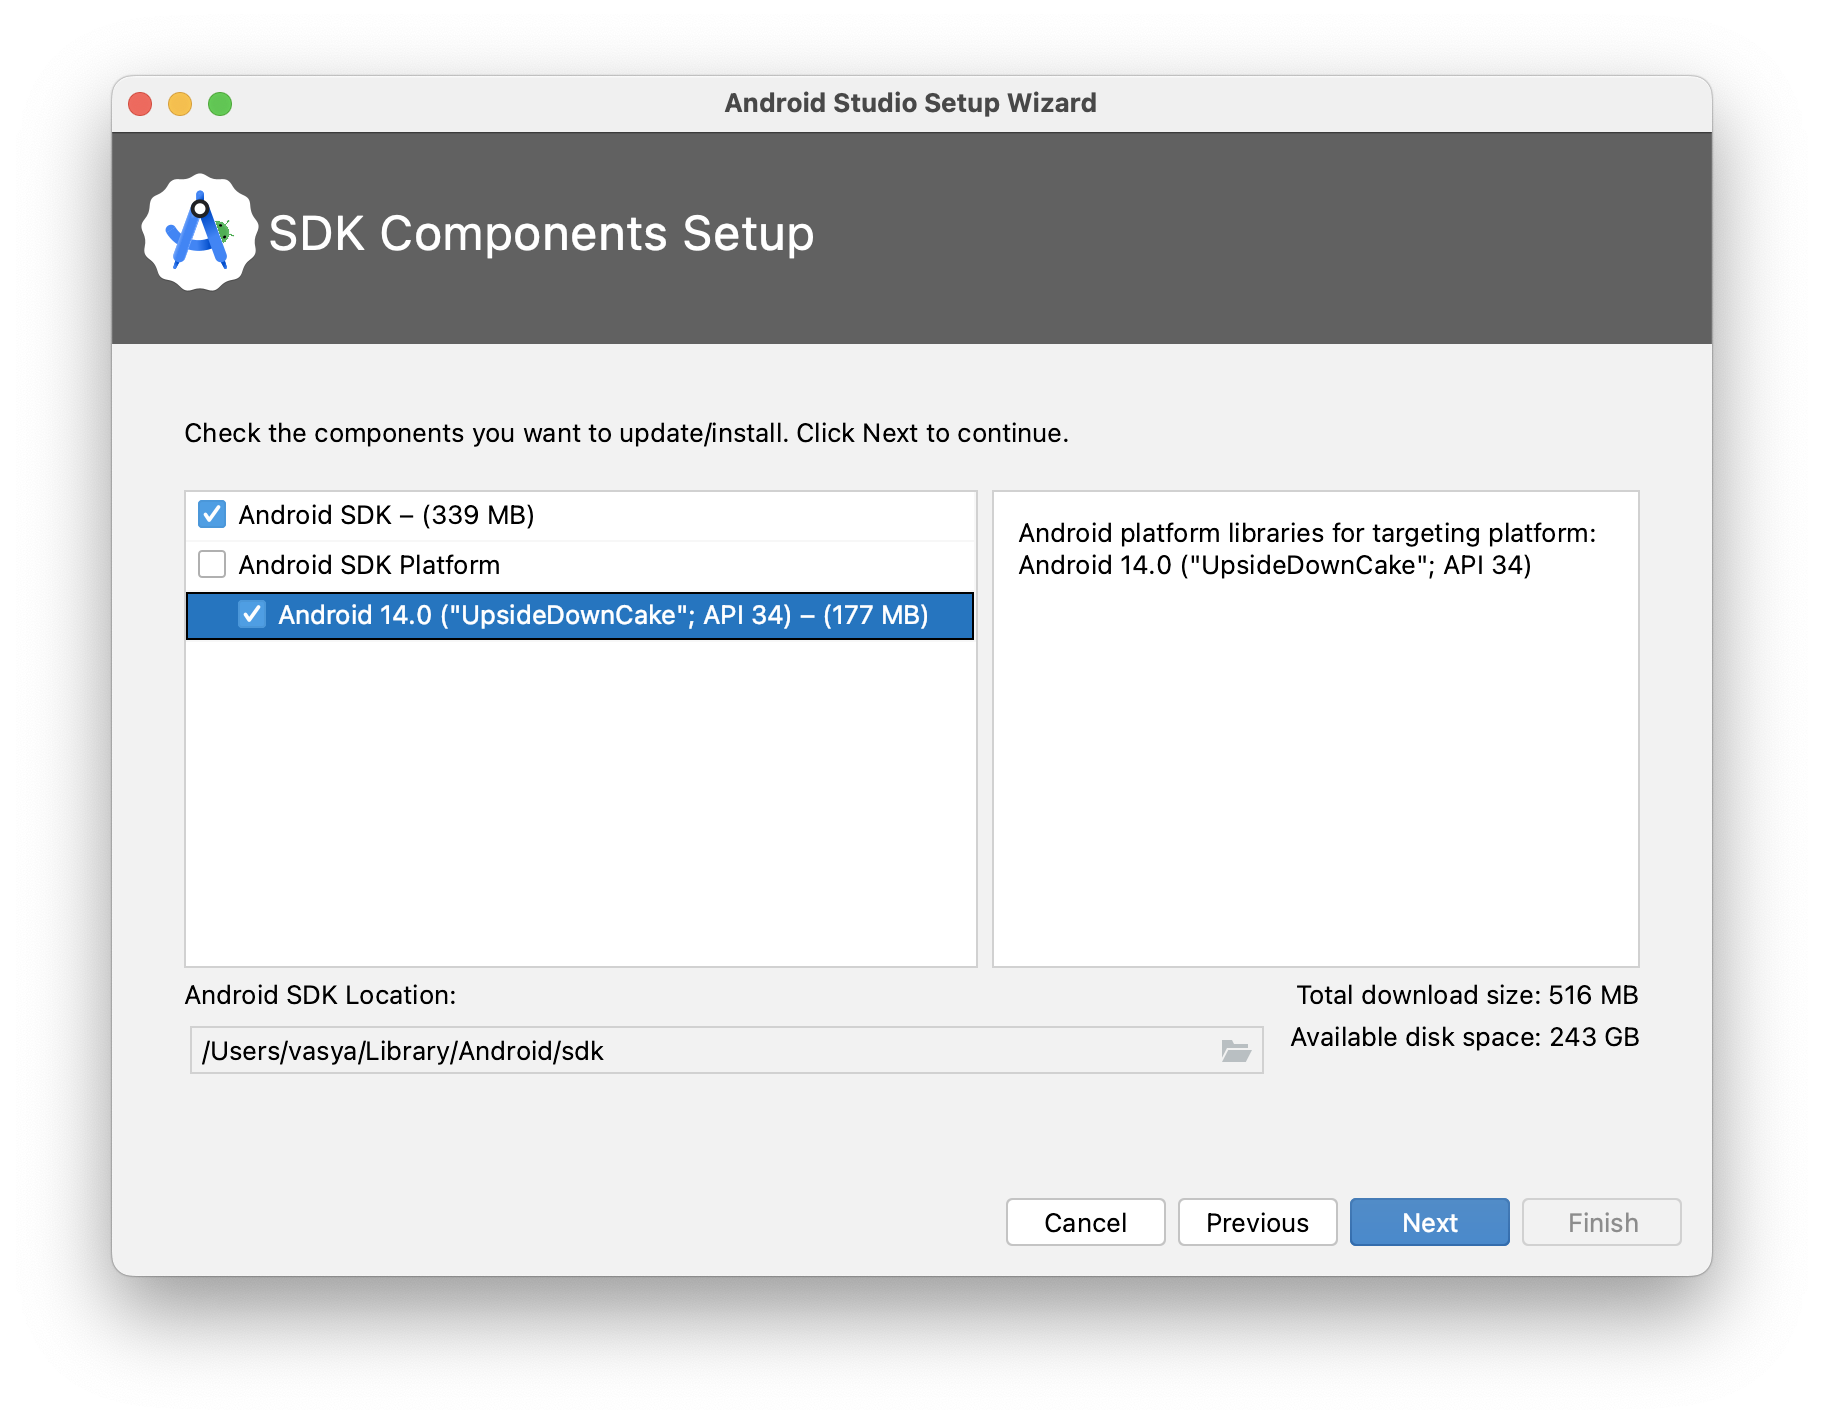
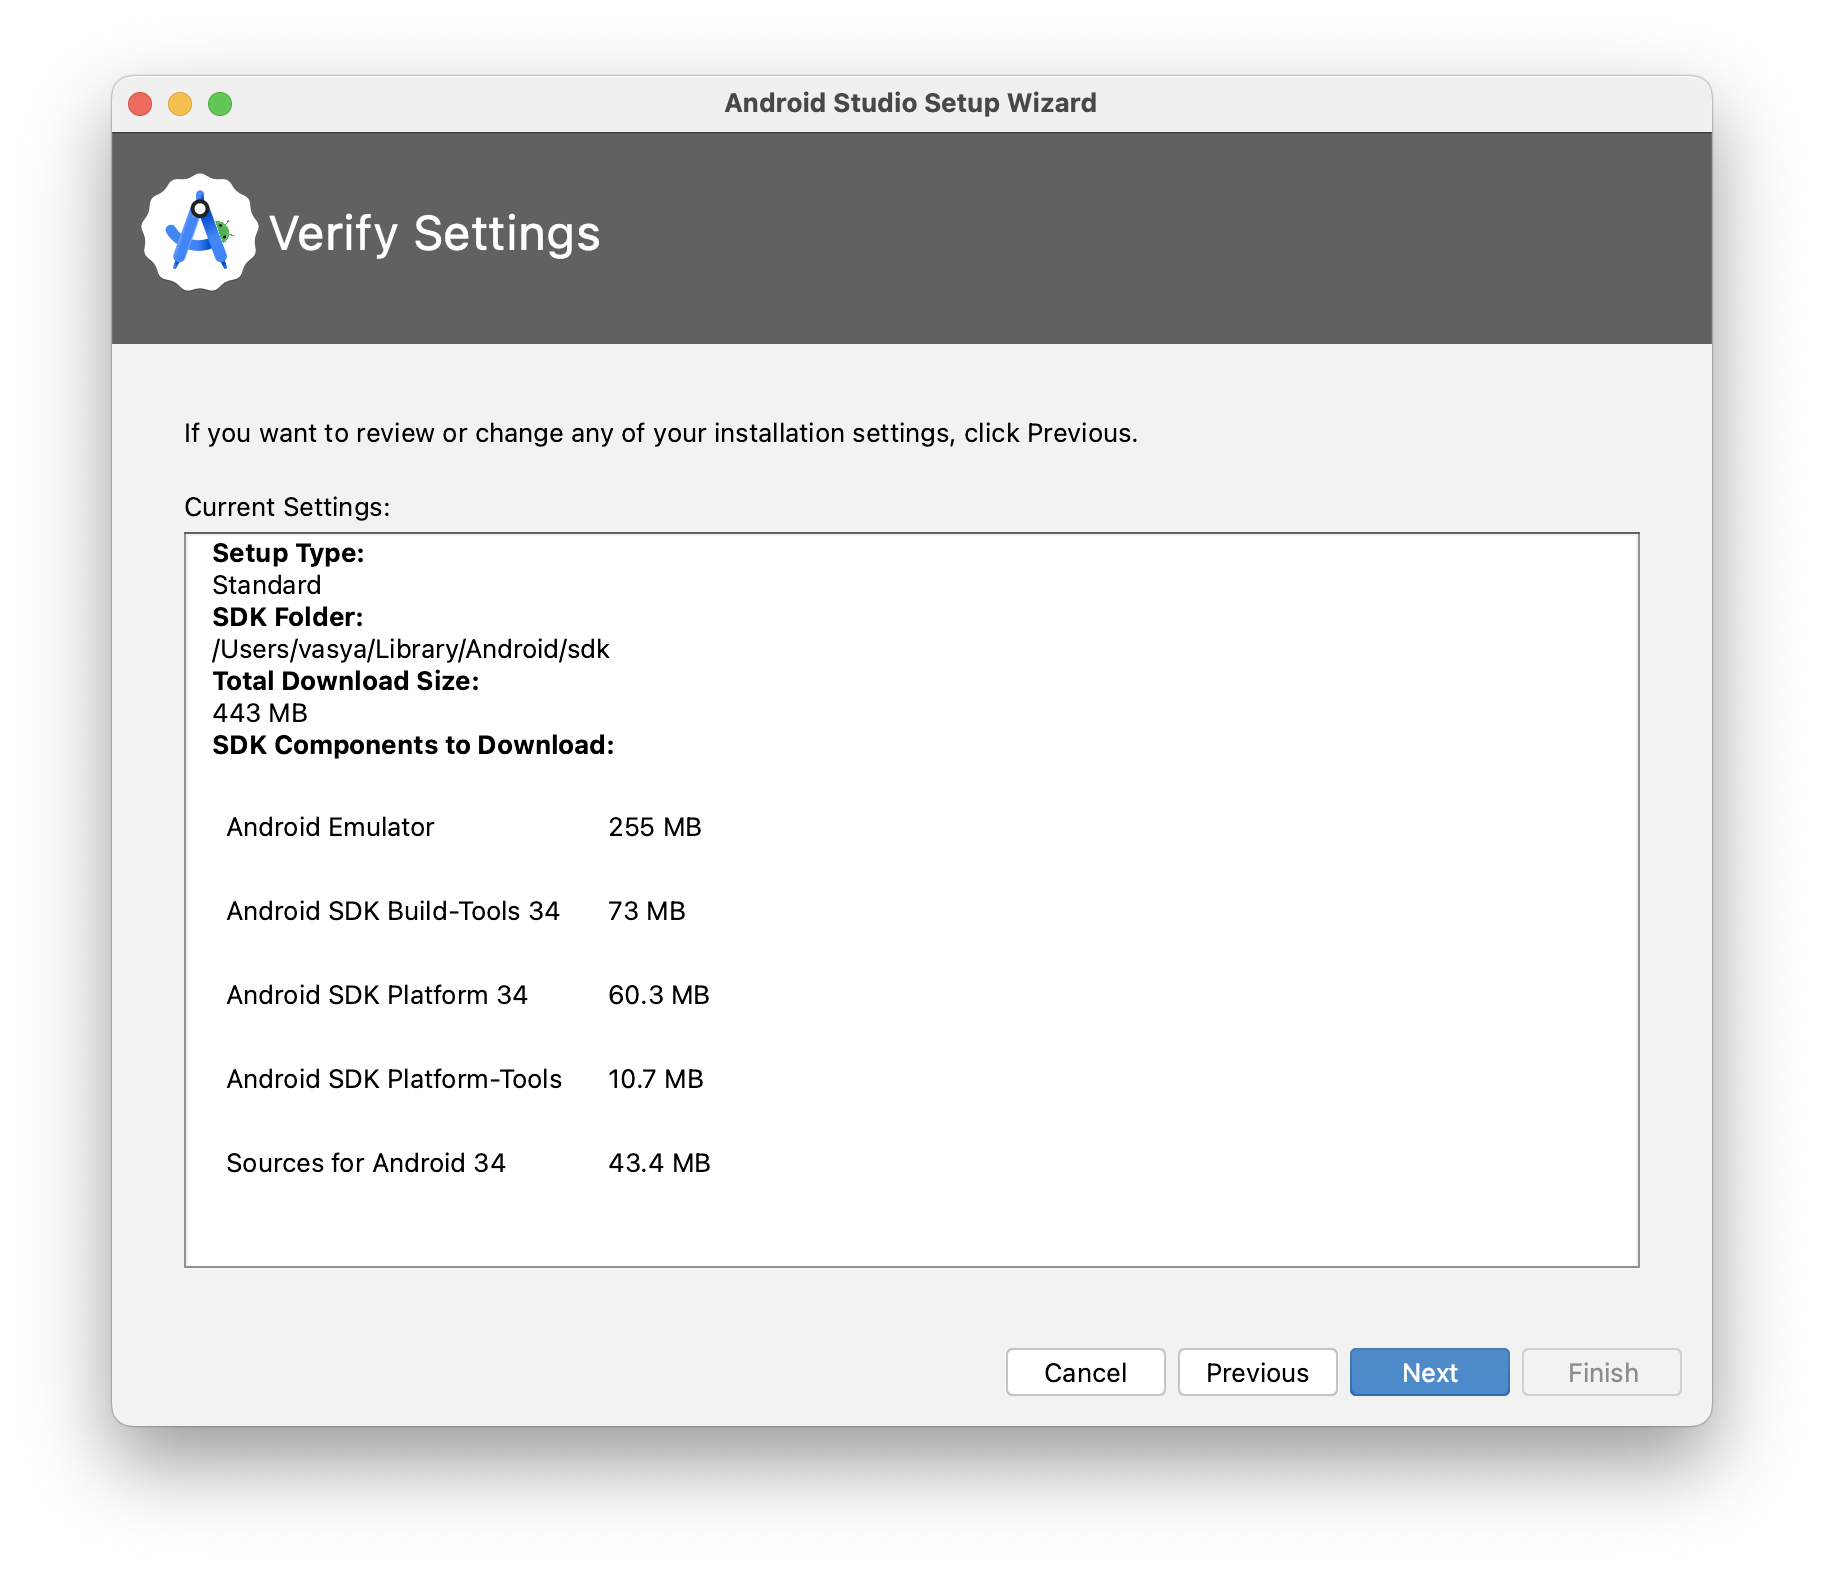
Most of the required components come together with Android Studio, so download and install it. When you launch it for the first time, it will choose some default SDK/API versions to be downloaded:
and it should install the emulator too:
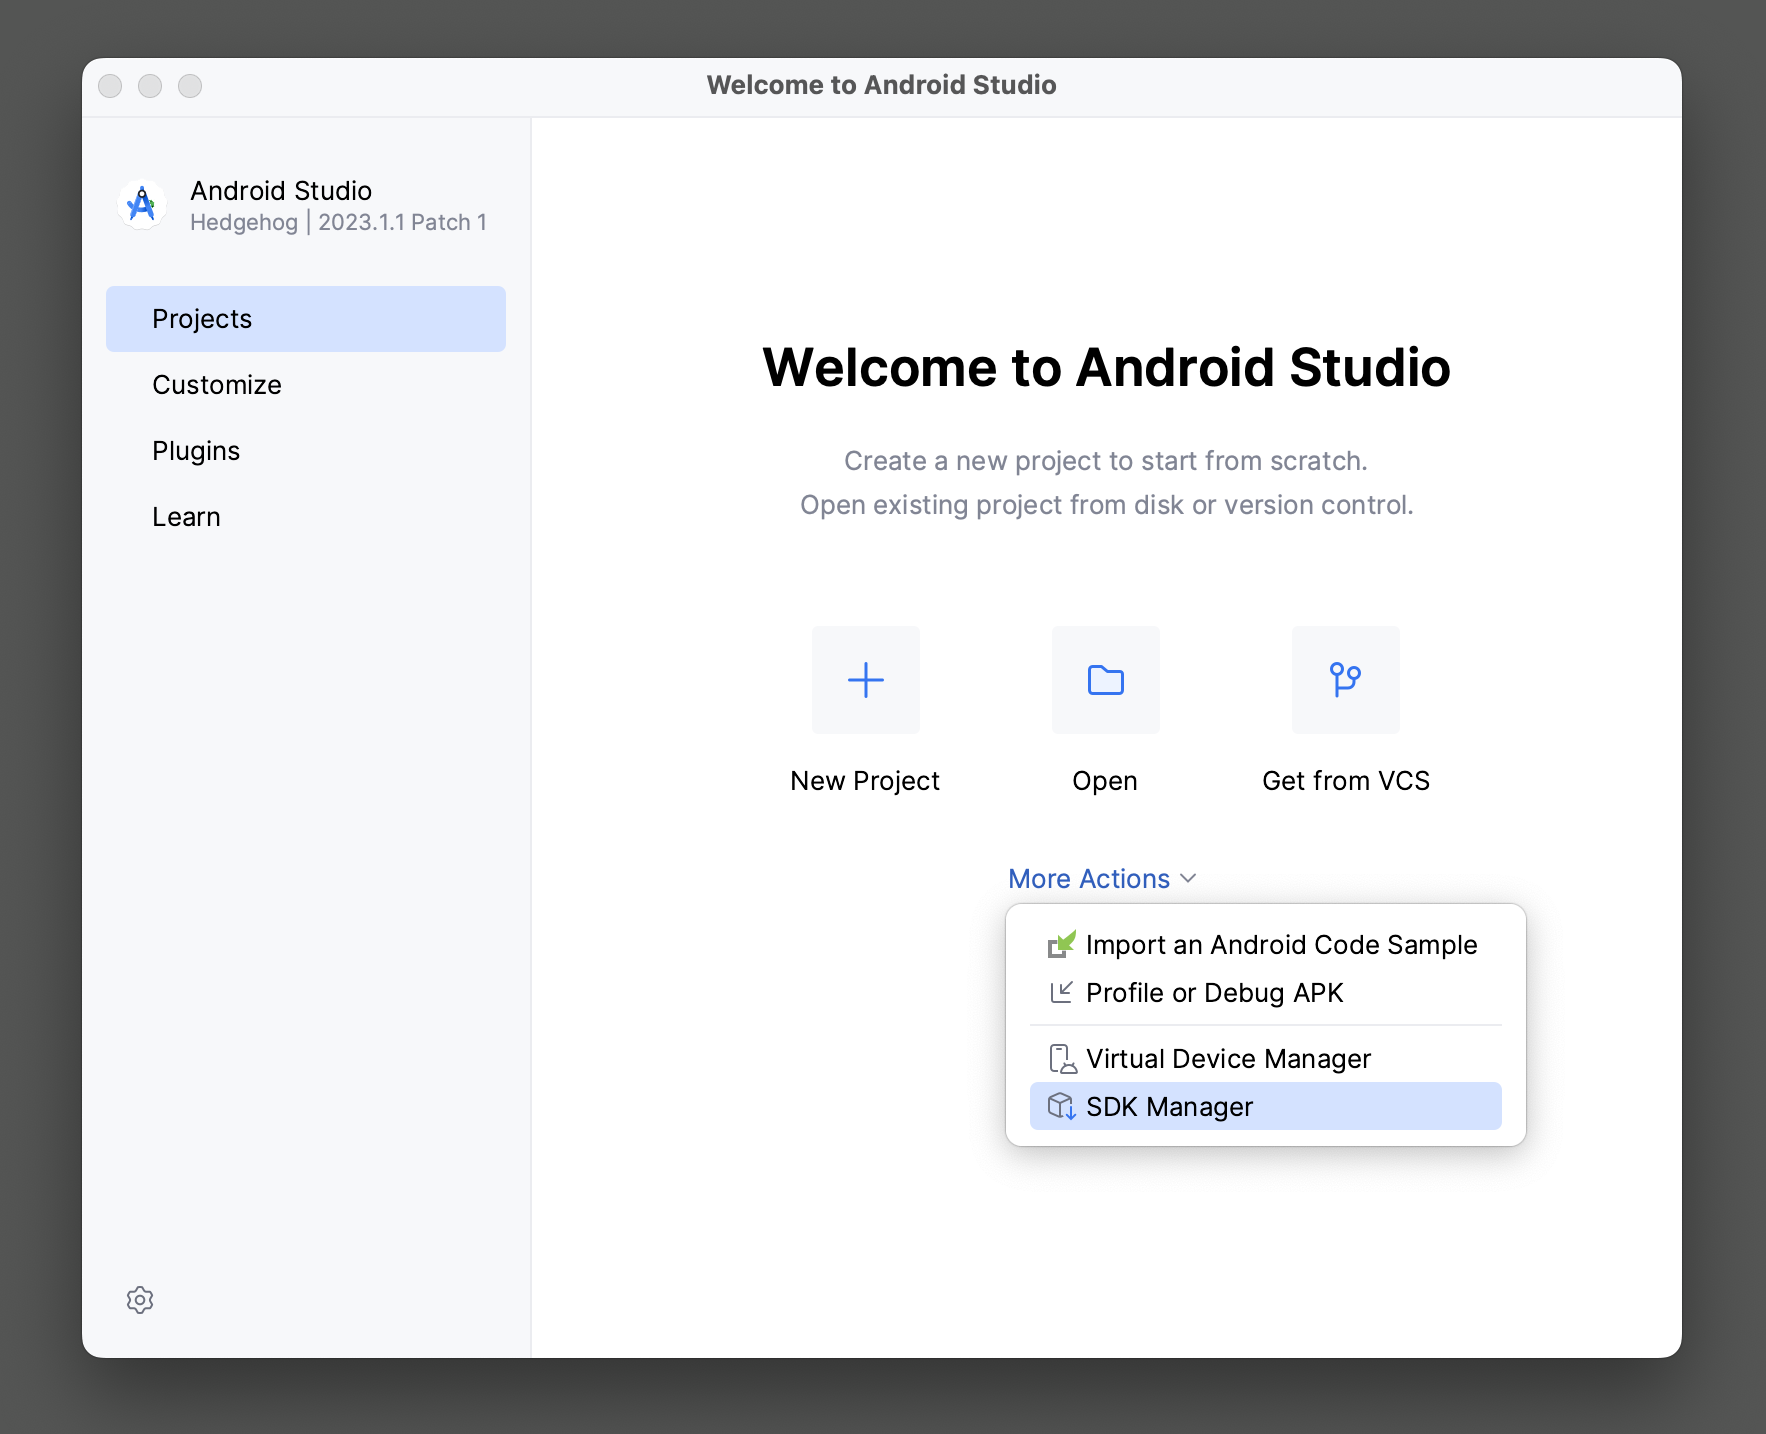
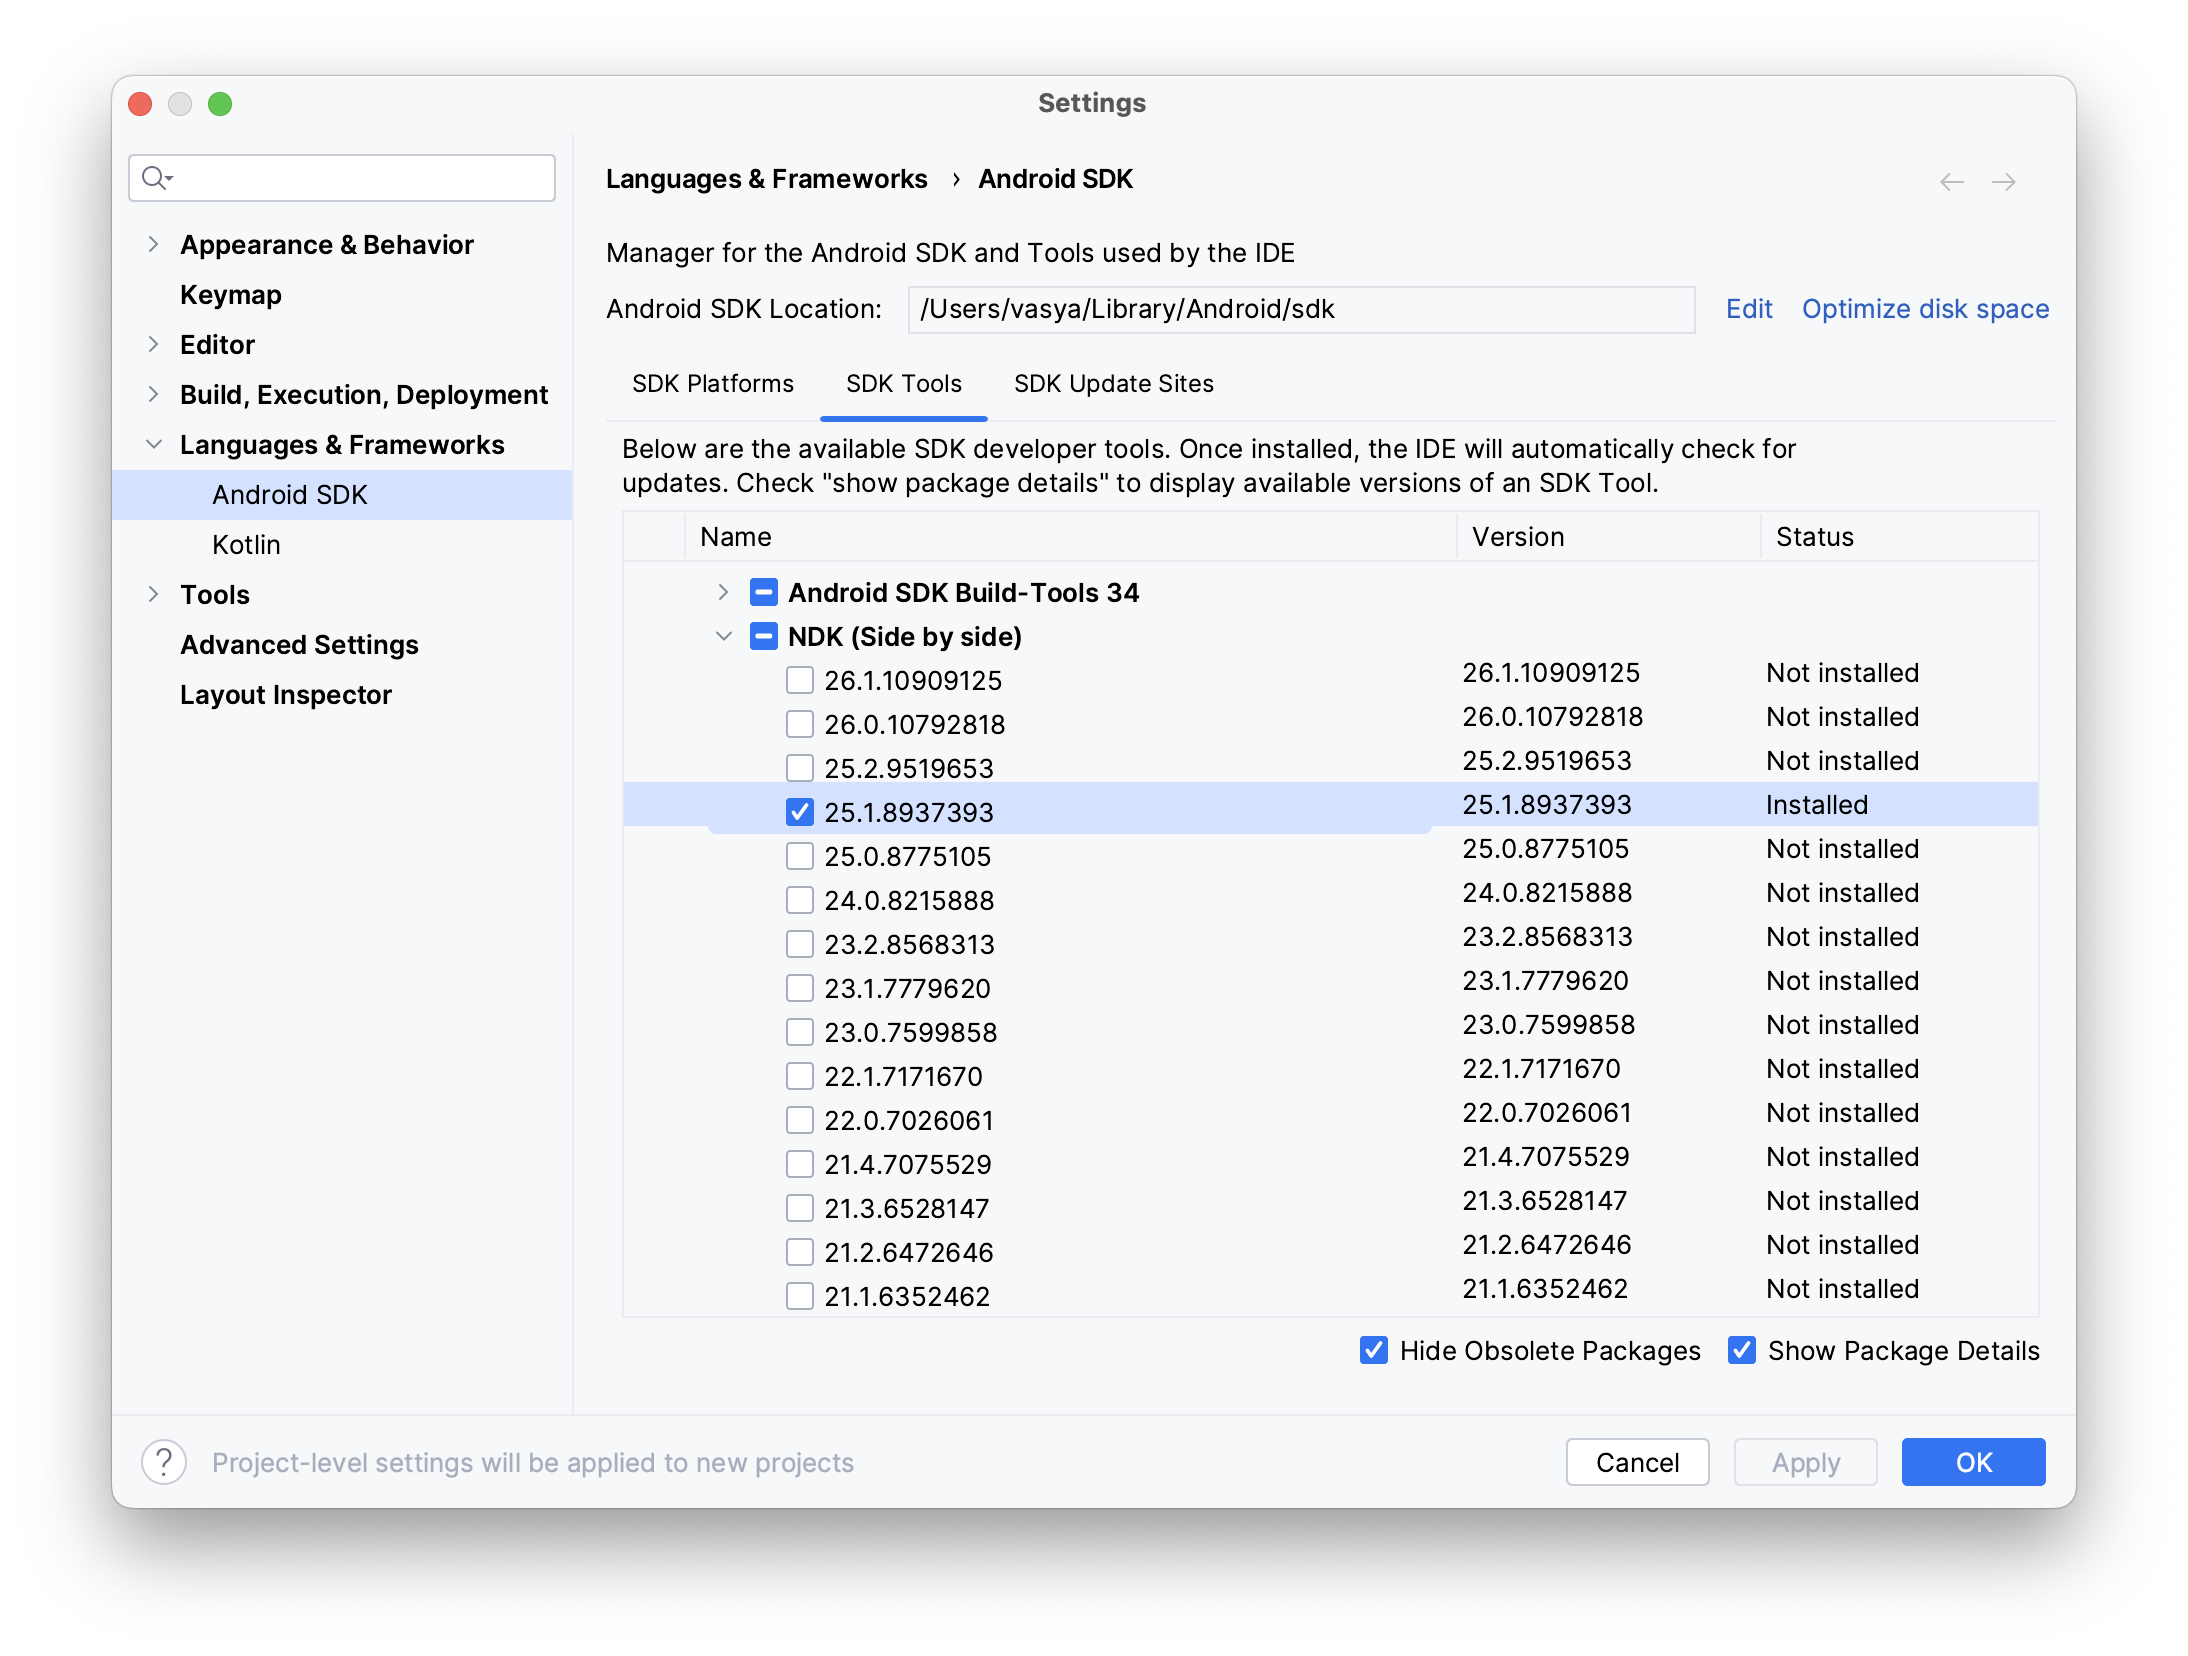
When it’s all done, open the SDK Manager:
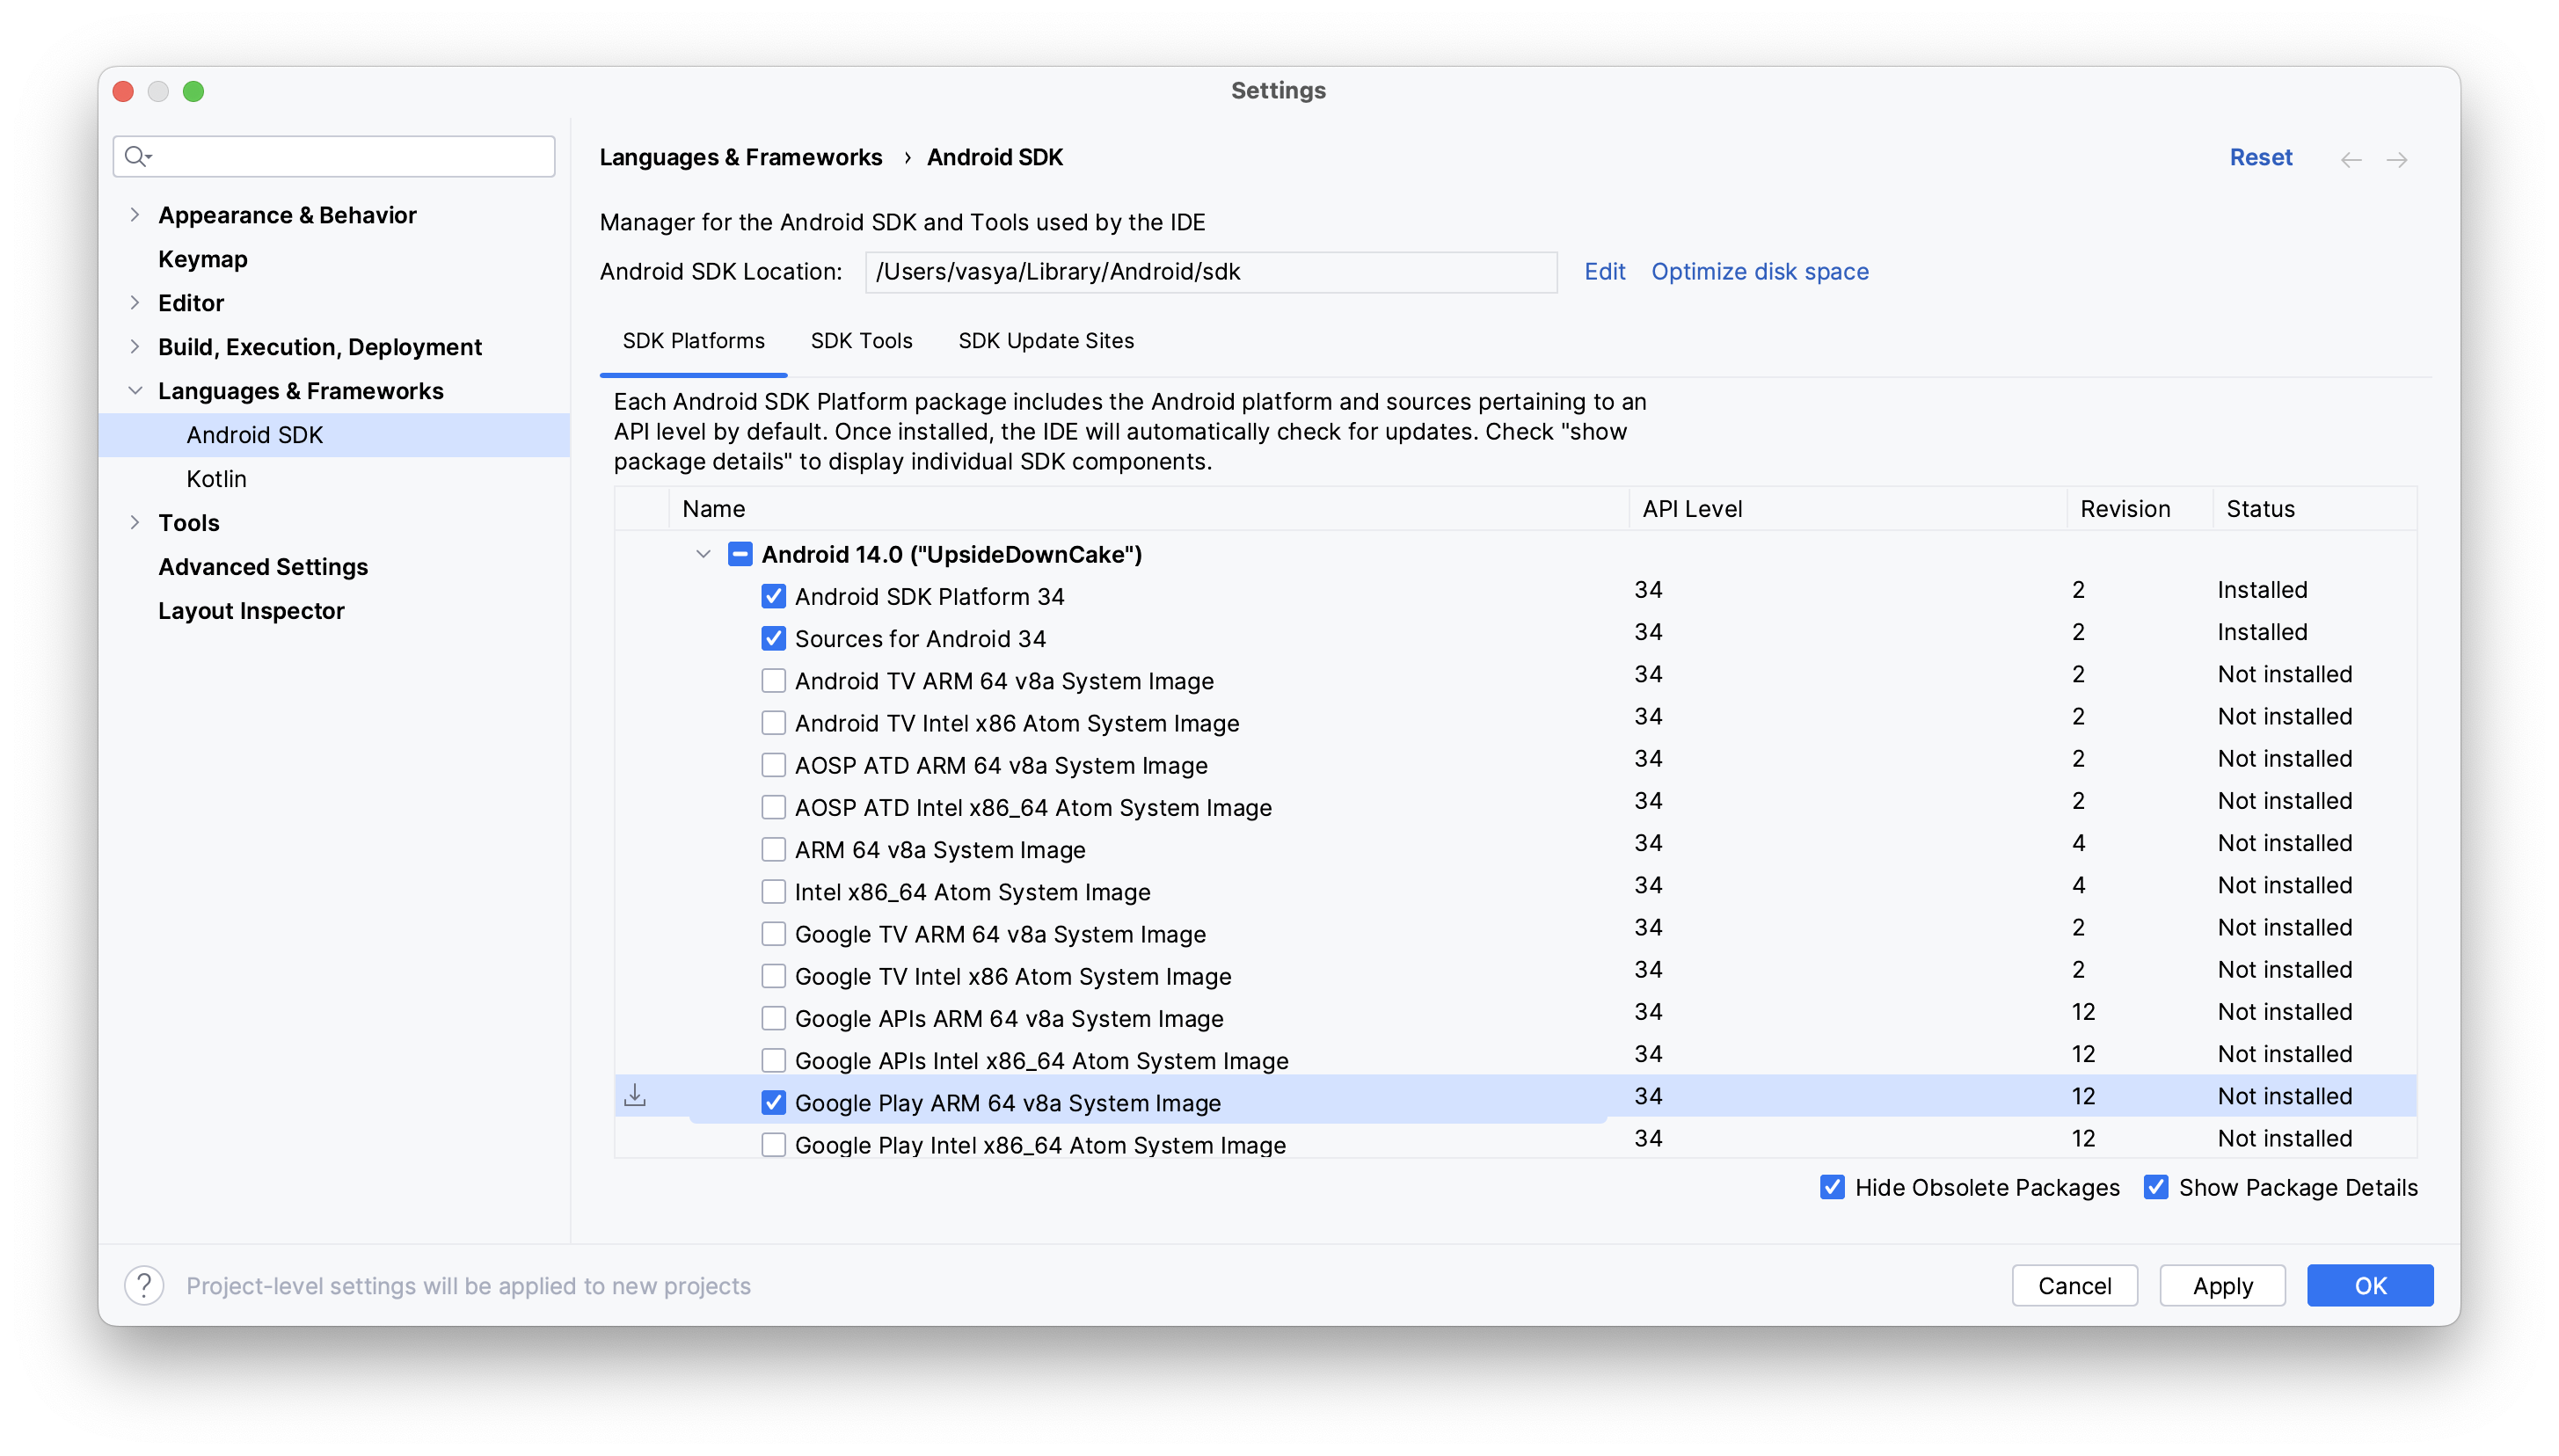
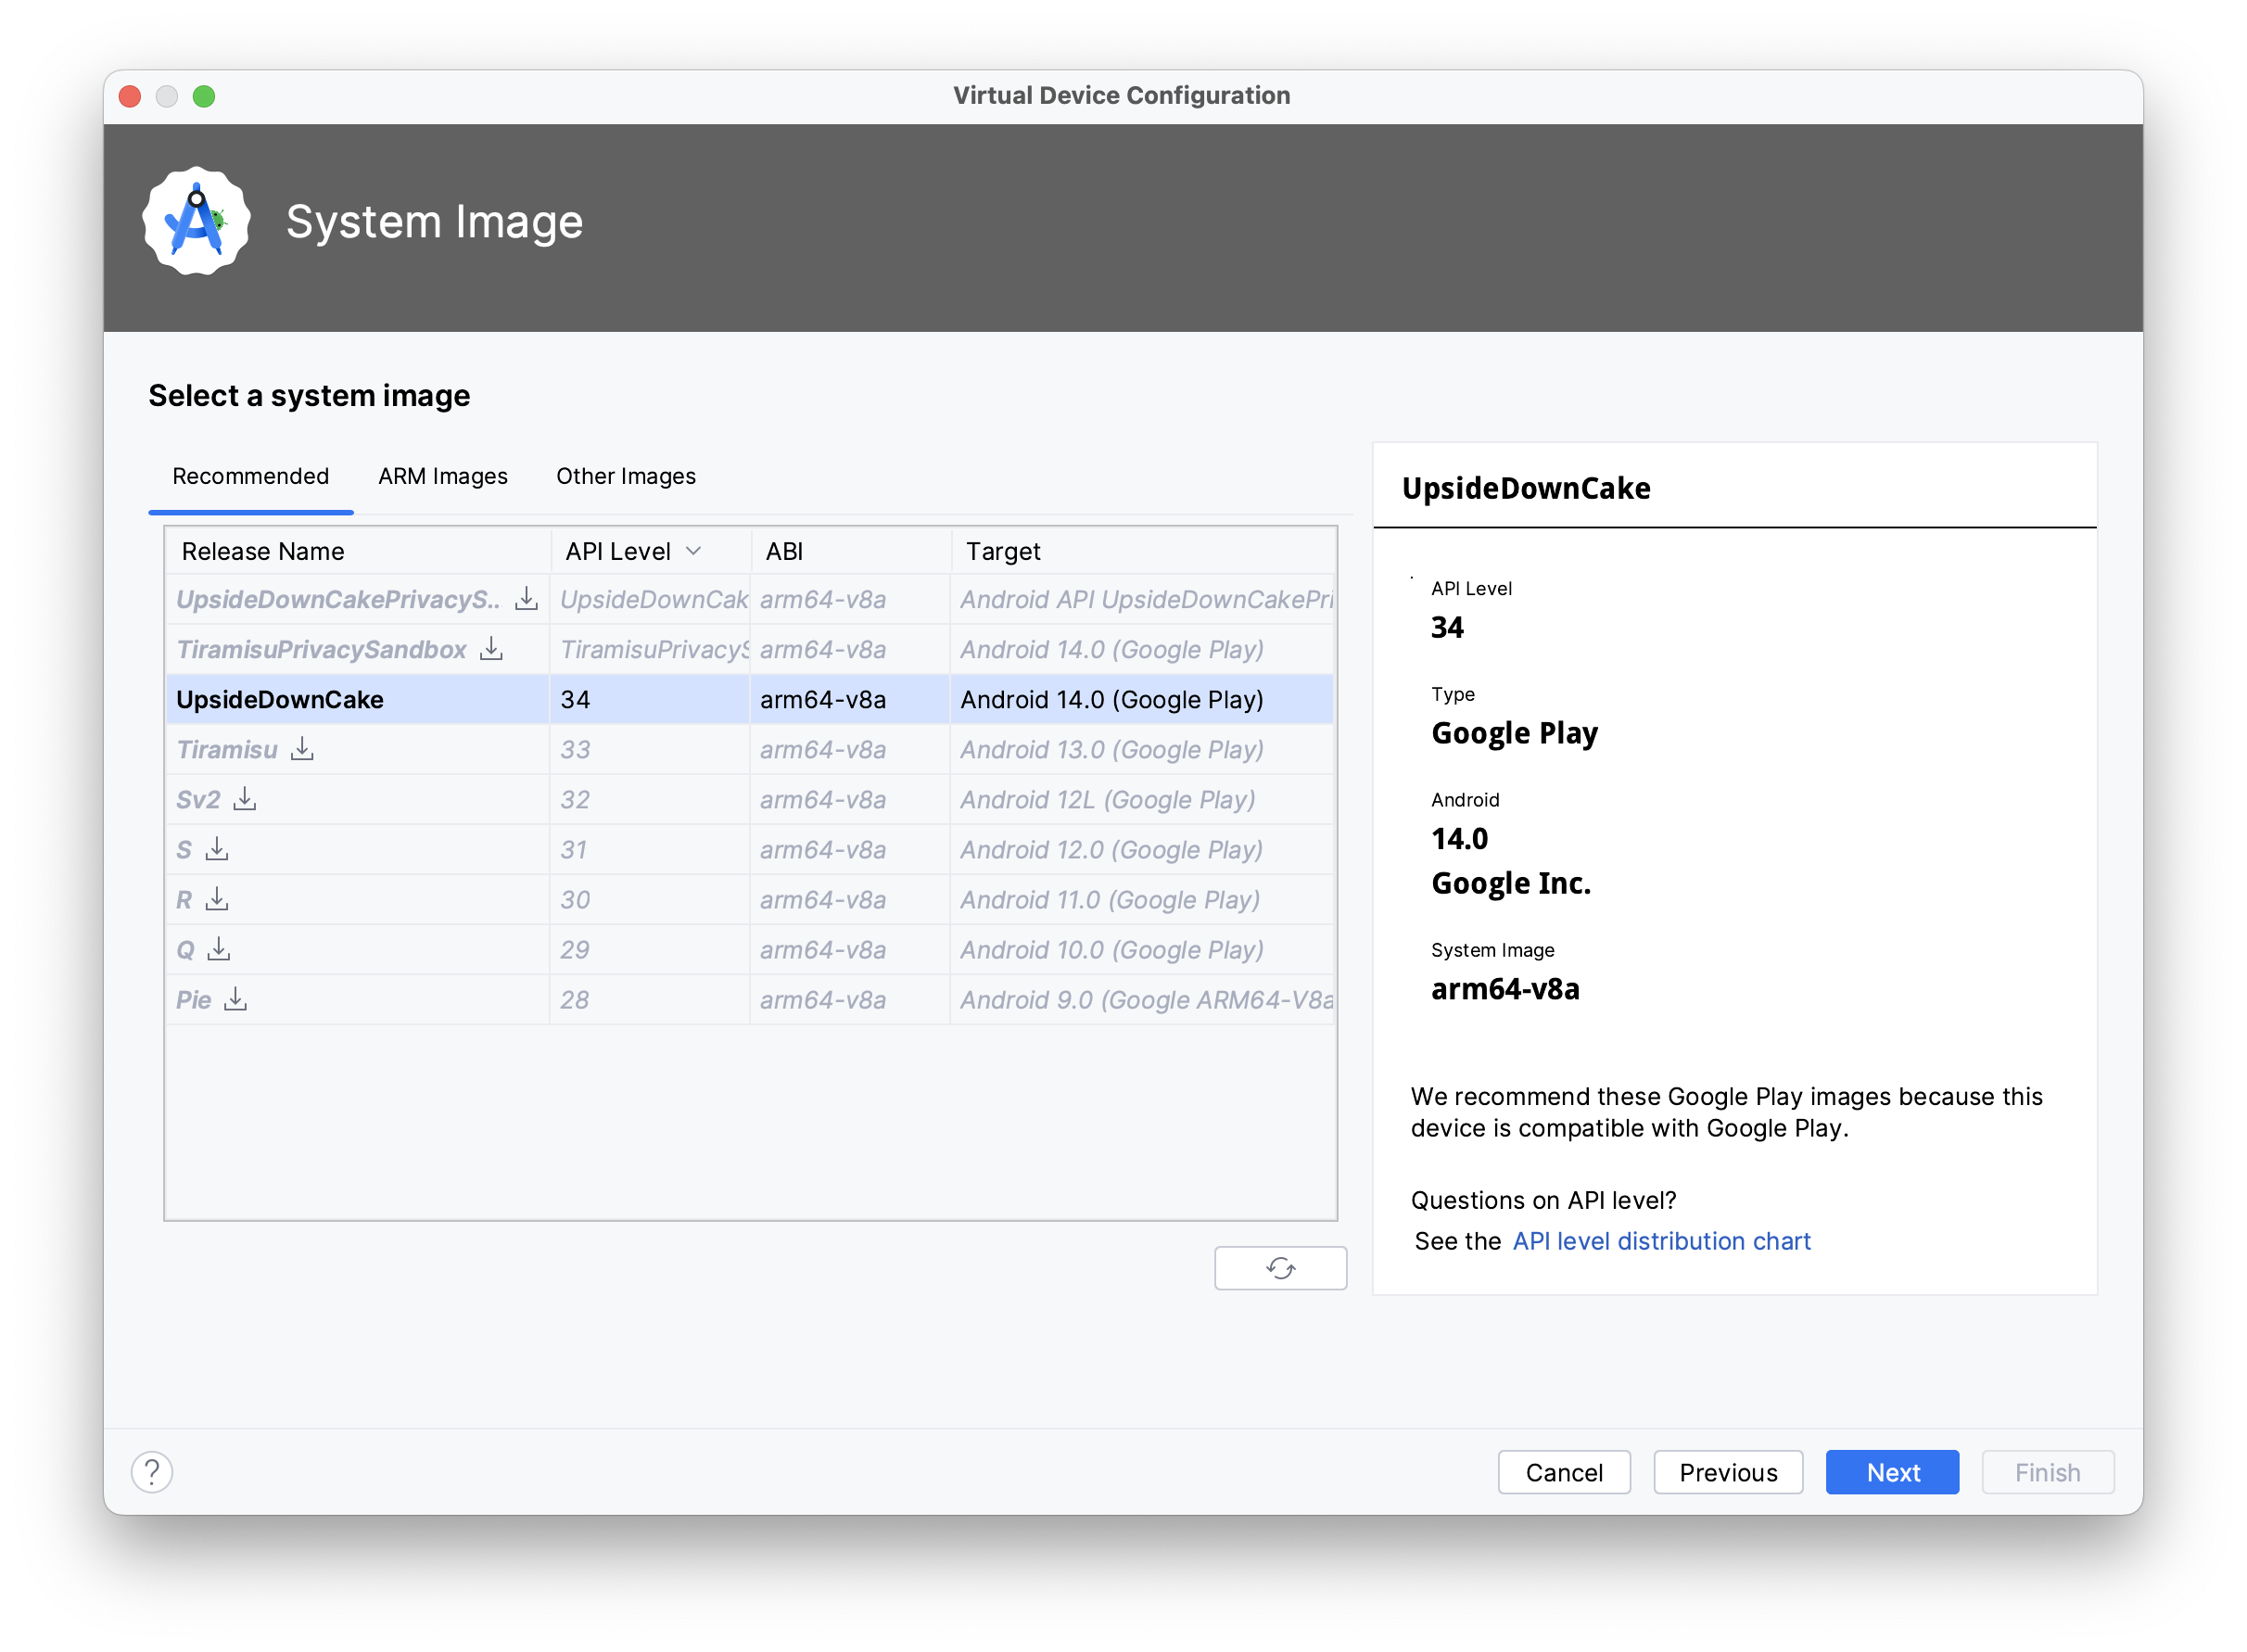
and install/download an Android system image, which is needed for creating a virtual device for the emulator. I chose Google Play ARM 64 v8a (you might have to choose a different one, depending on your host architecture):
After that open Virtual Device Manager:
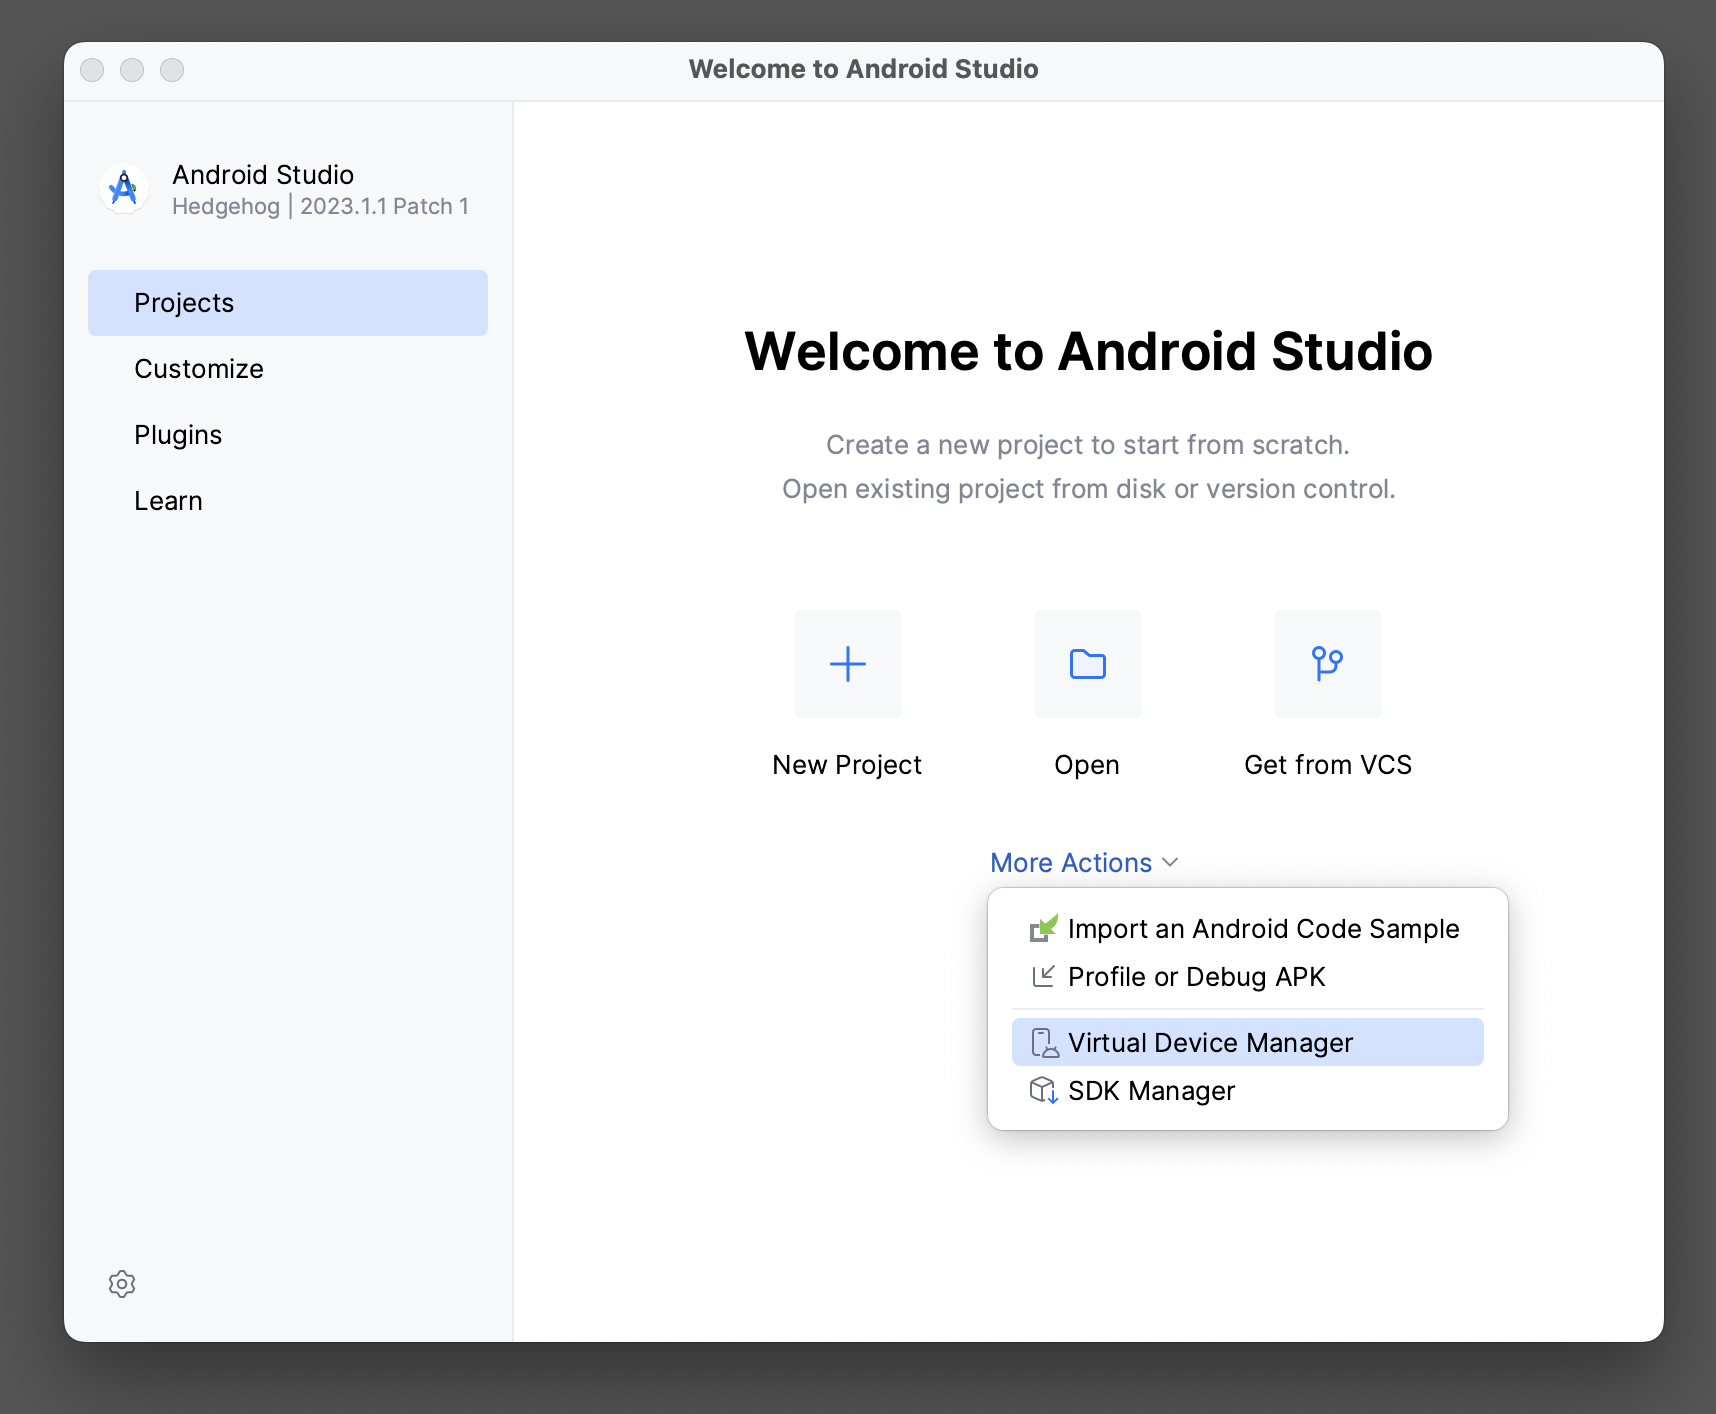
and create a new virtual device:
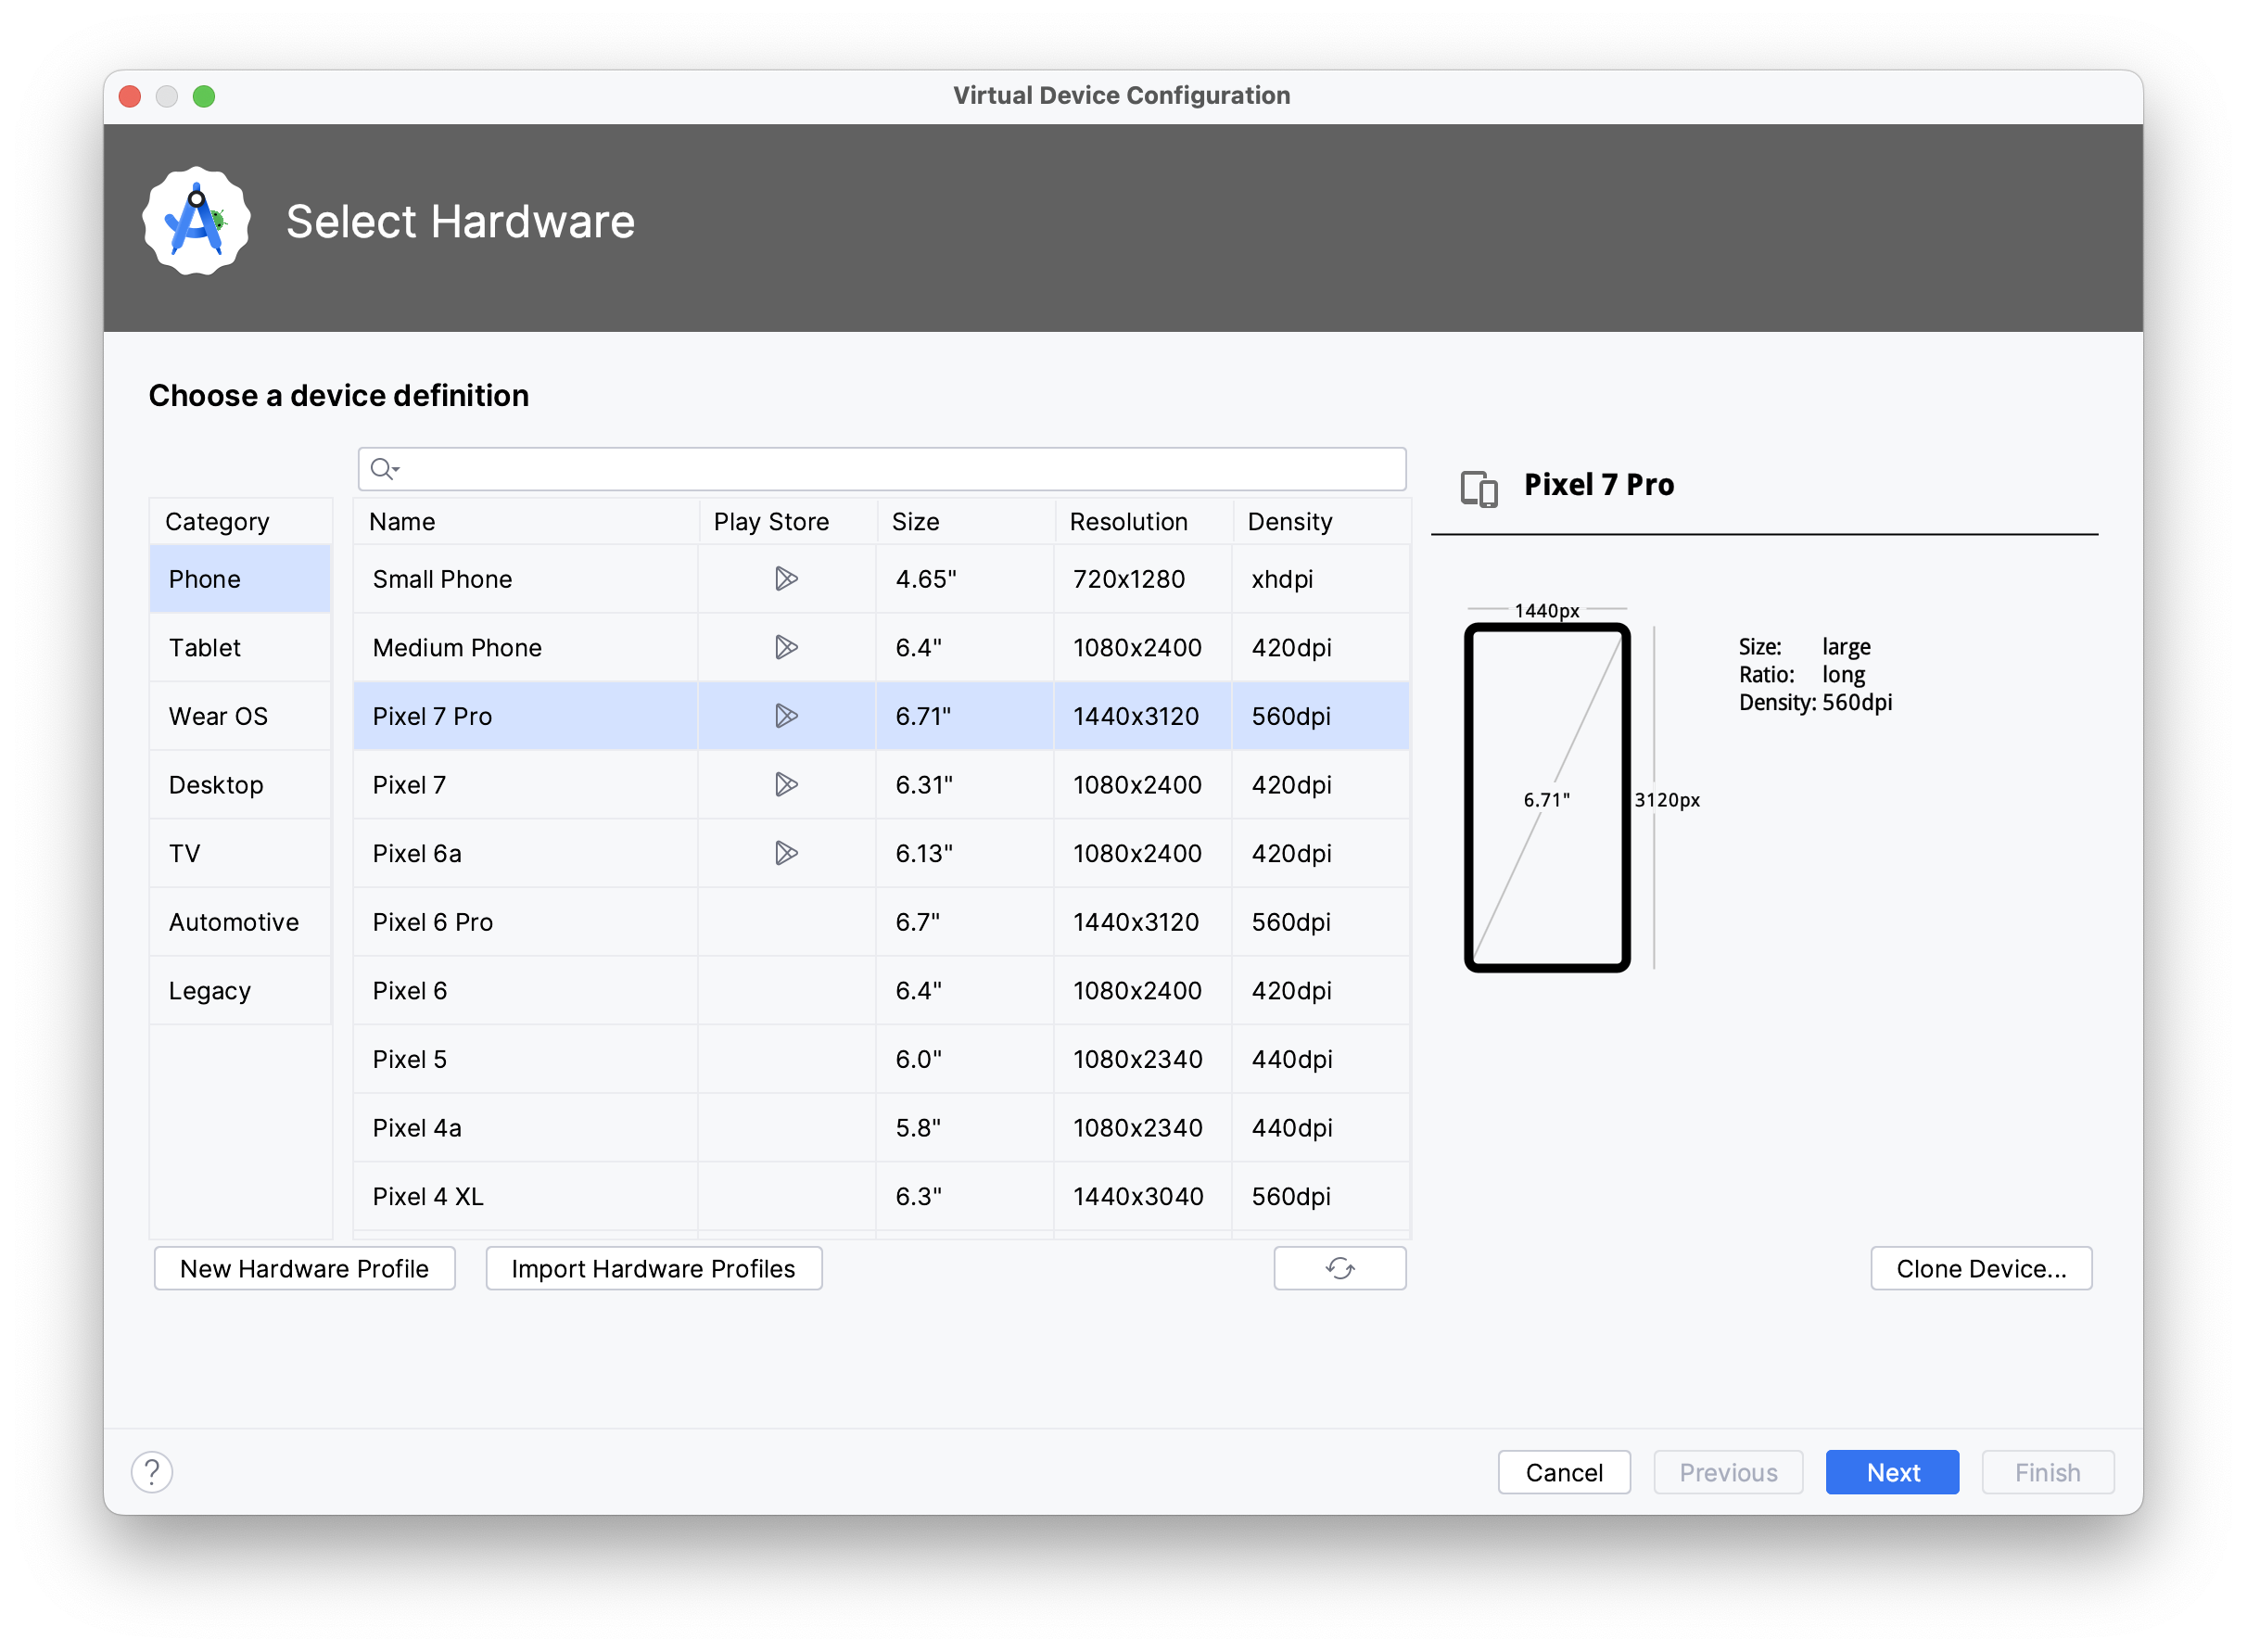
The image you’ve downloaded just now should be available there:
Once the device is created, it will be listed in Device Manager:
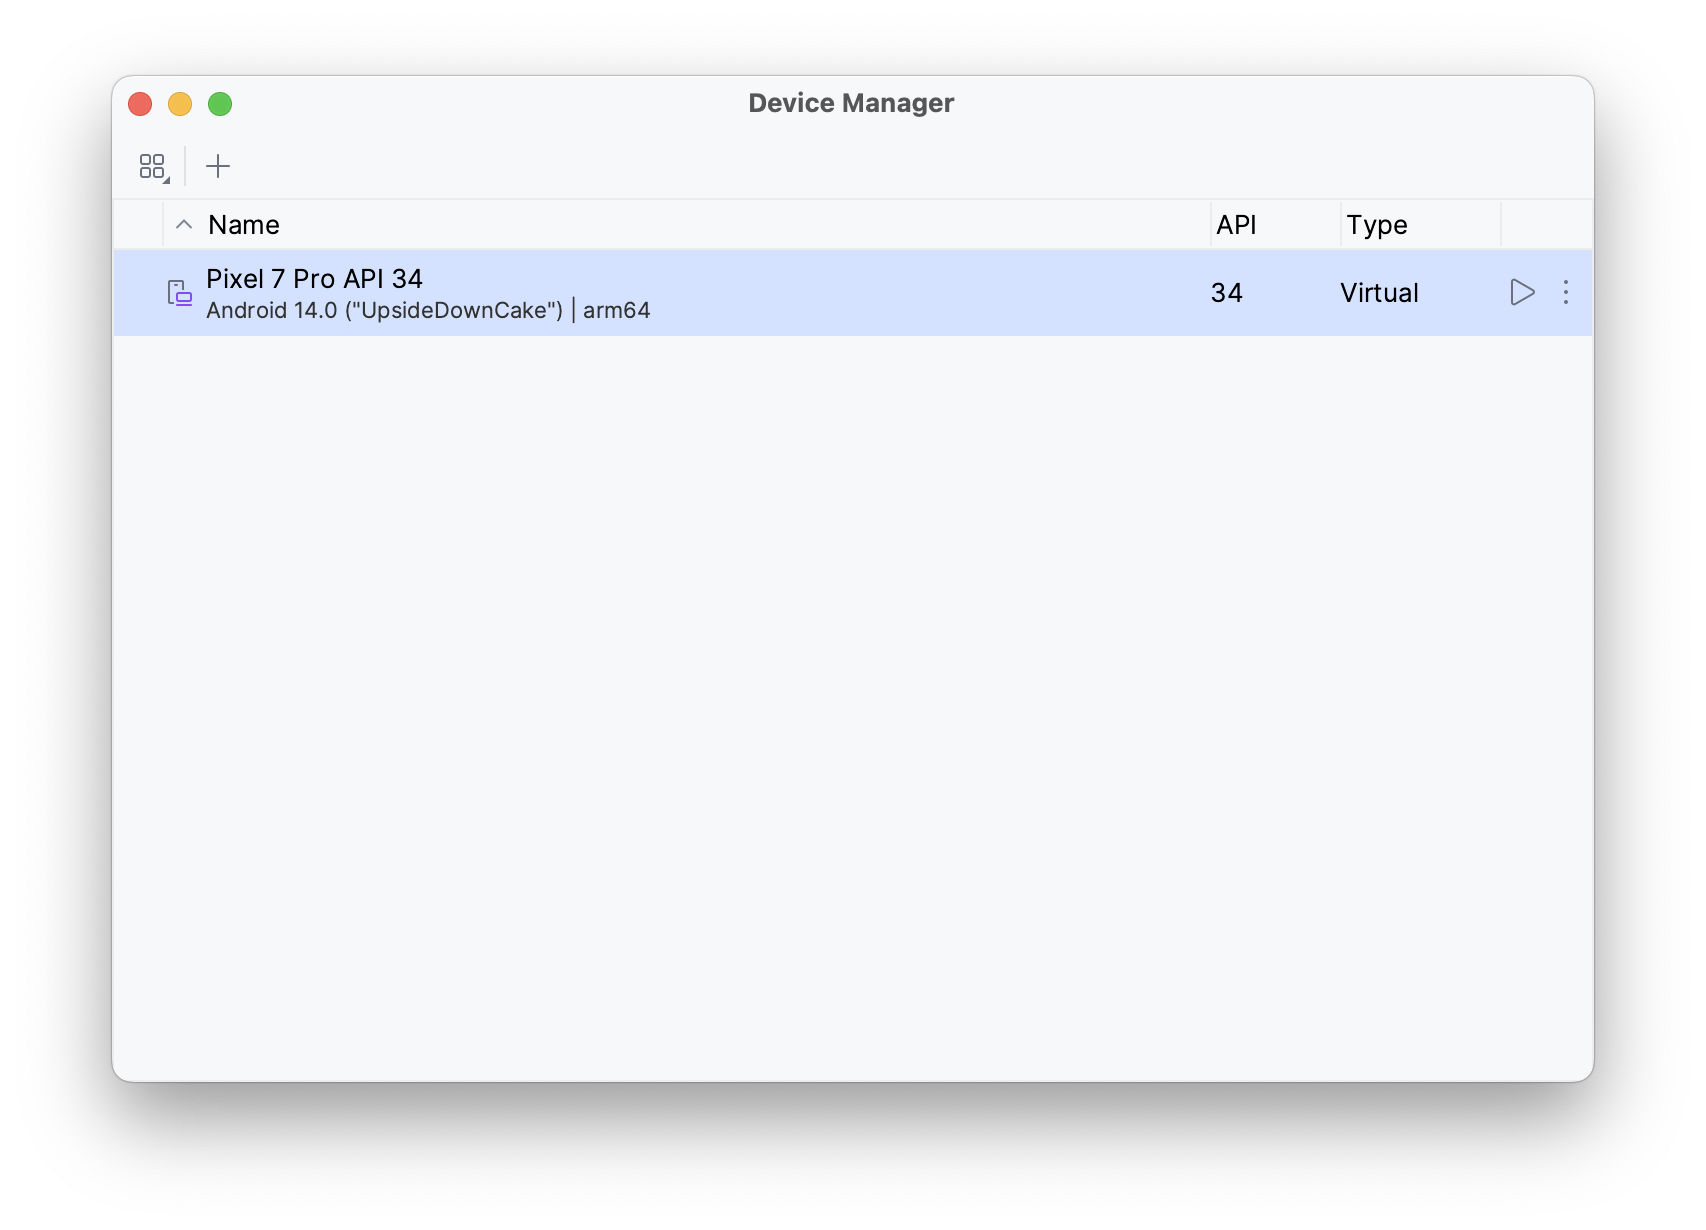
and you should be able to run it in emulator:
Project
Application
I know almost nothing about creating applications for Android, so I just followed Jetpack Compose tutorial.
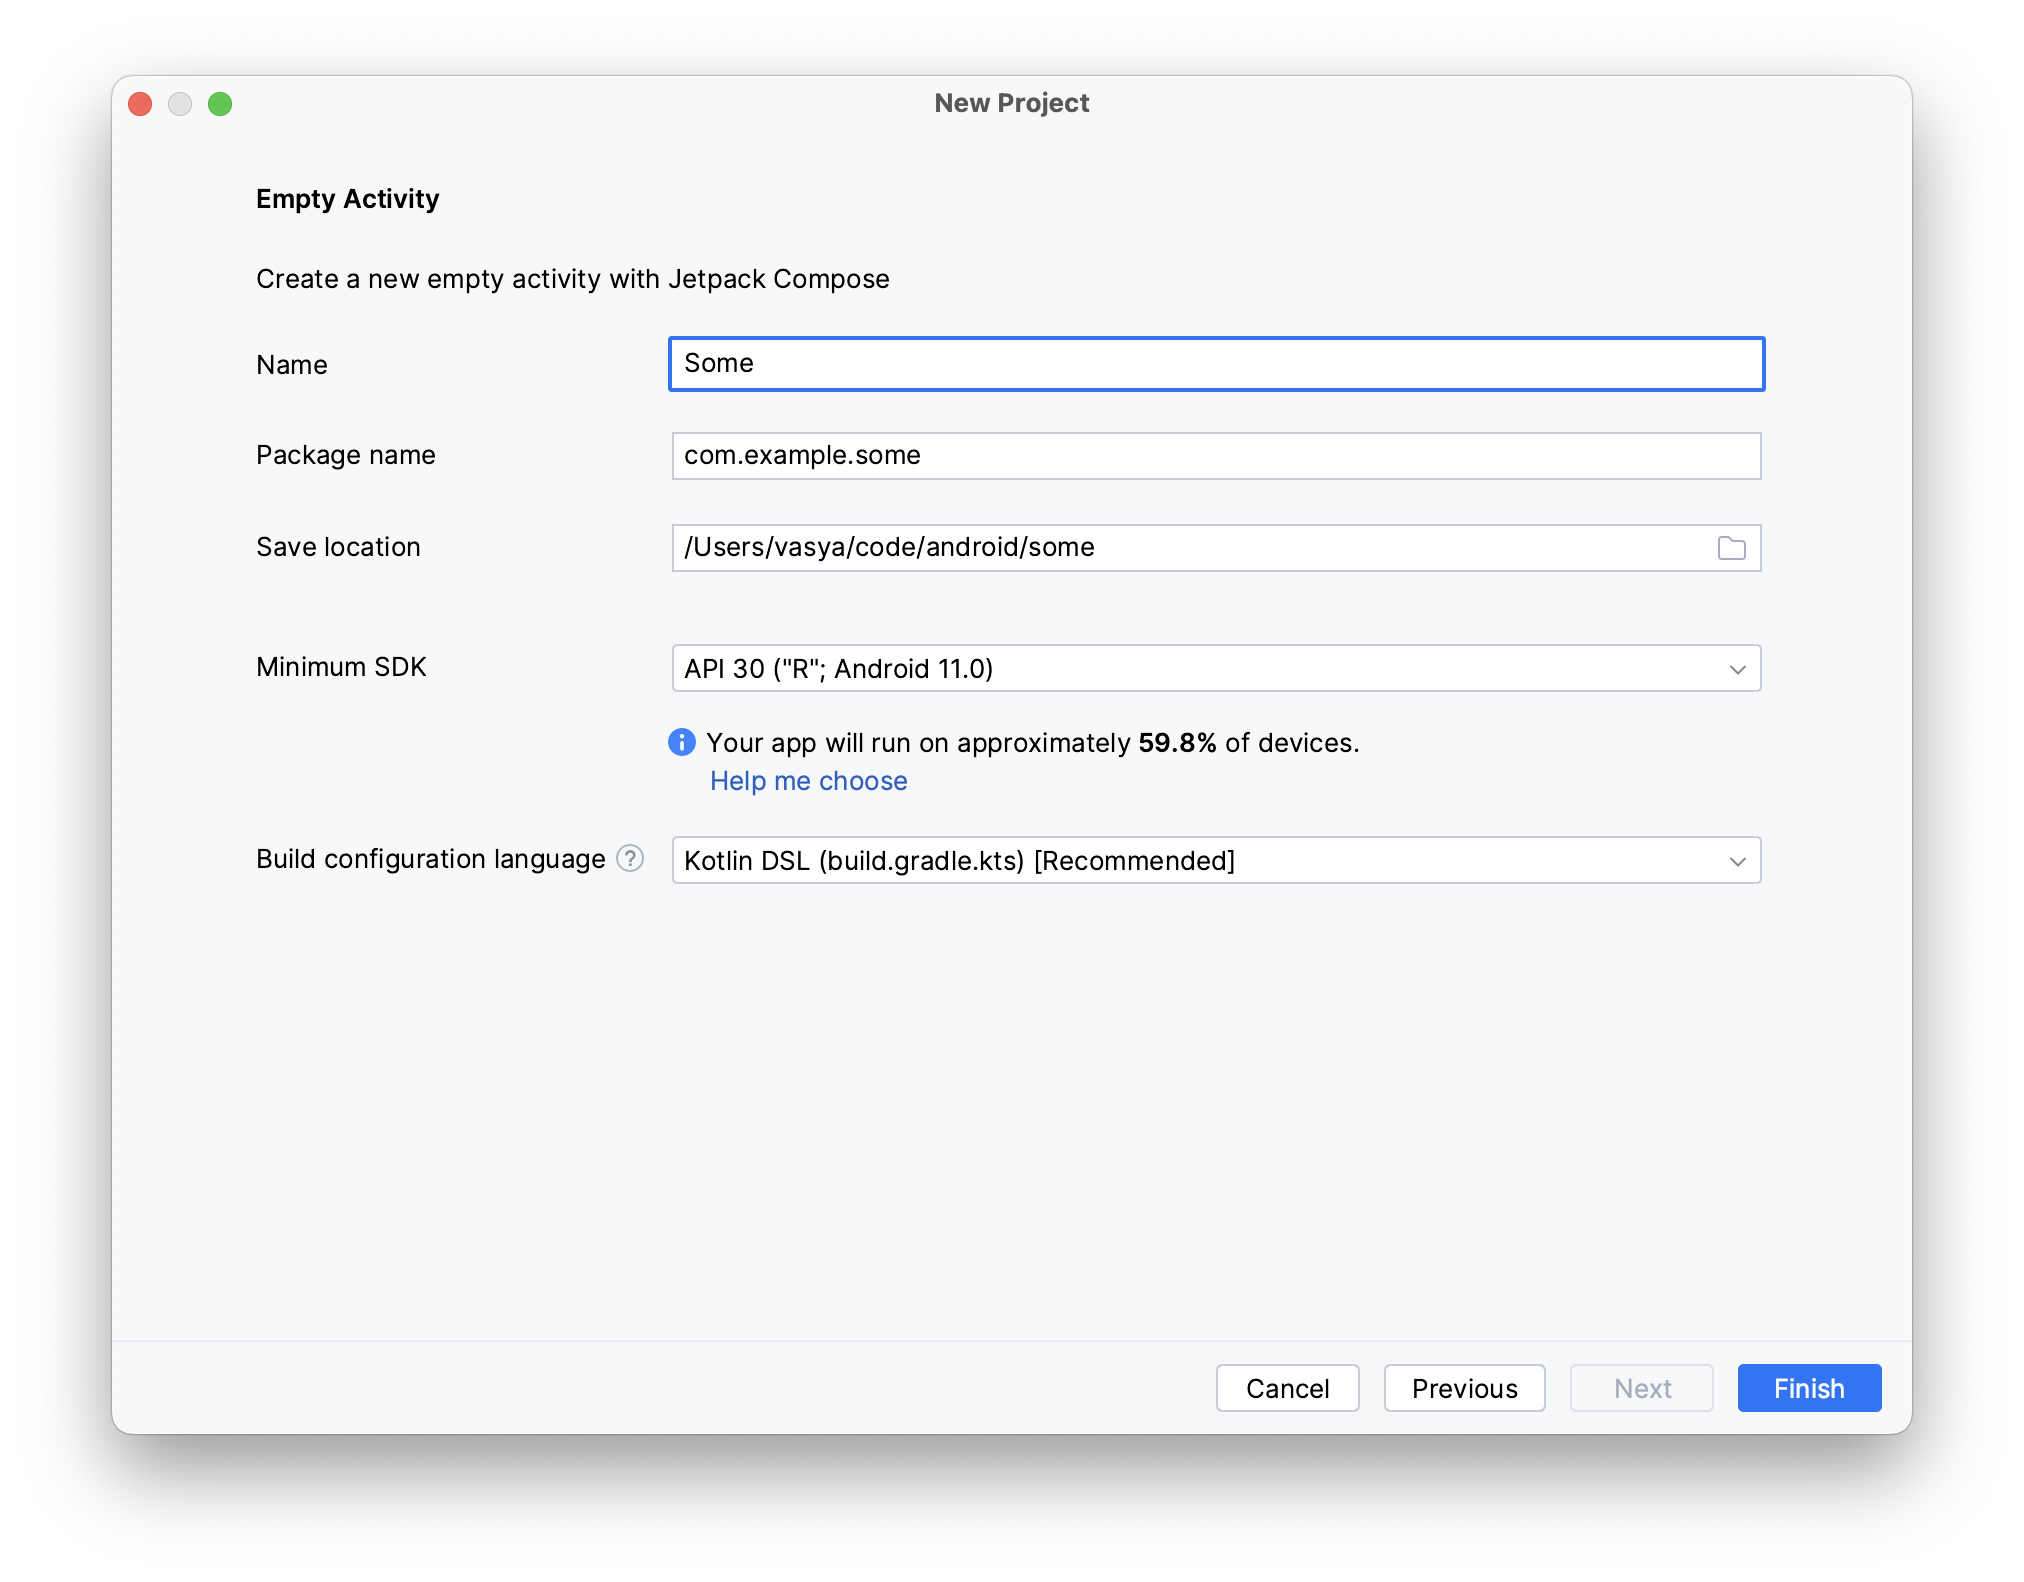
To create an application in Android Studio go to New project → Phone and Tablet → Empty Activity, and then you’ll need to set the minimum SDK version:
This is up to you, but probably don’t set the SDK/API version to the absolutely latest, as Android users are known to be mostly bums and drug addicts, so the majority of them is likely to have some ancient phones running a long time deprecated Android version. Actually, thanks to GoAccess, I can see the exact distribution of Android versions among my website audience:
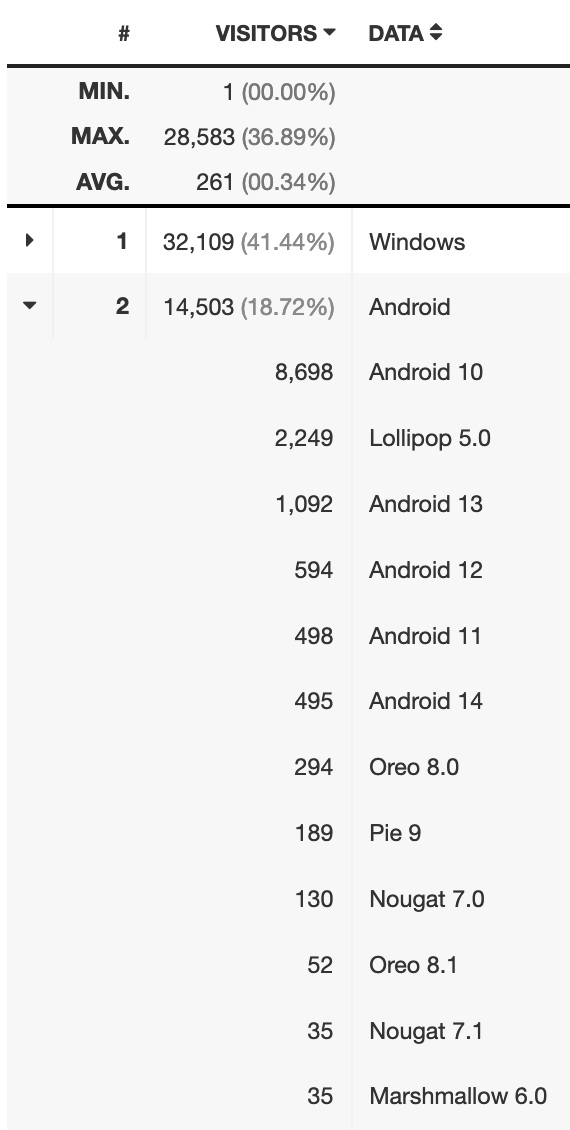
So Android users are the second biggest group of my visitors, and while the vast majority of them are on Android 10 (API level 29, which is not too bad), the second most popular version is Android 5 (API level 21, which is ancient as dinosaurs coprolites).
Anyway, in the example project I’ve set the minimal API level to 30 (Android 11), which is clearly way too high, based on my own website audience analytics, so I should have chosen 29 at least.
The application itself is a silly gallery of some grils:
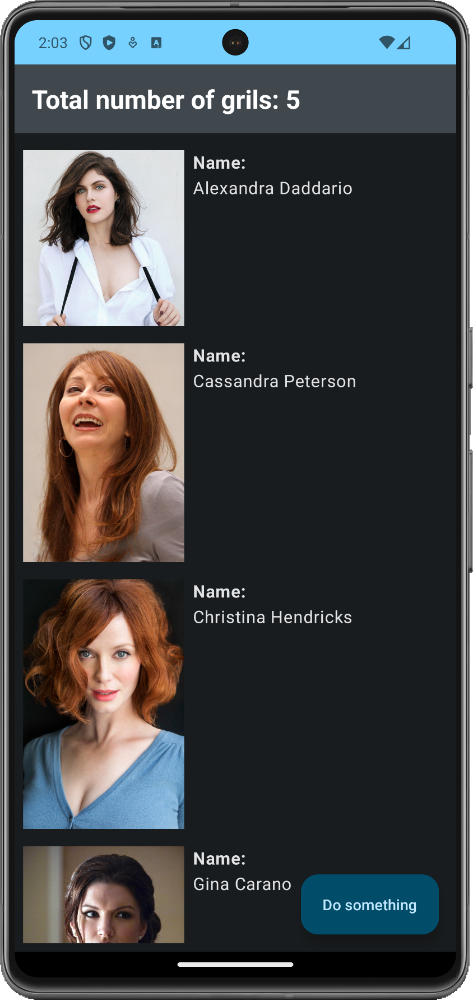
It doesn’t do anything exciting, it’s literally just a series of images in a column layout with a button. There is no interaction whatsoever, except for scrolling the view and clicking on the button. The implementation is nothing special either - it’s a standard Scaffold component:
@OptIn(ExperimentalMaterial3Api::class) // is there a fucking stable alternative?
@Composable
fun GrilsGallery(grils: List<Gril>) {
    Scaffold(
        topBar = {
            TopAppBar(
                title = {
                    Text(
                        "Total number of grils: ${Grils.grilsData.count()}",
                        fontWeight = FontWeight.Bold,
                        fontSize = TextUnit(24.0F, TextUnitType.Sp),
                        maxLines = 1,
                        overflow = TextOverflow.Ellipsis,
                        color = White
                    )
                },
                colors = topAppBarColors(
                    containerColor = MaterialTheme.colorScheme.primary
                )
            )
        },
        floatingActionButtonPosition = FabPosition.End,
        floatingActionButton = {
            ExtendedFloatingActionButton(
                content = { Text("Do something") },
                // that's where we'll be calling a function from C++ library later
                onClick = { Log.i("log", "ololo") }
            )
        },
        content = { padding ->
            Column(modifier = Modifier.padding(all = Layout.padding))
            {
                Spacer(modifier = Modifier.height(padding.calculateTopPadding()))

                LazyColumn {
                    items(grils) { gril -> GrilCard(gril) }
                }
            }
        }
    )
}
One thing to note here is that I find it hilarious how using TopAppBar requires you to do @OptIn(ExperimentalMaterial3Api::class), implying that there is no a stable alternative (still, in 2024?). So to be able to use such basic UI controls one just has to enable experimental/unstable stuff in one’s completely new application right from the day one.
Other than that, this Jetpack/Kotlin thing looks rather good, I could probably even like it. It looks very similar to SwiftUI (not sure which one came first), but somewhat simpler / cleaner. And both of them seem to look up to Qt Quick / QML, which is the simplest of them all (although, perhaps, not as capable, given its cross-platform nature).
As for building the application, there is probably a way to do it from command line without Android Studio, and usually I do prefer building things from bare CLI, but here it’s just too convenient to build and launch the application in emulator right from the IDE - you only need to click Run.
C++ library
To build a C++ library targetting Android platform, you need to have NDK installed. As I understand it, NDK is a set of build tools/compiler(s) for (cross-)compiling C++ sources into an Android binary. In other words, you won’t be able to compile your C++ library for Android using your “standard” host platform compiler/toolchain.
The NDK should be pre-installed/pre-downloaded together with Android Studio:
The library that I’ll be using is very simple. The only thing it does is printing a string of text to stdout (later it will be returning that string instead of printing it):
#include <iostream>

#include <Thingy/thingy.h>
#include "stuff.h"

namespace dpndnc
{
    void doThingy()
    {
        std::cout << "a string from C++: " << thingyString << std::endl;
    }
}
To build a C++ library for Android you need to use the Android toolchain from NDK:
$ export ANDROID_NDK_VERSION='25.1.8937393'
$ export ANDROID_NDK_HOME="$HOME/Library/Android/sdk/ndk/$ANDROID_NDK_VERSION"

$ cmake -G Ninja -DCMAKE_BUILD_TYPE=Release -DCMAKE_INSTALL_PREFIX="../install" \
    -DCMAKE_TOOLCHAIN_FILE="${ANDROID_NDK_HOME}/build/cmake/android.toolchain.cmake" \
    -DBUILD_SHARED_LIBS=1 \
    ..
$ cmake --build . --target install
And since we need to get an .so variant, the library needs to build as dynamic/SHARED (BUILD_SHARED_LIBS=1). I am actually not sure if it’s exactly dynamic variant that is required, but I read somewhere that while later versions of Java are able to load static C++ libraries, for Android applications that might still not be the case.
Inspecting the resulting .so with Detect It Easy shows that it is indeed an Android library, although it is 32-bit:
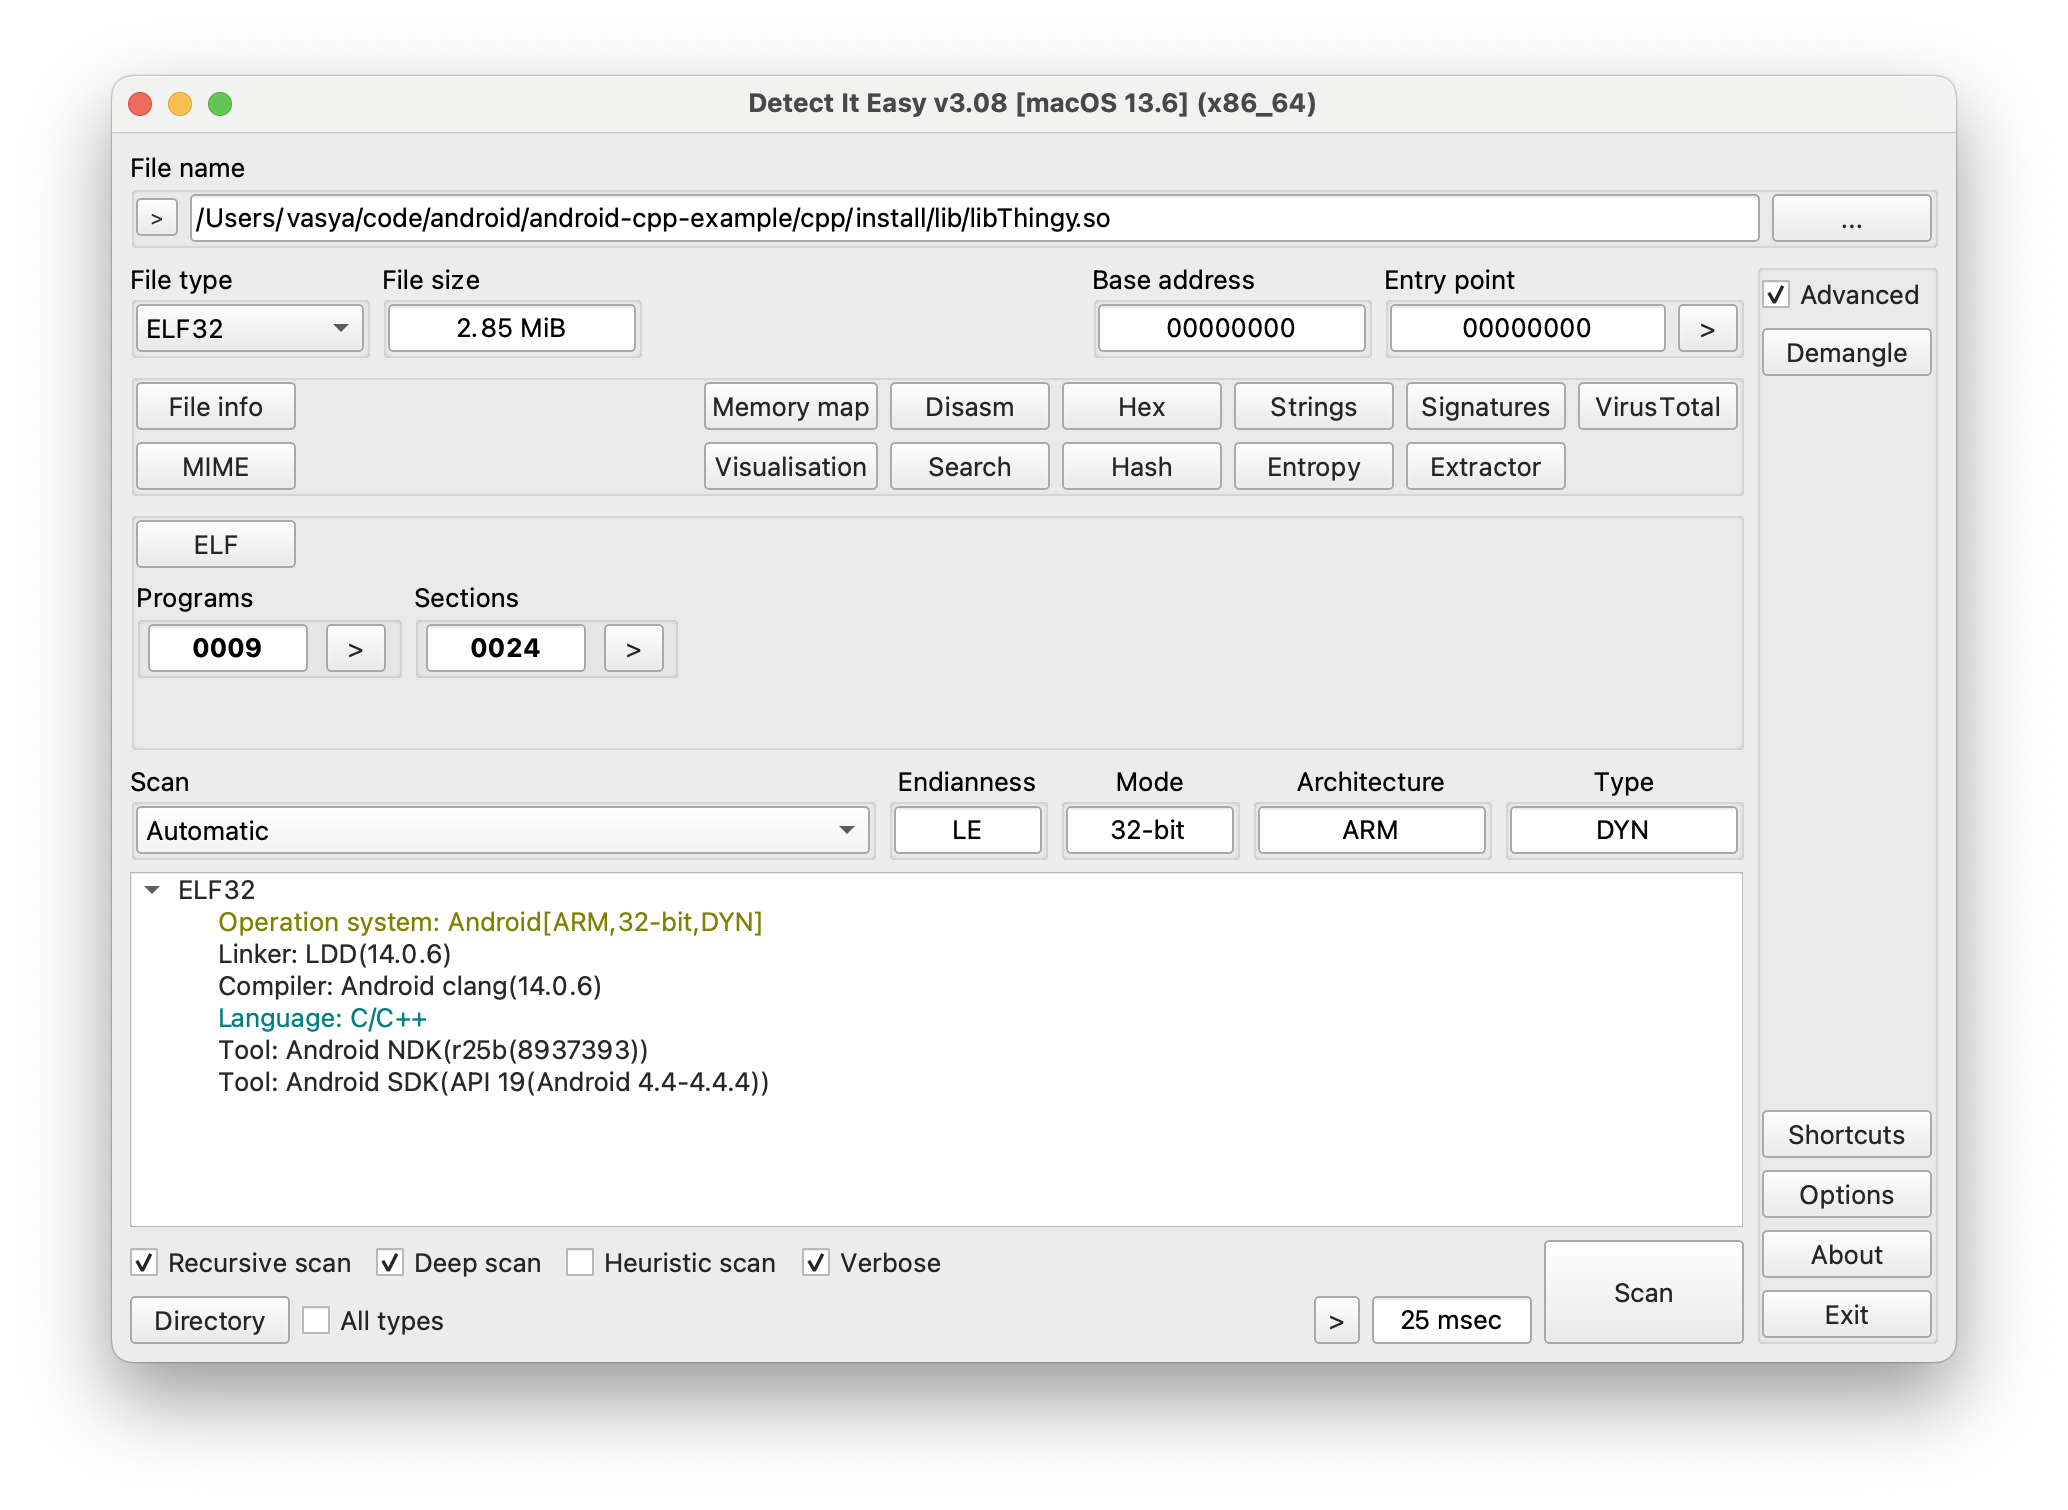
But we want to target arm64-v8a devices, so re-configure the project with -DANDROID_ABI=arm64-v8a, build it again, and then the resulting binary will be this:
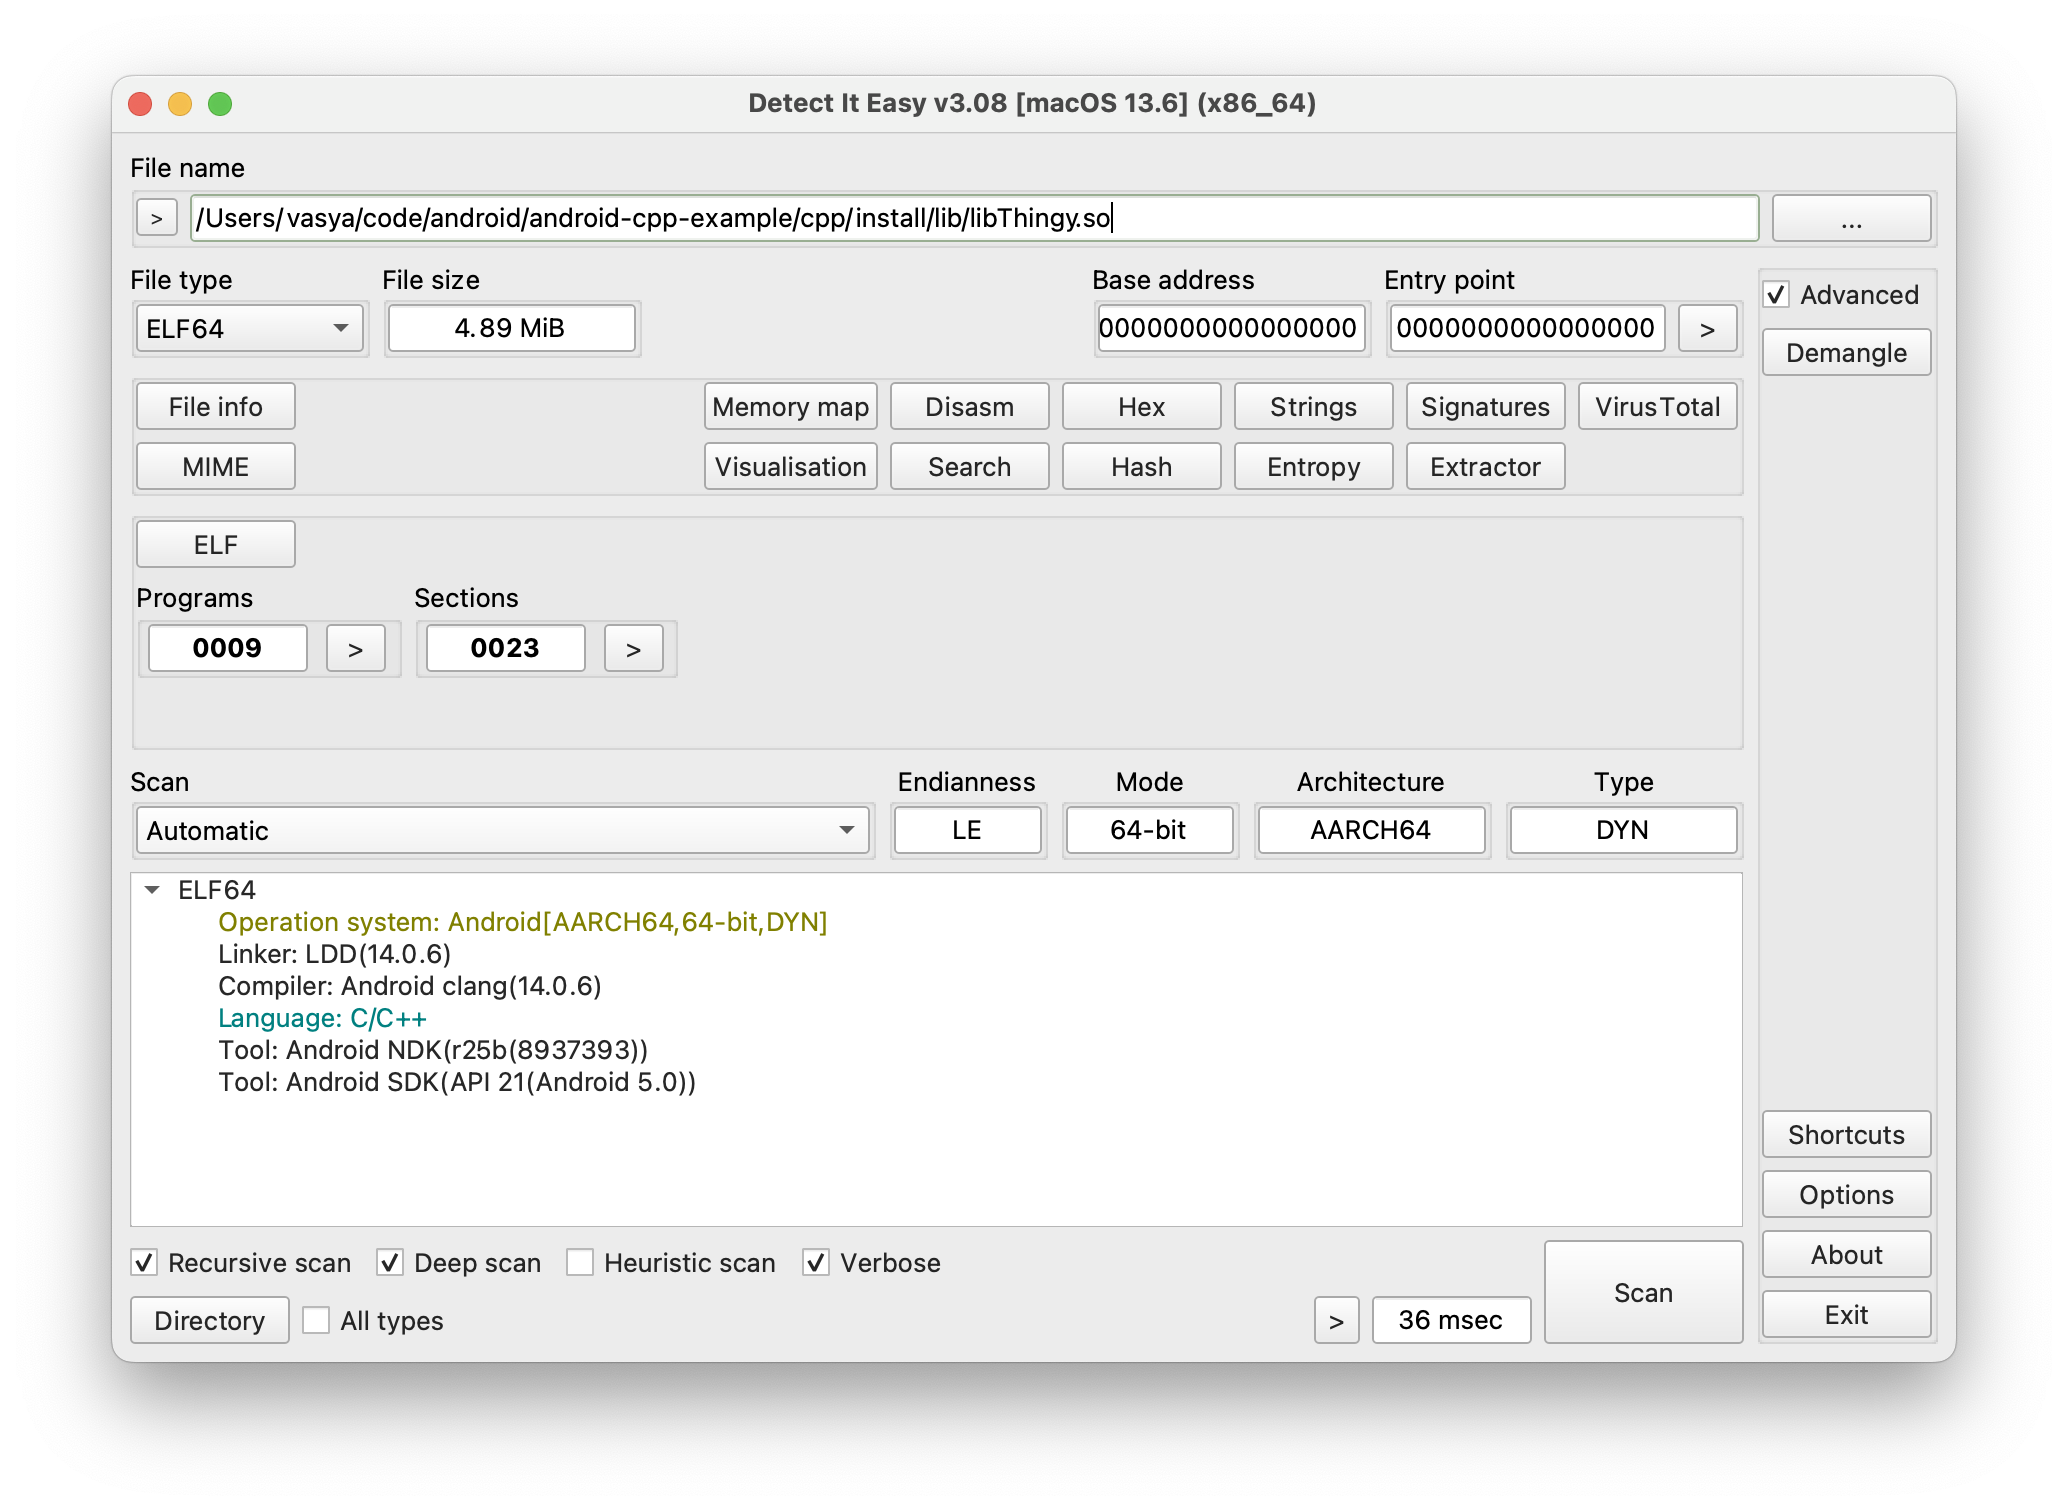
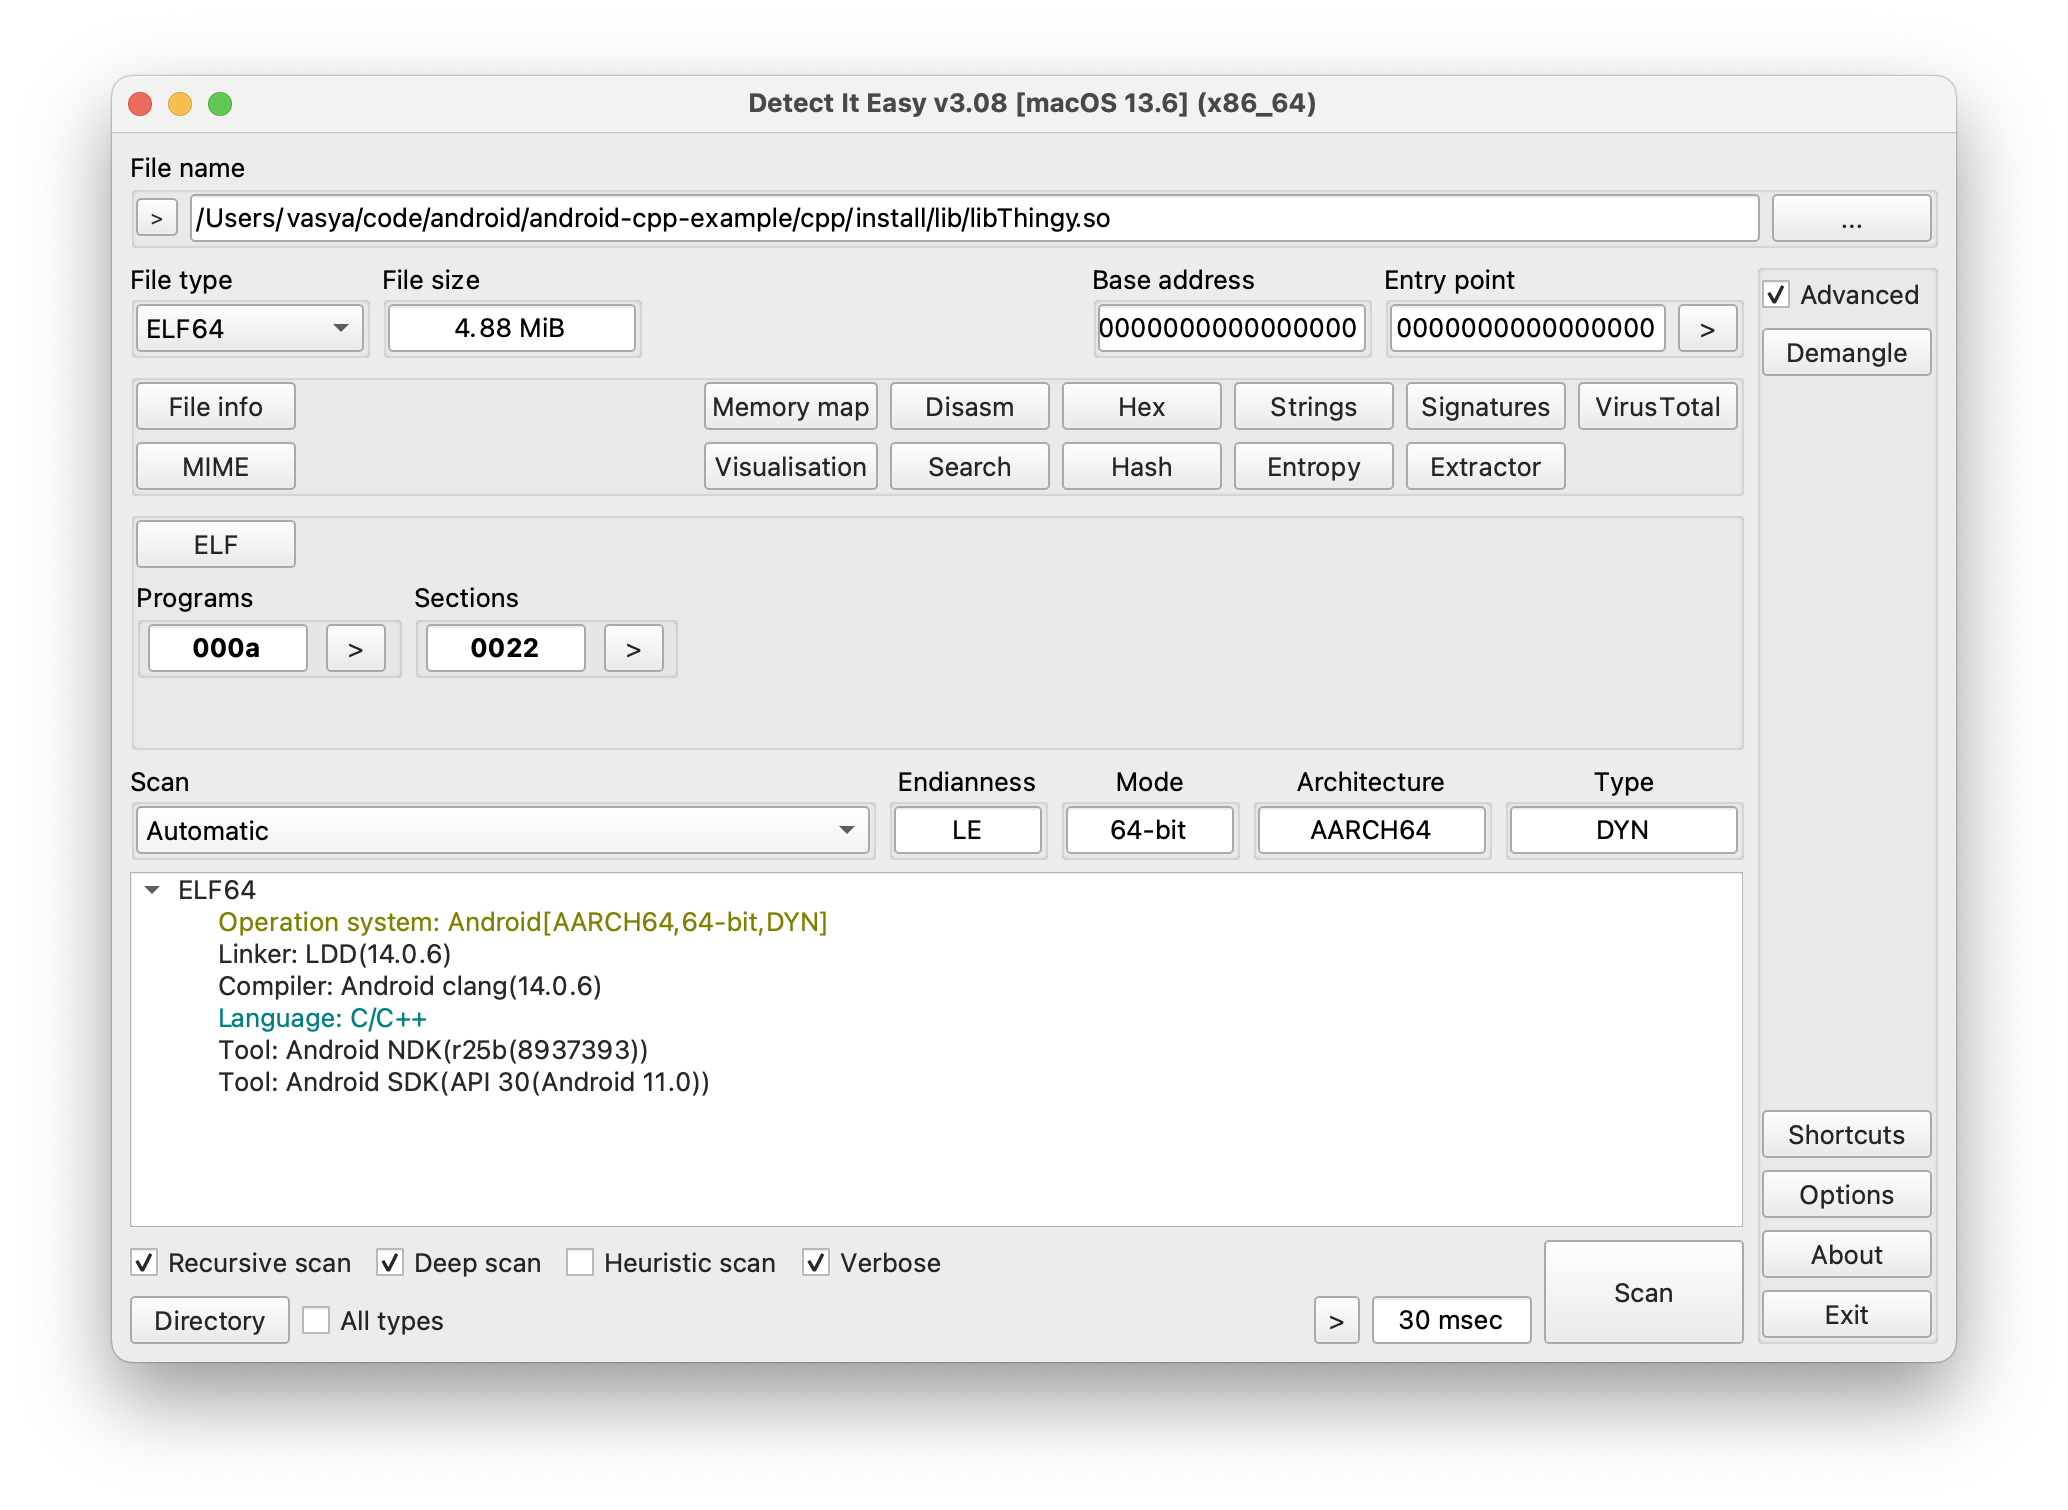
Interesting that even though the NDK version is the same, the API level got raised from 19 to 21. That is probably because there were no arm64-v8a devices before Android 5.0. And actually, since our Android application is already limited to API version/level 30, perhaps it makes sense to limit that here too with -DANDROID_PLATFORM=30, and then the resulting binary will be this:
Loading a pre-built C++ library in an Android application
Okay, so we have an Android application and we have a pre-built C++ library. Now we need to somehow load this library from the application and call its functions.
Such a thing is at all possible thanks to Java Native Interface (JNI), and that is what I will be using. Aside from that, there is also Java Native Access (JNA), which apparently is supposed to be an easier thing to use, but from what I see on the internet, JNA is slower than JNI, and since I haven’t experienced any particular difficulties using JNI, I guess I’ll stick to that one.
Directly
Having started googling for how does one load a pre-built C++ library in an Android application, I was overwhelmed by the amount of articles and forum threads on the subject, and what was especially amazing is that none of them were actually useful. They would tell you how to build C++ library as a part of your project in Android Studio, but not a single fucking soul would tell you how to simply load an existing already pre-built binary.
As I understand now, it doesn’t make a lot of sense to load a pre-built C++ library directly, because a more common way is to use a wrapper. But still, I wanted to know how can I just take my pre-built library, and just load it, and just call its functions, so can I fucking do that or not.
I barely found this answer, which covers almost everything, and the rest I was able to figure out on my own. So first you create a folder jni inside the app folder, and given that we are targetting arm64-v8a, the folder structure and contents would be this then:
./app/jni/
├── Android.mk
└── libs
    └── arm64-v8a
        └── libThingy.so
Here’s what’s inside the Android.mk file:
LOCAL_PATH := $(call my-dir)

include $(CLEAR_VARS)
LOCAL_MODULE := thingy
LOCAL_SRC_FILES := libs/$(TARGET_ARCH_ABI)/libThingy.so
include $(PREBUILT_SHARED_LIBRARY)
If the path in LOCAL_SRC_FILES is not correct, for example if you forget to add libs/ part of the path or if you confuse Debug/Release variants (so you would try to load libThingyd.so), then the application build will fail like this:
[CXX1429] error when building with ndkBuild using /path/to/app/jni/Android.mk: Android NDK: ERROR:/path/to/app/jni/Android.mk:thingy: LOCAL_SRC_FILES points to a missing file
If the path is correct, then add the following to the build.gradle.kts:
...

android {
    ...

    defaultConfig {
        ...

        ndk {
            abiFilters.clear() // is this required?
            abiFilters.add("arm64-v8a")
        }

        ...
    }

    ...

    externalNativeBuild {
        ndkBuild {
            path = file("./jni/Android.mk")
        }
    }
}

...
Don’t forget to click on Sync Now in Android Studio after you edit something in those files.
Finally, in MainActivity.kt source file add the following to your MainActivity class:
class MainActivity : ComponentActivity()
{
    // ...

    private external fun doThingy(): String

    companion object
    {
        init {
            // why the fuck does it need to be a part of the file name, what's the point then
            // of declaring LOCAL_MODULE in Android.mk?
            // and by the way, if you'll need to load a Debug variant (libThingyd.so),
            // then the name here would need to be Thingyd
            System.loadLibrary("Thingy")
        }
    }
}
If you’ll try to build the application now, it will succeed, but trying to launch it will fail, and to see the error message you’ll need to open Logcat:
FATAL EXCEPTION: main
Process: com.example.some, PID: 7806
java.lang.UnsatisfiedLinkError: dlopen failed: library "libThingy.so" not found
    at java.lang.Runtime.loadLibrary0(Runtime.java:1082)
    at java.lang.Runtime.loadLibrary0(Runtime.java:1003)
    at java.lang.System.loadLibrary(System.java:1661)
    at com.example.some.MainActivity.<clinit>(MainActivity.kt:75)
    ...
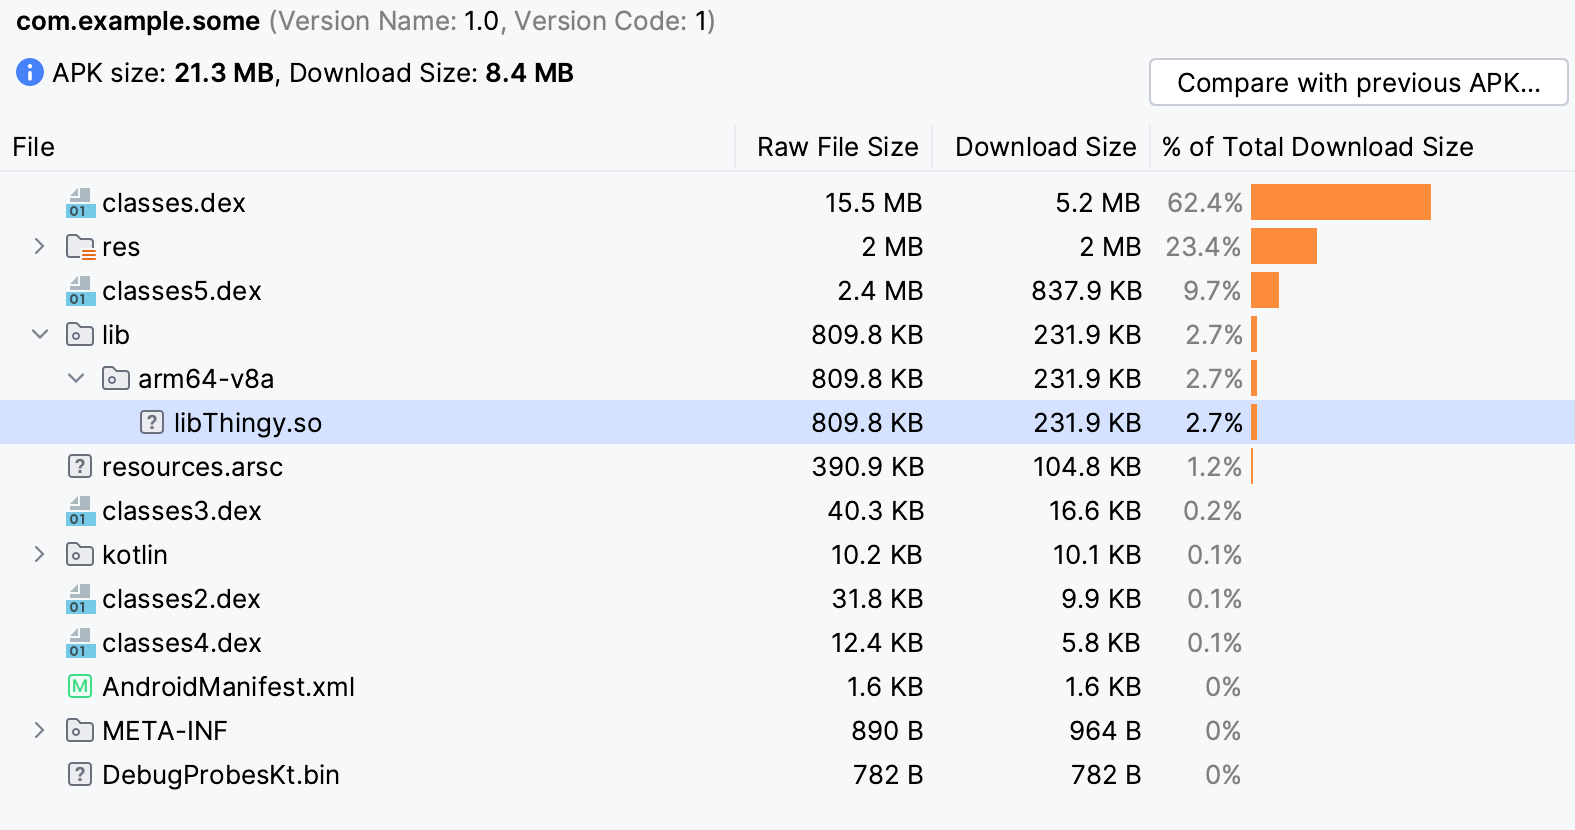
That is because the libThingy.so file needs to be deployed/bundled into the resulting APK, which makes sense, as it is a dynamic/SHARED library. If you’ll build the APK, then go to Build → Analyze APK... and choose your ./app/build/outputs/apk/debug/app-debug.apk, you’ll see that there is indeed no .so files inside that bundle:

To tell Gradle that you want to deploy/bundle libraries too, add sourceSets block into the build.gradle.kts:
...

android {
    ...

    sourceSets {
        this.getByName("main") {
            jniLibs.srcDirs("./jni/libs")
        }
    }
}

...
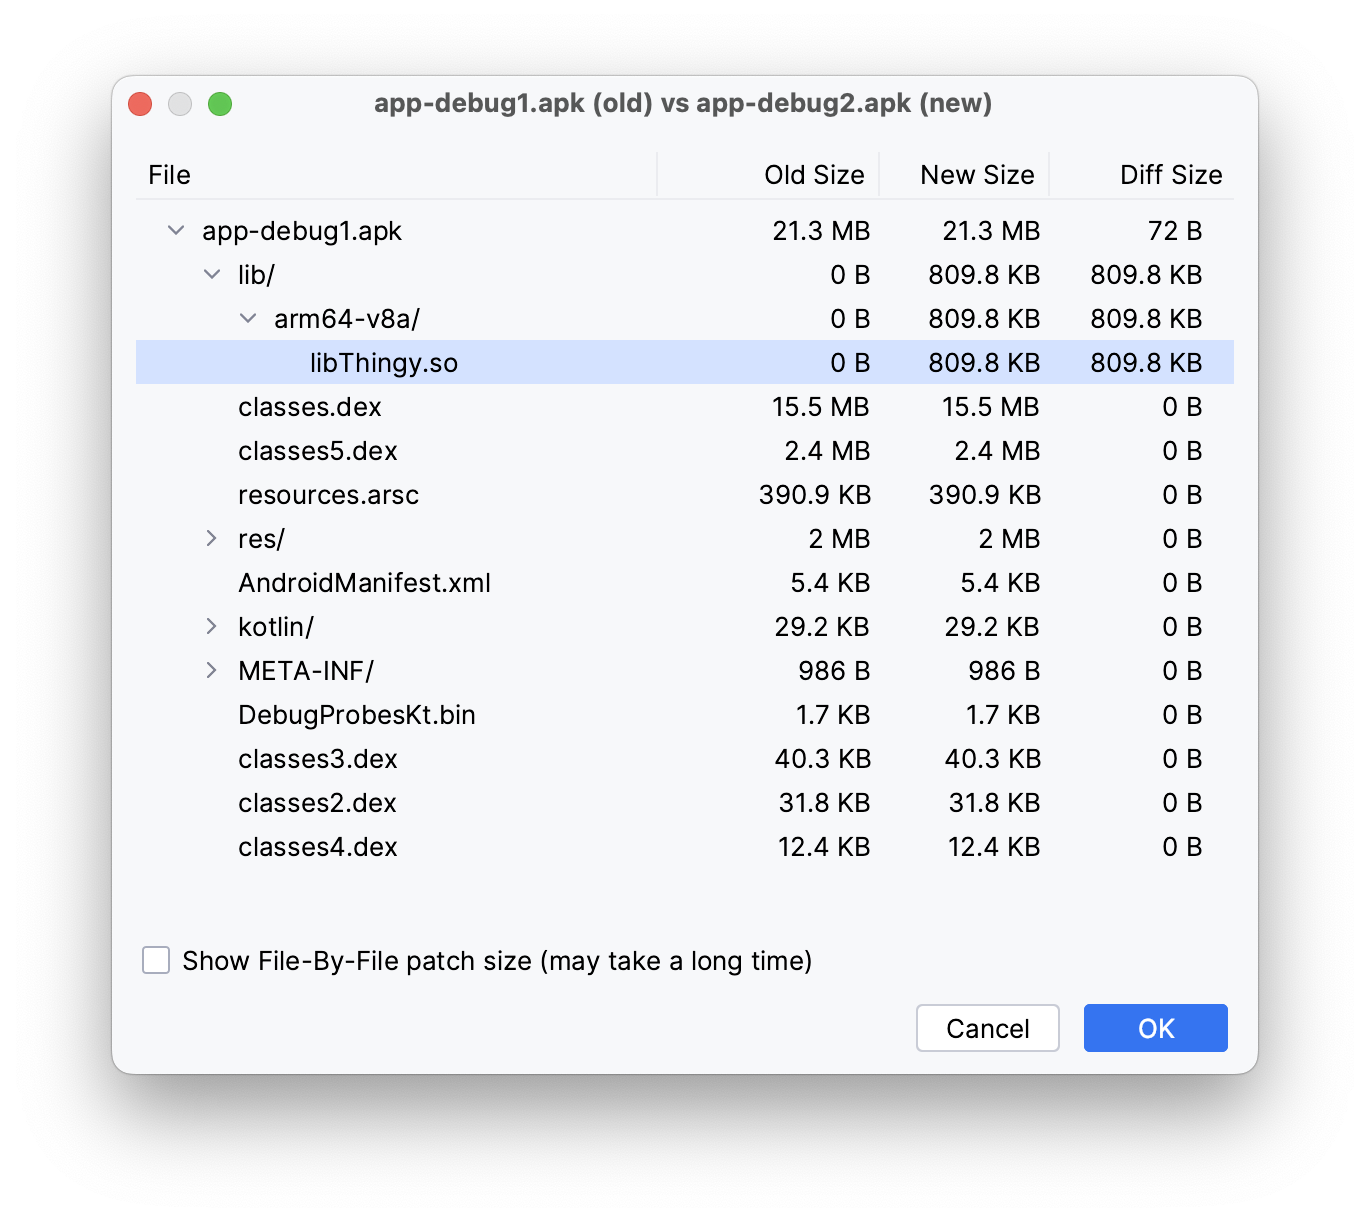
If you re-build the application and analyze the resulting APK again, you’ll see that now it contains the .so file:
Here’s also a comparison of the APKs with and without bundled library:
Okay, so the library will be loaded just fine. But trying to call the doThingy() function will result in the following error:
No implementation found for java.lang.String com.example.some.MainActivity.doThingy() (tried Java_com_example_some_MainActivity_doThingy and Java_com_example_some_MainActivity_doThingy__) - is the library loaded, e.g. System.loadLibrary?
As you can see, it expects this function name to have a Java_com_example_some_MainActivity_ prefix. Just how is one supposed to guess that (aside from reading JNI documentation, of course). Furthermore, you also need to add some other things in your library sources, so the resulting code will look like this:
#include <sstream>
#include <jni.h>

#include <Thingy/thingy.h>
#include "stuff.h"

namespace dpndnc
{
    extern "C" JNIEXPORT jstring JNICALL
    Java_com_example_some_MainActivity_doThingy(JNIEnv *env, jobject)
    {
        // now instead of printing to stdout it returns the resulting string
        std::stringstream someThing;
        someThing << "a string from C++: " << thingyString;
        return env->NewStringUTF(someThing.str().c_str());
    }
}
Surprisingly, nothing needs to be done in thingy.h, not even changing the function return value type. But then again this header is never needed in the Android project, only resulting binary libThingy.so is.
To use that function in a @Composable, you’ll need to declare it as an argument:
fun GrilsGallery(
    grils: List<Gril>,
    doSomething: () -> String
)
{
    // ...

    floatingActionButton = {
        ExtendedFloatingActionButton(
            content = { Text("Do something") },
            onClick = {
                Log.i("log", "ololo");
                Log.i("log", doSomething());
            }
        )
    }

    // ...
}
and here’s how you pass it from the MainActivity class:
class MainActivity : ComponentActivity()
{
    override fun onCreate(savedInstanceState: Bundle?)
    {
        super.onCreate(savedInstanceState)
        setContent {
            SomeTheme {
                Surface(
                    modifier = Modifier.fillMaxSize(),
                    color = MaterialTheme.colorScheme.background
                )
                {
                    GrilsGallery(
                        Grils.grilsData,
                        this::doThingy
                    )
                }
            }
        }
    }

    private external fun doThingy(): String

    companion object
    {
        init {
            System.loadLibrary("Thingy")
        }
    }
}
Since our function doesn’t actually do anything useful, and we just write its return value to Logcat, here’s how it will look like in action:
If video doesn’t play in your browser, you can download it here.
The current project repository state for this example is in here. In later commits the project will be using a wrapper, so don’t get confused.
A bit later I have also discovered this article, from which I learned that there is actually no need in having Android.mk file and ndkBuild block. I am not quite sure if it really is so, but if anything, here’s a patch with these changes:
diff --git a/android/app/build.gradle.kts b/android/app/build.gradle.kts
index 3eb4e56..fcd3f5b 100644
--- a/android/app/build.gradle.kts
+++ b/android/app/build.gradle.kts
@@ -49,12 +49,6 @@ android {
         }
     }

-    externalNativeBuild {
-        ndkBuild {
-            path = file("./jni/Android.mk")
-        }
-    }
-
     sourceSets {
         this.getByName("main") {
             jniLibs.srcDirs("./jni/libs")
diff --git a/android/app/jni/Android.mk b/android/app/jni/Android.mk
deleted file mode 100644
index 1904d26..0000000
--- a/android/app/jni/Android.mk
+++ /dev/null
@@ -1,6 +0,0 @@
-LOCAL_PATH := $(call my-dir)
-
-include $(CLEAR_VARS)
-LOCAL_MODULE := thingy
-LOCAL_SRC_FILES := libs/$(TARGET_ARCH_ABI)/libThingy.so
-include $(PREBUILT_SHARED_LIBRARY)
I tried it myself, and project still built just fine, and application could load the library and call its functions.
Via wrapper
But, obviously, we don’t want to mutilate our library functions with those Java_com_example_some_MainActivity_* prefixes, as we want it to be re-usable in other projects too, and on other platforms as well, so we can’t have these Android-specific headers and signatures in the our library sources.
And that is how I arrived to an understanding of a wrapper. So in order to keep the original C++ library sources clean from the Android-specific filth, one needs to create yet another C++ library, which would link to the original library and quite literally “wrap” its functions into those ugly prefixed functions, which in turn would be callable from the Android application.
Such a wrapper can be created as a separate external project too, and then there will be no changes in our Android project, except for changing the .so file name that is passed to System.loadLibrary(), of course. But it can also be created as a part of the Android project, which is actually more convenient. There is an official documentation on the matter, and while I can see now that it does provide required guidance, back when I read it for the first time it wasn’t particularly helpful/clear for me. There is even an example for that in the standard galery of project templates in Android Studio, and that one was in fact quite useful.
Instead of creating a new project we can simply “upgrade” our current project by replacing the directly loaded C++ library with an internal project of a C++ library (which will be our wrapper). To do that you only need to delete the ./app/jni folder with all its contents and add a new folder ./app/src/main/cpp. In that folder there will be a small CMake project:
$ tree ./app/src/main/cpp/
├── CMakeLists.txt
└── wrapper.cpp
In build.gradle.kts you will also need to delete sourceSets block and add a cmake block inside externalNativeBuild instead of ndkBuild:
externalNativeBuild {
    cmake {
        path = file("./src/main/cpp/CMakeLists.txt")
        version = "3.22.1"
    }
}
If you lost track of what’s going on, here’s a commit with all these changes.
Given that the wrapper’s CMake project (and library target) is named cpp-wrapper, set this value in System.loadLibrary(). But yet again, it works in mysterious ways, because if I am to set a debug postfix for the wrapper’s target, then the resulting binary file name will be libcpp-wrapperd.so, but having System.loadLibrary("cpp-wrapper"), Gradle(?) will be looking for libcpp-wrapper.so (without d postfix), and that will fail. So it means that one needs to change that value depending on the current build configuration - adding d when building Debug and removing d when building Release.
I mean, cannot it fucking figure out things like this on its own? It already does transform cpp-wrapper into libcpp-wrapper.so somehow, doesn’t it? I didn’t find how does one go about it, so I just don’t set the debug postfix, which makes the binary file to have the same name in both Debug and Release variants.
If you now clean and build/make the project, you’ll see that the .so binary(ies) will be built too:
$ cd /path/to/project
$ find . -iname "*.so" | xargs du -hs
1.8M    ./app/build/intermediates/cxx/Debug/6g2o6m6f/obj/arm64-v8a/libcpp-wrapper.so
1.8M    ./app/build/intermediates/merged_native_libs/debug/out/lib/arm64-v8a/libcpp-wrapper.so
284K    ./app/build/intermediates/stripped_native_libs/debug/out/lib/arm64-v8a/libcpp-wrapper.so
Moreover, it will be automatically deployed/bundled into the resulting APK:

Okay then, now let’s actually make a wrapper out of it. For that we need to find the CMake package of our external library, link to its imported target in the wrapper’s project:
find_package(Thingy CONFIG REQUIRED)

target_link_libraries(${CMAKE_PROJECT_NAME}
    PRIVATE
        some::Thingy
)
and provide the path to the library’s installation in build.gradle.kts, so CMake would know where to look for it:
// ...

android {
    // ...

    defaultConfig {
        // ...

        externalNativeBuild {
            cmake {
                arguments += "-DCMAKE_PREFIX_PATH=/path/to/external/cpp/project/install"
            }
        }

        // ...
    }

    // ...

    externalNativeBuild {
        cmake {
            path = file("./src/main/cpp/CMakeLists.txt")
            version = "3.22.1"
        }
    }
}

// ...
Note that this is a different externalNativeBuild block, not the one where we previously enabled CMake build, as that one does not allow manipulating arguments for some reason. Alternatively, you could’ve set CMAKE_PREFIX_PATH right in the wrapper’s CMakeLists.txt, but usually that is not recommended.
Anyway, in a “normal” C++ project setup these steps would be enough, but not this time, as CMake will fail to find the package:
CMake Error at CMakeLists.txt:20 (find_package):
  Could not find a package configuration file provided by "Thingy" with any
  of the following names:

    ThingyConfig.cmake
    thingy-config.cmake

  Add the installation prefix of "Thingy" to CMAKE_PREFIX_PATH or set
  "Thingy_DIR" to a directory containing one of the above files.  If "Thingy"
  provides a separate development package or SDK, be sure it has been
  installed.
Which, as I understand it, is because of the Android toolchain (${ANDROID_NDK_HOME}/build/cmake/android.toolchain.cmake), specifically because it sets this:
set(CMAKE_SYSROOT "${ANDROID_TOOLCHAIN_ROOT}/sysroot")
To test that theory and see where CMake was trying to find the package, set CMAKE_FIND_DEBUG_MODE around find_package():
set(CMAKE_FIND_DEBUG_MODE 1)
find_package(Thingy CONFIG REQUIRED)
set(CMAKE_FIND_DEBUG_MODE 0)
Clean and re-make the project and check the output in /path/to/project/app/build/intermediates/cxx/Debug/SOME-RANDOM-ID/logs/arm64-v8a/configure_stderr.txt:
find_package considered the following locations for the Config module:
  /Users/vasya/Library/Android/sdk/ndk/25.1.8937393/toolchains/llvm/prebuilt/darwin-x86_64/ThingyConfig.cmake
  /Users/vasya/Library/Android/sdk/ndk/25.1.8937393/toolchains/llvm/prebuilt/darwin-x86_64/thingy-config.cmake
  /Users/vasya/Library/Android/sdk/ndk/25.1.8937393/ThingyConfig.cmake
  /Users/vasya/Library/Android/sdk/ndk/25.1.8937393/thingy-config.cmake
  /Users/vasya/Library/Android/sdk/ndk/25.1.8937393/toolchains/llvm/prebuilt/darwin-x86_64/sysroot/usr/local/ThingyConfig.cmake
  /Users/vasya/Library/Android/sdk/ndk/25.1.8937393/toolchains/llvm/prebuilt/darwin-x86_64/sysroot/usr/local/thingy-config.cmake
  /Users/vasya/Library/Android/sdk/ndk/25.1.8937393/toolchains/llvm/prebuilt/darwin-x86_64/sysroot/usr/ThingyConfig.cmake
  /Users/vasya/Library/Android/sdk/ndk/25.1.8937393/toolchains/llvm/prebuilt/darwin-x86_64/sysroot/usr/thingy-config.cmake
  /Users/vasya/Library/Android/sdk/ndk/25.1.8937393/toolchains/llvm/prebuilt/darwin-x86_64/sysroot/ThingyConfig.cmake
  /Users/vasya/Library/Android/sdk/ndk/25.1.8937393/toolchains/llvm/prebuilt/darwin-x86_64/sysroot/thingy-config.cmake
  /Users/vasya/Library/Android/sdk/ndk/25.1.8937393/toolchains/llvm/prebuilt/darwin-x86_64/sysroot/usr/lib/aarch64-linux-android/30/ThingyConfig.cmake
  /Users/vasya/Library/Android/sdk/ndk/25.1.8937393/toolchains/llvm/prebuilt/darwin-x86_64/sysroot/usr/lib/aarch64-linux-android/30/thingy-config.cmake
So yes, that is the reason - it didn’t even consider the path we gave it in CMAKE_PREFIX_PATH. To make it consider that path too, add CMAKE_FIND_ROOT_PATH_MODE_PACKAGE="BOTH" to the list of CMake arguments:
externalNativeBuild {
    cmake {
        arguments += "-DCMAKE_PREFIX_PATH=/path/to/external/cpp/project/install"
        arguments += "-DCMAKE_FIND_ROOT_PATH_MODE_PACKAGE=\"BOTH\""
    }
}
Then the project configuration will succeed, as the package should be discovered now:
find_package considered the following locations for the Config module:

  /Users/vasya/Library/Android/sdk/ndk/25.1.8937393/toolchains/llvm/prebuilt/darwin-x86_64/ThingyConfig.cmake
  /Users/vasya/Library/Android/sdk/ndk/25.1.8937393/toolchains/llvm/prebuilt/darwin-x86_64/thingy-config.cmake
  /Users/vasya/Library/Android/sdk/ndk/25.1.8937393/ThingyConfig.cmake
  /Users/vasya/Library/Android/sdk/ndk/25.1.8937393/thingy-config.cmake
  /Users/vasya/Library/Android/sdk/ndk/25.1.8937393/toolchains/llvm/prebuilt/darwin-x86_64/sysroot/usr/local/ThingyConfig.cmake
  /Users/vasya/Library/Android/sdk/ndk/25.1.8937393/toolchains/llvm/prebuilt/darwin-x86_64/sysroot/usr/local/thingy-config.cmake
  /Users/vasya/Library/Android/sdk/ndk/25.1.8937393/toolchains/llvm/prebuilt/darwin-x86_64/sysroot/usr/ThingyConfig.cmake
  /Users/vasya/Library/Android/sdk/ndk/25.1.8937393/toolchains/llvm/prebuilt/darwin-x86_64/sysroot/usr/thingy-config.cmake
  /Users/vasya/Library/Android/sdk/ndk/25.1.8937393/toolchains/llvm/prebuilt/darwin-x86_64/sysroot/ThingyConfig.cmake
  /Users/vasya/Library/Android/sdk/ndk/25.1.8937393/toolchains/llvm/prebuilt/darwin-x86_64/sysroot/thingy-config.cmake
  /Users/vasya/Library/Android/sdk/ndk/25.1.8937393/toolchains/llvm/prebuilt/darwin-x86_64/sysroot/usr/lib/aarch64-linux-android/30/ThingyConfig.cmake
  /Users/vasya/Library/Android/sdk/ndk/25.1.8937393/toolchains/llvm/prebuilt/darwin-x86_64/sysroot/usr/lib/aarch64-linux-android/30/thingy-config.cmake
  /path/to/external/cpp/project/install/ThingyConfig.cmake
  /path/to/external/cpp/project/install/thingy-config.cmake
  /path/to/external/cpp/project/install/share/Thingy/ThingyConfig.cmake

The file was found at
  /path/to/external/cpp/project/install/share/Thingy/ThingyConfig.cmake
It would have also worked if you provided CMAKE_FIND_ROOT_PATH instead:
externalNativeBuild {
    cmake {
        arguments += "-DCMAKE_FIND_ROOT_PATH=/path/to/external/cpp/project/install"
    }
}
but that might break things, as in that case the path you provided there will be the only path for packages discovery:
find_package considered the following locations for the Config module:

  /path/to/external/cpp/project/install/ThingyConfig.cmake
  /path/to/external/cpp/project/install/thingy-config.cmake
  /path/to/external/cpp/project/install/share/Thingy/ThingyConfig.cmake

The file was found at

  /path/to/external/cpp/project/install/share/Thingy/ThingyConfig.cmake
so probably don’t do that, use CMAKE_FIND_ROOT_PATH_MODE_PACKAGE="BOTH" instead.
Now, when the library package is discovered, we can wrap a call to its function in the wrapper sources:
#include <jni.h>
#include <string>

// include the external library public header
#include <Thingy/thingy.h>

// this is a wrapper's "own" function
extern "C" JNIEXPORT jstring JNICALL
Java_com_example_some_MainActivity_wrapperMessage(
    JNIEnv *env,
    jobject
)
{
    std::string msg = "some message directly from wrapper";
    return env->NewStringUTF(msg.c_str());
}

// and this one is a wrapped call to an external library function
extern "C" JNIEXPORT jstring JNICALL
Java_com_example_some_MainActivity_doThingy(
        JNIEnv *env,
        jobject
)
{
    std::string msg = dpndnc::doThingy();
    return env->NewStringUTF(msg.c_str());
}
Modified MainActivity class for calling the wrapper functions will be this:
class MainActivity : ComponentActivity()
{
    override fun onCreate(savedInstanceState: Bundle?)
    {
        super.onCreate(savedInstanceState)
        setContent {
            SomeTheme {
                Surface(
                    modifier = Modifier.fillMaxSize(),
                    color = MaterialTheme.colorScheme.background
                )
                {
                    GrilsGallery(
                        isSystemInDarkTheme(),
                        Grils.grilsData,
                        this::doSomething
                    )
                }
            }
        }
    }

    private external fun wrapperMessage(): String
    private external fun doThingy(): String
    private fun doSomething()
    {
        Log.i("log", wrapperMessage()); // calling wrapper's own function
        Log.i("log", doThingy()); // calling a wrapped function of the external library
    }

    companion object
    {
        init {
            System.loadLibrary("cpp-wrapper")
        }
    }
}
The button’s onClick handler will also change a bit:
floatingActionButton = {
    ExtendedFloatingActionButton(
        content = { Text("Do something") },
        onClick = {
            Log.i("log", "ololo");
            doSomething();
        }
    )
}
Clicking that button will now write the following to Logcat:
2024-02-10 12:11:23.942  4095-4095  log  com.example.some  I  ololo
2024-02-10 12:11:23.942  4095-4095  log  com.example.some  I  some message directly from wrapper
2024-02-10 12:11:23.942  4095-4095  log  com.example.some  I  a string from C++: some thingy
Searching for .so files in the project folder will now find both the wrapper and the external library binaries, even though I haven’t copied the external library files into the project, so that was handled behind the scenes:
$ find . -iname "*.so" | xargs du -hs
4.9M    ./app/build/intermediates/cxx/Debug/SOME-RANDOM-ID/obj/arm64-v8a/libThingy.so
132K    ./app/build/intermediates/cxx/Debug/SOME-RANDOM-ID/obj/arm64-v8a/libcpp-wrapper.so
4.9M    ./app/build/intermediates/merged_native_libs/debug/out/lib/arm64-v8a/libThingy.so
132K    ./app/build/intermediates/merged_native_libs/debug/out/lib/arm64-v8a/libcpp-wrapper.so
812K    ./app/build/intermediates/stripped_native_libs/debug/out/lib/arm64-v8a/libThingy.so
 32K    ./app/build/intermediates/stripped_native_libs/debug/out/lib/arm64-v8a/libcpp-wrapper.so
And having analyzed the resulting APK, you’ll see that it bundles both of them too:

But we actually don’t need the external library to be built as dynamic/SHARED anymore, as its symbols can be “incorporated” into the wrapper binary. So it can be re-built with -DBUILD_SHARED_LIBS=0, an then after cleaning and re-making the Android project there will be just the libcpp-wrapper.so files, although 3 times bigger in size than before:
$ find . -iname "*.so" | xargs du -hs
4.9M    ./app/build/intermediates/cxx/Debug/v1z2r5v1/obj/arm64-v8a/libcpp-wrapper.so
4.9M    ./app/build/intermediates/merged_native_libs/debug/out/lib/arm64-v8a/libcpp-wrapper.so
816K    ./app/build/intermediates/stripped_native_libs/debug/out/lib/arm64-v8a/libcpp-wrapper.so
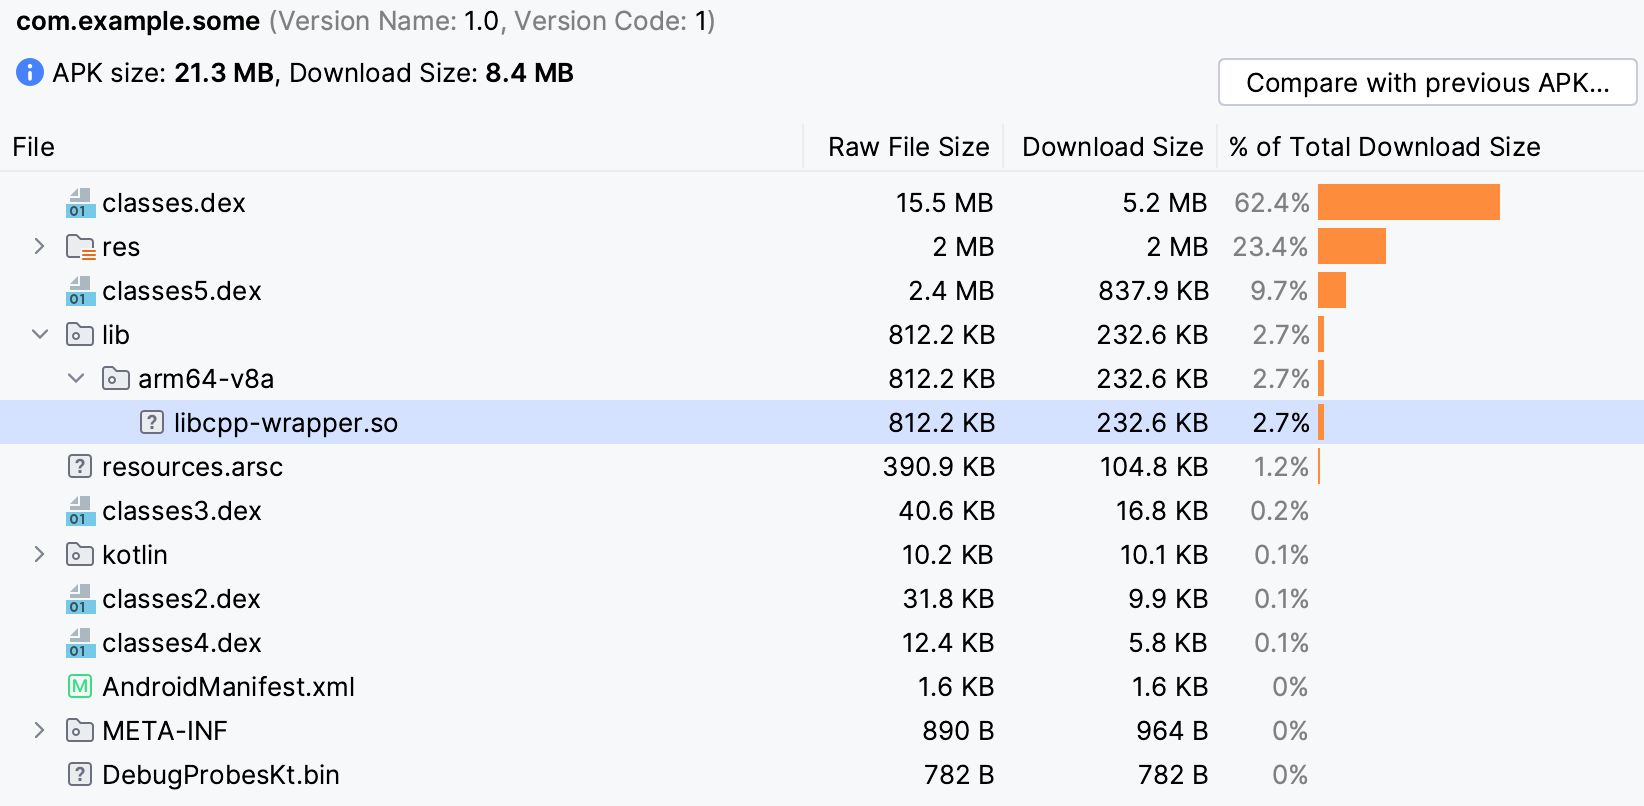
And analyzing the APK will show that now it contains just the wrapper binary:
Here’s a commit with all these changes, and the current state of the project repository is here. After that commit the project will be further enhanced with parsing JSON on C++ side through a transitive dependency on a 3rd-party library.
Transitive dependencies
Of course, there is not much of a point to involve an external C++ library just for getting static text strings. At the same time, our goal was just to research how does one do that at all, and now it will be easier to bring-in an actually useful library that does something meaningful. It also should be no worries to resolve that library’s own 3rd-party dependencies, should it have some, as it will be all the same as with any other regular CMake project.
Say, we’d like to parse some JSON, and let’s imagine that there is nothing for working with JSON on Android side, so we just have to pass JSON string to C++ side and parse it there.
For working with JSON in C++ I usually prefer json-nlohmann, but it’s a header-only library, so it won’t be as exciting, and so let’s take JsonCpp instead. A function for parsing JSON with JsonCpp would be something like this:
// ...

#include <json/json.h>

namespace dpndnc
{
    // ...

    std::string parseJSON(std::string jsonString)
    {
        Json::Value root;
        Json::Reader reader;
        if (!reader.parse(jsonString, root))
        {
            // lazy-ass errors reporting
            return "[ERROR] Couldn't parse this JSON";
        }

        std::string rez = "Some result";

        // some processing of the parsed object, writing results to the `rez` variable

        return rez;
    }
}
To make things even less boring, let’s resolve JsonCpp dependency via vcpkg. It would have probably worked fine with the standard arm64-android triplet too, but still I created a custom one (to specify the Android API version):
set(VCPKG_TARGET_ARCHITECTURE arm64)
set(VCPKG_CRT_LINKAGE static)
set(VCPKG_LIBRARY_LINKAGE static)

set(VCPKG_CMAKE_SYSTEM_NAME Android)

set(VCPKG_MAKE_BUILD_TRIPLET "--host=aarch64-linux-android")
set(VCPKG_CMAKE_CONFIGURE_OPTIONS -DANDROID_ABI=arm64-v8a -DANDROID_PLATFORM=30)
The configuration and building of our external C++ library project will be the following:
$ cmake -G Ninja -DCMAKE_BUILD_TYPE=Release -DCMAKE_INSTALL_PREFIX="../install" \
    -DCMAKE_TOOLCHAIN_FILE="$VCPKG_ROOT/scripts/buildsystems/vcpkg.cmake" \
    -DVCPKG_TARGET_TRIPLET="arm64-android-v8a-v30" \
    -DVCPKG_OVERLAY_TRIPLETS="/path/to/external/cpp/project/misc/vcpkg/triplets" \
    -DVCPKG_CHAINLOAD_TOOLCHAIN_FILE="${ANDROID_NDK_HOME}/build/cmake/android.toolchain.cmake" \
    -DANDROID_ABI=arm64-v8a -DANDROID_PLATFORM=30 \
    ..
$ cmake --build . --target install
It is mostly the same as before, but with added vcpkg stuff:
CMAKE_TOOLCHAIN_FILE- now points to the vcpkg toolchain, as that one will be used for building dependencies resolved with vcpkg (JsonCpp in this case);VCPKG_CHAINLOAD_TOOLCHAIN_FILE- points to Android toolchain, as that one will be used for building the project itself after vcpkg is done building dependencies using its own toolchain. If you won’t chainload the Android toolchain here, the project will be configured to target your host OS and will most likely fail to link with dependencies because of the mismatching architectures (not to mention non-Android resulting binary, should you manage to build it somehow);VCPKG_TARGET_TRIPLET- my custom triplet;VCPKG_OVERLAY_TRIPLETS- where vcpkg can find it;
ANDROID_ABIandANDROID_PLATFORMare still there, because these are the ones that apply to building the project itself, while the same values that are set in my custom triplet apply only to building vcpkg-resolved dependencies.
After the project is configured, built and installed, you might want to “merge” the vcpkg installation prefix into the project installation prefix (so you could set CMAKE_PREFIX_PATH to one path instead of two in build.gradle.kts):
$ cp -an ./vcpkg_installed/arm64-android-v8a-v30/* ../install/

$ tree ../install/
├── debug
│   └── lib
│       └── libjsoncpp.a
├── include
│   ├── Thingy
│   │   └── thingy.h
│   └── json
│       ├── allocator.h
│       ├── assertions.h
│       ├── config.h
│       ├── forwards.h
│       ├── json.h
│       ├── json_features.h
│       ├── reader.h
│       ├── value.h
│       ├── version.h
│       └── writer.h
├── lib
│   ├── libThingy.a
│   └── libjsoncpp.a
└── share
    ├── Thingy
    │   ├── ThingyConfig.cmake
    │   ├── ThingyConfigVersion.cmake
    │   ├── ThingyTargets-release.cmake
    │   └── ThingyTargets.cmake
    └── jsoncpp
        ├── copyright
        ├── jsoncpp-namespaced-targets.cmake
        ├── jsoncpp-targets-debug.cmake
        ├── jsoncpp-targets-release.cmake
        ├── jsoncpp-targets.cmake
        ├── jsoncppConfig.cmake
        ├── jsoncppConfigVersion.cmake
        ├── vcpkg.spdx.json
        └── vcpkg_abi_info.txt
To be able to link to this new version of the external library, the wrapper’s CMakeLists.txt should actually do find_package(jsoncpp CONFIG REQUIRED), because JsonCpp binary will be required for linking, but instead we can do it via find_dependency() in the library’s CMake config, so wrapper’s project file can remain the same.
In the wrapper sources we need to wrap the external library’s function that will be parsing a JSON string, which will be passed to it as an argument. And if you thought that passing a string of text from Android side to C++ side is a trivial thing, then you thought wrong, because that is how it is supposedly done:
extern "C" JNIEXPORT jstring JNICALL
Java_com_example_some_MainActivity_parseJSON(
    JNIEnv *env,
    jobject,
    jstring stringToParse
)
{
    // apparently, that becomes true (JNI_TRUE) at some point
    jboolean isCopy;
    // pointer to an array of bytes representing the string in modified UTF-8 encoding
    // https://docs.oracle.com/javase/8/docs/technotes/guides/jni/spec/functions.html#GetStringUTFChars
    const char *utf = (env)->GetStringUTFChars(stringToParse, &isCopy);

    // only now we can pass the string to C++ side
    std::string rez = dpndnc::parseJSON(utf);

    // after the string is done being used, it needs to be "released" (to prevent memory leak?)
    // https://docs.oracle.com/javase/8/docs/technotes/guides/jni/spec/functions.html#ReleaseStringUTFChars
    if (isCopy == JNI_TRUE) { env->ReleaseStringUTFChars(stringToParse, utf); }

    return env->NewStringUTF(rez.c_str());
}
So we can pass a JSON string from our Android application to an external C++ library for parsing/processing and get back a result. Certainly, that purpose is far from being glorious too, but once again this is just an example, and you should now be able to wrap something more sophisticated yourself.
If you haven’t got enough links to the example project repository, here’s one more.